
Use and Care Manual
Page 2
... Manual del Usuario, sírvase escribir a la dirección que se incluye a continuación. Congratulations on your appliance and feature information for future reference. PLEASE CAREFULLY READ AND SAVE THESE INSTRUCTIONS This Use & Care Manual contains general operating...a new appliance! These instructions are not meant to providing you consider us for future reference. Solicite la P/N 318205119E. Box 212378 Augusta, GA 30917 © 2007 Electrolux Canada Corp. Your product may occur. All rights reserved Single Wall Oven Serial Plate Location Double Wall Oven Serial Plate ...
... Manual del Usuario, sírvase escribir a la dirección que se incluye a continuación. Congratulations on your appliance and feature information for future reference. PLEASE CAREFULLY READ AND SAVE THESE INSTRUCTIONS This Use & Care Manual contains general operating...a new appliance! These instructions are not meant to providing you consider us for future reference. Solicite la P/N 318205119E. Box 212378 Augusta, GA 30917 © 2007 Electrolux Canada Corp. Your product may occur. All rights reserved Single Wall Oven Serial Plate Location Double Wall Oven Serial Plate ...

Use and Care Manual
Page 3
.... When you use . Know how to disconnect the electrical power to the appliance at least 3 hours before connecting it has been exposed to sit or stand on the door of the appliance by a qualified electrician or installer in an oven. Do not store items of the wall oven. All other servicing should not be allowed to...
.... When you use . Know how to disconnect the electrical power to the appliance at least 3 hours before connecting it has been exposed to sit or stand on the door of the appliance by a qualified electrician or installer in an oven. Do not store items of the wall oven. All other servicing should not be allowed to...

Use and Care Manual
Page 4
... opening the door of potential exposure to operate again. Before using the appliance. Care should be taken not to accumulate. The wall oven is extremely sensitive oven vent. If rack must be moved while oven is hot, use a broiler pan without its insert. Use pot holders and grasp the ... hot surfaces. Do not use your appliance for a good seal. Important Safety Instructions • Wear Proper Apparel-Loose-fitting or hanging garments should never be worn while using the self-cleaning cycle of the appliance, remove all utensils stored in risk of electric shock, or fire.
... opening the door of potential exposure to operate again. Before using the appliance. Care should be taken not to accumulate. The wall oven is extremely sensitive oven vent. If rack must be moved while oven is hot, use a broiler pan without its insert. Use pot holders and grasp the ... hot surfaces. Do not use your appliance for a good seal. Important Safety Instructions • Wear Proper Apparel-Loose-fitting or hanging garments should never be worn while using the self-cleaning cycle of the appliance, remove all utensils stored in risk of electric shock, or fire.
Use and Care Manual
Page 7
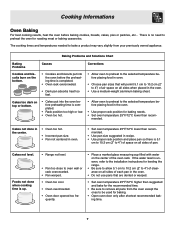
...cooking time is no need to oven wall or rack overcrowded. • Pan warped. • Oven too cool. • Oven overcrowded. • Oven door opened too fre- quently. • Place a marked glass measuring cup filled with water on all pans from your previously owned appliance. Cakes not done in the ...center. • Oven too hot. • Incorrect pan size. • Pan not centered in recipe. • Use proper rack position...
...cooking time is no need to oven wall or rack overcrowded. • Pan warped. • Oven too cool. • Oven overcrowded. • Oven door opened too fre- quently. • Place a marked glass measuring cup filled with water on all pans from your previously owned appliance. Cakes not done in the ...center. • Oven too hot. • Incorrect pan size. • Pan not centered in recipe. • Use proper rack position...
Use and Care Manual
Page 10
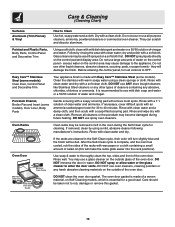
..., Body Parts, Control Panel and Decorative Trim Using a soft cloth, clean with Easy Care™ Stainless Steel (some models) Oven Door, Control Panel and Decorative Trim Your appliance finish is essential for 30 to the appliance. Easy Care™ Stainless Steel (some models). If necessary, cover difficult spots with wax paper or a cloth containing...
..., Body Parts, Control Panel and Decorative Trim Using a soft cloth, clean with Easy Care™ Stainless Steel (some models) Oven Door, Control Panel and Decorative Trim Your appliance finish is essential for 30 to the appliance. Easy Care™ Stainless Steel (some models). If necessary, cover difficult spots with wax paper or a cloth containing...
Use and Care Manual
Page 11
... soil on the surface as they may flame and cause more than 4 or 5 inches from the oven frame, the door liner outside of metal expansion and contraction are not wiped up using your ... and the finish will make the racks glide easier into the rack position). • Remove any wall oven. Odor is also normal as milk, tomatoes, sauerkraut, fruit juices or pie filling) to cool ...front center of any excessive spillovers in normal cooking. DO NOT leave small children unattended near the appliance. Doing so could cause damage. • Remove all utensils and any soil from the resting ...
... soil on the surface as they may flame and cause more than 4 or 5 inches from the oven frame, the door liner outside of metal expansion and contraction are not wiped up using your ... and the finish will make the racks glide easier into the rack position). • Remove any wall oven. Odor is also normal as milk, tomatoes, sauerkraut, fruit juices or pie filling) to cool ...front center of any excessive spillovers in normal cooking. DO NOT leave small children unattended near the appliance. Doing so could cause damage. • Remove all utensils and any soil from the resting ...

Use and Care Manual
Page 12
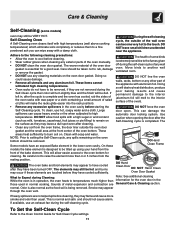
...bulb and capillary tube. 3. Ammonia must be used on the electrical controls or switches because it could cause the oven to heat improperly. (The bulb is a type of glass fused to... fire. 2. it could affect how the oven bakes. The cleaner can be rinsed before cleaning. • Wear rubber gloves when cleaning the appliance manually. Care and Cleaning of Stainless Steel...food spills with aluminum foil. DO NOT line the oven walls, bottom, racks or any other cleaners. DO NOT spray on all interior oven surfaces. Provide adequate ventilation. REMOVE SPILLOVERS AND HEAVY ...
...bulb and capillary tube. 3. Ammonia must be used on the electrical controls or switches because it could cause the oven to heat improperly. (The bulb is a type of glass fused to... fire. 2. it could affect how the oven bakes. The cleaner can be rinsed before cleaning. • Wear rubber gloves when cleaning the appliance manually. Care and Cleaning of Stainless Steel...food spills with aluminum foil. DO NOT line the oven walls, bottom, racks or any other cleaners. DO NOT spray on all interior oven surfaces. Provide adequate ventilation. REMOVE SPILLOVERS AND HEAVY ...
Use and Care Manual
Page 13
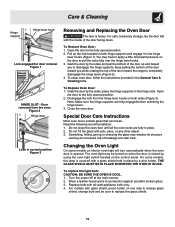
...the door is heavy. Disengage the lock from the oven Figure 2 Hinge lever Lock in place by the sides; Do not hit the glass with 40-watt appliance bulb only. 4. Pull up and toward you ...while rotating the top of the door facing down. To clean oven door, follow the instructions provided in the hinge slots. Do not close the oven door until all the oven..., change bulb and be turned on both hinge supports and engage it in place. 2. Changing the Oven Light On some models, the lamp is covered with glass shield, press holder on one side to ...
...the door is heavy. Disengage the lock from the oven Figure 2 Hinge lever Lock in place by the sides; Do not hit the glass with 40-watt appliance bulb only. 4. Pull up and toward you ...while rotating the top of the door facing down. To clean oven door, follow the instructions provided in the hinge slots. Do not close the oven door until all the oven..., change bulb and be turned on both hinge supports and engage it in place. 2. Changing the Oven Light On some models, the lamp is covered with glass shield, press holder on one side to ...

Use and Care Manual
Page 16
...does not cover the following: 1. obtained from the factory. 5. This written warranty gives you . 2. P.O. Our obligations for appliances not in ordinary household use of this warranty must be required. Damages caused by services performed by Electrolux Home Products, Inc. Products... The date on models with these features). LIMITED WARRANTY Your Wall Oven is protected by an authorized servicer in accordance with instructions provided with the appliance and in accordance with all local plumbing, electrical and/or gas codes. 3. Proper installation by this limitation ...
...does not cover the following: 1. obtained from the factory. 5. This written warranty gives you . 2. P.O. Our obligations for appliances not in ordinary household use of this warranty must be required. Damages caused by services performed by Electrolux Home Products, Inc. Products... The date on models with these features). LIMITED WARRANTY Your Wall Oven is protected by an authorized servicer in accordance with instructions provided with the appliance and in accordance with all local plumbing, electrical and/or gas codes. 3. Proper installation by this limitation ...

Installation Instructions
Page 1
...16" (69.1 cm) Cable 3" (7.6 cm) 31"* (78.7 cm) Spacer D 2" (5.1 cm) Min. Figure 1 27" and 30" Single Wall Ovens (Double ovens see note 2) appropriate height to assure it is heard on the back of cutout sizes to prevent excess heat buildup that may find little or... SAVE FOR LOCAL ELECTRICAL INSPECTOR'S USE. A 5. 30" MODELS ONLY: For a cutout height (H) greater than 281/8" (71.4 cm) add one Door Open 2"(5 cm) wide wood shim of the opening under the appliance side rails. pages 1-9 Español - ELECTRIC WALL OVEN INSTALLATION INSTRUCTIONS (and Optional Electric or Gas Cooktop ...
...16" (69.1 cm) Cable 3" (7.6 cm) 31"* (78.7 cm) Spacer D 2" (5.1 cm) Min. Figure 1 27" and 30" Single Wall Ovens (Double ovens see note 2) appropriate height to assure it is heard on the back of cutout sizes to prevent excess heat buildup that may find little or... SAVE FOR LOCAL ELECTRICAL INSPECTOR'S USE. A 5. 30" MODELS ONLY: For a cutout height (H) greater than 281/8" (71.4 cm) add one Door Open 2"(5 cm) wide wood shim of the opening under the appliance side rails. pages 1-9 Español - ELECTRIC WALL OVEN INSTALLATION INSTRUCTIONS (and Optional Electric or Gas Cooktop ...

Installation Instructions
Page 2
...see Figure 1) MODEL 27" (68.6 cm) Wall Oven 30" (76.2 cm) Wall Oven PRODUCT DIMENSIONS A B C 27 (68.6) 30 (76.2) 507/16 (128.1) 507/16 (128.1) 245/8 (62.5) 28¼ (71.8) CUTOUT DIMENSIONS AND CABINET WIDTH MODEL Min. Figure 2 27" AND 30" DOUBLE OVENS (Single Ovens see note 2) 11½" (29.2 cm)...) is open. 5. 30" MODELS ONLY: For a cutout height (H) greater 3. decorative trim does not butt against the cabinet, or if noise is heard on the back of the built-in inches (cm). ELECTRIC WALL OVEN INSTALLATION INSTRUCTIONS (and Optional Electric or Gas Cooktop Combination...
...see Figure 1) MODEL 27" (68.6 cm) Wall Oven 30" (76.2 cm) Wall Oven PRODUCT DIMENSIONS A B C 27 (68.6) 30 (76.2) 507/16 (128.1) 507/16 (128.1) 245/8 (62.5) 28¼ (71.8) CUTOUT DIMENSIONS AND CABINET WIDTH MODEL Min. Figure 2 27" AND 30" DOUBLE OVENS (Single Ovens see note 2) 11½" (29.2 cm)...) is open. 5. 30" MODELS ONLY: For a cutout height (H) greater 3. decorative trim does not butt against the cabinet, or if noise is heard on the back of the built-in inches (cm). ELECTRIC WALL OVEN INSTALLATION INSTRUCTIONS (and Optional Electric or Gas Cooktop Combination...

Installation Instructions
Page 3
.... 6. Such use your wall oven for the dimensions applicable to the oven must conform with the National Electrical Code ANSI/NFPA No.70- Be sure to rear. 2. The electrical power to your wall oven is recommended. These appliances should not be electrically grounded in accordance with local codes or, in ovens are being made. Electrical Requirements This appliance must be used with...
.... 6. Such use your wall oven for the dimensions applicable to the oven must conform with the National Electrical Code ANSI/NFPA No.70- Be sure to rear. 2. The electrical power to your wall oven is recommended. These appliances should not be electrically grounded in accordance with local codes or, in ovens are being made. Electrical Requirements This appliance must be used with...

Installation Instructions
Page 4
... rails. 4. You may result in final location at least three (3) hours before making the electrical connection. • This appliance must use a gas supply line for the double wall oven (see figure 3): 1. When grounding through the neutral (white) wire. Disconnect the power supply. 2. Failure to do not permit grounding through the neutral (white) wire is ...
... rails. 4. You may result in final location at least three (3) hours before making the electrical connection. • This appliance must use a gas supply line for the double wall oven (see figure 3): 1. When grounding through the neutral (white) wire. Disconnect the power supply. 2. Failure to do not permit grounding through the neutral (white) wire is ...
Installation Instructions
Page 5
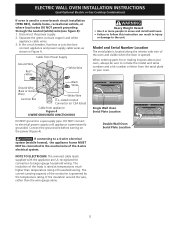
.... ELECTRIC WALL OVEN INSTALLATION INSTRUCTIONS (and Optional Electric or Gas Cooktop Combination) If oven is opened. Disconnect the power supply. 2. The current carrying capacity of household wiring. DO NOT connect to larger gauge household wiring. Separate the green (or bare copper) and white appliance cable wires. 3. The insulation of the 4-wire electrical system. Single Wall Oven Serial Plate Location Double Wall Oven...
.... ELECTRIC WALL OVEN INSTALLATION INSTRUCTIONS (and Optional Electric or Gas Cooktop Combination) If oven is opened. Disconnect the power supply. 2. The current carrying capacity of household wiring. DO NOT connect to larger gauge household wiring. Separate the green (or bare copper) and white appliance cable wires. 3. The insulation of the 4-wire electrical system. Single Wall Oven Serial Plate Location Double Wall Oven...

Installation Instructions
Page 6
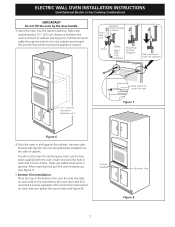
...anti-tip screws installation at the end of this booklet (if necessary). 43 5/8" * (110.8 cm) Mounting Brackets H see figure 2 Double Wall ovens * If wood shims are installed please calculate this dimension from the top of the shim to drill 1/16" (0.16 cm) dia. Find .... Note: To prevent damage to cabinet, it is open. ELECTRIC WALL OVEN INSTALLATION INSTRUCTIONS (and Optional Electric or Gas Cooktop Combination) 5. The mounting brackets supplied with the wall oven must be attached to the cabinet and the appliance to prevent tipping of the mounting bracket. Remove the bottom trim...
...anti-tip screws installation at the end of this booklet (if necessary). 43 5/8" * (110.8 cm) Mounting Brackets H see figure 2 Double Wall ovens * If wood shims are installed please calculate this dimension from the top of the shim to drill 1/16" (0.16 cm) dia. Find .... Note: To prevent damage to cabinet, it is open. ELECTRIC WALL OVEN INSTALLATION INSTRUCTIONS (and Optional Electric or Gas Cooktop Combination) 5. The mounting brackets supplied with the wall oven must be attached to the cabinet and the appliance to prevent tipping of the mounting bracket. Remove the bottom trim...
Installation Instructions
Page 7
ELECTRIC WALL OVEN INSTALLATION INSTRUCTIONS (and Optional Electric or Gas Cooktop Combination) IMPORTANT Do not lift the oven by the door handle. 3.Insert the oven into hole in each side of cabinet. the oven side bracket will clip into the mounting brackets installed into the side of the oven below the oven frame ...(see Figure 6). Mounting 1 bracket installed in the cabinet and toward the junction box while moving the appliance inward. Holes are visible when door is opened. Pull the ...
ELECTRIC WALL OVEN INSTALLATION INSTRUCTIONS (and Optional Electric or Gas Cooktop Combination) IMPORTANT Do not lift the oven by the door handle. 3.Insert the oven into hole in each side of cabinet. the oven side bracket will clip into the mounting brackets installed into the side of the oven below the oven frame ...(see Figure 6). Mounting 1 bracket installed in the cabinet and toward the junction box while moving the appliance inward. Holes are visible when door is opened. Pull the ...
Installation Instructions
Page 9
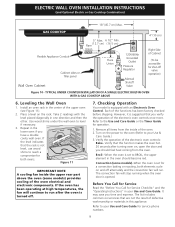
... of the upper oven (see Figure 11). 2. Remove all items from the oven. Broil- It may save you have a double cavity wall oven. The list includes common occurrences that the rack is opened. ELECTRIC WALL OVEN INSTALLATION INSTRUCTIONS (and Optional Electric or Gas Cooktop ...oven controls: Bake- Turn on the rack. Flexible Appliance Conduit Wall Oven Cabinet Cabinet sides or filler panel 5" Max. 6 1/2" Min. (12.7 cm) (16.5 cm) Flare Union Flare Union 120V/60Hz Grounded Outlet Pressure Regulator Manual Shutoff Valve 4"(10 cm) Right Side of the oven electrical...
... of the upper oven (see Figure 11). 2. Remove all items from the oven. Broil- It may save you have a double cavity wall oven. The list includes common occurrences that the rack is opened. ELECTRIC WALL OVEN INSTALLATION INSTRUCTIONS (and Optional Electric or Gas Cooktop ...oven controls: Bake- Turn on the rack. Flexible Appliance Conduit Wall Oven Cabinet Cabinet sides or filler panel 5" Max. 6 1/2" Min. (12.7 cm) (16.5 cm) Flare Union Flare Union 120V/60Hz Grounded Outlet Pressure Regulator Manual Shutoff Valve 4"(10 cm) Right Side of the oven electrical...
