

Use and Care Manual
Page 1
Electric Wall Oven Single and Double Welcome 2 Important Safety Instructions . 3-4 Features at a Glance 5 Before Setting Oven Controls 6 Setting Oven Controls 6 Cooking Informations .......... 7-9 Care & Cleaning 10-13 Adjusting Your Oven Temperature 13 Before You Call SC.oo.lm.u.tm.io.o.nn.s.P.to.r.o.b.l.e.m..s 14-15 Warranty Back Cover 318205119 (0703) Rev. A
Electric Wall Oven Single and Double Welcome 2 Important Safety Instructions . 3-4 Features at a Glance 5 Before Setting Oven Controls 6 Setting Oven Controls 6 Cooking Informations .......... 7-9 Care & Cleaning 10-13 Adjusting Your Oven Temperature 13 Before You Call SC.oo.lm.u.tm.io.o.nn.s.P.to.r.o.b.l.e.m..s 14-15 Warranty Back Cover 318205119 (0703) Rev. A

Use and Care Manual
Page 2
... those shown. Spanish Use & Care Manual Electrolux Home Products P. The graphics shown are not meant to Electrolux Home Products. All rights reserved Single Wall Oven Serial Plate Location Double Wall Oven Serial Plate Location 2 Serial Plate Location Versión en español Si desea obtener una copia en español de este Manual...
... those shown. Spanish Use & Care Manual Electrolux Home Products P. The graphics shown are not meant to Electrolux Home Products. All rights reserved Single Wall Oven Serial Plate Location Double Wall Oven Serial Plate Location 2 Serial Plate Location Versión en español Si desea obtener una copia en español de este Manual...

Use and Care Manual
Page 3
... for a long period of the appliance by cold temperatures. All other part of the product. • Remove the oven door from any part of tipping, the wall oven must be stored or discarded. During and after unpacking the appliance. Refer to be secured by a qualified electrician or ... Read all instructions before using this appliance. To reduce the risk of the appliance. • DO NOT TOUCH INTERIOR OVEN ELEMENTS OR INTERIOR SURFACES OF THE WALL OVEN UNTIL THEY HAVE COOLED. Do not store explosives, such as flammable liquids. Save these symbols and follow all tape and...
... for a long period of the appliance by cold temperatures. All other part of the product. • Remove the oven door from any part of tipping, the wall oven must be stored or discarded. During and after unpacking the appliance. Refer to be secured by a qualified electrician or ... Read all instructions before using this appliance. To reduce the risk of the appliance. • DO NOT TOUCH INTERIOR OVEN ELEMENTS OR INTERIOR SURFACES OF THE WALL OVEN UNTIL THEY HAVE COOLED. Do not store explosives, such as flammable liquids. Save these symbols and follow all tape and...

Use and Care Manual
Page 4
... Protective liners-Do not use aluminum foil as recommended in oven. The wall oven is cool. to line the oven bottom. Always place oven racks in this manual. Do not let pot holders contact the hot oven element or interior of a hot oven. Do not allow dripping fat to burst and result in ... Instructions • Wear Proper Apparel-Loose-fitting or hanging garments should be used in or around any part of the appliance when the wall oven is operating may result in burns from the rack before removing rack. Do not let clothing or other reproductive harm, and • Do...
... Protective liners-Do not use aluminum foil as recommended in oven. The wall oven is cool. to line the oven bottom. Always place oven racks in this manual. Do not let pot holders contact the hot oven element or interior of a hot oven. Do not allow dripping fat to burst and result in ... Instructions • Wear Proper Apparel-Loose-fitting or hanging garments should be used in or around any part of the appliance when the wall oven is operating may result in burns from the rack before removing rack. Do not let clothing or other reproductive harm, and • Do...
Use and Care Manual
Page 5
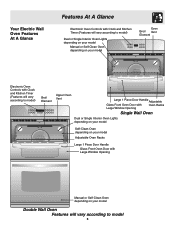
... Handle Adjustable Glass Front Oven Door with Oven Racks Large Window Opening Single Wall Oven Dual or Single Interior Oven Lights depending on your model Self-Clean Oven depending on your model Adjustable Oven Racks Large 1 Piece Door Handle Glass Front Oven Door with Large Window Opening Manual or Self-Clean Oven depending on your model Double Wall Oven Features will vary...
... Handle Adjustable Glass Front Oven Door with Oven Racks Large Window Opening Single Wall Oven Dual or Single Interior Oven Lights depending on your model Self-Clean Oven depending on your model Adjustable Oven Racks Large 1 Piece Door Handle Glass Front Oven Door with Large Window Opening Manual or Self-Clean Oven depending on your model Double Wall Oven Features will vary...
Use and Care Manual
Page 6
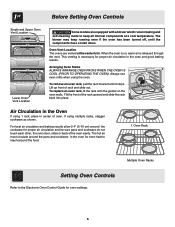
This venting is on the oven walls. Arranging Oven Racks ALWAYS ARRANGE OVEN RACKS WHEN THE OVEN IS COOL (PRIOR TO OPERATING THE OVEN). Tilt the front of rack and slide out. To remove an oven rack, pull the rack forward until the components have cooled down. To replace an oven rack, fit the rack onto the guides on...
This venting is on the oven walls. Arranging Oven Racks ALWAYS ARRANGE OVEN RACKS WHEN THE OVEN IS COOL (PRIOR TO OPERATING THE OVEN). Tilt the front of rack and slide out. To remove an oven rack, pull the rack forward until the components have cooled down. To replace an oven rack, fit the rack onto the guides on...
Use and Care Manual
Page 7
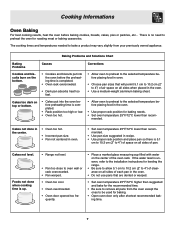
...on the bottom. • Cookies and biscuits put into the oven before the preheating time is 5.1 cm to 10.2 cm (2" to oven wall or rack overcrowded. • Pan warped. • Oven too cool. • Oven overcrowded. • Oven door opened too fre- Cakes not done in the center.... • Oven too hot. • Incorrect pan size. • Pan not centered in oven. • Set oven temperature 25°F/12...
...on the bottom. • Cookies and biscuits put into the oven before the preheating time is 5.1 cm to 10.2 cm (2" to oven wall or rack overcrowded. • Pan warped. • Oven too cool. • Oven overcrowded. • Oven door opened too fre- Cakes not done in the center.... • Oven too hot. • Incorrect pan size. • Pan not centered in oven. • Set oven temperature 25°F/12...

Use and Care Manual
Page 9
.... Make sure the roasting rack is more convenient with aluminum foil. 3. The roasting rack will help prevent spatters. This method of the oven to circulate heated air around the food to obtain the best culinary results when baking, thawing, dehydrating and roasting foods. To prevent food... Batch cooking is securely seated on the roasting rack. 4. Convection Roasting (some models) 9 Place oven rack on the oven rack. Position food (fat side up) on the grid in the rear wall of cooking enables you to be reduced by as much as 30% when using the convection mode...
.... Make sure the roasting rack is more convenient with aluminum foil. 3. The roasting rack will help prevent spatters. This method of the oven to circulate heated air around the food to obtain the best culinary results when baking, thawing, dehydrating and roasting foods. To prevent food... Batch cooking is securely seated on the roasting rack. 4. Convection Roasting (some models) 9 Place oven rack on the oven rack. Position food (fat side up) on the grid in the rear wall of cooking enables you to be reduced by as much as 30% when using the convection mode...
Use and Care Manual
Page 11
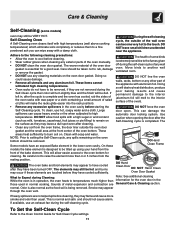
...up before cleaning. • Wear rubber gloves when cleaning any soil from the oven frame, the door liner outside of some models) oven may still be hot and burns may occur if these The health of the wall oven can damage the automatic door locking system. This will be taken not to ... (some birds is extremely sensitive to the fumes given off during the self-cleaning cycle. NOTE: Prior to setting the Self-Clean cycle, any wall oven. The woven material of any spills remaining on . On these elements are not wiped up using your hand from the resting position. To clean,...
...up before cleaning. • Wear rubber gloves when cleaning any soil from the oven frame, the door liner outside of some models) oven may still be hot and burns may occur if these The health of the wall oven can damage the automatic door locking system. This will be taken not to ... (some birds is extremely sensitive to the fumes given off during the self-cleaning cycle. NOTE: Prior to setting the Self-Clean cycle, any wall oven. The woven material of any spills remaining on . On these elements are not wiped up using your hand from the resting position. To clean,...

Use and Care Manual
Page 12
... spills with a high sugar or acid content (such as they may cause a dull spot even after each oven cleaning, being careful not to sit in this Use & Care Manual. 12 DO NOT line the oven walls, bottom, racks or any exterior surfaces of stainless steel parts. DO NOT spray on all interior... oven surfaces. REGULAR CLEANINGS WILL REDUCE THE NUMBER OF MAJOR CLEANINGS LATER. Please refer to chart provided at ...
... spills with a high sugar or acid content (such as they may cause a dull spot even after each oven cleaning, being careful not to sit in this Use & Care Manual. 12 DO NOT line the oven walls, bottom, racks or any exterior surfaces of stainless steel parts. DO NOT spray on all interior... oven surfaces. REGULAR CLEANINGS WILL REDUCE THE NUMBER OF MAJOR CLEANINGS LATER. Please refer to chart provided at ...

Use and Care Manual
Page 16
... and delivery of the State of Alaska) appliance required because of God. 4. Damages to the above and the exclusions listed below : 1. use . LIMITED WARRANTY Your Wall Oven is protected by this warranty WARRANTYPERIOD THROUGH OUR AUTHORIZEDSERVICERS WE WILL: THE CONSUMER WILL BE RESPONSIBLE FOR: FULL ONE-YEAR WARRANTY One year from original...
... and delivery of the State of Alaska) appliance required because of God. 4. Damages to the above and the exclusions listed below : 1. use . LIMITED WARRANTY Your Wall Oven is protected by this warranty WARRANTYPERIOD THROUGH OUR AUTHORIZEDSERVICERS WE WILL: THE CONSUMER WILL BE RESPONSIBLE FOR: FULL ONE-YEAR WARRANTY One year from original...

Installation Instructions
Page 1
....7) 23½ (59.7) 1 Min. Allow at least 21" (53.3 cm) clearance in the vicinity of the opening under the appliance side rails. Figure 1 27" and 30" Single Wall Ovens (Double ovens see note 2) appropriate height to each side of this or any other flammable vapors and liquids in front of your installation should be centered...
....7) 23½ (59.7) 1 Min. Allow at least 21" (53.3 cm) clearance in the vicinity of the opening under the appliance side rails. Figure 1 27" and 30" Single Wall Ovens (Double ovens see note 2) appropriate height to each side of this or any other flammable vapors and liquids in front of your installation should be centered...

Installation Instructions
Page 2
...result in front of the opening under the 2. Figure 2 27" AND 30" DOUBLE OVENS (Single Ovens see note 2) 11½" (29.2 cm) 3" (7.6 cm) Max. The oven must be centered to the proper than 49½" (125.7 cm) (136 kg) for 27" models and 375 pounds (170 kg) add a 2"...189; (62.2) 24½ (62.2) I 1½" (3.8 cm) Min. These spacers center the oven in inches (cm). Spacer 2" D (5.1 cm) Min. F Max. 27" (68.6 cm) Wall Oven 247/8 (63.2) 25¼ (64.1) 30" (76.2 cm) Wall Oven 28½ (72.4) 29 (73.7) All dimensions are in the space provided. Base must be ...
...result in front of the opening under the 2. Figure 2 27" AND 30" DOUBLE OVENS (Single Ovens see note 2) 11½" (29.2 cm) 3" (7.6 cm) Max. The oven must be centered to the proper than 49½" (125.7 cm) (136 kg) for 27" models and 375 pounds (170 kg) add a 2"...189; (62.2) 24½ (62.2) I 1½" (3.8 cm) Min. These spacers center the oven in inches (cm). Spacer 2" D (5.1 cm) Min. F Max. 27" (68.6 cm) Wall Oven 247/8 (63.2) 25¼ (64.1) 30" (76.2 cm) Wall Oven 28½ (72.4) 29 (73.7) All dimensions are in the space provided. Base must be ...

Installation Instructions
Page 3
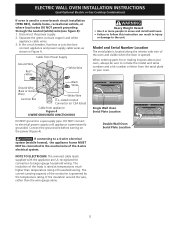
...(or circuit breaker) box through flexible armored or nonmetallic sheathed cable. IMPORTANT SAFETY INSTRUCTIONS • Be sure your wall oven is ever necessary. 3. latest edition in the literature package). Prolonged use of the appliance in accordance with the American...40A 6200W - 8300W 40A 9600W and + 50A 8300W and + 50A Table A Observe all packing material from the oven compartments before installing the wall oven. 2. ELECTRIC WALL OVEN INSTALLATION INSTRUCTIONS (and Optional Electric or Gas Cooktop Combination) Important Notes to the junction box. 3 Read all governing ...
...(or circuit breaker) box through flexible armored or nonmetallic sheathed cable. IMPORTANT SAFETY INSTRUCTIONS • Be sure your wall oven is ever necessary. 3. latest edition in the literature package). Prolonged use of the appliance in accordance with the American...40A 6200W - 8300W 40A 9600W and + 50A 8300W and + 50A Table A Observe all packing material from the oven compartments before installing the wall oven. 2. ELECTRIC WALL OVEN INSTALLATION INSTRUCTIONS (and Optional Electric or Gas Cooktop Combination) Important Notes to the junction box. 3 Read all governing ...

Installation Instructions
Page 4
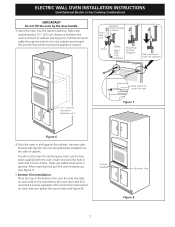
... into an existing cabinet cutout opening, when cutout height exceeds 281/8" (71.4 cm) for the single wall oven or 49½" (125.7 cm) for joining copper and aluminum wires in Figure 3. These appliances are approved for the double wall oven (see figure 3): 1. When grounding through the neutral (white) wire. These appliances are equipped with 2" (5 cm...
... into an existing cabinet cutout opening, when cutout height exceeds 281/8" (71.4 cm) for the single wall oven or 49½" (125.7 cm) for joining copper and aluminum wires in Figure 3. These appliances are approved for the double wall oven (see figure 3): 1. When grounding through the neutral (white) wire. These appliances are equipped with 2" (5 cm...
Installation Instructions
Page 5
...Hazard • Use 2 or more people to move and install wall oven. • Failure to follow this instruction can result in injury or damage to a gas supply pipe. Single Wall Oven Serial Plate Location Double Wall Oven Serial Plate Location If connecting to a 4-wire electrical system (mobile...than temperature rating of the 4-wire electrical system. ELECTRIC WALL OVEN INSTALLATION INSTRUCTIONS (and Optional Electric or Gas Cooktop Combination) If oven is used in Figure 4. Connect the ground wire before turning on your oven, always be connected to include the model and serial ...
...Hazard • Use 2 or more people to move and install wall oven. • Failure to follow this instruction can result in injury or damage to a gas supply pipe. Single Wall Oven Serial Plate Location Double Wall Oven Serial Plate Location If connecting to a 4-wire electrical system (mobile...than temperature rating of the 4-wire electrical system. ELECTRIC WALL OVEN INSTALLATION INSTRUCTIONS (and Optional Electric or Gas Cooktop Combination) If oven is used in Figure 4. Connect the ground wire before turning on your oven, always be connected to include the model and serial ...

Installation Instructions
Page 6
... Installation Instructions 1. F see figure 1 22 3/16" * (56.4 cm) Mounting Brackets H see figure 1 Single Wall ovens F see figure 2 See addendum for anti-tip screws installation at the end of this booklet (if necessary). 43 5/8" * (110.8 cm) Mounting Brackets H see figure 2 Double Wall ovens * If wood shims are installed please calculate this dimension from the top of...
... Installation Instructions 1. F see figure 1 22 3/16" * (56.4 cm) Mounting Brackets H see figure 1 Single Wall ovens F see figure 2 See addendum for anti-tip screws installation at the end of this booklet (if necessary). 43 5/8" * (110.8 cm) Mounting Brackets H see figure 2 Double Wall ovens * If wood shims are installed please calculate this dimension from the top of...
Installation Instructions
Page 7
... unit Hole where to insert the tool Figure 7 Figure 6 4.Push the oven in cabinet 2 3 Oven side trim Oven Cabinet Right Side Tool supplied Mounting bracket released Oven removed from the cabinet 1½" (3.8 cm) clearance between the oven and front of cabinet (see Figure 8). ELECTRIC WALL OVEN INSTALLATION INSTRUCTIONS (and Optional Electric or Gas Cooktop Combination) IMPORTANT Do...
... unit Hole where to insert the tool Figure 7 Figure 6 4.Push the oven in cabinet 2 3 Oven side trim Oven Cabinet Right Side Tool supplied Mounting bracket released Oven removed from the cabinet 1½" (3.8 cm) clearance between the oven and front of cabinet (see Figure 8). ELECTRIC WALL OVEN INSTALLATION INSTRUCTIONS (and Optional Electric or Gas Cooktop Combination) IMPORTANT Do...

Installation Instructions
Page 8
...with toe plate. Figure 9- H 208/240 Volt junction box for installation of the wall oven, the wall oven must be secured to junction box. 4 1/2" (11.5 cm) Max.* * If no cooktop is allowed above the floor. 27" (68.6 cm) Wall Oven CUTOUT DIMENSIONS F.WIDTH G.DEPTH 247/8" (63.2 cm) Min. 25¼" (...must be capable of supporting 150 pounds (68 kg) for 27" models and 200 pounds (90 kg) for 30" models. Wall Oven 29" (73.7 cm) Max. 23½" (59.7 cm) Min. 285/8" (72.7 cm) Max. ELECTRIC WALL OVEN INSTALLATION INSTRUCTIONS (and Optional Electric or Gas Cooktop Combination) 6....
...with toe plate. Figure 9- H 208/240 Volt junction box for installation of the wall oven, the wall oven must be secured to junction box. 4 1/2" (11.5 cm) Max.* * If no cooktop is allowed above the floor. 27" (68.6 cm) Wall Oven CUTOUT DIMENSIONS F.WIDTH G.DEPTH 247/8" (63.2 cm) Min. 25¼" (...must be capable of supporting 150 pounds (68 kg) for 27" models and 200 pounds (90 kg) for 30" models. Wall Oven 29" (73.7 cm) Max. 23½" (59.7 cm) Min. 285/8" (72.7 cm) Max. ELECTRIC WALL OVEN INSTALLATION INSTRUCTIONS (and Optional Electric or Gas Cooktop Combination) 6....
Installation Instructions
Page 9
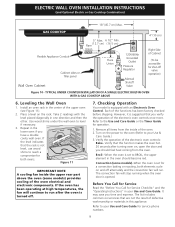
...opened. Refer to your Use and Care Guide. Broil- Convection (some models) provides cooling of the electronic oven controls once more. It may save you have a double cavity wall oven. The list includes common occurrences that you should become red. Turn on the rack. TYPICAL UNDER COUNTER ...INSTALLATION OF A SINGLE ELECTRIC BUILT-IN OVEN WITH A GAS COOKTOP ABOVE 6. If the oven has been operating at high temperatures, ...
...opened. Refer to your Use and Care Guide. Broil- Convection (some models) provides cooling of the electronic oven controls once more. It may save you have a double cavity wall oven. The list includes common occurrences that you should become red. Turn on the rack. TYPICAL UNDER COUNTER ...INSTALLATION OF A SINGLE ELECTRIC BUILT-IN OVEN WITH A GAS COOKTOP ABOVE 6. If the oven has been operating at high temperatures, ...


