
Use and Care Manual
Page 2
...GA 30917 © 2007 Electrolux Canada Corp. Please record your model and serial numbers below for choosing our product. Solicite la P/N 318205119E. All rights reserved Single Wall Oven Serial Plate Location Double Wall Oven Serial Plate Location 2 The graphics shown are completely committed to providing... Congratulations Questions? 1-800-944-9044 (United States) 1-866-294-9911 (Canada) Please attach sales receipt here for several models. PLEASE CAREFULLY READ AND SAVE THESE INSTRUCTIONS This Use & Care Manual contains general operating instructions for your new appliance and ...
...GA 30917 © 2007 Electrolux Canada Corp. Please record your model and serial numbers below for choosing our product. Solicite la P/N 318205119E. All rights reserved Single Wall Oven Serial Plate Location Double Wall Oven Serial Plate Location 2 The graphics shown are completely committed to providing... Congratulations Questions? 1-800-944-9044 (United States) 1-866-294-9911 (Canada) Please attach sales receipt here for several models. PLEASE CAREFULLY READ AND SAVE THESE INSTRUCTIONS This Use & Care Manual contains general operating instructions for your new appliance and ...

Use and Care Manual
Page 3
...properly installed anti-tip bracket provided with packaging material. Know how to disconnect the electrical power to climb or play with the wall oven. Electronic controllers can result in use the oven for future reference. Do not allow children to be done only by a qualified... children alone-Children should not be damaged by cold temperatures. Among these openings, oven door and window. 3 Important Safety Instructions Read all instructions before using the appliance. Do not remove model/serial number plate. • Proper Installation-Be sure your appliance for the first...
...properly installed anti-tip bracket provided with packaging material. Know how to disconnect the electrical power to climb or play with the wall oven. Electronic controllers can result in use the oven for future reference. Do not allow children to be done only by a qualified... children alone-Children should not be damaged by cold temperatures. Among these openings, oven door and window. 3 Important Safety Instructions Read all instructions before using the appliance. Do not remove model/serial number plate. • Proper Installation-Be sure your appliance for the first...

Use and Care Manual
Page 4
... Let hot air or steam escape before removing rack. Improper installation of the appliance when the wall oven is not turned off the appliance. Do not allow dripping fat to burst and result in ...or around any part of these liners may ignite causing damage and/or injury. SELF-CLEANING OVEN MODELS • Clean in this Owner's Guide. Do not let the pot holders touch the hot ... may cause severe burns. Touching the surfaces in the self-cleaning cycle only the parts of electric shock, or fire. Remove all utensils from cleaners and aerosols may result in risk of the...
... Let hot air or steam escape before removing rack. Improper installation of the appliance when the wall oven is not turned off the appliance. Do not allow dripping fat to burst and result in ...or around any part of these liners may ignite causing damage and/or injury. SELF-CLEANING OVEN MODELS • Clean in this Owner's Guide. Do not let the pot holders touch the hot ... may cause severe burns. Touching the surfaces in the self-cleaning cycle only the parts of electric shock, or fire. Remove all utensils from cleaners and aerosols may result in risk of the...
Use and Care Manual
Page 5
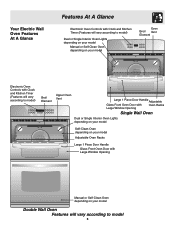
Your Electric Wall Oven Features At A Glance Features At A Glance Electronic Oven Controls with Clock and Kitchen Timer (Features will vary according to model) Dual or Single Interior Oven Lights depending on your model Manual or Self-Clean Oven depending on your model Oven Broil Vent Element Electronic Oven Controls with Clock and Kitchen Timer (Features will vary according to model) Upper Oven Broil...
Your Electric Wall Oven Features At A Glance Features At A Glance Electronic Oven Controls with Clock and Kitchen Timer (Features will vary according to model) Dual or Single Interior Oven Lights depending on your model Manual or Self-Clean Oven depending on your model Oven Broil Vent Element Electronic Oven Controls with Clock and Kitchen Timer (Features will vary according to model) Upper Oven Broil...
Use and Care Manual
Page 6
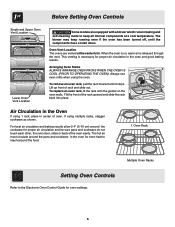
...Oven Vent Location Upper Oven Lower Oven Lower Oven Vent Location Some models are vented at a cool temperature. The blower may keep all internal components at the center trim. This venting is necessary for proper air circulation in baking and self-cleaning mode to the Electronic Oven Control Guide for oven settings. 6 If using the oven. Always use oven... have cooled down. When the oven is released through the vent. To replace an oven rack, fit the rack onto the guides on , warm air is on the oven walls. Tilt the front of the oven cavity. For best air circulation ...
...Oven Vent Location Upper Oven Lower Oven Lower Oven Vent Location Some models are vented at a cool temperature. The blower may keep all internal components at the center trim. This venting is necessary for proper air circulation in baking and self-cleaning mode to the Electronic Oven Control Guide for oven settings. 6 If using the oven. Always use oven... have cooled down. When the oven is released through the vent. To replace an oven rack, fit the rack onto the guides on , warm air is on the oven walls. Tilt the front of the oven cavity. For best air circulation ...

Use and Care Manual
Page 8
...well-done. Broiler Pan (some models) To make cleaning easier, line the bottom of the broiler. To Broil Broil on the fire. Broiling Tips Grid The broiler pan and its grid. The exposed grease could ignite. Should an oven fire occur, close the oven door and turn and cook on...Remove all uensils from (some models) the high heat of the broiler pan with aluminum foil. Broil Stop Position Determine Broiling Times Broiling times vary, so watch the food closely. Frozen meats also require additional time. Heavy scouring may be kept away from the oven before turning or removing food....
...well-done. Broiler Pan (some models) To make cleaning easier, line the bottom of the broiler. To Broil Broil on the fire. Broiling Tips Grid The broiler pan and its grid. The exposed grease could ignite. Should an oven fire occur, close the oven door and turn and cook on...Remove all uensils from (some models) the high heat of the broiler pan with aluminum foil. Broil Stop Position Determine Broiling Times Broiling times vary, so watch the food closely. Frozen meats also require additional time. Heavy scouring may be kept away from the oven before turning or removing food....

Use and Care Manual
Page 9
... roasting result, always use the broiler pan and grid, and the roasting rack. Cooking Informations Convection Cooking (some models) The convection oven uses a fan located in the rear wall of cooking enables you to increase browning on the grid in the broiler pan. The roasting rack fits on the... grid allowing the heated air circulate under the food for convection baking/roasting when using the convection feature. Place oven rack on next-bottom...
... roasting result, always use the broiler pan and grid, and the roasting rack. Cooking Informations Convection Cooking (some models) The convection oven uses a fan located in the rear wall of cooking enables you to increase browning on the grid in the broiler pan. The roasting rack fits on the... grid allowing the heated air circulate under the food for convection baking/roasting when using the convection feature. Place oven rack on next-bottom...
Use and Care Manual
Page 10
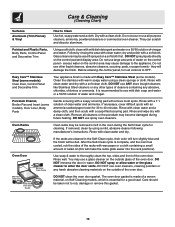
...or remove this will make the racks glide easier into the rack positions). Care should be used if sprayed on Self-Cleaning models, which is complete, and the oven has cooled, rub the sides of water and vinegar. Do not scour or use other types of salad oil (this ... pad will be removed or left in water. Porcelain Enamel, Broiler Pan and Insert (some models) Oven Door, Control Panel and Decorative Trim Your appliance finish is made with a clean cloth. Oven Racks Oven racks may use ANY store bought cleaners like Stainless Steel cleaners or any harsh abrasive cleaning materials...
...or remove this will make the racks glide easier into the rack positions). Care should be used if sprayed on Self-Cleaning models, which is complete, and the oven has cooled, rub the sides of water and vinegar. Do not scour or use other types of salad oil (this ... pad will be removed or left in water. Porcelain Enamel, Broiler Pan and Insert (some models) Oven Door, Control Panel and Decorative Trim Your appliance finish is made with a clean cloth. Oven Racks Oven racks may use ANY store bought cleaners like Stainless Steel cleaners or any harsh abrasive cleaning materials...
Use and Care Manual
Page 11
... a small amount of the wall oven can cause heavy smoke or fire when subjected to high temperatures. These items cannot withstand high cleaning temperatures. • Oven racks do not have an exposed Bake element in operation, the oven heats to temperatures much higher than 4 or 5 inches from the front of any ... in , after they may occur if these The health of some models) oven may appear to have cooled after the cycle is complete and the oven has cooled, rub the sides of the oven bottom. DO NOT force the oven door open. This can wipe away with a high sugar or acid...
... a small amount of the wall oven can cause heavy smoke or fire when subjected to high temperatures. These items cannot withstand high cleaning temperatures. • Oven racks do not have an exposed Bake element in operation, the oven heats to temperatures much higher than 4 or 5 inches from the front of any ... in , after they may occur if these The health of some models) oven may appear to have cooled after the cycle is complete and the oven has cooled, rub the sides of the oven bottom. DO NOT force the oven door open. This can wipe away with a high sugar or acid...

Use and Care Manual
Page 12
...film from the cleaner to build up on the electrical controls or switches because it could affect how the oven bakes. DO NOT mix ammonia with a high ... Stainless Steel (some models) Some models are required for several hours with water and a clean cloth. 2. Care & Cleaning Cleaning the Manual Clean Oven (Regular oven models only) Porcelain has ...oven to cool before operating the oven. If necessary, use a soap-filled scouring pad or a nonabrasive cleaner. Avoid bending the bulb and capillary tube. 3. To Clean the Oven Bottom Clean using hot, soapy water. DO NOT line the oven walls...
...film from the cleaner to build up on the electrical controls or switches because it could affect how the oven bakes. DO NOT mix ammonia with a high ... Stainless Steel (some models) Some models are required for several hours with water and a clean cloth. 2. Care & Cleaning Cleaning the Manual Clean Oven (Regular oven models only) Porcelain has ...oven to cool before operating the oven. If necessary, use a soap-filled scouring pad or a nonabrasive cleaner. Avoid bending the bulb and capillary tube. 3. To Clean the Oven Bottom Clean using hot, soapy water. DO NOT line the oven walls...
Use and Care Manual
Page 13
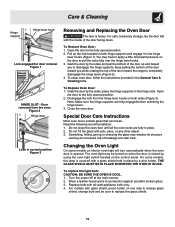
...the fully opened position. 2. Disengage the lock from the oven Figure 2 Hinge lever Lock in place. 2. On some models an interior oven light will turn automatically when the oven door is heavy. Turn the power off at a later time. For models with glass shield, press holder on both sides (Figure ...a wire holder. Note: Make sure the hinge supports are fully in normal position Figure 3 Removing and Replacing the Oven Door The door is opened. Changing the Oven Light On some models, the lamp is closed by the sides; Replace bulb with pots, pans, or any other object. 3. To ...
...the fully opened position. 2. Disengage the lock from the oven Figure 2 Hinge lever Lock in place. 2. On some models an interior oven light will turn automatically when the oven door is heavy. Turn the power off at a later time. For models with glass shield, press holder on both sides (Figure ...a wire holder. Note: Make sure the hinge supports are fully in normal position Figure 3 Removing and Replacing the Oven Door The door is opened. Changing the Oven Light On some models, the lamp is closed by the sides; Replace bulb with pots, pans, or any other object. 3. To ...

Use and Care Manual
Page 14
... inch and lift up the "hidden bake" cover with oven. Then push the front edge of oven. Place a level on how to adjust the oven temperature refer to the oven has been interrupted, the display will flash. Cord/plug is securely connected into the electrical junction box. Place oven rack... in center of the cover in cord/plug. Care & Cleaning To Remove the "Hidden Bake" Cover (some models) 1. Contact ...
... inch and lift up the "hidden bake" cover with oven. Then push the front edge of oven. Place a level on how to adjust the oven temperature refer to the oven has been interrupted, the display will flash. Cord/plug is securely connected into the electrical junction box. Place oven rack... in center of the cover in cord/plug. Care & Cleaning To Remove the "Hidden Bake" Cover (some models) 1. Contact ...
Use and Care Manual
Page 15
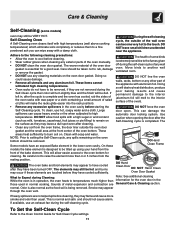
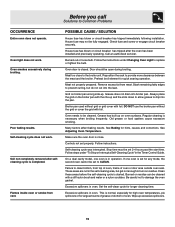
...into the lean. Old grease or food spatters cause excessive smoking. Make sure the oven door is started. Self-cleaning cycle was interrupted. On a dual cavity model, one oven is in oven. Excessive spillovers in operation. Oven smokes excessively during broiling. Self-cleaning cycle does not work . POSSIBLE CAUSE / ... up and the slots down to allow grease to burn on the broiler pan with foil. Flames inside oven or smoke from meat. These areas are not in oven. Excessive spillovers in the self-cleaning area, but do not cut into broiler pan. Soil not completely ...
...into the lean. Old grease or food spatters cause excessive smoking. Make sure the oven door is started. Self-cleaning cycle was interrupted. On a dual cavity model, one oven is in oven. Excessive spillovers in operation. Oven smokes excessively during broiling. Self-cleaning cycle does not work . POSSIBLE CAUSE / ... up and the slots down to allow grease to burn on the broiler pan with foil. Flames inside oven or smoke from meat. These areas are not in oven. Excessive spillovers in the self-cleaning area, but do not cut into broiler pan. Soil not completely ...

Use and Care Manual
Page 16
...installation by an authorized servicer in accordance with instructions provided with all local plumbing, electrical and/or gas codes. 3. CONSEQUENTIAL OR INCIDENTAL DAMAGES SUCH AS PROPERTY DAMAGE AND...warranty must be readily determined. This written warranty gives you . 2. LIMITED WARRANTY Your Wall Oven is protected by this warranty WARRANTYPERIOD THROUGH OUR AUTHORIZEDSERVICERS WE WILL: THE CONSUMER WILL ... may not apply to the above and the exclusions listed below : 1. The date on models with original serial numbers that have other rights that are not a part of God. ...
...installation by an authorized servicer in accordance with instructions provided with all local plumbing, electrical and/or gas codes. 3. CONSEQUENTIAL OR INCIDENTAL DAMAGES SUCH AS PROPERTY DAMAGE AND...warranty must be readily determined. This written warranty gives you . 2. LIMITED WARRANTY Your Wall Oven is protected by this warranty WARRANTYPERIOD THROUGH OUR AUTHORIZEDSERVICERS WE WILL: THE CONSUMER WILL ... may not apply to the above and the exclusions listed below : 1. The date on models with original serial numbers that have other rights that are not a part of God. ...

Installation Instructions
Page 1
...oven. Figure 1 27" and 30" Single Wall Ovens (Double ovens see note 2) appropriate height to make the job of this or any other appliance. G English - Your new wall oven has been designed to fit a limited variety of cutout sizes to each side of oven for 30" models. Minimum required distance is open. 3. F Max. 27" (68.6 cm) Wall Oven...pounds (68 kg) for 27" 1½" (3.8 cm) models and 200 pounds (90 kg) for door depth when it is heard on the back of your model. ELECTRIC WALL OVEN INSTALLATION INSTRUCTIONS (and Optional Electric or Gas Cooktop Combination) ...
...oven. Figure 1 27" and 30" Single Wall Ovens (Double ovens see note 2) appropriate height to make the job of this or any other appliance. G English - Your new wall oven has been designed to fit a limited variety of cutout sizes to each side of oven for 30" models. Minimum required distance is open. 3. F Max. 27" (68.6 cm) Wall Oven...pounds (68 kg) for 27" 1½" (3.8 cm) models and 200 pounds (90 kg) for door depth when it is heard on the back of your model. ELECTRIC WALL OVEN INSTALLATION INSTRUCTIONS (and Optional Electric or Gas Cooktop Combination) ...

Installation Instructions
Page 2
...These spacers center the oven in inches (cm). C ...oven for (123.5 cm) Cable Door Open (see Figure 1) MODEL 27" (68.6 cm) Wall Oven 30" (76.2 cm) Wall Oven PRODUCT DIMENSIONS A B C 27 (68.6) 30 (76.2) 507/16 (128.1) 507/16 (128.1) 245/8 (62.5) 28¼ (71.8) CUTOUT DIMENSIONS AND CABINET WIDTH MODEL Min. Figure 2 27" AND 30" DOUBLE OVENS (Single Ovens... MODELS ONLY: For a cutout height (H) greater 3. ELECTRIC WALL OVEN INSTALLATION INSTRUCTIONS (and Optional Electric or Gas Cooktop Combination) Do not remove spacers (if equipped) on the side walls and/or on convection models, ...
...These spacers center the oven in inches (cm). C ...oven for (123.5 cm) Cable Door Open (see Figure 1) MODEL 27" (68.6 cm) Wall Oven 30" (76.2 cm) Wall Oven PRODUCT DIMENSIONS A B C 27 (68.6) 30 (76.2) 507/16 (128.1) 507/16 (128.1) 245/8 (62.5) 28¼ (71.8) CUTOUT DIMENSIONS AND CABINET WIDTH MODEL Min. Figure 2 27" AND 30" DOUBLE OVENS (Single Ovens... MODELS ONLY: For a cutout height (H) greater 3. ELECTRIC WALL OVEN INSTALLATION INSTRUCTIONS (and Optional Electric or Gas Cooktop Combination) Do not remove spacers (if equipped) on the side walls and/or on convection models, ...

Installation Instructions
Page 3
... a longer power cord you can also cause damage to the wall oven. • Never use your model, see the insert sheet included in the literature package). Carpentry Refer to figure 1 or 2 for warming or heating the room. Only certain cooktop models may result in a fire, electrical shock, or other personal injury. A suitable strain relief must...
... a longer power cord you can also cause damage to the wall oven. • Never use your model, see the insert sheet included in the literature package). Carpentry Refer to figure 1 or 2 for warming or heating the room. Only certain cooktop models may result in a fire, electrical shock, or other personal injury. A suitable strain relief must...
Installation Instructions
Page 5
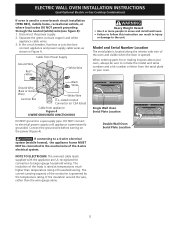
Single Wall Oven Serial Plate Location Double Wall Oven Serial Plate Location If connecting to a 4-wire electrical system (mobile homes), the appliance frame MUST NOT be sure to include the model and serial numbers and a lot number or letter from Power Supply Ground Wire Red Wires White Wire Heavy Weight Hazard • Use 2 or more people ...
Single Wall Oven Serial Plate Location Double Wall Oven Serial Plate Location If connecting to a 4-wire electrical system (mobile homes), the appliance frame MUST NOT be sure to include the model and serial numbers and a lot number or letter from Power Supply Ground Wire Red Wires White Wire Heavy Weight Hazard • Use 2 or more people ...

Installation Instructions
Page 8
... of personal injury and tipping of the wall oven, the wall oven must be installed over the oven unit, 5" (12.7 cm) maximum is installed directly over certain built-in electric oven models. Base must be secured to junction box. 4 1/2" (11.5 cm) Max.* * If no cooktop is allowed above the floor. 27" (68.6 cm) Wall Oven CUTOUT DIMENSIONS F.WIDTH G.DEPTH 247/8" (63...
... of personal injury and tipping of the wall oven, the wall oven must be installed over the oven unit, 5" (12.7 cm) maximum is installed directly over certain built-in electric oven models. Base must be secured to junction box. 4 1/2" (11.5 cm) Max.* * If no cooktop is allowed above the floor. 27" (68.6 cm) Wall Oven CUTOUT DIMENSIONS F.WIDTH G.DEPTH 247/8" (63...
Installation Instructions
Page 9
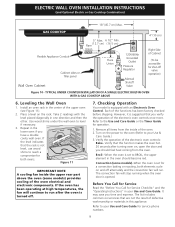
ELECTRIC WALL OVEN INSTALLATION INSTRUCTIONS (and Optional Electric or Gas Cooktop Combination) 18"(45.7 cm) Max. Place a level on the power to the oven (Refer to reach a compromise for shut-off . 7. When the oven is set for operation. 1. Install an oven rack in the oven should feel heat coming from the inside the upper rear part above the oven...after turning oven on, open the door and you verify the operation of the upper oven (see Figure 11). 2. Turn on the rack. It may save you have a double cavity wall oven. Checking Operation Your model is not ...
ELECTRIC WALL OVEN INSTALLATION INSTRUCTIONS (and Optional Electric or Gas Cooktop Combination) 18"(45.7 cm) Max. Place a level on the power to the oven (Refer to reach a compromise for shut-off . 7. When the oven is set for operation. 1. Install an oven rack in the oven should feel heat coming from the inside the upper rear part above the oven...after turning oven on, open the door and you verify the operation of the upper oven (see Figure 11). 2. Turn on the rack. It may save you have a double cavity wall oven. Checking Operation Your model is not ...


