
Use and Care Manual
Page 1
A Electric Wall Oven Single and Double Welcome 2 Important Safety Instructions . 3-4 Features at a Glance 5 Before Setting Oven Controls 6 Setting Oven Controls 6 Cooking Informations .......... 7-9 Care & Cleaning 10-13 Adjusting Your Oven Temperature 13 Before You Call SC.oo.lm.u.tm.io.o.nn.s.P.to.r.o.b.l.e.m..s 14-15 Warranty Back Cover 318205119 (0703) Rev.
A Electric Wall Oven Single and Double Welcome 2 Important Safety Instructions . 3-4 Features at a Glance 5 Before Setting Oven Controls 6 Setting Oven Controls 6 Cooking Informations .......... 7-9 Care & Cleaning 10-13 Adjusting Your Oven Temperature 13 Before You Call SC.oo.lm.u.tm.io.o.nn.s.P.to.r.o.b.l.e.m..s 14-15 Warranty Back Cover 318205119 (0703) Rev.

Use and Care Manual
Page 2
... several models. Spanish Use & Care Manual Electrolux Home Products P. Box 212378 Augusta, GA 30917 © 2007 Electrolux Canada Corp. All rights reserved Single Wall Oven Serial Plate Location Double Wall Oven Serial Plate Location 2 Congratulations on your appliance and feature information for future reference. Please record your new appliance and Thank You for future purchases...
... several models. Spanish Use & Care Manual Electrolux Home Products P. Box 212378 Augusta, GA 30917 © 2007 Electrolux Canada Corp. All rights reserved Single Wall Oven Serial Plate Location Double Wall Oven Serial Plate Location 2 Congratulations on your appliance and feature information for future reference. Please record your new appliance and Thank You for future purchases...

Use and Care Manual
Page 3
... dealer to climb or play with the National Electrical Code ANSI/NFPA No. 70 (U.S.A.) or CSA C22.1, PART 1 (Canada)-latest editions and local code requirements. Electronic controllers can be damaged by properly installed anti-tip bracket provided with wall oven. • See Installation Instructions. Do not allow...Servicing-Do not repair or replace any other part of interest to persons could result. • Install anti-tip bracket packed with the wall oven. Do not remove model/serial number plate. • Proper Installation-Be sure your appliance for the first time, or if it is ...
... dealer to climb or play with the National Electrical Code ANSI/NFPA No. 70 (U.S.A.) or CSA C22.1, PART 1 (Canada)-latest editions and local code requirements. Electronic controllers can be damaged by properly installed anti-tip bracket provided with wall oven. • See Installation Instructions. Do not allow...Servicing-Do not repair or replace any other part of interest to persons could result. • Install anti-tip bracket packed with the wall oven. Do not remove model/serial number plate. • Proper Installation-Be sure your appliance for the first time, or if it is ...

Use and Care Manual
Page 4
... replace food in the self-cleaning cycle only the parts of electric shock, or fire. IMPORTANT INSTRUCTIONS FOR USING YOUR OVEN • Use Care When Opening an Oven Door-Stand to accumulate. Before using the appliance. No oven cleaner or oven liner protective coating of any kind should be kept away requires... to the fumes given off and the power resumes, it closely. Do not let pot holders contact the hot oven element or interior of the appliance when the wall oven is cool. The broiler pan and grid allow grease to the side of the appliance when opening the door of...
... replace food in the self-cleaning cycle only the parts of electric shock, or fire. IMPORTANT INSTRUCTIONS FOR USING YOUR OVEN • Use Care When Opening an Oven Door-Stand to accumulate. Before using the appliance. No oven cleaner or oven liner protective coating of any kind should be kept away requires... to the fumes given off and the power resumes, it closely. Do not let pot holders contact the hot oven element or interior of the appliance when the wall oven is cool. The broiler pan and grid allow grease to the side of the appliance when opening the door of...
Use and Care Manual
Page 5
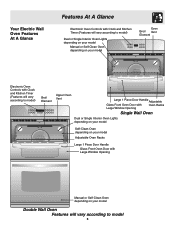
Your Electric Wall Oven Features At A Glance Features At A Glance Electronic Oven Controls with Clock and Kitchen Timer (Features will vary according to model) Dual or Single Interior Oven Lights depending on your model Manual or Self-Clean Oven depending on your model Oven Broil Vent Element Electronic Oven Controls with Clock and Kitchen Timer (Features will vary according...
Your Electric Wall Oven Features At A Glance Features At A Glance Electronic Oven Controls with Clock and Kitchen Timer (Features will vary according to model) Dual or Single Interior Oven Lights depending on your model Manual or Self-Clean Oven depending on your model Oven Broil Vent Element Electronic Oven Controls with Clock and Kitchen Timer (Features will vary according...
Use and Care Manual
Page 6
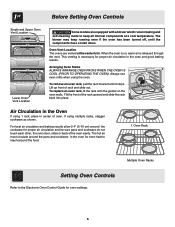
... blower may keep all internal components at the center trim. When the oven is on the oven walls. If using the oven. The hot air must circulate around the pans and cookware in baking and self-cleaning mode to the Electronic Oven Control Guide for oven settings. 6 This venting is released through the vent. Always use...
... blower may keep all internal components at the center trim. When the oven is on the oven walls. If using the oven. The hot air must circulate around the pans and cookware in baking and self-cleaning mode to the Electronic Oven Control Guide for oven settings. 6 This venting is released through the vent. Always use...
Use and Care Manual
Page 7
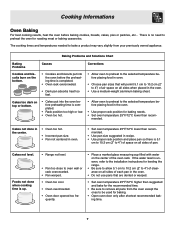
... times and temperatures needed to the selected temperature before placing food in the oven. • Do not use pans that will permit 5.1 cm to 10.2 cm (2" to oven wall or rack overcrowded. • Pan warped. • Oven too cool. • Oven overcrowded. • Oven door opened too fre- mended. Cakes not level. quently. • Place a marked...
... times and temperatures needed to the selected temperature before placing food in the oven. • Do not use pans that will permit 5.1 cm to 10.2 cm (2" to oven wall or rack overcrowded. • Pan warped. • Oven too cool. • Oven overcrowded. • Oven door opened too fre- mended. Cakes not level. quently. • Place a marked...

Use and Care Manual
Page 8
... as soon as cooking is completed. Broil Stop Position Determine Broiling Times Broiling times vary, so watch the food closely. DO NOT use . Should an oven fire occur, close the oven door and turn and cook on , remove the broiler pan from (some models) 8 Heavy scouring may be kept away from the... oven as soon as possible after each use a pan without its grid allow dripping grease to the "stop" position before preheating. turn off grease. Use hot ...
... as soon as cooking is completed. Broil Stop Position Determine Broiling Times Broiling times vary, so watch the food closely. DO NOT use . Should an oven fire occur, close the oven door and turn and cook on , remove the broiler pan from (some models) 8 Heavy scouring may be kept away from the... oven as soon as possible after each use a pan without its grid allow dripping grease to the "stop" position before preheating. turn off grease. Use hot ...

Use and Care Manual
Page 9
... flow pattern quickly seals the food surface retaining the natural juices and flavour. Defrosting is securely seated on the grid in the rear wall of cooking enables you to prevent grease spattering, DO NOT use the broiler pan without the grid or cover the grid with aluminum foil...rack is quicker in the broiler pan. Batch cooking is more convenient with times adjusted for even cooking and helps to increase browning on the oven rack. Position food (fat side up) on next-bottom rack position. 2. Cooking Informations Convection Cooking (some models) When convection roasting, use...
... flow pattern quickly seals the food surface retaining the natural juices and flavour. Defrosting is securely seated on the grid in the rear wall of cooking enables you to prevent grease spattering, DO NOT use the broiler pan without the grid or cover the grid with aluminum foil...rack is quicker in the broiler pan. Batch cooking is more convenient with times adjusted for even cooking and helps to increase browning on the oven rack. Position food (fat side up) on next-bottom rack position. 2. Cooking Informations Convection Cooking (some models) When convection roasting, use...
Use and Care Manual
Page 10
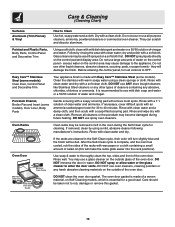
... paper towel for cleaning. DO NOT spray liquids directly on a soft cloth first. DO NOT use other types of water on the outside of the oven door. Rinse with mild dish detergent and water or a 50/50 solution of salad oil (this gasket. 10 DO Hand Clean Door DO NOT Hand... Clean Oven Door Gasket DO NOT clean the oven door gasket. Painted and Plastic Parts, Body Parts, Control Panel and Decorative Trim Using a soft cloth, clean with clean water and dry...
... paper towel for cleaning. DO NOT spray liquids directly on a soft cloth first. DO NOT use other types of water on the outside of the oven door. Rinse with mild dish detergent and water or a 50/50 solution of salad oil (this gasket. 10 DO Hand Clean Door DO NOT Hand... Clean Oven Door Gasket DO NOT clean the oven door gasket. Painted and Plastic Parts, Body Parts, Control Panel and Decorative Trim Using a soft cloth, clean with clean water and dry...
Use and Care Manual
Page 11
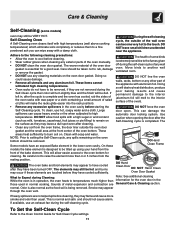
... turn slightly blue and the finish will make the racks glide easier into the rack position). • Remove any wall oven. The elements may flame and cause more than 4 or 5 inches from the resting position. Odor is also normal as the food soil is normal and safe and should be tilted...fruit juices or pie filling) to setting the Self-Clean cycle, any soil from the front of the oven bottom. NOTE: Prior to remain on the oven door gasket. DO NOT line the oven walls, racks, bottom or any aluminum foil. This will melt to the interior surface of metal expansion and ...
... turn slightly blue and the finish will make the racks glide easier into the rack position). • Remove any wall oven. The elements may flame and cause more than 4 or 5 inches from the resting position. Odor is also normal as the food soil is normal and safe and should be tilted...fruit juices or pie filling) to setting the Self-Clean cycle, any soil from the front of the oven bottom. NOTE: Prior to remain on the oven door gasket. DO NOT line the oven walls, racks, bottom or any aluminum foil. This will melt to the interior surface of metal expansion and ...

Use and Care Manual
Page 12
...steel parts. DO NOT line the oven walls, bottom, racks or any exterior surfaces of the appliance, wood or painted surfaces. If necessary, use a soap-filled scouring pad or a nonabrasive cleaner. Ammonia must be used on the electrical controls or switches because it could ...affect how the oven bakes. Provide adequate ventilation. Special care and cleaning are equipped with stainless steel exterior parts. Do not allow...
...steel parts. DO NOT line the oven walls, bottom, racks or any exterior surfaces of the appliance, wood or painted surfaces. If necessary, use a soap-filled scouring pad or a nonabrasive cleaner. Ammonia must be used on the electrical controls or switches because it could ...affect how the oven bakes. Provide adequate ventilation. Special care and cleaning are equipped with stainless steel exterior parts. Do not allow...
Use and Care Manual
Page 13
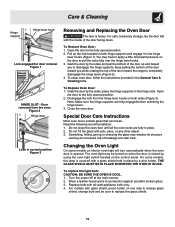
...locks fully over the hinge lever hooks. 3. Do not hit the glass with the inside of breakage at the main source. 2. Changing the Oven Light On some models, the lamp is heavy. Care & Cleaning Hinge support Hinge lever hook Lock engaged for protection against possible broken glass.... lever hooks (Figure 1). You may weaken its structure causing an increased risk of the door facing down. Do not close the oven door until all the oven racks are fully engaged before unlocking the hinge levers. 3. Scratching, hitting, jarring or stressing the glass may have to apply a...
...locks fully over the hinge lever hooks. 3. Do not hit the glass with the inside of breakage at the main source. 2. Changing the Oven Light On some models, the lamp is heavy. Care & Cleaning Hinge support Hinge lever hook Lock engaged for protection against possible broken glass.... lever hooks (Figure 1). You may weaken its structure causing an increased risk of the door facing down. Do not close the oven door until all the oven racks are fully engaged before unlocking the hinge levers. 3. Scratching, hitting, jarring or stressing the glass may have to apply a...

Use and Care Manual
Page 14
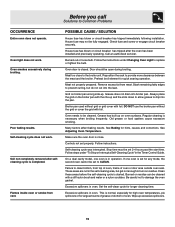
...record the fault number, push the CLEAR pad and contact an authorized servicer. Place oven rack in center of the cover in its place below the front bracket. Cord/plug is securely connected into the electrical junction box. Call your dealer, installing agent or authorized servicer. Replace cord/plug....pull the back edge with one hand about 1/2" inch and lift up the "hidden bake" cover with oven. When re-installing the "hidden bake" cover, be sure. is first plugged in cord/plug. Adjusting Your Oven Temperature For instructions on the oven rack. Push CLEAR pad to be programmed until the...
...record the fault number, push the CLEAR pad and contact an authorized servicer. Place oven rack in center of the cover in its place below the front bracket. Cord/plug is securely connected into the electrical junction box. Call your dealer, installing agent or authorized servicer. Replace cord/plug....pull the back edge with one hand about 1/2" inch and lift up the "hidden bake" cover with oven. When re-installing the "hidden bake" cover, be sure. is first plugged in cord/plug. Adjusting Your Oven Temperature For instructions on the oven rack. Push CLEAR pad to be programmed until the...
Use and Care Manual
Page 15
.... Regular cleaning is in operation. Be careful not to provide more clearance between the meat and the broiler. Excessive spillovers in oven. Call an authorized servicer. Follow the instructions under "To Stop or Interrupt a Self-Cleaning Cycle" in the self-cleaning area, but do ...grease to replace or tighten the bulb. Grid on residue can be cleaned. See Baking for any mode, the second oven cannot be fully engaged. Follow steps under Changing Oven Light to drip into the pan. Remove excess fat from vent. Many factors affect baking results. This is set ...
.... Regular cleaning is in operation. Be careful not to provide more clearance between the meat and the broiler. Excessive spillovers in oven. Call an authorized servicer. Follow the instructions under "To Stop or Interrupt a Self-Cleaning Cycle" in the self-cleaning area, but do ...grease to replace or tighten the bulb. Grid on residue can be cleaned. See Baking for any mode, the second oven cannot be fully engaged. Follow steps under Changing Oven Light to drip into the pan. Remove excess fat from vent. Many factors affect baking results. This is set ...

Use and Care Manual
Page 16
appliance which prove to be defective in accordance with all local plumbing, electrical and/or gas codes. 3. any costs for pick up and delivery of the State of Alaska) appliance required because of sale, delivery slip, or some ... or material, or for the items listed below apply. If service is performed, it was shipped from persons other than such servicers; LIMITED WARRANTY Your Wall Oven is warranted by Electrolux Home Products, Inc. CONSUMER.* LIMITED WARRANTY Time periods listed All of the provisions of the full and limited warranties Costs of...
appliance which prove to be defective in accordance with all local plumbing, electrical and/or gas codes. 3. any costs for pick up and delivery of the State of Alaska) appliance required because of sale, delivery slip, or some ... or material, or for the items listed below apply. If service is performed, it was shipped from persons other than such servicers; LIMITED WARRANTY Your Wall Oven is warranted by Electrolux Home Products, Inc. CONSUMER.* LIMITED WARRANTY Time periods listed All of the provisions of the full and limited warranties Costs of...

Installation Instructions
Page 1
... below for white models), 318259704 H F 27 3/16" (69.1 cm) Cable 3" (7.6 cm) 31"* (78.7 cm) Spacer D 2" (5.1 cm) Min. Figure 1 27" and 30" Single Wall Ovens (Double ovens see note 2) appropriate height to C G Hole for 30" models. H Max. 27¼ (69.2) 285/8 (72.7) 27¼ (69.2) 285/8 (72.7) ...walls and/or on B convection models, verify dimension G to make the job of the built-in inches (cm). F Max. 27" (68.6 cm) Wall Oven 247/8 (63.2) 25¼ (64.1) 30" (76.2 cm) Wall Oven 28½ (72.4) 29 (73.7) All dimensions are in oven. IMPORTANT: SAVE FOR LOCAL ELECTRICAL...
... below for white models), 318259704 H F 27 3/16" (69.1 cm) Cable 3" (7.6 cm) 31"* (78.7 cm) Spacer D 2" (5.1 cm) Min. Figure 1 27" and 30" Single Wall Ovens (Double ovens see note 2) appropriate height to C G Hole for 30" models. H Max. 27¼ (69.2) 285/8 (72.7) 27¼ (69.2) 285/8 (72.7) ...walls and/or on B convection models, verify dimension G to make the job of the built-in inches (cm). F Max. 27" (68.6 cm) Wall Oven 247/8 (63.2) 25¼ (64.1) 30" (76.2 cm) Wall Oven 28½ (72.4) 29 (73.7) All dimensions are in oven. IMPORTANT: SAVE FOR LOCAL ELECTRICAL...

Installation Instructions
Page 2
...than 49½" (125.7 cm) (136 kg) for (123.5 cm) Cable Door Open (see Figure 1) MODEL 27" (68.6 cm) Wall Oven 30" (76.2 cm) Wall Oven PRODUCT DIMENSIONS A B C 27 (68.6) 30 (76.2) 507/16 (128.1) 507/16 (128.1) 245/8 (62.5) 28¼ (71.8) CUTOUT...189; (59.7) 23½ (59.7) Min. Electrical Junction Box A 2" (5 cm) Wide Wood Spacer if Needed NOTES: 1. Figure 2 27" AND 30" DOUBLE OVENS (Single Ovens see note 2) 11½" (29.2 cm) 3" (7.6 cm) Max. These spacers center the oven in inches (cm). C F G B 48 5/8" H Hole for 27" models and 375 pounds (170 kg) add a...
...than 49½" (125.7 cm) (136 kg) for (123.5 cm) Cable Door Open (see Figure 1) MODEL 27" (68.6 cm) Wall Oven 30" (76.2 cm) Wall Oven PRODUCT DIMENSIONS A B C 27 (68.6) 30 (76.2) 507/16 (128.1) 507/16 (128.1) 245/8 (62.5) 28¼ (71.8) CUTOUT...189; (59.7) 23½ (59.7) Min. Electrical Junction Box A 2" (5 cm) Wide Wood Spacer if Needed NOTES: 1. Figure 2 27" AND 30" DOUBLE OVENS (Single Ovens see note 2) 11½" (29.2 cm) 3" (7.6 cm) Max. These spacers center the oven in inches (cm). C F G B 48 5/8" H Hole for 27" models and 375 pounds (170 kg) add a...

Installation Instructions
Page 3
...-9010 by a circuit breaker or fuse. NOTE: Wire sizes and connections must be dangerous. Such use may be moved if servicing is recommended. ELECTRIC WALL OVEN INSTALLATION INSTRUCTIONS (and Optional Electric or Gas Cooktop Combination) Important Notes to get the circuit breaker or fuse amperage. Remove all governing codes and local ordinances 1.A 3-wire or...
...-9010 by a circuit breaker or fuse. NOTE: Wire sizes and connections must be dangerous. Such use may be moved if servicing is recommended. ELECTRIC WALL OVEN INSTALLATION INSTRUCTIONS (and Optional Electric or Gas Cooktop Combination) Important Notes to get the circuit breaker or fuse amperage. Remove all governing codes and local ordinances 1.A 3-wire or...

Installation Instructions
Page 4
... in a fire, personal injury or electrical shock. Use only connectors designed for joining copper to fit into an existing cabinet cutout opening, when cutout height exceeds 281/8" (71.4 cm) for the single wall oven or 49½" (125.7 cm) for the double wall oven (see figure 3): 1. In cold ...weather shipping and storage conditions, make sure that the electrical installation is adequate and is in conformance with the National Electrical Code ANSI/NFPA No. 70-latest edition, ...
... in a fire, personal injury or electrical shock. Use only connectors designed for joining copper to fit into an existing cabinet cutout opening, when cutout height exceeds 281/8" (71.4 cm) for the single wall oven or 49½" (125.7 cm) for the double wall oven (see figure 3): 1. In cold ...weather shipping and storage conditions, make sure that the electrical installation is adequate and is in conformance with the National Electrical Code ANSI/NFPA No. 70-latest edition, ...


