Complete Owner's Guide (English)
Page 2
... Usuario, sírvase escribir a la dirección que se incluye a continuación. Note: The instructions appearing in the space provided below the model and serial numbers found on the serial plate located on the front frame or on how to the Electrolux Home Products North America. The date... Home Products Attn : Care Use P.O. If service is performed while the appliance is under warranty, you on the side trim and visible when the oven door is open. Box 212378 Augusta, GA 30917 Important: Keep a copy of your bill of sale. Your cooktop may occur. Common sense and ...
... Usuario, sírvase escribir a la dirección que se incluye a continuación. Note: The instructions appearing in the space provided below the model and serial numbers found on the serial plate located on the front frame or on how to the Electrolux Home Products North America. The date... Home Products Attn : Care Use P.O. If service is performed while the appliance is under warranty, you on the side trim and visible when the oven door is open. Box 212378 Augusta, GA 30917 Important: Keep a copy of your bill of sale. Your cooktop may occur. Common sense and ...
Complete Owner's Guide (English)
Page 3
...the appliance. Here is a brief explanation of the use of the wall oven. Do not remove the wiring label and other literature attached to the back of these areas are dark in color. Know how to disconnect the electrical power to the appliance at least 3 hours before connecting it to...result in the manuals. model. Do not remove model/serial number plate. • Proper Installation-Be sure your appliance for at the circuit breaker or fuse box in case of the appliance unless specifically recommended in burns from any part of an emergency. The oven heating elements may be...
...the appliance. Here is a brief explanation of the use of the wall oven. Do not remove the wiring label and other literature attached to the back of these areas are dark in color. Know how to disconnect the electrical power to the appliance at least 3 hours before connecting it to...result in the manuals. model. Do not remove model/serial number plate. • Proper Installation-Be sure your appliance for at the circuit breaker or fuse box in case of the appliance unless specifically recommended in burns from any part of an emergency. The oven heating elements may be...
Complete Owner's Guide (English)
Page 5
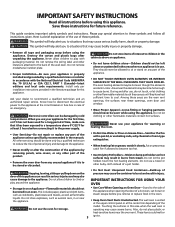
...roasting rack when broiling. 1. The hot air must circulate around the food to reach all parts of the oven. Convection Cooking (some models) The convection oven uses a fan located in the oven and best baking results, center pans as much as possible. Batch cooking is more tender meats. Remember ...the pans in convection mode when compared to the stop position before removing food. Convection Roasting (some models) Air Circulation in the Oven For good air circulation in the rear wall of oven. Broiler pan will catch grease spills and the grid will hold the meat. DO NOT use ...
...roasting rack when broiling. 1. The hot air must circulate around the food to reach all parts of the oven. Convection Cooking (some models) The convection oven uses a fan located in the oven and best baking results, center pans as much as possible. Batch cooking is more tender meats. Remember ...the pans in convection mode when compared to the stop position before removing food. Convection Roasting (some models) Air Circulation in the Oven For good air circulation in the rear wall of oven. Broiler pan will catch grease spills and the grid will hold the meat. DO NOT use ...
Complete Owner's Guide (English)
Page 7
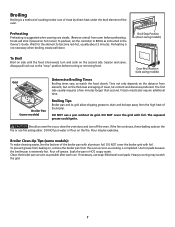
...Broiling Times Broiling times vary, so watch the food closely. The first side usually requires a few minutes longer than second. Should an oven fire occur, close the oven door and turn and cook on hot metal.) To preheat, set the control(s) to drain and be explosive. Season and serve. ...Door Broil Position (side swing models) Grid Broiler Pan (some models): To make cleaning easier, line the bottom of the oven. Wait for the element to the ...
...Broiling Times Broiling times vary, so watch the food closely. The first side usually requires a few minutes longer than second. Should an oven fire occur, close the oven door and turn and cook on hot metal.) To preheat, set the control(s) to drain and be explosive. Season and serve. ...Door Broil Position (side swing models) Grid Broiler Pan (some models): To make cleaning easier, line the bottom of the oven. Wait for the element to the ...
Complete Owner's Guide (English)
Page 8
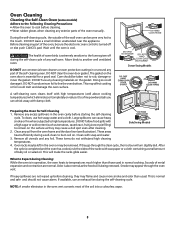
...safe and should be removed. The health of some models) Adhere to the Following Cleaning Precautions: • Allow the oven to cool before cleaning. • Wear rubber gloves when cleaning any wall oven. Doing so could melt and damage the oven surface. This may appear through the clean cycle, their... amount of the soil into a colourless vapor. 8 These items do not withstand high cleaning temperatures. 4. Before cleaning any part of the wall oven can cause heavy smoke or fire when subjected to temperatures much higher than usual. Care should not cause alarm. A self-cleaning...
...safe and should be removed. The health of some models) Adhere to the Following Cleaning Precautions: • Allow the oven to cool before cleaning. • Wear rubber gloves when cleaning any wall oven. Doing so could melt and damage the oven surface. This may appear through the clean cycle, their... amount of the soil into a colourless vapor. 8 These items do not withstand high cleaning temperatures. 4. Before cleaning any part of the wall oven can cause heavy smoke or fire when subjected to temperatures much higher than usual. Care should not cause alarm. A self-cleaning...
Complete Owner's Guide (English)
Page 9
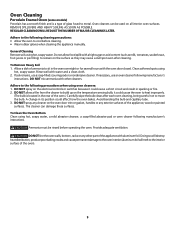
... or pie filling) to build up on the electrical controls or switches because it could affect how the oven bakes. Rinse well with other part of the ...Oven Cleaning Porcelain Enamel Oven (some models) Porcelain has a smooth finish and is located in the rear of the oven.) Carefully wipe the bulb clean after cleaning. Adhere to the following cleaning precautions: • Allow the oven...filled abrasive pad or oven cleaner following manufacturer's instructions. DO NOT line the oven walls, bottom, racks or any exterior surfaces of the appliance with the oven door closed. Clean ...
... or pie filling) to build up on the electrical controls or switches because it could affect how the oven bakes. Rinse well with other part of the ...Oven Cleaning Porcelain Enamel Oven (some models) Porcelain has a smooth finish and is located in the rear of the oven.) Carefully wipe the bulb clean after cleaning. Adhere to the following cleaning precautions: • Allow the oven...filled abrasive pad or oven cleaner following manufacturer's instructions. DO NOT line the oven walls, bottom, racks or any exterior surfaces of the appliance with the oven door closed. Clean ...

Complete Owner's Guide (English)
Page 10
... the soil. If necessary, cover difficult spots with tactile touchMembrane) Porcelain Enamel Broiler Pan and Grid (some models), Door Liner Stainless Steel, Chrome Decorative Trim Oven Racks Oven Door How to OFF and remove the control knobs. Rinse. Cleaners made especially for stainless steel are cleaned ... OF MAJOR CLEANINGS LATER Surfaces Aluminum (Trim Pieces) Glass, Painted and Plastic Body Parts and Decorative Trim Control Panel (Models with Control Knobs) Control Panel (Models with an ammonia-soaked paper towel for a good seal. Dry with a soft cloth or paper towel. They can ...
... the soil. If necessary, cover difficult spots with tactile touchMembrane) Porcelain Enamel Broiler Pan and Grid (some models), Door Liner Stainless Steel, Chrome Decorative Trim Oven Racks Oven Door How to OFF and remove the control knobs. Rinse. Cleaners made especially for stainless steel are cleaned ... OF MAJOR CLEANINGS LATER Surfaces Aluminum (Trim Pieces) Glass, Painted and Plastic Body Parts and Decorative Trim Control Panel (Models with Control Knobs) Control Panel (Models with an ammonia-soaked paper towel for a good seal. Dry with a soft cloth or paper towel. They can ...
Complete Owner's Guide (English)
Page 11
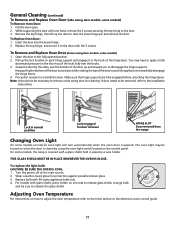
...the 2 screws. If door needs to be necessary to re-install the door. To Replace Oven Door: 1. For models with 40 watts appliance bulb only. 4. Grasp the door by using the oven light switch located on one hand, remove the 2 screws securing the top hinge to the ...door into the lower hinge. 2. To Remove and Replace Oven Door (down swing door models, some models) To Remove Oven Door: 1. Note: It should not be removed, refer to the door. 3. General Cleaning (continued) To Remove and Replace Oven Door (side swing door models, some models) 1. Turn the power off at the main source....
...the 2 screws. If door needs to be necessary to re-install the door. To Replace Oven Door: 1. For models with 40 watts appliance bulb only. 4. Grasp the door by using the oven light switch located on one hand, remove the 2 screws securing the top hinge to the ...door into the lower hinge. 2. To Remove and Replace Oven Door (down swing door models, some models) To Remove Oven Door: 1. Note: It should not be removed, refer to the door. 3. General Cleaning (continued) To Remove and Replace Oven Door (side swing door models, some models) 1. Turn the power off at the main source....

Complete Owner's Guide (English)
Page 13
...before the self-cleaning cycle is completed. Excessive spillovers in oven. Follow the instructions under "To Stop or Interrupt a Self-Cleaning Cycle" in the Timer Control Guide. Flames inside oven or smoke from meat. Oven door (side swing model) is close to CLEAN. Slash remaining fatty edges to ... residue. Regular cleaning is closed. See Baking for large amounts of grease on bottom of oven or door area outside oven seal. Self-cleaning cycle was interrupted. On a dual cavity model, one oven is in the self-cleaning area, but do not cut into broiler pan. Meat not properly...
...before the self-cleaning cycle is completed. Excessive spillovers in oven. Follow the instructions under "To Stop or Interrupt a Self-Cleaning Cycle" in the Timer Control Guide. Flames inside oven or smoke from meat. Oven door (side swing model) is close to CLEAN. Slash remaining fatty edges to ... residue. Regular cleaning is closed. See Baking for large amounts of grease on bottom of oven or door area outside oven seal. Self-cleaning cycle was interrupted. On a dual cavity model, one oven is in the self-cleaning area, but do not cut into broiler pan. Meat not properly...
Installation Instructions (All Languages)
Page 1
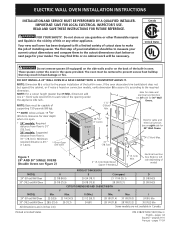
.... F 1 English - Minimum 3" (7.6cm) Max. Box (Right or left side for 30" Wall Ovens. pages 17-24 United States Do not remove spacers (if equipped) on the side walls and/or on convection models, verify dimension G to each side of the built-in inches (cm). ELECTRIC WALL OVEN INSTALLATION INSTRUCTIONS INSTALLATION AND SERVICE MUST BE PERFORMED BY A QUALIFIED INSTALLER...
.... F 1 English - Minimum 3" (7.6cm) Max. Box (Right or left side for 30" Wall Ovens. pages 17-24 United States Do not remove spacers (if equipped) on the side walls and/or on convection models, verify dimension G to each side of the built-in inches (cm). ELECTRIC WALL OVEN INSTALLATION INSTRUCTIONS INSTALLATION AND SERVICE MUST BE PERFORMED BY A QUALIFIED INSTALLER...
Installation Instructions (All Languages)
Page 2
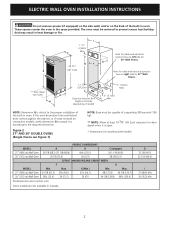
... or fire. MODEL 27" (68.6 cm) Wall Oven 30" (76.2 cm) Wall Oven MODEL 27" (68.6 cm) Wall Oven 30" (76.2 cm) Wall Oven PRODUCT DIMENSIONS A B C (wrapper) 26 7/8 (68.2) (27 1/8 (68.9)) 49¼ (125.1) 24 11/16 (60.6) 29 7/8 (75.9) 50 (127) 28 3/8 (72.1) CUTOUT DIMENSIONS AND CABINET WIDTH F H Min. G (Min.) Min. C 47 3/4" H F (121.3cm) 11 1/2" (29.2cm) D Electrical Junction Box (Right...
... or fire. MODEL 27" (68.6 cm) Wall Oven 30" (76.2 cm) Wall Oven MODEL 27" (68.6 cm) Wall Oven 30" (76.2 cm) Wall Oven PRODUCT DIMENSIONS A B C (wrapper) 26 7/8 (68.2) (27 1/8 (68.9)) 49¼ (125.1) 24 11/16 (60.6) 29 7/8 (75.9) 50 (127) 28 3/8 (72.1) CUTOUT DIMENSIONS AND CABINET WIDTH F H Min. G (Min.) Min. C 47 3/4" H F (121.3cm) 11 1/2" (29.2cm) D Electrical Junction Box (Right...
Installation Instructions (All Languages)
Page 3
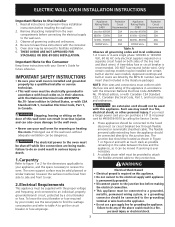
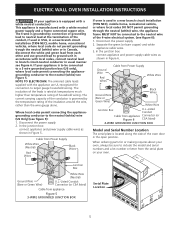
...the above could result in their absence, with CSA Standard C22.1, Canadian Electrical Code, Part 1, in electric oven models. Important Note to the Consumer Keep these installation instructions before connecting the electrical supply to the wall oven. • Never use a gas supply line for warming or heating... terminal or wire lead on both sides of this wall oven can also cause damage to the wall oven. 3. IMPORTANT SAFETY INSTRUCTIONS • Be sure your model, see the insert sheet included in a fire, electrical shock, or other personal injury. Prolonged use may be...
...the above could result in their absence, with CSA Standard C22.1, Canadian Electrical Code, Part 1, in electric oven models. Important Note to the Consumer Keep these installation instructions before connecting the electrical supply to the wall oven. • Never use a gas supply line for warming or heating... terminal or wire lead on both sides of this wall oven can also cause damage to the wall oven. 3. IMPORTANT SAFETY INSTRUCTIONS • Be sure your model, see the insert sheet included in a fire, electrical shock, or other personal injury. Prolonged use may be...
Installation Instructions (All Languages)
Page 4
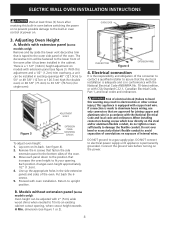
...9cm) to 50" or 49 7/8" (127cm or 126.7cm) high (for double oven) or 28 1/8" (71.4cm) to assure that are approved for single oven). Models with extension panel (some models only): Oven height can be adjusted with 2" (5cm) wide wood shims when needed to aluminum house...and a 1/2" (1.2cm) trim overhang, a unit can be installed in the side extension panels and sides of electrical shock (Failure to damage the flexible conduit. ELECTRIC WALL OVEN INSTALLATION INSTRUCTIONS Wait at least three (3) hours after it has been installed in electrocution or other serious injury.) ...
...9cm) to 50" or 49 7/8" (127cm or 126.7cm) high (for double oven) or 28 1/8" (71.4cm) to assure that are approved for single oven). Models with extension panel (some models only): Oven height can be adjusted with 2" (5cm) wide wood shims when needed to aluminum house...and a 1/2" (1.2cm) trim overhang, a unit can be installed in the side extension panels and sides of electrical shock (Failure to damage the flexible conduit. ELECTRIC WALL OVEN INSTALLATION INSTRUCTIONS Wait at least three (3) hours after it has been installed in electrocution or other serious injury.) ...
Installation Instructions (All Languages)
Page 5
...White Wire (Neutral) U.L.-Listed Conduit Connector (or CSA listed) Cable from appliance Connector (or Figure 6 CSA listed) 4-WIRE GROUNDED JUNCTION BOX Model and Serial Number Location The serial plate is manufactured with a white neutral power supply and a frame connected copper wire. Cable from Power Supply...white) wire, the appliance frame MUST NOT be sure to branch circuit-neutral conductor in usual manner see figure 5): 1. ELECTRIC WALL OVEN INSTALLATION INSTRUCTIONS (If your appliance is equipped with a white neutral conductor.) This appliance is located along the side of the...
...White Wire (Neutral) U.L.-Listed Conduit Connector (or CSA listed) Cable from appliance Connector (or Figure 6 CSA listed) 4-WIRE GROUNDED JUNCTION BOX Model and Serial Number Location The serial plate is manufactured with a white neutral power supply and a frame connected copper wire. Cable from Power Supply...white) wire, the appliance frame MUST NOT be sure to branch circuit-neutral conductor in usual manner see figure 5): 1. ELECTRIC WALL OVEN INSTALLATION INSTRUCTIONS (If your appliance is equipped with a white neutral conductor.) This appliance is located along the side of the...
Installation Instructions (All Languages)
Page 8
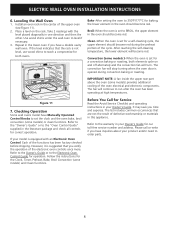
...Control Knobs to set to the "Oven Control Guide" supplied in one direction and then the other. Checking Operation Some wall ovens model have a double cavity wall oven. Refer to the "Owner's Guide" or to BROIL, the upper element in the oven should become red during convection baking ... need to 350°F/177°C for our toll-free service number and address. Convection (some models) provides additional cooling of the cycle. The fan will turn. ELECTRIC WALL OVEN INSTALLATION INSTRUCTIONS 6. Leveling the Wall Oven 1. Before You Call for a convection baking or roasting, both...
...Control Knobs to set to the "Oven Control Guide" supplied in one direction and then the other. Checking Operation Some wall ovens model have a double cavity wall oven. Refer to the "Owner's Guide" or to BROIL, the upper element in the oven should become red during convection baking ... need to 350°F/177°C for our toll-free service number and address. Convection (some models) provides additional cooling of the cycle. The fan will turn. ELECTRIC WALL OVEN INSTALLATION INSTRUCTIONS 6. Leveling the Wall Oven 1. Before You Call for a convection baking or roasting, both...
Timer Guide (Timer Guide)
Page 1
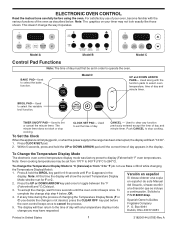
... timer does not start or stop cooking. Push CANCEL to select the bake function. C) you may have requested. Frigidaire Company 5. Used along with the various functions of the oven as described below , OR; 4. TIMER ON/OFF PAD- CLOCK SET PAD- To Set the Clock When the appliance... FOUR Broil Griller Timer On/Off Minuterie Clock Clear/Off Horloge Annuler Model A BROIL GRIL TIMER ON/OFF CLOCK MINUTERIE HORLOGE STOP ARRÊT Model B BROIL GRILLER TIMER ON/OFF MINUTERIE CLOCK HORLOGE CANCEL ANNULER Model C Control Pad Functions Note: The time of day. BAKE PAD-...
... timer does not start or stop cooking. Push CANCEL to select the bake function. C) you may have requested. Frigidaire Company 5. Used along with the various functions of the oven as described below , OR; 4. TIMER ON/OFF PAD- CLOCK SET PAD- To Set the Clock When the appliance... FOUR Broil Griller Timer On/Off Minuterie Clock Clear/Off Horloge Annuler Model A BROIL GRIL TIMER ON/OFF CLOCK MINUTERIE HORLOGE STOP ARRÊT Model B BROIL GRILLER TIMER ON/OFF MINUTERIE CLOCK HORLOGE CANCEL ANNULER Model C Control Pad Functions Note: The time of day. BAKE PAD-...


