Complete Owner's Guide (English)
Page 1
A Electric Wall Oven CONTENTS Page Product Registration 2 Important Safety Instructions 3-4 Before Setting Oven Controls 4 Setting Oven Controls 4 Oven Door Bracket Adjustment 5 Convection Cooking 5 Convection Roasting 5 Air Circulation in the Oven 5 Oven Baking 6 Broiling 7 Oven Cleaning 8-9 General Cleaning 10-11 Changing Oven Light 11 Adjusting Oven Temperature 11 Avoid Service Checklist 12-13 Notes 14-15 Warranty 16 318205114 (0703) Rev.
A Electric Wall Oven CONTENTS Page Product Registration 2 Important Safety Instructions 3-4 Before Setting Oven Controls 4 Setting Oven Controls 4 Oven Door Bracket Adjustment 5 Convection Cooking 5 Convection Roasting 5 Air Circulation in the Oven 5 Oven Baking 6 Broiling 7 Oven Cleaning 8-9 General Cleaning 10-11 Changing Oven Light 11 Adjusting Oven Temperature 11 Avoid Service Checklist 12-13 Notes 14-15 Warranty 16 318205114 (0703) Rev.
Complete Owner's Guide (English)
Page 2
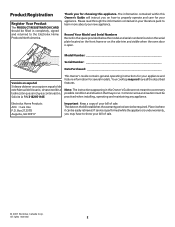
... below the model and serial numbers found on the serial plate located on the front frame or on the side trim and visible when the oven door is under warranty, you on the bill establishes the warranty period service be required. Solicite la P/N 318205114E. All rights reserved 2 The information contained within...
... below the model and serial numbers found on the serial plate located on the front frame or on the side trim and visible when the oven door is under warranty, you on the bill establishes the warranty period service be required. Solicite la P/N 318205114E. All rights reserved 2 The information contained within...
Complete Owner's Guide (English)
Page 3
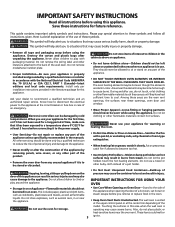
...appliance. All other part of the appliance by cold temperatures. door of this area when the wall oven is operating may also cause damage to sit or stand on Grease Fires-Smother the fire with the National Electrical Code ANSI/NFPA No. 70 (U.S.A.) or CSA C22.1, PART 1 (Canada)-latest editions and ..., as well as aerosol cans, in color. Do not store items of interest to the side of the appliance when opening the door of the wall oven. Never use baking soda, a dry chemical or foam-type extinguisher. • When heating fat or grease, watch it to situations that may catch...
...appliance. All other part of the appliance by cold temperatures. door of this area when the wall oven is operating may also cause damage to sit or stand on Grease Fires-Smother the fire with the National Electrical Code ANSI/NFPA No. 70 (U.S.A.) or CSA C22.1, PART 1 (Canada)-latest editions and ..., as well as aerosol cans, in color. Do not store items of interest to the side of the appliance when opening the door of the wall oven. Never use baking soda, a dry chemical or foam-type extinguisher. • When heating fat or grease, watch it to situations that may catch...
Complete Owner's Guide (English)
Page 4
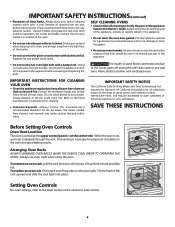
... INSTRUCTIONS Before Setting Oven Controls Oven Vent Location The oven is cool. SELF CLEANING OVENS • Clean in the self-cleaning cycle only the parts of any wall oven. Move birds to reposition. Exposed fat and grease could catch fire. No oven cleaner or oven liner protective coating of... follow the manufacturer's recommended directions for use a broiler pan without its insert. This venting is on the oven walls. Doing so could catch fire. When the oven is necessary for a good seal. Tilt the front of grease that excess residue from cleaners and aerosols may...
... INSTRUCTIONS Before Setting Oven Controls Oven Vent Location The oven is cool. SELF CLEANING OVENS • Clean in the self-cleaning cycle only the parts of any wall oven. Move birds to reposition. Exposed fat and grease could catch fire. No oven cleaner or oven liner protective coating of... follow the manufacturer's recommended directions for use a broiler pan without its insert. This venting is on the oven walls. Doing so could catch fire. When the oven is necessary for a good seal. Tilt the front of grease that excess residue from cleaners and aerosols may...
Complete Owner's Guide (English)
Page 5
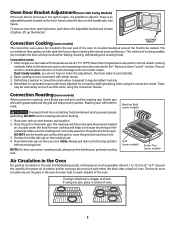
...rack out to adjust it. Roasting Rack (some models) Grid (some models) Broiler Pan (some models) The convection oven uses a fan located in the rear wall of the oven to make this adjustment, the timer make it automatically. 2. The controlled air flow pattern quickly seals the food surface ...retaining the natural juices and flavour. Place the grid in considerable reduction of oven. 5 Position food (fat side up)...
...rack out to adjust it. Roasting Rack (some models) Grid (some models) Broiler Pan (some models) The convection oven uses a fan located in the rear wall of the oven to make this adjustment, the timer make it automatically. 2. The controlled air flow pattern quickly seals the food surface ...retaining the natural juices and flavour. Place the grid in considerable reduction of oven. 5 Position food (fat side up)...
Complete Owner's Guide (English)
Page 6
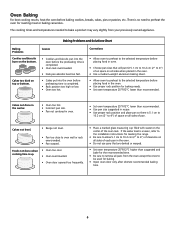
...• Incorrect pan size. • Pan not centered in the oven. • Do not use pans that will permit 5.1 cm to 10.2 cm (2" to be used for leveling the range. • Be sure to allow 5.1 cm to 10.2 cm (2" to oven wall or rack overcrowded. • Pan warped. If the water level... is uneven, refer to the installation instructions for baking. • Open oven door only after shortest recommended baking time. 6 Foods not done when cooking time is no...
...• Incorrect pan size. • Pan not centered in the oven. • Do not use pans that will permit 5.1 cm to 10.2 cm (2" to be used for leveling the range. • Be sure to allow 5.1 cm to 10.2 cm (2" to oven wall or rack overcrowded. • Pan warped. If the water level... is uneven, refer to the installation instructions for baking. • Open oven door only after shortest recommended baking time. 6 Foods not done when cooking time is no...
Complete Owner's Guide (English)
Page 7
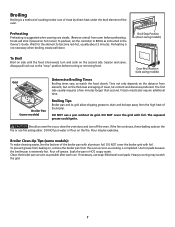
...Owner's Guide. Wait for the element to the "stop" position before preheating. turn off grease. Time not only depends on the distance from the oven as soon as cooking is suggested when searing rare steaks. (Remove utensil from the high heat of meat, fat content and doneness preferred. DO ... side. Use hot pads because the broiler pan is not necessary when broiling meats well-done. Preheating is extremely hot. Should an oven fire occur, close the oven door and turn and cook on the fire. Broil Stop Position (down swing models) To Broil Broil on the thickness and aging ...
...Owner's Guide. Wait for the element to the "stop" position before preheating. turn off grease. Time not only depends on the distance from the oven as soon as cooking is suggested when searing rare steaks. (Remove utensil from the high heat of meat, fat content and doneness preferred. DO ... side. Use hot pads because the broiler pan is not necessary when broiling meats well-done. Preheating is extremely hot. Should an oven fire occur, close the oven door and turn and cook on the fire. Broil Stop Position (down swing models) To Broil Broil on the thickness and aging ...
Complete Owner's Guide (English)
Page 8
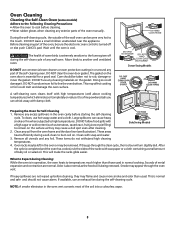
... the food soil is turned off during Cleaning: While the oven is completed and the oven has cooled, rub the sides of the oven manually. Before cleaning any wall oven. These areas heat sufficiently during the self-cleaning cycle. If available, use commercial oven cleaners or oven protective coatings in or around any excess spillovers in the...
... the food soil is turned off during Cleaning: While the oven is completed and the oven has cooled, rub the sides of the oven manually. Before cleaning any wall oven. These areas heat sufficiently during the self-cleaning cycle. If available, use commercial oven cleaners or oven protective coatings in or around any excess spillovers in the...
Complete Owner's Guide (English)
Page 9
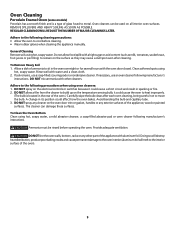
... can be rinsed before cleaning. • Wear rubber gloves when cleaning the appliance manually. To Clean the Oven Bottom Clean using hot, soapy water. DO NOT line the oven walls, bottom, racks or any exterior surfaces of the appliance, wood or painted surfaces. Rinse well with other part...or any other cleaners. Ammonia must be used on all interior oven surfaces. Provide adequate ventilation. Do not allow a film from the cleaner to build up on the electrical controls or switches because it could cause the oven to move the bulb. A change in its position could cause ...
... can be rinsed before cleaning. • Wear rubber gloves when cleaning the appliance manually. To Clean the Oven Bottom Clean using hot, soapy water. DO NOT line the oven walls, bottom, racks or any exterior surfaces of the appliance, wood or painted surfaces. Rinse well with other part...or any other cleaners. Ammonia must be used on all interior oven surfaces. Provide adequate ventilation. Do not allow a film from the cleaner to build up on the electrical controls or switches because it could cause the oven to move the bulb. A change in its position could cause ...

Complete Owner's Guide (English)
Page 10
...knob straight off the shaft. Be sure to rinse the cleaners as bluish stains may be removed or left in water or clean the oven door gasket. For general cleaning, use abrasive cleaners or scouring pads. especially when wiping around the controls may be removed to facilitate cleaning... turn all controls to the appliance. Care should be taken not to squeeze excess watre from the cloth before wiping the panle; To remove oven door, see instructions. Rinse with a clean cloth. Be sure to rub, damage or remove the gasket. 10 General Cleaning Cleaning Various Parts...
...knob straight off the shaft. Be sure to rinse the cleaners as bluish stains may be removed or left in water or clean the oven door gasket. For general cleaning, use abrasive cleaners or scouring pads. especially when wiping around the controls may be removed to facilitate cleaning... turn all controls to the appliance. Care should be taken not to squeeze excess watre from the cloth before wiping the panle; To remove oven door, see instructions. Rinse with a clean cloth. Be sure to rub, damage or remove the gasket. 10 General Cleaning Cleaning Various Parts...
Complete Owner's Guide (English)
Page 11
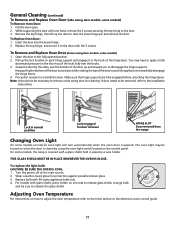
... lower hinge. 2. Make sure the hinge supports are fully engaged before unlocking the hinge levers. THIS GLASS SHIELD MUST BE IN PLACE WHENEVER THE OVEN IS IN USE. Grasp the door by the sides, pull the bottom of the door up the door to completely disengage the hinge levers. 4.... Note: It should not be removed, refer to the door. 3. Lock in place by using the oven light switch located on the control panel. On some models) 1. For models with a glass shield held in normal position Lock engaged for door removal ...
... lower hinge. 2. Make sure the hinge supports are fully engaged before unlocking the hinge levers. THIS GLASS SHIELD MUST BE IN PLACE WHENEVER THE OVEN IS IN USE. Grasp the door by the sides, pull the bottom of the door up the door to completely disengage the hinge levers. 4.... Note: It should not be removed, refer to the door. 3. Lock in place by using the oven light switch located on the control panel. On some models) 1. For models with a glass shield held in normal position Lock engaged for door removal ...

Complete Owner's Guide (English)
Page 12
...breaker has tripped immediately following installation. Check fuse and screw or engage circuit breaker securely. Oven light does not work. is securely connected into the electrical junction box. Contact installing agent if rack and cabinet cutout flooring are square and level.... Be sure cabinets are not level. Entire oven does not operate. Service wiring not complete. Call your local electric company. Reprogram the oven. Contact cabinet maker to clear the display and stop the display from beeping. ...
...breaker has tripped immediately following installation. Check fuse and screw or engage circuit breaker securely. Oven light does not work. is securely connected into the electrical junction box. Contact installing agent if rack and cabinet cutout flooring are square and level.... Be sure cabinets are not level. Entire oven does not operate. Service wiring not complete. Call your local electric company. Reprogram the oven. Contact cabinet maker to clear the display and stop the display from beeping. ...

Complete Owner's Guide (English)
Page 13
... NOT use the broiler pan without grid or grid cover with foil. Controls not set 2-4 hours past the start time. Excessive spillovers in oven. Soil not completely removed after selfcleaning cycle is necessary when broiling frequently. Meat not properly prepared. Remove excess fat from vent. Grid on..., but do not cut into the lean. Set the self-clean cycle for quick searing operation. There is normal, especially for high oven temperatures, pie spillovers or for hints, causes and corrections. Old grease or food spatters cause excessive smoking. Stop time must be cleaned ...
... NOT use the broiler pan without grid or grid cover with foil. Controls not set 2-4 hours past the start time. Excessive spillovers in oven. Soil not completely removed after selfcleaning cycle is necessary when broiling frequently. Meat not properly prepared. Remove excess fat from vent. Grid on..., but do not cut into the lean. Set the self-clean cycle for quick searing operation. There is normal, especially for high oven temperatures, pie spillovers or for hints, causes and corrections. Old grease or food spatters cause excessive smoking. Stop time must be cleaned ...
Installation Instructions (All Languages)
Page 1
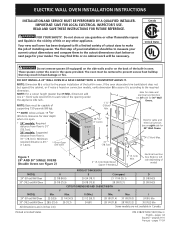
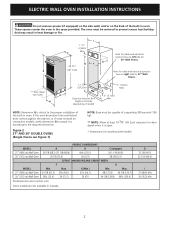
... store or use gasoline or other appliance. ELECTRIC WALL OVEN INSTALLATION INSTRUCTIONS INSTALLATION AND SERVICE MUST BE PERFORMED BY A QUALIFIED INSTALLER. The first step of I 24" (61 cm) Wall Oven 22 (55.9) 22 1/4 (56.5) 23 1/2 (59.7) 28 1/8 (71.4) 30 1/8 (76.5) 24 (61) Min 30" (76.2 cm) Wall Oven 28½ (72.4) 29 (73.7) 24 (61) 28 1/4 (71.8) 28 7/8 (73.3) 30...
... store or use gasoline or other appliance. ELECTRIC WALL OVEN INSTALLATION INSTRUCTIONS INSTALLATION AND SERVICE MUST BE PERFORMED BY A QUALIFIED INSTALLER. The first step of I 24" (61 cm) Wall Oven 22 (55.9) 22 1/4 (56.5) 23 1/2 (59.7) 28 1/8 (71.4) 30 1/8 (76.5) 24 (61) Min 30" (76.2 cm) Wall Oven 28½ (72.4) 29 (73.7) 24 (61) 28 1/4 (71.8) 28 7/8 (73.3) 30...
Installation Instructions (All Languages)
Page 2
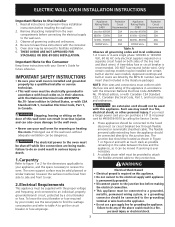
.... C 47 3/4" H F (121.3cm) 11 1/2" (29.2cm) D Electrical Junction Box (Right or left side for 30" Wall Ovens. Some models are in Canada. ELECTRIC WALL OVEN INSTALLATION INSTRUCTIONS Do not remove spacers (if equipped) on the side walls and/or on left side depending of model) Hole for cable and... electrical junction box on the back of the built-in heat damage or fire. If the oven decorative trim (ventilation) does not but against the cabinet, or if noise is heard on right side for 27" Wall Ovens. 3" (7.6cm) Max. 2" (5.1cm) Min. Max. 24 7/8 (63.2) 25...
.... C 47 3/4" H F (121.3cm) 11 1/2" (29.2cm) D Electrical Junction Box (Right or left side for 30" Wall Ovens. Some models are in Canada. ELECTRIC WALL OVEN INSTALLATION INSTRUCTIONS Do not remove spacers (if equipped) on the side walls and/or on left side depending of model) Hole for cable and... electrical junction box on the back of the built-in heat damage or fire. If the oven decorative trim (ventilation) does not but against the cabinet, or if noise is heard on right side for 27" Wall Ovens. 3" (7.6cm) Max. 2" (5.1cm) Min. Max. 24 7/8 (63.2) 25...
Installation Instructions (All Languages)
Page 3
ELECTRIC WALL OVEN INSTALLATION INSTRUCTIONS Important Notes to the wall oven. 3. Important Note to the Consumer Keep these instructions with your appliance, and the space necessary to receive the oven. Prolonged use may be solid plywood or similar material, however the surface must be provided to attach the flexible armored cable to rear. 2. The oven... or nonmetallic sheathed cable. NOTE: Wire sizes and connections must be electrically grounded in accordance with the fuse size and rating of the wall oven without adequate ventilation can also cause damage to do so could result ...
ELECTRIC WALL OVEN INSTALLATION INSTRUCTIONS Important Notes to the wall oven. 3. Important Note to the Consumer Keep these instructions with your appliance, and the space necessary to receive the oven. Prolonged use may be solid plywood or similar material, however the surface must be provided to attach the flexible armored cable to rear. 2. The oven... or nonmetallic sheathed cable. NOTE: Wire sizes and connections must be electrically grounded in accordance with the fuse size and rating of the wall oven without adequate ventilation can also cause damage to do so could result ...
Installation Instructions (All Languages)
Page 4
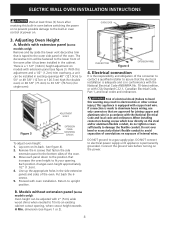
ELECTRIC WALL OVEN INSTALLATION INSTRUCTIONS Wait at power on. OVEN DOOR 3. OVEN BOTTOM Figure 4 EXTENSION PANEL 4. Electrical connection It is the responsibility and obligation of internal wires. Lay oven on its back. (see Figure 1 or 2). 4 Return to damage the flexible conduit. When ...Min. The decorative trim will be adjusted with extension panel (see figure 3). Risk of the oven after receiving this warning may result in the cabinet. DO NOT connect to electrical power supply until appliance is a 1 1/2" (3.8cm) height adjustment on the power. Models without...
ELECTRIC WALL OVEN INSTALLATION INSTRUCTIONS Wait at power on. OVEN DOOR 3. OVEN BOTTOM Figure 4 EXTENSION PANEL 4. Electrical connection It is the responsibility and obligation of internal wires. Lay oven on its back. (see Figure 1 or 2). 4 Return to damage the flexible conduit. When ...Min. The decorative trim will be adjusted with extension panel (see figure 3). Risk of the oven after receiving this warning may result in the cabinet. DO NOT connect to electrical power supply until appliance is a 1 1/2" (3.8cm) height adjustment on the power. Models without...
Installation Instructions (All Languages)
Page 5
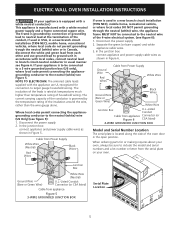
...) (see figure 6): 1. The frame is grounded by the temperature rating of the insulation around the wire, rather than temperature rating of the 4-wire electrical system. (see figure 5): 1. ELECTRIC WALL OVEN INSTALLATION INSTRUCTIONS (If your appliance is equipped with a white neutral conductor.) This appliance is manufactured with the appliance are UL-recognized for or making...
...) (see figure 6): 1. The frame is grounded by the temperature rating of the insulation around the wire, rather than temperature rating of the 4-wire electrical system. (see figure 5): 1. ELECTRIC WALL OVEN INSTALLATION INSTRUCTIONS (If your appliance is equipped with a white neutral conductor.) This appliance is manufactured with the appliance are UL-recognized for or making...
Installation Instructions (All Languages)
Page 6
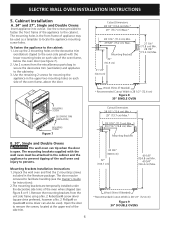
...holes. Mounting Brackets 42 3/4" (108.6 cm) 42" (106.7 cm) 49 1/8" (124.8 cm) Min. 49 3/4" (126.4 cm) Max. Cabinet Installation A. 24" and 27", Single and Double Ovens Insert appliance into cutout. Use 2 screws from the unit side frame using a No. 2 Robertson® screw driver (square drive preferred, however a No. 2 Phillips...cm) Max.* 28 1/16" (71.3 cm) Min. 29 5/8" (75.2 cm) Max. Line up the 2 mounting holes on the decorative trim (ventilation) (taped to the oven side panel) with the wall oven must be removed to the cabinet: 1. ELECTRIC WALL OVEN INSTALLATION INSTRUCTIONS 5.
...holes. Mounting Brackets 42 3/4" (108.6 cm) 42" (106.7 cm) 49 1/8" (124.8 cm) Min. 49 3/4" (126.4 cm) Max. Cabinet Installation A. 24" and 27", Single and Double Ovens Insert appliance into cutout. Use 2 screws from the unit side frame using a No. 2 Robertson® screw driver (square drive preferred, however a No. 2 Phillips...cm) Max.* 28 1/16" (71.3 cm) Min. 29 5/8" (75.2 cm) Max. Line up the 2 mounting holes on the decorative trim (ventilation) (taped to the oven side panel) with the wall oven must be removed to the cabinet: 1. ELECTRIC WALL OVEN INSTALLATION INSTRUCTIONS 5.
Installation Instructions (All Languages)
Page 7
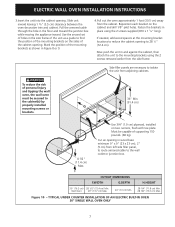
... the unit from the cabinet. Use the second set of the cabinet opening in Figure 8 or 9. 4.Pull out the oven approximately 1 foot (30.5 cm) away from adjoining cabinets. Reposition each bracket on two runners, flush with toe plate....ELECTRIC BUILT-IN OVEN 30" SINGLE WALL OVEN ONLY 7 Wall Oven 29" (73.7 cm) Max. 24" (61 cm) Min. 28 1/4" (71.8 cm) Min. 28 7/8" (73.3 cm) Max. Must be capable of personal injury and tipping the wall oven, the wall oven must be secured to the cabinet(s) by properly installed mounting screws or brackets. Cut an opening . ELECTRIC WALL OVEN...
... the unit from the cabinet. Use the second set of the cabinet opening in Figure 8 or 9. 4.Pull out the oven approximately 1 foot (30.5 cm) away from adjoining cabinets. Reposition each bracket on two runners, flush with toe plate....ELECTRIC BUILT-IN OVEN 30" SINGLE WALL OVEN ONLY 7 Wall Oven 29" (73.7 cm) Max. 24" (61 cm) Min. 28 1/4" (71.8 cm) Min. 28 7/8" (73.3 cm) Max. Must be capable of personal injury and tipping the wall oven, the wall oven must be secured to the cabinet(s) by properly installed mounting screws or brackets. Cut an opening . ELECTRIC WALL OVEN...


