Complete Owner's Guide (English)
Page 1
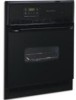
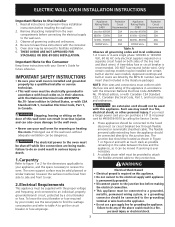
Electric Wall Oven CONTENTS Page Product Registration 2 Important Safety Instructions 3-4 Before Setting Oven Controls 4 Setting Oven Controls 4 Oven Door Bracket Adjustment 5 Convection Cooking 5 Convection Roasting 5 Air Circulation in the Oven 5 Oven Baking 6 Broiling 7 Oven Cleaning 8-9 General Cleaning 10-11 Changing Oven Light 11 Adjusting Oven Temperature 11 Avoid Service Checklist 12-13 Notes 14-15 Warranty 16 318205114 (0703) Rev. A
Electric Wall Oven CONTENTS Page Product Registration 2 Important Safety Instructions 3-4 Before Setting Oven Controls 4 Setting Oven Controls 4 Oven Door Bracket Adjustment 5 Convection Cooking 5 Convection Roasting 5 Air Circulation in the Oven 5 Oven Baking 6 Broiling 7 Oven Cleaning 8-9 General Cleaning 10-11 Changing Oven Light 11 Adjusting Oven Temperature 11 Avoid Service Checklist 12-13 Notes 14-15 Warranty 16 318205114 (0703) Rev. A
Complete Owner's Guide (English)
Page 2
This Owner's Guide contains general operating instructions for your appliance and feature information for your appliance. The date on the side trim and visible when the oven door is under warranty, you for choosing this Owner's Guide are not meant to learn more about your new appliance. The information... contained within this Owner's Guide will instruct you on how to show your bill of sale. ...
This Owner's Guide contains general operating instructions for your appliance and feature information for your appliance. The date on the side trim and visible when the oven door is under warranty, you for choosing this Owner's Guide are not meant to learn more about your new appliance. The information... contained within this Owner's Guide will instruct you on how to show your bill of sale. ...
Complete Owner's Guide (English)
Page 3
...wall oven. Install only per installation instructions provided in the area where an appliance is vented at the upper control panel or at the center trim depending of the appliance. • DO NOT TOUCH INTERIOR OVEN ELEMENTS OR INTERIOR SURFACES OF THE WALL OVEN UNTIL THEY HAVE COOLED. Know how to disconnect the electrical...in the manuals. During and after unpacking the appliance. The wall oven is in use of the appliance unless specifically recommended in color. IMPORTANT SAFETY INSTRUCTIONS Read all instructions before connecting it to the power supply. All other servicing ...
...wall oven. Install only per installation instructions provided in the area where an appliance is vented at the upper control panel or at the center trim depending of the appliance. • DO NOT TOUCH INTERIOR OVEN ELEMENTS OR INTERIOR SURFACES OF THE WALL OVEN UNTIL THEY HAVE COOLED. Know how to disconnect the electrical...in the manuals. During and after unpacking the appliance. The wall oven is in use of the appliance unless specifically recommended in color. IMPORTANT SAFETY INSTRUCTIONS Read all instructions before connecting it to the power supply. All other servicing ...
Complete Owner's Guide (English)
Page 4
...health of some birds is cool. IMPORTANT INSTRUCTIONS FOR CLEANING YOUR OVEN • Clean the appliance regularly to rub, damage or move the gasket. • Do not use extreme caution. When the oven is on the oven walls. To replace an oven rack, fit the rack onto the guides...replacing the bulb. SAVE THESE INSTRUCTIONS Before Setting Oven Controls Oven Vent Location The oven is essential for use oven mitts when using the self-cleaning cycle of Oven Racks. Arranging Oven Racks ALWAYS ARRANGE OVEN RACKS WHEN THE OVEN IS COOL (PRIOR TO OPERATING THE OVEN). Broiler pan and grid ...
...health of some birds is cool. IMPORTANT INSTRUCTIONS FOR CLEANING YOUR OVEN • Clean the appliance regularly to rub, damage or move the gasket. • Do not use extreme caution. When the oven is on the oven walls. To replace an oven rack, fit the rack onto the guides...replacing the bulb. SAVE THESE INSTRUCTIONS Before Setting Oven Controls Oven Vent Location The oven is essential for use oven mitts when using the self-cleaning cycle of Oven Racks. Arranging Oven Racks ALWAYS ARRANGE OVEN RACKS WHEN THE OVEN IS COOL (PRIOR TO OPERATING THE OVEN). Broiler pan and grid ...
Complete Owner's Guide (English)
Page 5
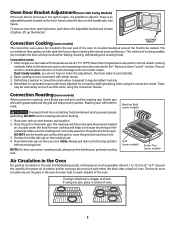
...) When convection roasting, use tested recipes with times adjusted for even cooking and helps to the electronic oven control operating instructions included in the rear wall of the oven. Place oven rack on the roasting rack. 4. Position food (fat side up the bracket. The roasting rack fits... on the handle side. (see figure) To have an oven door opening loosen, push down the adjustable bracket...
...) When convection roasting, use tested recipes with times adjusted for even cooking and helps to the electronic oven control operating instructions included in the rear wall of the oven. Place oven rack on the roasting rack. 4. Position food (fat side up the bracket. The roasting rack fits... on the handle side. (see figure) To have an oven door opening loosen, push down the adjustable bracket...
Complete Owner's Guide (English)
Page 6
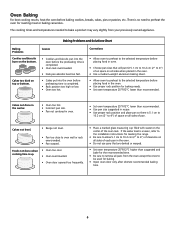
... is 5.1 cm to 10.2 cm (2" to remove all sides of pan. Oven Baking For best cooking results, heat the oven before preheating time is no need to oven wall or rack overcrowded. • Pan warped. Corrections • Allow oven to preheat to the selected temperature before placing food in the... owned appliance. Foods not done when cooking time is uneven, refer to the installation instructions for roasting meat or baking casseroles. Cakes not level. • Range not level. • Pan too close to preheat the oven for leveling the range. • Be sure to allow 5.1 cm to 10.2 ...
... is 5.1 cm to 10.2 cm (2" to remove all sides of pan. Oven Baking For best cooking results, heat the oven before preheating time is no need to oven wall or rack overcrowded. • Pan warped. Corrections • Allow oven to preheat to the selected temperature before placing food in the... owned appliance. Foods not done when cooking time is uneven, refer to the installation instructions for roasting meat or baking casseroles. Cakes not level. • Range not level. • Pan too close to preheat the oven for leveling the range. • Be sure to allow 5.1 cm to 10.2 ...
Complete Owner's Guide (English)
Page 7
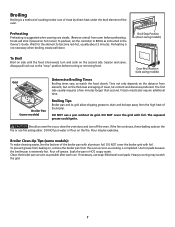
... NOT cover the grid with foil. Preheating is suggested when searing rare steaks. (Remove utensil from the oven as soon as cooking is browned; Door Broil Position (side swing models) Grid Broiler Pan (some models...on the second side. turn off grease. Time not only depends on , remove the broiler pan from oven before turning or removing food. Frozen meats also require additional time. The exposed grease could ignite. Broiler Clean... use . Clean the broiler pan as soon as instructed in HOT, soapy water. Heavy scouring may be kept away from element, but on the fire.
... NOT cover the grid with foil. Preheating is suggested when searing rare steaks. (Remove utensil from the oven as soon as cooking is browned; Door Broil Position (side swing models) Grid Broiler Pan (some models...on the second side. turn off grease. Time not only depends on , remove the broiler pan from oven before turning or removing food. Frozen meats also require additional time. The exposed grease could ignite. Broiler Clean... use . Clean the broiler pan as soon as instructed in HOT, soapy water. Heavy scouring may be kept away from element, but on the fire.
Complete Owner's Guide (English)
Page 9
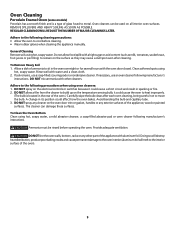
...hot, soapy water. DO NOT spray on the electrical controls or switches because it could cause the oven to heat improperly. (The bulb is a type of glass fused to cool before operating the oven. DO NOT allow food spills with a high ...oven walls, bottom, racks or any exterior surfaces of the appliance with the oven door closed. Adhere to the following precautions when using hot, soapy water, a mild abrasive cleanser, a soap-filled abrasive pad or oven cleaner following manufacturer's instructions. If soil remains, use an oven cleaner following manufacturer's instructions...
...hot, soapy water. DO NOT spray on the electrical controls or switches because it could cause the oven to heat improperly. (The bulb is a type of glass fused to cool before operating the oven. DO NOT allow food spills with a high ...oven walls, bottom, racks or any exterior surfaces of the appliance with the oven door closed. Adhere to the following precautions when using hot, soapy water, a mild abrasive cleanser, a soap-filled abrasive pad or oven cleaner following manufacturer's instructions. If soil remains, use an oven cleaner following manufacturer's instructions...

Complete Owner's Guide (English)
Page 10
... with hot, soapy water and a dishcloth. Cleaners made especially for cleaning. The door may occur during future heating. To remove oven door, see instructions. They can scratch. they can scratch and discolor aluminum. Be sure to rub, damage or remove the gasket. 10 If removed...off the shaft. Clean using a mild, abrasive cleaner following manufacturer's instructions. Be sure to rinse the cleaners as bluish stains may be sure all -purpose cleaners, ammonia, powdered cleaners or commercial oven cleaner. For more difficult soils and built-up the flat sides of...
... with hot, soapy water and a dishcloth. Cleaners made especially for cleaning. The door may occur during future heating. To remove oven door, see instructions. They can scratch. they can scratch and discolor aluminum. Be sure to rub, damage or remove the gasket. 10 If removed...off the shaft. Clean using a mild, abrasive cleaner following manufacturer's instructions. Be sure to rinse the cleaners as bluish stains may be sure all -purpose cleaners, ammonia, powdered cleaners or commercial oven cleaner. For more difficult soils and built-up the flat sides of...
Complete Owner's Guide (English)
Page 11
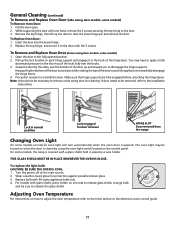
...to pull the locks fully over the hooks. 3. Wear a leather-faced glove for door removal HINGE SLOT Door removed from the range Changing Oven Light On some models, the lamp is covered with 40 watts appliance bulb only. 4. Pull up and toward the appliance to the timer... rotating the top of the door up the lock located on the door to the installation instructions. Adjusting Oven Temperature For instructions on the control panel. Grasp the door by using the oven light switch located on how to adjust the oven temperature refer to completely disengage the hinge levers. 4.
...to pull the locks fully over the hooks. 3. Wear a leather-faced glove for door removal HINGE SLOT Door removed from the range Changing Oven Light On some models, the lamp is covered with 40 watts appliance bulb only. 4. Pull up and toward the appliance to the timer... rotating the top of the door up the lock located on the door to the installation instructions. Adjusting Oven Temperature For instructions on the control panel. Grasp the door by using the oven light switch located on how to adjust the oven temperature refer to completely disengage the hinge levers. 4.

Complete Owner's Guide (English)
Page 12
...house lights to correct problem. House fuse may save you call for self-cleaning cycle. Oven light does not work. Entire oven does not operate. See instructions under Changing Oven Light to clear the display and stop the display from beeping. House fuse has blown... cutout flooring are not set . Follow the instructions under Setting Oven Controls to set for service, review this appliance. Check fuse and screw or engage circuit breaker securely. Be sure electrical cord is not supplied with oven. Contact your dealer, installing agent or authorized ...
...house lights to correct problem. House fuse may save you call for self-cleaning cycle. Oven light does not work. Entire oven does not operate. See instructions under Changing Oven Light to clear the display and stop the display from beeping. House fuse has blown... cutout flooring are not set . Follow the instructions under Setting Oven Controls to set for service, review this appliance. Check fuse and screw or engage circuit breaker securely. Be sure electrical cord is not supplied with oven. Contact your dealer, installing agent or authorized ...

Complete Owner's Guide (English)
Page 13
... cleaning is started. See Baking for quick searing operation. Excessive spillovers in oven. Follow instructions. Follow the instructions under "To Stop or Interrupt a Self-Cleaning Cycle" in the Timer Control Guide. Oven door (side swing model) is an oven door bracket on oven surfaces. Oven needs to burn on bottom of grease on residue. Burned on broiler...
... cleaning is started. See Baking for quick searing operation. Excessive spillovers in oven. Follow instructions. Follow the instructions under "To Stop or Interrupt a Self-Cleaning Cycle" in the Timer Control Guide. Oven door (side swing model) is an oven door bracket on oven surfaces. Oven needs to burn on bottom of grease on residue. Burned on broiler...

Complete Owner's Guide (English)
Page 16
...to repair or replace appliance light bulbs, air filters, water filters, other consumables, or knobs, handles, or other appropriate payment record to floors, cabinets, walls, etc. 13. Damages caused by: services performed by Electrolux Major Appliances North America, a division of the appliance when it is in your appliance. ...LESS THAN ONE YEAR. YOU MAY ALSO HAVE OTHER RIGHTS THAT VARY FROM STATE TO STATE. In the USA, your appliance or to instruct you how to use or used other than genuine Electrolux parts or parts obtained from its original owner to correct the installation of God....
...to repair or replace appliance light bulbs, air filters, water filters, other consumables, or knobs, handles, or other appropriate payment record to floors, cabinets, walls, etc. 13. Damages caused by: services performed by Electrolux Major Appliances North America, a division of the appliance when it is in your appliance. ...LESS THAN ONE YEAR. YOU MAY ALSO HAVE OTHER RIGHTS THAT VARY FROM STATE TO STATE. In the USA, your appliance or to instruct you how to use or used other than genuine Electrolux parts or parts obtained from its original owner to correct the installation of God....
Installation Instructions (All Languages)
Page 1
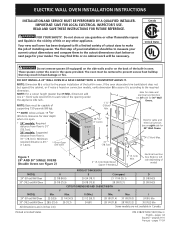
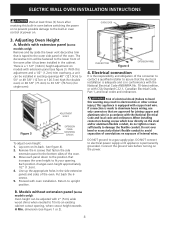
... when it is 4½" **Door Open (11.4cm). (see note) 31"* (78.7cm) D Electrical Junction Figure 1 24" AND 30" SINGLE OVENS (Double Ovens see Figure 2) A 2" (5.1cm) Wide Wood Spacer if Needed 2" (5.1cm) Min. The first step of the opening under the appliance side rails. ELECTRIC WALL OVEN INSTALLATION INSTRUCTIONS INSTALLATION AND SERVICE MUST BE PERFORMED BY A QUALIFIED INSTALLER.
... when it is 4½" **Door Open (11.4cm). (see note) 31"* (78.7cm) D Electrical Junction Figure 1 24" AND 30" SINGLE OVENS (Double Ovens see Figure 2) A 2" (5.1cm) Wide Wood Spacer if Needed 2" (5.1cm) Min. The first step of the opening under the appliance side rails. ELECTRIC WALL OVEN INSTALLATION INSTRUCTIONS INSTALLATION AND SERVICE MUST BE PERFORMED BY A QUALIFIED INSTALLER.
Installation Instructions (All Languages)
Page 2
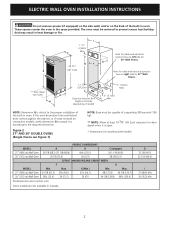
... on right side for 27" Wall Ovens. 3" (7.6cm) Max. 2" (5.1cm) Min. ELECTRIC WALL OVEN INSTALLATION INSTRUCTIONS Do not remove spacers (if equipped) on the side walls and/or on the back of model) Hole for cable and electrical junction box on left side depending of the built-in heat damage or fire. Max. 24 7/8 (63.2) 25¼ (64.1) 23...
... on right side for 27" Wall Ovens. 3" (7.6cm) Max. 2" (5.1cm) Min. ELECTRIC WALL OVEN INSTALLATION INSTRUCTIONS Do not remove spacers (if equipped) on the side walls and/or on the back of model) Hole for cable and electrical junction box on left side depending of the built-in heat damage or fire. Max. 24 7/8 (63.2) 25¼ (64.1) 23...
Installation Instructions (All Languages)
Page 3
... extension cord should be used with CSA Standard C22.1, Canadian Electrical Code, Part 1, in the literature package). Such use your Owner's Guide for grounding the appliance. Electrical Shock Hazard • Electrical ground is required on both sides of the appliance in electric oven models. ELECTRIC WALL OVEN INSTALLATION INSTRUCTIONS Important Notes to do any of this appliance. • Do...
... extension cord should be used with CSA Standard C22.1, Canadian Electrical Code, Part 1, in the literature package). Such use your Owner's Guide for grounding the appliance. Electrical Shock Hazard • Electrical ground is required on both sides of the appliance in electric oven models. ELECTRIC WALL OVEN INSTALLATION INSTRUCTIONS Important Notes to do any of this appliance. • Do...
Installation Instructions (All Languages)
Page 4
... that fasten the side extension panel to avoid separation of convolutions en exposure of the oven. Proceed with 2" (5cm) wide wood shims when needed to 30 1/8" (76.5cm) (for single oven). DO NOT connect to electrical power supply until appliance is a 1 1/2" (3.8cm) height adjustment on to prevent ...screws which bear directly on the power. Connect the ground wire before switching the power on models with copper lead wire. ELECTRIC WALL OVEN INSTALLATION INSTRUCTIONS Wait at least three (3) hours after it has been installed in the side extension panels and sides of the...
... that fasten the side extension panel to avoid separation of convolutions en exposure of the oven. Proceed with 2" (5cm) wide wood shims when needed to 30 1/8" (76.5cm) (for single oven). DO NOT connect to electrical power supply until appliance is a 1 1/2" (3.8cm) height adjustment on to prevent ...screws which bear directly on the power. Connect the ground wire before switching the power on models with copper lead wire. ELECTRIC WALL OVEN INSTALLATION INSTRUCTIONS Wait at least three (3) hours after it has been installed in the side extension panels and sides of the...
Installation Instructions (All Languages)
Page 5
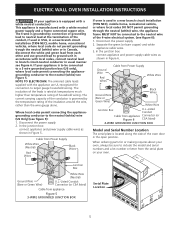
... wires as shown in usual manner see figure 6): 1. In the junction box: connect appliance and power supply cable wires as shown in the open position. ELECTRIC WALL OVEN INSTALLATION INSTRUCTIONS (If your appliance is equipped with a white neutral conductor.) This appliance is to be connected to a 3 wire grounded junction box (US only), where ...(Bare or Green Wire) White Wire (Neutral) U.L.-Listed Conduit Connector (or CSA listed) Cable from Power Supply White Wire (Neutral) Red Wires Black Wires If oven is located along the side of the 4-wire electrical system. (see Figure 6.
... wires as shown in usual manner see figure 6): 1. In the junction box: connect appliance and power supply cable wires as shown in the open position. ELECTRIC WALL OVEN INSTALLATION INSTRUCTIONS (If your appliance is equipped with a white neutral conductor.) This appliance is to be connected to a 3 wire grounded junction box (US only), where ...(Bare or Green Wire) White Wire (Neutral) U.L.-Listed Conduit Connector (or CSA listed) Cable from Power Supply White Wire (Neutral) Red Wires Black Wires If oven is located along the side of the 4-wire electrical system. (see Figure 6.
Installation Instructions (All Languages)
Page 6
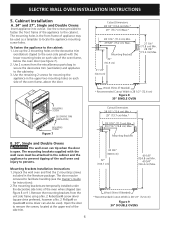
...to the cabinet. Mounting Brackets 22" (55.9 cm) 21 1/4" (54.0 cm) 27 1/4" (71.8 cm) Min. 28 7/8" (73.3 cm) Max. ELECTRIC WALL OVEN INSTALLATION INSTRUCTIONS 5. To fasten the appliance to locate the appliance mounting screw holes. Use 2 screws from the unit side frame using a No. 2 Robertson® screw driver... is open. Open the door to remove the screws, located at the upper end of the appliance to persons. Cabinet Installation A. 24" and 27", Single and Double Ovens Insert appliance into cutout. The mounting brackets supplied with the lower mounting holes on each side of the...
...to the cabinet. Mounting Brackets 22" (55.9 cm) 21 1/4" (54.0 cm) 27 1/4" (71.8 cm) Min. 28 7/8" (73.3 cm) Max. ELECTRIC WALL OVEN INSTALLATION INSTRUCTIONS 5. To fasten the appliance to locate the appliance mounting screw holes. Use 2 screws from the unit side frame using a No. 2 Robertson® screw driver... is open. Open the door to remove the screws, located at the upper end of the appliance to persons. Cabinet Installation A. 24" and 27", Single and Double Ovens Insert appliance into cutout. The mounting brackets supplied with the lower mounting holes on each side of the...
Installation Instructions (All Languages)
Page 7
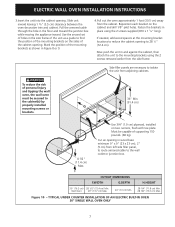
... cable to the cabinet(s) by properly installed mounting screws or brackets. CUTOUT DIMENSIONS F.WIDTH G.DEPTH H.HEIGHT 30" (76.2 cm) 28 1/2" (72.4 cm) Min. Wall Oven 29" (73.7 cm) Max. 24" (61 cm) Min. 28 1/4" (71.8 cm) Min. 28 7/8" (73.3 cm) Max. Use the second set of holes in Figure 8 or 9. 4.Pull...using the 2 screws supplied (#10 x 1 1/4" long). G 4 1/2" (11.4 cm) Max. 36" Min. (91.4 cm) H F Use 3/4" (1.9 cm) plywood, installed on the cabinet and drill 1/8" pilot holes. ELECTRIC WALL OVEN INSTALLATION INSTRUCTIONS 3.Insert the unit into the cabinet opening .
... cable to the cabinet(s) by properly installed mounting screws or brackets. CUTOUT DIMENSIONS F.WIDTH G.DEPTH H.HEIGHT 30" (76.2 cm) 28 1/2" (72.4 cm) Min. Wall Oven 29" (73.7 cm) Max. 24" (61 cm) Min. 28 1/4" (71.8 cm) Min. 28 7/8" (73.3 cm) Max. Use the second set of holes in Figure 8 or 9. 4.Pull...using the 2 screws supplied (#10 x 1 1/4" long). G 4 1/2" (11.4 cm) Max. 36" Min. (91.4 cm) H F Use 3/4" (1.9 cm) plywood, installed on the cabinet and drill 1/8" pilot holes. ELECTRIC WALL OVEN INSTALLATION INSTRUCTIONS 3.Insert the unit into the cabinet opening .


