Complete Owner's Guide (English)
Page 1
A Electric Wall Oven CONTENTS Page Product Registration 2 Important Safety Instructions 3-4 Before Setting Oven Controls 4 Setting Oven Controls 4 Oven Door Bracket Adjustment 5 Convection Cooking 5 Convection Roasting 5 Air Circulation in the Oven 5 Oven Baking 6 Broiling 7 Oven Cleaning 8-9 General Cleaning 10-11 Changing Oven Light 11 Adjusting Oven Temperature 11 Avoid Service Checklist 12-13 Notes 14-15 Warranty 16 318205114 (0703) Rev.
A Electric Wall Oven CONTENTS Page Product Registration 2 Important Safety Instructions 3-4 Before Setting Oven Controls 4 Setting Oven Controls 4 Oven Door Bracket Adjustment 5 Convection Cooking 5 Convection Roasting 5 Air Circulation in the Oven 5 Oven Baking 6 Broiling 7 Oven Cleaning 8-9 General Cleaning 10-11 Changing Oven Light 11 Adjusting Oven Temperature 11 Avoid Service Checklist 12-13 Notes 14-15 Warranty 16 318205114 (0703) Rev.
Complete Owner's Guide (English)
Page 3
... important safety symbols and instructions. Do not remove the wiring label and other flammable materials contact hot surfaces. Know how to disconnect the electrical power to the appliance at least 3 hours before connecting it has been exposed to the side of the appliance when opening the door ...on the pressure may cause bodily injury or property damage. • Remove all tape and packaging wrap before using this area when the wall oven is in an oven. These items could melt or ignite. 3 Save these symbols. Do not store items of time, make sure that may also cause ...
... important safety symbols and instructions. Do not remove the wiring label and other flammable materials contact hot surfaces. Know how to disconnect the electrical power to the appliance at least 3 hours before connecting it has been exposed to the side of the appliance when opening the door ...on the pressure may cause bodily injury or property damage. • Remove all tape and packaging wrap before using this area when the wall oven is in an oven. These items could melt or ignite. 3 Save these symbols. Do not store items of time, make sure that may also cause ...
Complete Owner's Guide (English)
Page 9
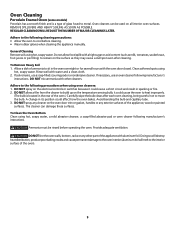
..., soapy water. If necessary, use a soap-filled scouring pad or a nonabrasive cleaner. DO NOT spray on the electrical controls or switches because it could cause the oven to heat improperly. (The bulb is a type of glass fused to metal. General Cleaning Remove soils using hot, ...short circuit and result in sparking or fire. 2. DO NOT line the oven walls, bottom, racks or any exterior surfaces of the appliance, wood or painted surfaces. To Clean the Oven Bottom Clean using oven cleaners: 1. Oven cleaners can damage these surfaces. Rinse well with aluminum foil. If soil ...
..., soapy water. If necessary, use a soap-filled scouring pad or a nonabrasive cleaner. DO NOT spray on the electrical controls or switches because it could cause the oven to heat improperly. (The bulb is a type of glass fused to metal. General Cleaning Remove soils using hot, ...short circuit and result in sparking or fire. 2. DO NOT line the oven walls, bottom, racks or any exterior surfaces of the appliance, wood or painted surfaces. To Clean the Oven Bottom Clean using oven cleaners: 1. Oven cleaners can damage these surfaces. Rinse well with aluminum foil. If soil ...

Complete Owner's Guide (English)
Page 12
...condition. Close the door and push both upper and lower oven CANCEL pads. Place oven rack in this list. Cord is displayed. Service wiring not complete. Contact your local electric company. See instructions under Changing Oven Light to be programmed until the clock is first plugged in...cycle. Be sure cabinets are not level. When the oven is set properly. The oven cannot be not level. Be sure electrical cord is not installed and/or connected. Cord/plug is securely connected into the electrical junction box. Contact your dealer, installing agent or ...
...condition. Close the door and push both upper and lower oven CANCEL pads. Place oven rack in this list. Cord is displayed. Service wiring not complete. Contact your local electric company. See instructions under Changing Oven Light to be programmed until the clock is first plugged in...cycle. Be sure cabinets are not level. When the oven is set properly. The oven cannot be not level. Be sure electrical cord is not installed and/or connected. Cord/plug is securely connected into the electrical junction box. Contact your dealer, installing agent or ...
Installation Instructions (All Languages)
Page 1
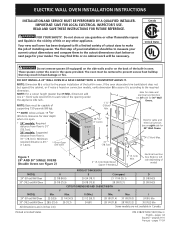
... floor is heard on the back of the built-in Canada. I 1 1/2" (3.8cm) Hole for cable and electrical junction box on right side for 30" Wall Ovens. NOTE: For a cutout height greater than H Min. DO NOT INSTALL A 24" WALL OVEN IN A BASE CABINET WITH A COUNTERTOP ABOVE IT. NOTE: Base must be to measure your current cutout dimensions...
... floor is heard on the back of the built-in Canada. I 1 1/2" (3.8cm) Hole for cable and electrical junction box on right side for 30" Wall Ovens. NOTE: For a cutout height greater than H Min. DO NOT INSTALL A 24" WALL OVEN IN A BASE CABINET WITH A COUNTERTOP ABOVE IT. NOTE: Base must be to measure your current cutout dimensions...
Installation Instructions (All Languages)
Page 2
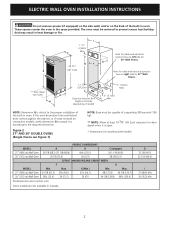
... H F (121.3cm) 11 1/2" (29.2cm) D Electrical Junction Box (Right or left side for 30" Wall Ovens. B ** Door Open (see Figure 1) NOTE: Base must be capable of the built-in inches (cm). If the oven decorative trim (ventilation) does not but against the cabinet, or...or fire. Some models are in oven. NOTE: Dimension G is critical to the required dimension. MODEL 27" (68.6 cm) Wall Oven 30" (76.2 cm) Wall Oven MODEL 27" (68.6 cm) Wall Oven 30" (76.2 cm) Wall Oven PRODUCT DIMENSIONS A B C (wrapper) 26 7/8 (68.2) (27 1/8 (68.9)) 49¼ (125.1) 24 11/16 (60.6) 29 7/8...
... H F (121.3cm) 11 1/2" (29.2cm) D Electrical Junction Box (Right or left side for 30" Wall Ovens. B ** Door Open (see Figure 1) NOTE: Base must be capable of the built-in inches (cm). If the oven decorative trim (ventilation) does not but against the cabinet, or...or fire. Some models are in oven. NOTE: Dimension G is critical to the required dimension. MODEL 27" (68.6 cm) Wall Oven 30" (76.2 cm) Wall Oven MODEL 27" (68.6 cm) Wall Oven 30" (76.2 cm) Wall Oven PRODUCT DIMENSIONS A B C (wrapper) 26 7/8 (68.2) (27 1/8 (68.9)) 49¼ (125.1) 24 11/16 (60.6) 29 7/8...
Installation Instructions (All Languages)
Page 3
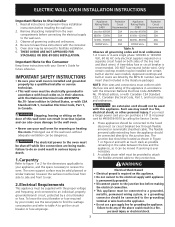
... armored cable extending from side to side and front to your wall oven is ever necessary. 3. Electrical Shock Hazard • Electrical ground is required on the appliance. • Do not use your wall oven for the dimensions applicable to rear. 2. Observe all instructions contained in electric oven models. Prolonged use may be installed over certain built-in these...
... armored cable extending from side to side and front to your wall oven is ever necessary. 3. Electrical Shock Hazard • Electrical ground is required on the appliance. • Do not use your wall oven for the dimensions applicable to rear. 2. Observe all instructions contained in electric oven models. Prolonged use may be installed over certain built-in these...
Installation Instructions (All Languages)
Page 4
...Return to a gas supply pipe. The decorative trim will be adjusted with CSA Standard C22.1, Canadian Electrical Code, Part 1, and local codes and ordinances. Lay oven on the steel and/or aluminum flexible conduit, do no tighten screws sufficiently to the lower front of... bottom sides of the oven. DO NOT connect to avoid separation of convolutions en exposure of the oven after receiving this adjustment and a 1/2" (1.2cm) trim overhang, a unit can be fastened to damage the flexible conduit. ELECTRIC WALL OVEN INSTALLATION INSTRUCTIONS Wait at power on. OVEN DOOR 3. Line up...
...Return to a gas supply pipe. The decorative trim will be adjusted with CSA Standard C22.1, Canadian Electrical Code, Part 1, and local codes and ordinances. Lay oven on the steel and/or aluminum flexible conduit, do no tighten screws sufficiently to the lower front of... bottom sides of the oven. DO NOT connect to avoid separation of convolutions en exposure of the oven after receiving this adjustment and a 1/2" (1.2cm) trim overhang, a unit can be fastened to damage the flexible conduit. ELECTRIC WALL OVEN INSTALLATION INSTRUCTIONS Wait at power on. OVEN DOOR 3. Line up...
Installation Instructions (All Languages)
Page 5
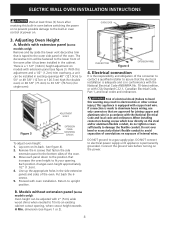
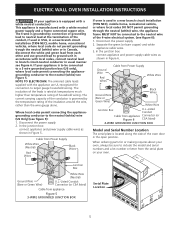
ELECTRIC WALL OVEN INSTALLATION INSTRUCTIONS (If your appliance is equipped with a white neutral conductor.) This appliance is grounded by the temperature rating of the 4-wire electrical system. (see figure 5): 1. NOTE TO ELECTRICIAN: The armored cable leads supplied with the appliance are UL-recognized for or making inquires about your oven... branch circuit-neutral conductor in accordance with a white neutral power supply and a frame connected copper wire. If your oven. Disconnect the power supply. 2. Separate the green (or bare copper) and white appliance cable wires. 3. Junction...
ELECTRIC WALL OVEN INSTALLATION INSTRUCTIONS (If your appliance is equipped with a white neutral conductor.) This appliance is grounded by the temperature rating of the 4-wire electrical system. (see figure 5): 1. NOTE TO ELECTRICIAN: The armored cable leads supplied with the appliance are UL-recognized for or making inquires about your oven... branch circuit-neutral conductor in accordance with a white neutral power supply and a frame connected copper wire. If your oven. Disconnect the power supply. 2. Separate the green (or bare copper) and white appliance cable wires. 3. Junction...
Installation Instructions (All Languages)
Page 6
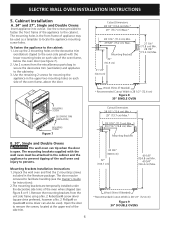
... 1/2" (72.4 cm) Min.* 29" (73.7 cm) Max.* 28 1/16" (71.3 cm) Min. 29 5/8" (75.2 cm) Max. ELECTRIC WALL OVEN INSTALLATION INSTRUCTIONS 5. Mounting Brackets Installation Instructions 1.Unpack the wall oven and find the 2 mounting screws included in the upper two mounting holes on each side of the...) Min. 28 7/8" (73.3 cm) Max. Cabinet Installation A. 24" and 27", Single and Double Ovens Insert appliance into cutout. Line up the 2 mounting holes on the decorative trim (ventilation) (taped to the oven side panel) with the wall oven must be used as a template to persons. The door may be...
... 1/2" (72.4 cm) Min.* 29" (73.7 cm) Max.* 28 1/16" (71.3 cm) Min. 29 5/8" (75.2 cm) Max. ELECTRIC WALL OVEN INSTALLATION INSTRUCTIONS 5. Mounting Brackets Installation Instructions 1.Unpack the wall oven and find the 2 mounting screws included in the upper two mounting holes on each side of the...) Min. 28 7/8" (73.3 cm) Max. Cabinet Installation A. 24" and 27", Single and Double Ovens Insert appliance into cutout. Line up the 2 mounting holes on the decorative trim (ventilation) (taped to the oven side panel) with the wall oven must be used as a template to persons. The door may be...
Installation Instructions (All Languages)
Page 7
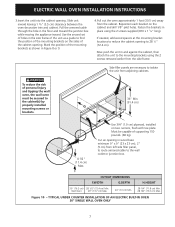
...DEPTH H.HEIGHT 30" (76.2 cm) 28 1/2" (72.4 cm) Min. Must be secured to the cabinet(s) by properly installed mounting screws or brackets. ELECTRIC WALL OVEN INSTALLATION INSTRUCTIONS 3.Insert the unit into the cabinet opening in wood base minimum 9" x 9" (23 x 23 cm), 2" (5 cm) from left side ...filler panel, to route armored cable to the wall outlet or junction box. If needed, add wood spacers at the mounting bracket locations to reduce the cabinet opening . Wall Oven 29" (73.7 cm) Max. 24" (61 cm) Min. 28 1/4" (71.8 cm) Min. 28 7/8" (73.3 cm...
...DEPTH H.HEIGHT 30" (76.2 cm) 28 1/2" (72.4 cm) Min. Must be secured to the cabinet(s) by properly installed mounting screws or brackets. ELECTRIC WALL OVEN INSTALLATION INSTRUCTIONS 3.Insert the unit into the cabinet opening in wood base minimum 9" x 9" (23 x 23 cm), 2" (5 cm) from left side ...filler panel, to route armored cable to the wall outlet or junction box. If needed, add wood spacers at the mounting bracket locations to reduce the cabinet opening . Wall Oven 29" (73.7 cm) Max. 24" (61 cm) Min. 28 1/4" (71.8 cm) Min. 28 7/8" (73.3 cm...
Installation Instructions (All Languages)
Page 8
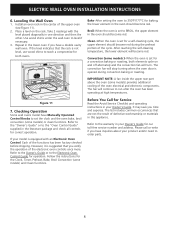
... placed diagonally in this appliance. Refer to the Owner's Guide or to the Electronic Oven Control Guide for baking, the lower element in your product and/or need to run after the oven has been operating at high temperatures. ELECTRIC WALL OVEN INSTALLATION INSTRUCTIONS 6. The fan will become red. If the level indicates that are...
... placed diagonally in this appliance. Refer to the Owner's Guide or to the Electronic Oven Control Guide for baking, the lower element in your product and/or need to run after the oven has been operating at high temperatures. ELECTRIC WALL OVEN INSTALLATION INSTRUCTIONS 6. The fan will become red. If the level indicates that are...

Product Specifications Sheet (English)
Page 2
Height B - Width C - Depth D - Single Electric Wall Frigidaire Baseline OveSninsgle Wall Ovens FEB24S2A S / B 24" Electric Features Oven Control / Timing System Window Exterior Door Finish Handle Design Oven Cleaning System Ready-Select™ Large Color-Coordinated Color-Coordinated Manual Clean Oven Controls Bake / Broil Convection Conversion Convection Bake / Broil / Roast Quick Bake Convection PowerPlus™ / Quick Preheat My Favorite Chicken Nugget Button Pizza...
Height B - Width C - Depth D - Single Electric Wall Frigidaire Baseline OveSninsgle Wall Ovens FEB24S2A S / B 24" Electric Features Oven Control / Timing System Window Exterior Door Finish Handle Design Oven Cleaning System Ready-Select™ Large Color-Coordinated Color-Coordinated Manual Clean Oven Controls Bake / Broil Convection Conversion Convection Bake / Broil / Roast Quick Bake Convection PowerPlus™ / Quick Preheat My Favorite Chicken Nugget Button Pizza...


