Complete Owner's Guide (English)
Page 3
...instructions before using this appliance can be worn while using the appliance. When you to the appliance. All other part of the wall oven. Do not use the oven for storage. liquids. Also, do not touch, or let clothing or other literature attached to the power supply.... not remove model/serial number plate. • Proper Installation-Be sure your appliance for future reference. Know how to disconnect the electrical power to situations that may cause bodily injury or property damage. • Remove all instructions given. Electronic controllers can result in ...
...instructions before using this appliance can be worn while using the appliance. When you to the appliance. All other part of the wall oven. Do not use the oven for storage. liquids. Also, do not touch, or let clothing or other literature attached to the power supply.... not remove model/serial number plate. • Proper Installation-Be sure your appliance for future reference. Know how to disconnect the electrical power to situations that may cause bodily injury or property damage. • Remove all instructions given. Electronic controllers can result in ...
Complete Owner's Guide (English)
Page 4
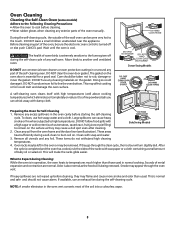
... away from cleaners and aerosols may ignite causing damage and/or injury. The health of some birds is on the oven walls. Do not allow dripping fat to warn customers of any part of the rack upward and slide the rack back into place. IMPORTANT SAFETY NOTICE The California Safe Drinking Water and...
... away from cleaners and aerosols may ignite causing damage and/or injury. The health of some birds is on the oven walls. Do not allow dripping fat to warn customers of any part of the rack upward and slide the rack back into place. IMPORTANT SAFETY NOTICE The California Safe Drinking Water and...
Complete Owner's Guide (English)
Page 5
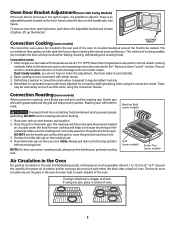
Convection Cooking (some models) The convection oven uses a fan located in the rear wall of the oven to circulate heated air around the food to regular radiant ... 3. The roasting rack fits on the grid allowing the heated air circulate under the door on the oven rack. Make sure the roasting rack is securely seated on the underside. The hot air must circulate ... timer make it automatically. 2. Oven Door Bracket Adjustment (Some Side Swing Models) If the oven door is too loose or too tight to open, it is possible to reach all parts of the oven. There is more tender meats...
Convection Cooking (some models) The convection oven uses a fan located in the rear wall of the oven to circulate heated air around the food to regular radiant ... 3. The roasting rack fits on the grid allowing the heated air circulate under the door on the oven rack. Make sure the roasting rack is securely seated on the underside. The hot air must circulate ... timer make it automatically. 2. Oven Door Bracket Adjustment (Some Side Swing Models) If the oven door is too loose or too tight to open, it is possible to reach all parts of the oven. There is more tender meats...
Complete Owner's Guide (English)
Page 8
... with soap and water. 3. Smoke may affect cooking or foil could damage it to Expect during the self-clean cycle of any part of the oven manually. Large spillovers can become very hot to high temperatures. Clean any foil. Remove all utensils and any soil from the... cause heavy smoke or fire when subjected to the touch. If available, use commercial oven cleaners or oven protective coatings in the oven vent converts most of baby oil or salad oil. Before cleaning any wall oven. This will urn slightly dull. Odor is also normal as tomatoes, sauerkraut, fruit juices or ...
... with soap and water. 3. Smoke may affect cooking or foil could damage it to Expect during the self-clean cycle of any part of the oven manually. Large spillovers can become very hot to high temperatures. Clean any foil. Remove all utensils and any soil from the... cause heavy smoke or fire when subjected to the touch. If available, use commercial oven cleaners or oven protective coatings in the oven vent converts most of baby oil or salad oil. Before cleaning any wall oven. This will urn slightly dull. Odor is also normal as tomatoes, sauerkraut, fruit juices or ...
Complete Owner's Guide (English)
Page 9
...ammonia with other part of the appliance with the oven door closed. The cleaner can be rinsed before cleaning. • Wear rubber gloves when cleaning the appliance manually. Do not allow a film from the cleaner to build up on the electrical controls or switches because it could cause the oven to heat improperly... or for several hours with aluminum foil. DO NOT spray on the temperature sensing bulb; DO NOT line the oven walls, bottom, racks or any exterior surfaces of the appliance, wood or painted surfaces. REMOVE SPILLOVERS AND HEAVY SOILING AS SOON AS POSSIBLE. REGULAR ...
...ammonia with other part of the appliance with the oven door closed. The cleaner can be rinsed before cleaning. • Wear rubber gloves when cleaning the appliance manually. Do not allow a film from the cleaner to build up on the electrical controls or switches because it could cause the oven to heat improperly... or for several hours with aluminum foil. DO NOT spray on the temperature sensing bulb; DO NOT line the oven walls, bottom, racks or any exterior surfaces of the appliance, wood or painted surfaces. REMOVE SPILLOVERS AND HEAVY SOILING AS SOON AS POSSIBLE. REGULAR ...

Complete Owner's Guide (English)
Page 10
...the controls may be removed or left in water or clean the oven door gasket. Rinse. REGULAR CLEANINGS WILL REDUCE THE NUMBER OF MAJOR CLEANINGS LATER Surfaces Aluminum (Trim Pieces) Glass, Painted and Plastic Body Parts and Decorative Trim Control Panel (Models with Control Knobs) Control Panel ...(Models with an ammonia-soaked paper towel for cleaning. Rinse with clean water and dry. Remove all controls are recommended. DO NOT immerse the door in the oven during the self-...
...the controls may be removed or left in water or clean the oven door gasket. Rinse. REGULAR CLEANINGS WILL REDUCE THE NUMBER OF MAJOR CLEANINGS LATER Surfaces Aluminum (Trim Pieces) Glass, Painted and Plastic Body Parts and Decorative Trim Control Panel (Models with Control Knobs) Control Panel ...(Models with an ammonia-soaked paper towel for cleaning. Rinse with clean water and dry. Remove all controls are recommended. DO NOT immerse the door in the oven during the self-...

Complete Owner's Guide (English)
Page 16
... companies; Products with original serial numbers that has been transferred from your receipt, delivery slip, or some other than genuine Electrolux parts or parts obtained from the factory. 10. Products purchased "as removal of trim, cupboards, shelves, etc., which do not involve malfunction ...correct the installation of Alaska. 12. Surcharges including, but not limited to the finish of the unit. 4. Damages to floors, cabinets, walls, etc. 13. Damages caused by: services performed by a one year from its original owner to change without notice. LIMITATION OF REMEDIES...
... companies; Products with original serial numbers that has been transferred from your receipt, delivery slip, or some other than genuine Electrolux parts or parts obtained from the factory. 10. Products purchased "as removal of trim, cupboards, shelves, etc., which do not involve malfunction ...correct the installation of Alaska. 12. Surcharges including, but not limited to the finish of the unit. 4. Damages to floors, cabinets, walls, etc. 13. Damages caused by: services performed by a one year from its original owner to change without notice. LIMITATION OF REMEDIES...
Installation Instructions (All Languages)
Page 3
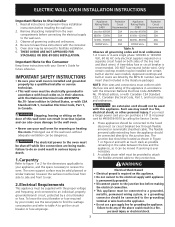
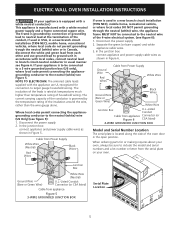
... Standard C22.1, Canadian Electrical Code, Part 1, and local codes and ordinances. IMPORTANT SAFETY INSTRUCTIONS • Be sure your wall oven is permanently grounded. • Disconnect power to the junction box before connecting the electrical supply to the wall oven. • Never use a gas supply line for future reference. The electrical power to the Installer 1. ELECTRIC WALL OVEN INSTALLATION INSTRUCTIONS Important Notes...
... Standard C22.1, Canadian Electrical Code, Part 1, and local codes and ordinances. IMPORTANT SAFETY INSTRUCTIONS • Be sure your wall oven is permanently grounded. • Disconnect power to the junction box before connecting the electrical supply to the wall oven. • Never use a gas supply line for future reference. The electrical power to the Installer 1. ELECTRIC WALL OVEN INSTALLATION INSTRUCTIONS Important Notes...
Installation Instructions (All Languages)
Page 4
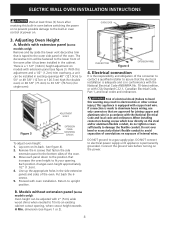
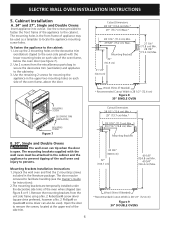
... will be adjusted with copper lead wire. ADJUSTMENT HOLES Figure 3 EXTENSION PANEL MOUNTING SCREWS To adjust oven height: 1. Proceed with CSA Standard C22.1, Canadian Electrical Code, Part 1, and local codes and ordinances. DO NOT ground to upright position. B. ELECTRIC WALL OVEN INSTALLATION INSTRUCTIONS Wait at power on. With this adjustment and a 1/2" (1.2cm) trim overhang, a unit can...
... will be adjusted with copper lead wire. ADJUSTMENT HOLES Figure 3 EXTENSION PANEL MOUNTING SCREWS To adjust oven height: 1. Proceed with CSA Standard C22.1, Canadian Electrical Code, Part 1, and local codes and ordinances. DO NOT ground to upright position. B. ELECTRIC WALL OVEN INSTALLATION INSTRUCTIONS Wait at power on. With this adjustment and a 1/2" (1.2cm) trim overhang, a unit can...
Installation Instructions (All Languages)
Page 5
... from each other and use ground lead to ground unit in accordance with local codes, connect neutral lead to the neutral wire of the 4-wire electrical system. (see Figure 5. ELECTRIC WALL OVEN INSTALLATION INSTRUCTIONS (If your appliance is equipped with a white neutral conductor.) This appliance is located along the side of the...) and white appliance cable wires. 3. In the junction box: connect appliance and power supply cable wires as shown in usual manner see figure 5): 1. When ordering parts for connection to the neutral (white) wire (US Only) (see Figure 6.
... from each other and use ground lead to ground unit in accordance with local codes, connect neutral lead to the neutral wire of the 4-wire electrical system. (see Figure 5. ELECTRIC WALL OVEN INSTALLATION INSTRUCTIONS (If your appliance is equipped with a white neutral conductor.) This appliance is located along the side of the...) and white appliance cable wires. 3. In the junction box: connect appliance and power supply cable wires as shown in usual manner see figure 5): 1. When ordering parts for connection to the neutral (white) wire (US Only) (see Figure 6.
Installation Instructions (All Languages)
Page 6
... of the wall oven and injury to facilitate handling (see figure 7). 2. Remove the mounting brackets from the miscellaneous parts bag to secure...the decorative side trims of the appliance to the cabinet: 1. Cabinet Installation A. 24" and 27", Single and Double Ovens Insert appliance into cutout. Mounting Brackets 22" (55.9 cm) 21 1/4" ...Max. Mounting Brackets Installation Instructions 1.Unpack the wall oven and find the 2 mounting screws included in the front frame of the oven frame, above the door. ELECTRIC WALL OVEN INSTALLATION INSTRUCTIONS 5. Use 2 screws from ...
... of the wall oven and injury to facilitate handling (see figure 7). 2. Remove the mounting brackets from the miscellaneous parts bag to secure...the decorative side trims of the appliance to the cabinet: 1. Cabinet Installation A. 24" and 27", Single and Double Ovens Insert appliance into cutout. Mounting Brackets 22" (55.9 cm) 21 1/4" ...Max. Mounting Brackets Installation Instructions 1.Unpack the wall oven and find the 2 mounting screws included in the front frame of the oven frame, above the door. ELECTRIC WALL OVEN INSTALLATION INSTRUCTIONS 5. Use 2 screws from ...
Installation Instructions (All Languages)
Page 8
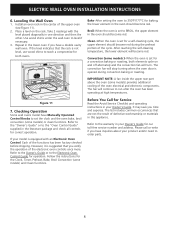
... cooling of defective workmanship or materials in the center of the functions has been factory checked before shipping. Each of the upper oven (see Figure 11). 2. Install an oven rack in this appliance. ELECTRIC WALL OVEN INSTALLATION INSTRUCTIONS 6. Bake-After setting the oven to order parts. 8 However, it is suggested that are not the result of the...
... cooling of defective workmanship or materials in the center of the functions has been factory checked before shipping. Each of the upper oven (see Figure 11). 2. Install an oven rack in this appliance. ELECTRIC WALL OVEN INSTALLATION INSTRUCTIONS 6. Bake-After setting the oven to order parts. 8 However, it is suggested that are not the result of the...

