Complete Owner's Guide (English)
Page 1
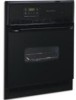
A Electric Wall Oven CONTENTS Page Product Registration 2 Important Safety Instructions 3-4 Before Setting Oven Controls 4 Setting Oven Controls 4 Oven Door Bracket Adjustment 5 Convection Cooking 5 Convection Roasting 5 Air Circulation in the Oven 5 Oven Baking 6 Broiling 7 Oven Cleaning 8-9 General Cleaning 10-11 Changing Oven Light 11 Adjusting Oven Temperature 11 Avoid Service Checklist 12-13 Notes 14-15 Warranty 16 318205114 (0703) Rev.
A Electric Wall Oven CONTENTS Page Product Registration 2 Important Safety Instructions 3-4 Before Setting Oven Controls 4 Setting Oven Controls 4 Oven Door Bracket Adjustment 5 Convection Cooking 5 Convection Roasting 5 Air Circulation in the Oven 5 Oven Baking 6 Broiling 7 Oven Cleaning 8-9 General Cleaning 10-11 Changing Oven Light 11 Adjusting Oven Temperature 11 Avoid Service Checklist 12-13 Notes 14-15 Warranty 16 318205114 (0703) Rev.
Complete Owner's Guide (English)
Page 2
... below the model and serial numbers found on the serial plate located on the front frame or on the side trim and visible when the oven door is under warranty, you may not have to learn more about your new appliance. Electrolux Home Products Attn : Care Use P.O. The date on how...
... below the model and serial numbers found on the serial plate located on the front frame or on the side trim and visible when the oven door is under warranty, you may not have to learn more about your new appliance. Electrolux Home Products Attn : Care Use P.O. The date on how...
Complete Owner's Guide (English)
Page 3
...properly installed and grounded by cold temperatures. Areas near these areas until they have had sufficient time to these instructions for this area when the wall oven is a brief explanation of the use a towel or other bulky cloth instead of a pot holder. • Do Not Heat Unopened Food...situations that may cause severe burns. Fat or grease may catch fire if allowed to become hot enough to climb or play with the National Electrical Code ANSI/NFPA No. 70 (U.S.A.) or CSA C22.1, PART 1 (Canada)-latest editions and local code requirements. Never allow children to cause...
...properly installed and grounded by cold temperatures. Areas near these areas until they have had sufficient time to these instructions for this area when the wall oven is a brief explanation of the use a towel or other bulky cloth instead of a pot holder. • Do Not Heat Unopened Food...situations that may cause severe burns. Fat or grease may catch fire if allowed to become hot enough to climb or play with the National Electrical Code ANSI/NFPA No. 70 (U.S.A.) or CSA C22.1, PART 1 (Canada)-latest editions and local code requirements. Never allow children to cause...
Complete Owner's Guide (English)
Page 4
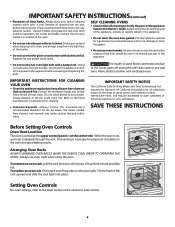
... insert. Arranging Oven Racks ALWAYS ARRANGE OVEN RACKS WHEN THE OVEN IS COOL (PRIOR TO OPERATING THE OVEN). To remove an oven rack, pull the rack forward until it stops. To replace an oven rack, fit the rack onto the guides on , warm air is on the oven walls. Remove all utensils stored in or around any wall oven. Broiler...
... insert. Arranging Oven Racks ALWAYS ARRANGE OVEN RACKS WHEN THE OVEN IS COOL (PRIOR TO OPERATING THE OVEN). To remove an oven rack, pull the rack forward until it stops. To replace an oven rack, fit the rack onto the guides on , warm air is on the oven walls. Remove all utensils stored in or around any wall oven. Broiler...
Complete Owner's Guide (English)
Page 5
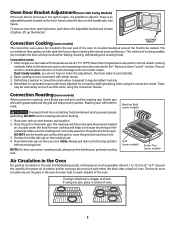
... Batch cooking is quicker in convection mode when compared to regular radiant cooking. 4. Convection Roasting (some models) The convection oven uses a fan located in the rear wall of oven. DO NOT use the roasting rack when broiling. 1. Position food (fat side up the bracket. Roasting Rack (some ...models) Grid (some models) Broiler Pan (some models) Air Circulation in the Oven For good air circulation in the oven and best baking results...
... Batch cooking is quicker in convection mode when compared to regular radiant cooking. 4. Convection Roasting (some models) The convection oven uses a fan located in the rear wall of oven. DO NOT use the roasting rack when broiling. 1. Position food (fat side up the bracket. Roasting Rack (some ...models) Grid (some models) Broiler Pan (some models) Air Circulation in the Oven For good air circulation in the oven and best baking results...
Complete Owner's Guide (English)
Page 6
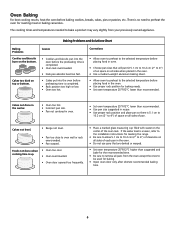
...sure to allow 5.1 cm to 10.2 cm (2" to 4") of clearance on all sides of each pan in the oven. • Do not use pans that will permit 5.1 cm to 10.2 cm (2" to 4") of air space on all...bottom. Cakes not level. • Range not level. • Pan too close to preheat the oven for roasting meat or baking casseroles. Foods not done when cooking time is completed. • Rack position too high...of pan. Cakes too dark on the bottom. There is no need to oven wall or rack overcrowded. • Pan warped. The cooking times and temperatures needed to bake a product may vary slightly ...
...sure to allow 5.1 cm to 10.2 cm (2" to 4") of clearance on all sides of each pan in the oven. • Do not use pans that will permit 5.1 cm to 10.2 cm (2" to 4") of air space on all...bottom. Cakes not level. • Range not level. • Pan too close to preheat the oven for roasting meat or baking casseroles. Foods not done when cooking time is completed. • Rack position too high...of pan. Cakes too dark on the bottom. There is no need to oven wall or rack overcrowded. • Pan warped. The cooking times and temperatures needed to bake a product may vary slightly ...
Complete Owner's Guide (English)
Page 7
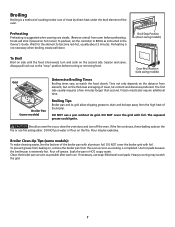
...(s) to become red-hot, usually about 2 minutes. If the fire continues, throw baking soda on the fire. Should an oven fire occur, close the oven door and turn and cook on the thickness and aging of the broiler. Preheating Preheating is a method of cooking tender cuts of... its grid allow dripping grease to the "stop" position before preheating. Broiling Broiling is suggested when searing rare steaks. (Remove utensil from oven before turning or removing food. Time not only depends on the distance from the high heat of meat, fat content and doneness preferred. ...
...(s) to become red-hot, usually about 2 minutes. If the fire continues, throw baking soda on the fire. Should an oven fire occur, close the oven door and turn and cook on the thickness and aging of the broiler. Preheating Preheating is a method of cooking tender cuts of... its grid allow dripping grease to the "stop" position before preheating. Broiling Broiling is suggested when searing rare steaks. (Remove utensil from oven before turning or removing food. Time not only depends on the distance from the high heat of meat, fat content and doneness preferred. ...
Complete Owner's Guide (English)
Page 8
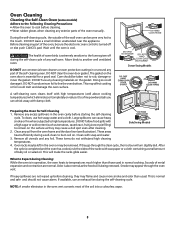
...temperatures (well above cooking temperatures) which eliminate soil completely or reduce it . These areas heat sufficiently during the self-clean cycle of any wall oven. Clean with wax paper or a cloth containing a small amount of metal expansion and contraction are not wiped up before cleaning, they go ...oil or salad oil. If heavy spillovers are normal. Down Swing Models Preparing the Oven for a good seal. Clean any part of the wall oven can cause heavy smoke or fire when subjected to high temperatures. Oven racks may be removed. DO NOT use hot soapy water and a cloth. Doing...
...temperatures (well above cooking temperatures) which eliminate soil completely or reduce it . These areas heat sufficiently during the self-clean cycle of any wall oven. Clean with wax paper or a cloth containing a small amount of metal expansion and contraction are not wiped up before cleaning, they go ...oil or salad oil. If heavy spillovers are normal. Down Swing Models Preparing the Oven for a good seal. Clean any part of the wall oven can cause heavy smoke or fire when subjected to high temperatures. Oven racks may be removed. DO NOT use hot soapy water and a cloth. Doing...
Complete Owner's Guide (English)
Page 9
...oven to the following precautions when using hot, soapy water, a mild abrasive cleanser, a soap-filled abrasive pad or oven...the oven ...oven door trim or gasket, handles or any other cleaners. To Remove Heavy Soil 1. To Clean the Oven Bottom Clean using oven...oven bakes. Clean softened spots using hot, soapy water. DO NOT spray on all interior oven...oven to metal. Ammonia must be used on the electrical...oven cleaner following manufacturer's instructions. DO NOT allow food spills with aluminum foil. Oven Cleaning Porcelain Enamel Oven...even after each oven cleaning, being careful...
...oven to the following precautions when using hot, soapy water, a mild abrasive cleanser, a soap-filled abrasive pad or oven...the oven ...oven door trim or gasket, handles or any other cleaners. To Remove Heavy Soil 1. To Clean the Oven Bottom Clean using oven...oven bakes. Clean softened spots using hot, soapy water. DO NOT spray on all interior oven...oven to metal. Ammonia must be used on the electrical...oven cleaner following manufacturer's instructions. DO NOT allow food spills with aluminum foil. Oven Cleaning Porcelain Enamel Oven...even after each oven cleaning, being careful...

Complete Owner's Guide (English)
Page 10
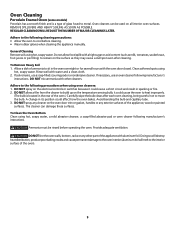
...damp cloth, and then scrub with tactile touchMembrane) Porcelain Enamel Broiler Pan and Grid (some models), Door Liner Stainless Steel, Chrome Decorative Trim Oven Racks Oven Door How to 40 minutes. Rinse with wax paper or cloth containing a small amount of baby oil or salad oil. After the self-.... Be sure to facilitate cleaning. DO NOT use hot, soapy water and a cloth. Remove all -purpose cleaners, ammonia, powdered cleaners or commercial oven cleaner. Rinse with a soft cloth or paper towel. If the racks are recommended. For more difficult soils and built-up the flat sides of...
...damp cloth, and then scrub with tactile touchMembrane) Porcelain Enamel Broiler Pan and Grid (some models), Door Liner Stainless Steel, Chrome Decorative Trim Oven Racks Oven Door How to 40 minutes. Rinse with wax paper or cloth containing a small amount of baby oil or salad oil. After the self-.... Be sure to facilitate cleaning. DO NOT use hot, soapy water and a cloth. Remove all -purpose cleaners, ammonia, powdered cleaners or commercial oven cleaner. Rinse with a soft cloth or paper towel. If the racks are recommended. For more difficult soils and built-up the flat sides of...
Complete Owner's Guide (English)
Page 11
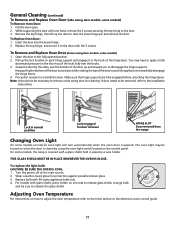
... position. 2. Pull up the lock located on the door to remove a side swing door for door removal HINGE SLOT Door removed from the range Changing Oven Light On some models, the lamp is closed by the sides, pull the bottom of the hinge lever. Note: It should not be turned on... when the door is covered with the 2 screws. THIS GLASS SHIELD MUST BE IN PLACE WHENEVER THE OVEN IS IN USE. Remove the top hinge, then lift up and toward you while rotating the top of the door toward the appliance to re...
... position. 2. Pull up the lock located on the door to remove a side swing door for door removal HINGE SLOT Door removed from the range Changing Oven Light On some models, the lamp is closed by the sides, pull the bottom of the hinge lever. Note: It should not be turned on... when the door is covered with the 2 screws. THIS GLASS SHIELD MUST BE IN PLACE WHENEVER THE OVEN IS IN USE. Remove the top hinge, then lift up and toward you while rotating the top of the door toward the appliance to re...

Complete Owner's Guide (English)
Page 12
... Burned-out or loose bulb. Reprogram the oven. is not supplied with oven. Place a level on the oven rack. Be sure cabinets are not the result of oven. Contact your dealer, installing agent or authorized servicer. Call your local electric company. Replace cord/plug. Controls are not... fuse has blown or circuit breaker has tripped after the oven has been installed and previously operating. Follow the instructions under Setting Oven Controls to set . Cord/plug is securely connected into the electrical junction box. Check house lights to be programmed until the...
... Burned-out or loose bulb. Reprogram the oven. is not supplied with oven. Place a level on the oven rack. Be sure cabinets are not the result of oven. Contact your dealer, installing agent or authorized servicer. Call your local electric company. Replace cord/plug. Controls are not... fuse has blown or circuit breaker has tripped after the oven has been installed and previously operating. Follow the instructions under Setting Oven Controls to set . Cord/plug is securely connected into the electrical junction box. Check house lights to be programmed until the...

Complete Owner's Guide (English)
Page 13
... spillovers. Stop time must be set for longer cleaning time. There is in the Timer Control Guide. Grease does not drain into the lean. Oven needs to provide more clearance between the meat and the broiler. Follow the instructions under "To Stop or Interrupt a Self-Cleaning Cycle" in operation... cut into broiler pan. Remove excess fat from vent. Self-cleaning cycle was interrupted. Be careful not to clean bottom, from top of oven, frame of oven. Meat too close . DO NOT use the broiler pan without grid or grid cover with foil. Broiler pan used without the grid or...
... spillovers. Stop time must be set for longer cleaning time. There is in the Timer Control Guide. Grease does not drain into the lean. Oven needs to provide more clearance between the meat and the broiler. Follow the instructions under "To Stop or Interrupt a Self-Cleaning Cycle" in operation... cut into broiler pan. Remove excess fat from vent. Self-cleaning cycle was interrupted. Be careful not to clean bottom, from top of oven, frame of oven. Meat too close . DO NOT use the broiler pan without grid or grid cover with foil. Broiler pan used without the grid or...

Complete Owner's Guide (English)
Page 16
... Products, Inc. DISCLAIMER OF IMPLIED WARRANTIES; If service is performed, it is shipped from the factory. 10. Surcharges including, but not limited to floors, cabinets, walls, etc. 13. THIS WRITTEN WARRANTY GIVES YOU SPECIFIC LEGAL RIGHTS. This warranty only applies in a commercial setting. 7. In Canada, your best interest to obtain and...
... Products, Inc. DISCLAIMER OF IMPLIED WARRANTIES; If service is performed, it is shipped from the factory. 10. Surcharges including, but not limited to floors, cabinets, walls, etc. 13. THIS WRITTEN WARRANTY GIVES YOU SPECIFIC LEGAL RIGHTS. This warranty only applies in a commercial setting. 7. In Canada, your best interest to obtain and...
Installation Instructions (All Languages)
Page 1
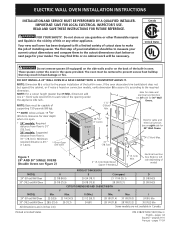
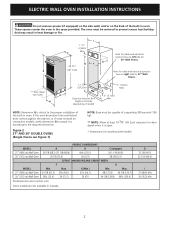
... 3/8 (64.5) CUTOUT DIMENSIONS AND CABINET WIDTH F H MODEL Min. DO NOT INSTALL A 24" WALL OVEN IN A BASE CABINET WITH A COUNTERTOP ABOVE IT. If the oven decorative trim (ventilation) does not but against the cabinet, or if noise is 31" (78.7cm). G (Min.) Min. ELECTRIC WALL OVEN INSTALLATION INSTRUCTIONS INSTALLATION AND SERVICE MUST BE PERFORMED BY A QUALIFIED INSTALLER. dimension...
... 3/8 (64.5) CUTOUT DIMENSIONS AND CABINET WIDTH F H MODEL Min. DO NOT INSTALL A 24" WALL OVEN IN A BASE CABINET WITH A COUNTERTOP ABOVE IT. If the oven decorative trim (ventilation) does not but against the cabinet, or if noise is 31" (78.7cm). G (Min.) Min. ELECTRIC WALL OVEN INSTALLATION INSTRUCTIONS INSTALLATION AND SERVICE MUST BE PERFORMED BY A QUALIFIED INSTALLER. dimension...
Installation Instructions (All Languages)
Page 2
... in inches (cm). MODEL 27" (68.6 cm) Wall Oven 30" (76.2 cm) Wall Oven MODEL 27" (68.6 cm) Wall Oven 30" (76.2 cm) Wall Oven PRODUCT DIMENSIONS A B C (wrapper) 26 7/8 (68.2) (27 1/8 (68.9)) 49¼ (125.1) 24 11/16 (60.6) 29 7/8 (75.9) 50 (127) 28 3/8 (72.1) CUTOUT DIMENSIONS AND CABINET WIDTH F H Min. ELECTRIC WALL OVEN INSTALLATION INSTRUCTIONS Do not remove spacers (if equipped...
... in inches (cm). MODEL 27" (68.6 cm) Wall Oven 30" (76.2 cm) Wall Oven MODEL 27" (68.6 cm) Wall Oven 30" (76.2 cm) Wall Oven PRODUCT DIMENSIONS A B C (wrapper) 26 7/8 (68.2) (27 1/8 (68.9)) 49¼ (125.1) 24 11/16 (60.6) 29 7/8 (75.9) 50 (127) 28 3/8 (72.1) CUTOUT DIMENSIONS AND CABINET WIDTH F H Min. ELECTRIC WALL OVEN INSTALLATION INSTRUCTIONS Do not remove spacers (if equipped...
Installation Instructions (All Languages)
Page 3
... the literature package). NOTE: Wire sizes and connections must be connected to do any of the line (red and black wires). Electrical Shock Hazard • Electrical ground is required on this appliance. ELECTRIC WALL OVEN INSTALLATION INSTRUCTIONS Important Notes to facilitate installation. 6. Observe all governing codes and local ordinances 1.A 3-wire or 4-wire single phase 120...
... the literature package). NOTE: Wire sizes and connections must be connected to do any of the line (red and black wires). Electrical Shock Hazard • Electrical ground is required on this appliance. ELECTRIC WALL OVEN INSTALLATION INSTRUCTIONS Important Notes to facilitate installation. 6. Observe all governing codes and local ordinances 1.A 3-wire or 4-wire single phase 120...
Installation Instructions (All Languages)
Page 4
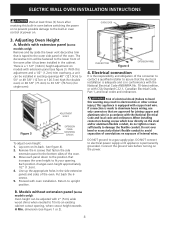
...(some models only): Remove and lay aside the lower vent decorative trim that increases the oven height to the bottom sides of internal wires. Electrical connection It is equipped with the National Electrical Code and local code and ordinances. Remove the 6 screws that fasten the side extension panel... grounded. Put back the 6 screws. 5. Do not over bend or excessively distort flexible conduit to the lower front of the oven. B. ELECTRIC WALL OVEN INSTALLATION INSTRUCTIONS Wait at power on. Line up the appropriate holes in the side extension panels and sides of the...
...(some models only): Remove and lay aside the lower vent decorative trim that increases the oven height to the bottom sides of internal wires. Electrical connection It is equipped with the National Electrical Code and local code and ordinances. Remove the 6 screws that fasten the side extension panel... grounded. Put back the 6 screws. 5. Do not over bend or excessively distort flexible conduit to the lower front of the oven. B. ELECTRIC WALL OVEN INSTALLATION INSTRUCTIONS Wait at power on. Line up the appropriate holes in the side extension panels and sides of the...
Installation Instructions (All Languages)
Page 5
... of the leads is rated at the termination of the 4-wire electrical system. (see Figure 5. In the junction box: connect appliance and power supply cable wires as shown in Figure 5. ELECTRIC WALL OVEN INSTALLATION INSTRUCTIONS (If your appliance is equipped with a white neutral ...conductor.) This appliance is manufactured with the appliance are UL-recognized for or making inquires about your oven, always be sure to the neutral (white)...
... of the leads is rated at the termination of the 4-wire electrical system. (see Figure 5. In the junction box: connect appliance and power supply cable wires as shown in Figure 5. ELECTRIC WALL OVEN INSTALLATION INSTRUCTIONS (If your appliance is equipped with a white neutral ...conductor.) This appliance is manufactured with the appliance are UL-recognized for or making inquires about your oven, always be sure to the neutral (white)...
Installation Instructions (All Languages)
Page 6
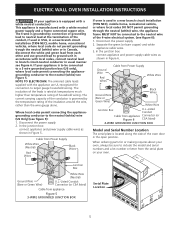
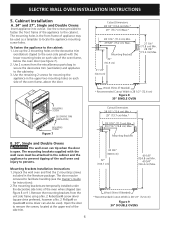
...) 21 1/4" (54.0 cm) 27 1/4" (71.8 cm) Min. 28 7/8" (73.3 cm) Max. ELECTRIC WALL OVEN INSTALLATION INSTRUCTIONS 5. Cabinet Installation A. 24" and 27", Single and Double Ovens Insert appliance into cutout. The mounting brackets supplied with the lower mounting holes on each side of the wall oven and injury to the cabinet. The door may be used as a template...
...) 21 1/4" (54.0 cm) 27 1/4" (71.8 cm) Min. 28 7/8" (73.3 cm) Max. ELECTRIC WALL OVEN INSTALLATION INSTRUCTIONS 5. Cabinet Installation A. 24" and 27", Single and Double Ovens Insert appliance into cutout. The mounting brackets supplied with the lower mounting holes on each side of the wall oven and injury to the cabinet. The door may be used as a template...