
Use and Care Manual
Page 2
.... IMPORTANT IMPORTANT indicates installation, operation or maintenance information which , if not avoided, could result in a safe place. Record and retain these instructions for future reference. It is used to alert you cannot reach your gas supplier, call your washer. DANGER DANGER indicates an... any phone in the vicinity of all instructions before using this washer. Follow the gas supplier's instructions. • If you to minimize the risk of the door. Installation and service must be performed by a qualified installer, service agency or the gas supplier. ...
.... IMPORTANT IMPORTANT indicates installation, operation or maintenance information which , if not avoided, could result in a safe place. Record and retain these instructions for future reference. It is used to alert you cannot reach your gas supplier, call your washer. DANGER DANGER indicates an... any phone in the vicinity of all instructions before using this washer. Follow the gas supplier's instructions. • If you to minimize the risk of the door. Installation and service must be performed by a qualified installer, service agency or the gas supplier. ...
Use and Care Manual
Page 4
... shock. Turning the controls to a new location, have it becomes overheated. Power cord with these warnings could result in 1 load unless specified on a solid floor. Installation instructions are moving. Never ground the washer to INSTALLATION INSTRUCTIONS for detailed grounding procedures. resulting in serious injury or death. • Do not combine laundry products for...
... shock. Turning the controls to a new location, have it becomes overheated. Power cord with these warnings could result in 1 load unless specified on a solid floor. Installation instructions are moving. Never ground the washer to INSTALLATION INSTRUCTIONS for detailed grounding procedures. resulting in serious injury or death. • Do not combine laundry products for...

Use and Care Manual
Page 24
... legs. Shipping bolts and foam block have it corrected by a qualified electrician. See INSTALLATION INSTRUCTIONS for service, review this washer. Wash load unevenly distributed in drum. Electrical power cord may be loose. If problem is too small. Load is a power outage, call local electric company. Wipe drum with a nonabrasive household cleanser, then rinse...
... legs. Shipping bolts and foam block have it corrected by a qualified electrician. See INSTALLATION INSTRUCTIONS for service, review this washer. Wash load unevenly distributed in drum. Electrical power cord may be loose. If problem is too small. Load is a power outage, call local electric company. Wipe drum with a nonabrasive household cleanser, then rinse...
Use and Care Manual
Page 25
... of balance. water hose to allow proper spinning. Increase standpipe height to support more than 8' (2.4 m). Load is not hot enough. INSTALLATION INSTRUCTIONS. See Operating Your Washer, step 4. Rearrange load to cold water faucet. Drain hose standpipe is a distance from washer. Unclog drain pipes. Hot water heater is set too low or is too tall. Drain hose...
... of balance. water hose to allow proper spinning. Increase standpipe height to support more than 8' (2.4 m). Load is not hot enough. INSTALLATION INSTRUCTIONS. See Operating Your Washer, step 4. Rearrange load to cold water faucet. Drain hose standpipe is a distance from washer. Unclog drain pipes. Hot water heater is set too low or is too tall. Drain hose...
Use and Care Manual
Page 26
...readily determined. 2. Product features or specifications as -is in accordance with the provided instructions. Rust on the interior or exterior of parts other than authorized service companies; Service calls to correct the installation of the appliance when it is " are not a part of your appliance ...or to instruct you how to use your best interest to be required. If service is performed, it is installed, used and maintained in a commercial setting. 7. Products purchased "as described or illustrated are ...
...readily determined. 2. Product features or specifications as -is in accordance with the provided instructions. Rust on the interior or exterior of parts other than authorized service companies; Service calls to correct the installation of the appliance when it is " are not a part of your appliance ...or to instruct you how to use your best interest to be required. If service is performed, it is installed, used and maintained in a commercial setting. 7. Products purchased "as described or illustrated are ...

Installation Instructions
Page 1
All about the Installation of your Washer TABLE OF CONTENTS Important Safety Instructions 2-3 Installation Instructions 9-10 Installation Requirements 4-5 Accessories 11 Installed Dryer Dimensions 6 Notes 12 Unpacking Washer 7-8 Français 13 www.frigidaire.com USA 1-800-944-9044 www.frigidaire.ca Canada 1-800-265-8352 137168200A (0901)
All about the Installation of your Washer TABLE OF CONTENTS Important Safety Instructions 2-3 Installation Instructions 9-10 Installation Requirements 4-5 Accessories 11 Installed Dryer Dimensions 6 Notes 12 Unpacking Washer 7-8 Français 13 www.frigidaire.com USA 1-800-944-9044 www.frigidaire.ca Canada 1-800-265-8352 137168200A (0901)
Installation Instructions
Page 2
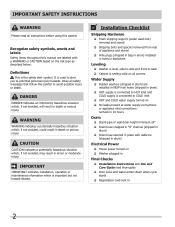
...place with a WARNING or CAUTION based on Washer plugged in Final Checks Installation Instructions and Use and Care Guide read all instructions before using this symbol to avoid possible injury or death. Important Safety Instructions WARNING Please read thoroughly Door locks and water... from rear of appliance and stored Hole plugs (shipped in bag in drum) installed in holes in backsheet Leveling Washer is level, side-to-side and front-to-back Cabinet is connected to potential personal injury hazards. CAUTION CAUTION indicates a...
...place with a WARNING or CAUTION based on Washer plugged in Final Checks Installation Instructions and Use and Care Guide read all instructions before using this symbol to avoid possible injury or death. Important Safety Instructions WARNING Please read thoroughly Door locks and water... from rear of appliance and stored Hole plugs (shipped in bag in drum) installed in holes in backsheet Leveling Washer is level, side-to-side and front-to-back Cabinet is connected to potential personal injury hazards. CAUTION CAUTION indicates a...
Installation Instructions
Page 3
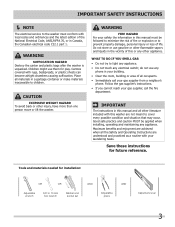
... any other literature included with this manual must be applied when installing, operating and maintaining any electrical switch; Children might use gasoline or other flammable vapors and liquids in Canada, the Canadian electrical code C22.1 part 1. IMPORTANT The instructions in this washer are understood and practiced as a routine with rugs, bedspreads, or plastic...
... any other literature included with this manual must be applied when installing, operating and maintaining any electrical switch; Children might use gasoline or other flammable vapors and liquids in Canada, the Canadian electrical code C22.1 part 1. IMPORTANT The instructions in this washer are understood and practiced as a routine with rugs, bedspreads, or plastic...

Installation Instructions
Page 8
... shipping hardware must be easily pulled through shipping hole. If the washer is to help prevent shipping damage. Installing hole plugs x 4 4 HOLE PLUGS (IN BAG) Locate 4 hole plugs in washer back panel. 8 Insert them in the holes in the small bag supplied with washer instruction guides. x 2 x 4 x 4 2 P CLAMPS 4 SPACERS 4 BOLTS Remove all of the following: 4 BOLTS...
... shipping hardware must be easily pulled through shipping hole. If the washer is to help prevent shipping damage. Installing hole plugs x 4 4 HOLE PLUGS (IN BAG) Locate 4 hole plugs in washer back panel. 8 Insert them in the holes in the small bag supplied with washer instruction guides. x 2 x 4 x 4 2 P CLAMPS 4 SPACERS 4 BOLTS Remove all of the following: 4 BOLTS...
Installation Instructions
Page 9
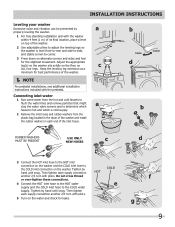
... leveling legs so the washer is level front-to-rear and side-to-side, and stable corner-to-corner. 3 Press down on top of the inlet hoses. Tighten by hand until snug. installation instructions Leveling your washer Excessive noise and vibration can be prevented by a properly leveling the washer. 1 For free standing installation and with pliers. g f 9 HOT...
... leveling legs so the washer is level front-to-rear and side-to-side, and stable corner-to-corner. 3 Press down on top of the inlet hoses. Tighten by hand until snug. installation instructions Leveling your washer Excessive noise and vibration can be prevented by a properly leveling the washer. 1 For free standing installation and with pliers. g f 9 HOT...
Installation Instructions
Page 10
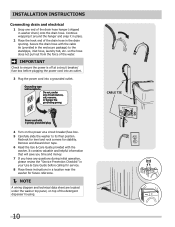
... the detergent dispenser housing. 10 CABLE TIE IMPORTANT Check to ensure the power is off at a circuit breaker/fuse box. 5 Carefully slide the washer to the standpipe, inlet hose, laundry tub, etc. Continue wrapping it around the hanger and snap it in place. 2 Place the hook end... panel, on the power at a circuit breaker/ fuse box before calling for service. 8 Place these instructions in a location near the washer for stability. installation instructions Connecting drain and electrical 1 Snap one end of the drain hose in the drain opening. Remove and discard door tape. 6 Read the ...
... the detergent dispenser housing. 10 CABLE TIE IMPORTANT Check to ensure the power is off at a circuit breaker/fuse box. 5 Carefully slide the washer to the standpipe, inlet hose, laundry tub, etc. Continue wrapping it around the hanger and snap it in place. 2 Place the hook end... panel, on the power at a circuit breaker/ fuse box before calling for service. 8 Place these instructions in a location near the washer for stability. installation instructions Connecting drain and electrical 1 Snap one end of the drain hose in the drain opening. Remove and discard door tape. 6 Read the ...


