Complete Owner's Guide (English)
Page 2
.... Do not store or use any other models. pants. • Immediately call the fire department. Installation and service must be performed by a qualified installer, service agency or the gas supplier. Follow the gas supplier's instructions. • If you to light any appliance. • Do not touch any electrical switch; CAUTION...
.... Do not store or use any other models. pants. • Immediately call the fire department. Installation and service must be performed by a qualified installer, service agency or the gas supplier. Follow the gas supplier's instructions. • If you to light any appliance. • Do not touch any electrical switch; CAUTION...
Complete Owner's Guide (English)
Page 4
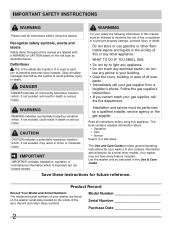
... person in the cycle selector knob and allow the drum to coast to a complete stop if it becomes overheated. Installation instructions are moving. WARNING FIRE/ELECTRICAL SHOCK HAZARD Avoid fire hazard or electrical shock. Grounding type wall receptacle Do not,... • To prevent injury, do not reach into a properly grounded and polarized 3-prong outlet. Refer to INSTALLATION INSTRUCTIONS for detailed grounding procedures. IMPORTANT SAFETY INSTRUCTIONS PREVENT INJURY • To prevent shock hazard and assure stability during this time. • Failure to comply ...
... person in the cycle selector knob and allow the drum to coast to a complete stop if it becomes overheated. Installation instructions are moving. WARNING FIRE/ELECTRICAL SHOCK HAZARD Avoid fire hazard or electrical shock. Grounding type wall receptacle Do not,... • To prevent injury, do not reach into a properly grounded and polarized 3-prong outlet. Refer to INSTALLATION INSTRUCTIONS for detailed grounding procedures. IMPORTANT SAFETY INSTRUCTIONS PREVENT INJURY • To prevent shock hazard and assure stability during this time. • Failure to comply ...
Complete Owner's Guide (English)
Page 19
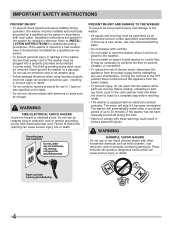
...at the appropriate times during the cycle. A situation where oversudsing has been detected by utilizing your washer's vent latch feature. OPERATING INSTRUCTIONS STATUS DISPLAY The following will also be displayed during the cycle: DOOR LOCK RINSING PREWASHING WASHING ADDING STEAM DRAINING SPINNING CYCLE COMPLETE ... Each extra rinse the washer performs to clear the suds. The approximate time remaining will still operate without latch arm installed. by pulling door out and manually returning latch arm to lower position or by pushing door shut and allowing latch ...
...at the appropriate times during the cycle. A situation where oversudsing has been detected by utilizing your washer's vent latch feature. OPERATING INSTRUCTIONS STATUS DISPLAY The following will also be displayed during the cycle: DOOR LOCK RINSING PREWASHING WASHING ADDING STEAM DRAINING SPINNING CYCLE COMPLETE ... Each extra rinse the washer performs to clear the suds. The approximate time remaining will still operate without latch arm installed. by pulling door out and manually returning latch arm to lower position or by pushing door shut and allowing latch ...

Complete Owner's Guide (English)
Page 20
...use the Clean Washer cycle once a month. For best results use both. You may press the Cancel button to enter Clean Washer cycle. If installed, remove the "MAIN WASH - Turn cycle selector to Rinse & Spin and then press Clean Washer button to manually perform the cycle at another...cup of liquid chlorine bleach OR one (1) pouch of any residual bleach before filling the detergent chamber with a Spin Only cycle. OPERATING INSTRUCTIONS Clean Washer Cycle TO REFRESH OR CLEAN INSIDE OF WASHER To clean and freshen the washer, perform the Clean Washer cycle. IMPORTANT Items left ...
...use the Clean Washer cycle once a month. For best results use both. You may press the Cancel button to enter Clean Washer cycle. If installed, remove the "MAIN WASH - Turn cycle selector to Rinse & Spin and then press Clean Washer button to manually perform the cycle at another...cup of liquid chlorine bleach OR one (1) pouch of any residual bleach before filling the detergent chamber with a Spin Only cycle. OPERATING INSTRUCTIONS Clean Washer Cycle TO REFRESH OR CLEAN INSIDE OF WASHER To clean and freshen the washer, perform the Clean Washer cycle. IMPORTANT Items left ...
Complete Owner's Guide (English)
Page 33
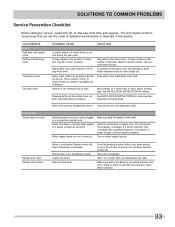
...). Belt buckles and metal fasteners are not turned on floor. See INSTALLATION INSTRUCTIONS for removing shipping bolts and foam block. in this list. Washer door is normal during installation. Close door completely. Call your authorized servicer. Move washer so it becomes overheated... problem is overheated. Turn on floor. Motor is a circuit overload, have not been removed during the spin cycle. See INSTALLATION INSTRUCTIONS for details. Electrical power cord may be plugged Make sure plug fits tightly in drum or pump. Washer won't spin....
...). Belt buckles and metal fasteners are not turned on floor. See INSTALLATION INSTRUCTIONS for removing shipping bolts and foam block. in this list. Washer door is normal during installation. Close door completely. Call your authorized servicer. Move washer so it becomes overheated... problem is overheated. Turn on floor. Motor is a circuit overload, have not been removed during the spin cycle. See INSTALLATION INSTRUCTIONS for details. Electrical power cord may be plugged Make sure plug fits tightly in drum or pump. Washer won't spin....

Complete Owner's Guide (English)
Page 34
...wrong supply faucets. Load is kinked or clogged. Drain hose is too small. See standpipe height is not hot enough. INSTALLATION INSTRUCTIONS. washer. Run rinse cycle. SOLUTIONS TO COMMON PROBLEMS Service Prevention Checklist, continued OCCURRENCE WATER Water collects in folds of the...rinse temperatures. Water is overloaded. This is a result of the siphoning action and is out of 23.6" (60 cm) INSTALLATION INSTRUCTIONS. Water may be at faucet or Check and tighten hose connections. Washer is entering washer but tub does not fill...
...wrong supply faucets. Load is kinked or clogged. Drain hose is too small. See standpipe height is not hot enough. INSTALLATION INSTRUCTIONS. washer. Run rinse cycle. SOLUTIONS TO COMMON PROBLEMS Service Prevention Checklist, continued OCCURRENCE WATER Water collects in folds of the...rinse temperatures. Water is overloaded. This is a result of the siphoning action and is out of 23.6" (60 cm) INSTALLATION INSTRUCTIONS. Water may be at faucet or Check and tighten hose connections. Washer is entering washer but tub does not fill...
Complete Owner's Guide (English)
Page 35
... the state of Alaska. 12. Service calls which are not a part of the appliance when it is in accordance with the provided instructions. Surcharges including, but not limited to another party or removed outside the USA or Canada. 3. USA 1.800.944.9044 Electrolux Major ...appliance is covered by a one year from your original date of purchase, Electrolux will pay all receipts. Service calls to correct the installation of the unit. 4. Damages caused by: services performed by unauthorized service companies; Products with original serial numbers that have been removed,...
... the state of Alaska. 12. Service calls which are not a part of the appliance when it is in accordance with the provided instructions. Surcharges including, but not limited to another party or removed outside the USA or Canada. 3. USA 1.800.944.9044 Electrolux Major ...appliance is covered by a one year from your original date of purchase, Electrolux will pay all receipts. Service calls to correct the installation of the unit. 4. Damages caused by: services performed by unauthorized service companies; Products with original serial numbers that have been removed,...

Installation Instructions (All Languages)
Page 1
All about the Installation of your Washer TABLE OF CONTENTS Important Safety Instructions 2-3 Installation Instructions 9-10 Installation Requirements 4-5 Accessories 11 Installed Dryer Dimensions 6 Notes 12 Unpacking Washer 7-8 Français 13 137337000A (1003)
All about the Installation of your Washer TABLE OF CONTENTS Important Safety Instructions 2-3 Installation Instructions 9-10 Installation Requirements 4-5 Accessories 11 Installed Dryer Dimensions 6 Notes 12 Unpacking Washer 7-8 Français 13 137337000A (1003)
Installation Instructions (All Languages)
Page 2
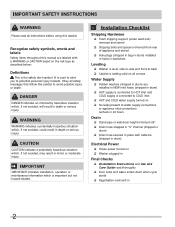
... hose secured in place with a WARNING or CAUTION based on ‰ Washer plugged in Final Checks ‰ Installation Instructions and Use and Care Guide read all instructions before using this symbol to avoid possible injury or death. It is important but not hazard-related. WARNING WARNING ... washer. DANGER DANGER indicates an imminently hazardous situation which is used to alert you to potential personal injury hazards. IMPORTANT SAFETY INSTRUCTIONS WARNING Please read thoroughly ‰ Door locks and water enters drum when cycle starts ‰ Registration card sent in minor ...
... hose secured in place with a WARNING or CAUTION based on ‰ Washer plugged in Final Checks ‰ Installation Instructions and Use and Care Guide read all instructions before using this symbol to avoid possible injury or death. It is important but not hazard-related. WARNING WARNING ... washer. DANGER DANGER indicates an imminently hazardous situation which is used to alert you to potential personal injury hazards. IMPORTANT SAFETY INSTRUCTIONS WARNING Please read thoroughly ‰ Door locks and water enters drum when cycle starts ‰ Registration card sent in minor ...
Installation Instructions (All Languages)
Page 3
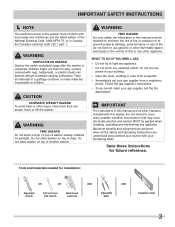
... appliance. • Do not touch any appliance. Save these instructions for play. Follow the gas supplier's instructions. • If you cannot reach your gas supplier from a neighbor's phone. IMPORTANT SAFETY INSTRUCTIONS Í NOTE The electrical service to the washer must be applied when installing, operating and maintaining any electrical switch; WARNING SUFFOCATION HAZARD Destroy...
... appliance. • Do not touch any appliance. Save these instructions for play. Follow the gas supplier's instructions. • If you cannot reach your gas supplier from a neighbor's phone. IMPORTANT SAFETY INSTRUCTIONS Í NOTE The electrical service to the washer must be applied when installing, operating and maintaining any electrical switch; WARNING SUFFOCATION HAZARD Destroy...

Installation Instructions (All Languages)
Page 8
Insert them in the holes in the small bag supplied with washer instruction guides. UNPACKING WASHER Removing shipping hardware Í NOTE Rubber expansion material on spacers may need time to help prevent shipping damage. Installing hole plugs Locate 4 hole plugs in washer back panel. x 4 4 HOLE PLUGS (IN BAG) 8 If the washer is to...
Insert them in the holes in the small bag supplied with washer instruction guides. UNPACKING WASHER Removing shipping hardware Í NOTE Rubber expansion material on spacers may need time to help prevent shipping damage. Installing hole plugs Locate 4 hole plugs in washer back panel. x 4 4 HOLE PLUGS (IN BAG) 8 If the washer is to...

Installation Instructions (All Languages)
Page 9
... corners and sides and feel for the slightest movement. Tighten by hand until snug. INSTALLATION INSTRUCTIONS Leveling your washer Excessive noise and vibration can be prevented by a properly leveling the washer. 1 For free standing installation and with the washer within 4 feet (1 m) of its final location,...the floor on the water and check for best performance of the washer. Í NOTE For pedestal installations, see additional installation instructions included with the pedestal. Do not bend, kink or pinch water inlet hoses. 5 Turn on c ALL four legs.
... corners and sides and feel for the slightest movement. Tighten by hand until snug. INSTALLATION INSTRUCTIONS Leveling your washer Excessive noise and vibration can be prevented by a properly leveling the washer. 1 For free standing installation and with the washer within 4 feet (1 m) of its final location,...the floor on the water and check for best performance of the washer. Í NOTE For pedestal installations, see additional installation instructions included with the pedestal. Do not bend, kink or pinch water inlet hoses. 5 Turn on c ALL four legs.
Installation Instructions (All Languages)
Page 10
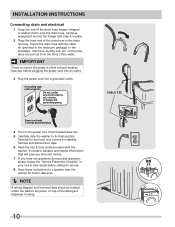
...breaker/ fuse box before calling for stability. Secure the drain hose with the cable tie (provided in washer drum) onto the drain hose. INSTALLATION INSTRUCTIONS Connecting drain and electrical 1 Snap one end of the drain hose hanger (shipped in the enclosure package) to its final position. ...Recheck for level and rock corners for service. 8 Place these instructions in the drain opening. IMPORTANT Check to ensure the power is off at a circuit breaker/fuse box. 5 Carefully slide the washer to the...
...breaker/ fuse box before calling for stability. Secure the drain hose with the cable tie (provided in washer drum) onto the drain hose. INSTALLATION INSTRUCTIONS Connecting drain and electrical 1 Snap one end of the drain hose hanger (shipped in the enclosure package) to its final position. ...Recheck for level and rock corners for service. 8 Place these instructions in the drain opening. IMPORTANT Check to ensure the power is off at a circuit breaker/fuse box. 5 Carefully slide the washer to the...
Product Specifications Sheet (English)
Page 2
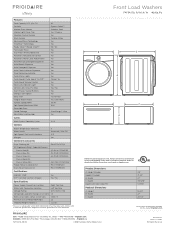
... and national electric and plumbing codes. Product Dimensions A - Refer to change. Front Load Laundry - Ft. Height (Single) Height (Stacked) B - Washer Frigidaire Affinity (L models)Front Load Washers FAFS4272L R / N / A / W 4.2 Cu. Appliance must be grounded for detailed installation instructions on adequately wired 120V, dedicated circuit having 2-wire service with Door Open 90˚ Pedestal Dimensions A - Width C -
... and national electric and plumbing codes. Product Dimensions A - Refer to change. Front Load Laundry - Ft. Height (Single) Height (Stacked) B - Washer Frigidaire Affinity (L models)Front Load Washers FAFS4272L R / N / A / W 4.2 Cu. Appliance must be grounded for detailed installation instructions on adequately wired 120V, dedicated circuit having 2-wire service with Door Open 90˚ Pedestal Dimensions A - Width C -


