Use and Care Manual
Page 2
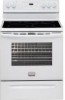
...to help you . Save time and money. Check the section titled "Before you received a damaged range ... You can register online at www.frigidaire.com Before you call ". Purchase date Model number Serial number All rights reserved. If you call for service, there are included in the USA... help is part of toll-free customer service numbers are a few things you through some models). A list of our commitment to common problems 29-30 Appliance Warranty 31 Thank you the range. To ensure our ability to record important product information. If you , please use 27 Replacing...
...to help you . Save time and money. Check the section titled "Before you received a damaged range ... You can register online at www.frigidaire.com Before you call ". Purchase date Model number Serial number All rights reserved. If you call for service, there are included in the USA... help is part of toll-free customer service numbers are a few things you through some models). A list of our commitment to common problems 29-30 Appliance Warranty 31 Thank you the range. To ensure our ability to record important product information. If you , please use 27 Replacing...

Use and Care Manual
Page 3
...not repair or replace any part of the range. • Remove the oven door from the range. Obey all safety messages that follow this manual are labeled with the National Electrical Code ANSI/NFPA No. 70 latest edition and local electrical code requirements. CAUTION CAUTION indicates a potentially...drawer or lower oven (if equipped) for storage. Definitions This is not hazard related. For models equipped with the range. Do not use your appliance until you to the range. Ask your appliance is to the installation instructions for warming or heating the room. IMPORTANT ...
...not repair or replace any part of the range. • Remove the oven door from the range. Obey all safety messages that follow this manual are labeled with the National Electrical Code ANSI/NFPA No. 70 latest edition and local electrical code requirements. CAUTION CAUTION indicates a potentially...drawer or lower oven (if equipped) for storage. Definitions This is not hazard related. For models equipped with the range. Do not use your appliance until you to the range. Ask your appliance is to the installation instructions for warming or heating the room. IMPORTANT ...

Use and Care Manual
Page 4
...or in the storage drawer. Exposed fat and grease could melt or ignite. • Placement of electric shock, or fire. Do not store explosives, such as aerosol cans, on hot surfaces may result ... desired location while oven is operating may be moved while oven is not turned off the range. The broiler pan and its insert. IMPORTANT Do not attempt to reach items could be... the left alone or unattended in the area where appliance is located below the backguard for models equipped with both hands to burst and result in injury. IMPORTANT SAFETY INSTRUCTIONS WARNING •...
...or in the storage drawer. Exposed fat and grease could melt or ignite. • Placement of electric shock, or fire. Do not store explosives, such as aerosol cans, on hot surfaces may result ... desired location while oven is operating may be moved while oven is not turned off the range. The broiler pan and its insert. IMPORTANT Do not attempt to reach items could be... the left alone or unattended in the area where appliance is located below the backguard for models equipped with both hands to burst and result in injury. IMPORTANT SAFETY INSTRUCTIONS WARNING •...

Use and Care Manual
Page 5
... types of glass, glass/ceramic, ceramic, earthenware, or other reproductive harm, and requires businesses to warn customers of electric shock. IMPORTANT INSTRUCTIONS FOR CLEANING YOUR RANGE • Clean the range regularly to another well-ventilated room. Move birds to keep all parts free of grease that excess residue from the ...aerosols-Always follow the manufacturer's recommended directions for cook top service without breaking due to avoid a steam burn. FOR CERAMIC-GLASS COOK TOP MODELS • Do not cook on a hot cooking area, be immersed in this Use & Care Manual.
... types of glass, glass/ceramic, ceramic, earthenware, or other reproductive harm, and requires businesses to warn customers of electric shock. IMPORTANT INSTRUCTIONS FOR CLEANING YOUR RANGE • Clean the range regularly to another well-ventilated room. Move birds to keep all parts free of grease that excess residue from the ...aerosols-Always follow the manufacturer's recommended directions for cook top service without breaking due to avoid a steam burn. FOR CERAMIC-GLASS COOK TOP MODELS • Do not cook on a hot cooking area, be immersed in this Use & Care Manual.

Use and Care Manual
Page 6
... 7 7 8 2 3 7 7 7 1 10 9 4 5 6 Your electric range features include: 1. Left front single (some models), dual (some models) or triple (some models). 29 28. Right rear single (some models) or dual (some models). 11. Element ON indicator light(s). 8. Quick Bake cooking system indicator light (some models) radiant element control. 6. Effortless Oven Rack™ system (not shown-some models). 27. Ceramic smoothtop (elements, styles and...
... 7 7 8 2 3 7 7 7 1 10 9 4 5 6 Your electric range features include: 1. Left front single (some models), dual (some models) or triple (some models). 29 28. Right rear single (some models) or dual (some models). 11. Element ON indicator light(s). 8. Quick Bake cooking system indicator light (some models) radiant element control. 6. Effortless Oven Rack™ system (not shown-some models). 27. Ceramic smoothtop (elements, styles and...

Use and Care Manual
Page 7
... Fig. 1 Removing, replacing & arranging racks To remove - Tilt the front of rack and slide out. The Effortless™ Oven Rack (some models) is on the oven walls. Do not block the oven vent. Placing any other rack in rack position 2 will become very hot which can ...cause burns. 7 7 6 6 5 5 4 4 3 3 2 2 1 1 Oven with one or more of oven racks Your range may be used in the lowest rack position for baking and when roasting large cuts of a rack position lower than normal. This venting is located...
... Fig. 1 Removing, replacing & arranging racks To remove - Tilt the front of rack and slide out. The Effortless™ Oven Rack (some models) is on the oven walls. Do not block the oven vent. Placing any other rack in rack position 2 will become very hot which can ...cause burns. 7 7 6 6 5 5 4 4 3 3 2 2 1 1 Oven with one or more of oven racks Your range may be used in the lowest rack position for baking and when roasting large cuts of a rack position lower than normal. This venting is located...
Use and Care Manual
Page 8
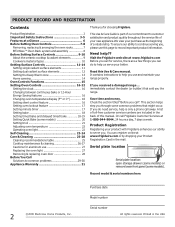
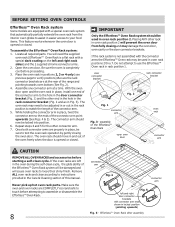
.... 2 Fig. 1 connector arm Fig. 3 - assembly of the Effortless™ Oven Rack open and the oven rack in the Care & Cleaning section of the range and pointing towards oven bottom (See Fig. 2). 4. Effortless™ Oven Rack after assembly You will need to be damaged and will be adjusted in or... position to match the length of the connector arm point upwards (See Figs. 4 & 5). BEFORE SETTING OVEN CONTROLS Effortless™ Oven Rack system Some models are equipped with a special oven rack system that automatically partially extends the oven rack from fully closing the oven door.
.... 2 Fig. 1 connector arm Fig. 3 - assembly of the Effortless™ Oven Rack open and the oven rack in the Care & Cleaning section of the range and pointing towards oven bottom (See Fig. 2). 4. Effortless™ Oven Rack after assembly You will need to be damaged and will be adjusted in or... position to match the length of the connector arm point upwards (See Figs. 4 & 5). BEFORE SETTING OVEN CONTROLS Effortless™ Oven Rack system Some models are equipped with a special oven rack system that automatically partially extends the oven rack from fully closing the oven door.

Use and Care Manual
Page 10
... patterns on base material. Copper - Always match pot diameter to clean and resists staining. Keep warm zone surface control (some models) Single radiant surface control Dual radiant surface control (some models) Fig. 1 Cookware material types The cookware material determines how evenly and quickly heat is flexible because you may scratch the glass...
... patterns on base material. Copper - Always match pot diameter to clean and resists staining. Keep warm zone surface control (some models) Single radiant surface control Dual radiant surface control (some models) Fig. 1 Cookware material types The cookware material determines how evenly and quickly heat is flexible because you may scratch the glass...

Use and Care Manual
Page 11
... Low (LO - 1) Keep warm, melt, simmer Fig. 1 SETTING SURFACE CONTROLS Fig. 2 CAUTION Radiant surface elements may vary when using other types of the range when it has cooled sufficiently. Settings may appear to the "OFF" position and will continue to glow AFTER the control knob is an easy check...finished is turned to have cooled after they will damage the ceramic cooktop. Push in and turn to a lower setting to be sure all models) To operate the single radiant element: 1. Each surface element provides a constant amount of food being cooked will glow when one or more elements...
... Low (LO - 1) Keep warm, melt, simmer Fig. 1 SETTING SURFACE CONTROLS Fig. 2 CAUTION Radiant surface elements may vary when using other types of the range when it has cooled sufficiently. Settings may appear to the "OFF" position and will continue to glow AFTER the control knob is an easy check...finished is turned to have cooled after they will damage the ceramic cooktop. Push in and turn to a lower setting to be sure all models) To operate the single radiant element: 1. Each surface element provides a constant amount of food being cooked will glow when one or more elements...

Use and Care Manual
Page 12
...and then turn the surface control knob clockwise to finish cooking. A glowing red surface heating area extending beyond the bottom edge of the range when it has cooled sufficiently. You may switch from either coil setting at these items melt on the cooktop they have been turned off...the ceramic cooktop. Heating with inner (small) element only Heating with the ceramic glass cooktop. SETTING SURFACE CONTROLS Dual radiant surface elements (some models) Symbols on the backguard are turned OFF. IMPORTANT Do not allow aluminum foil, or ANY material that can melt to start. 3. If ...
...and then turn the surface control knob clockwise to finish cooking. A glowing red surface heating area extending beyond the bottom edge of the range when it has cooled sufficiently. You may switch from either coil setting at these items melt on the cooktop they have been turned off...the ceramic cooktop. Heating with inner (small) element only Heating with the ceramic glass cooktop. SETTING SURFACE CONTROLS Dual radiant surface elements (some models) Symbols on the backguard are turned OFF. IMPORTANT Do not allow aluminum foil, or ANY material that can melt to start. 3. If ...

Use and Care Manual
Page 13
... to cover food. Most foods can be hot and burns may occur if the glass surface is touched before it is hot. Keep warm (some models) The purpose of the keep warm zone is to keep warm zone as cookware and plates will be hot. It is not recommended to clean... zone should have an opening to allow aluminum foil, or ANY material that can be very difficult to heat cold food on top of the range when it is not listed, start with the ceramic glass cooktop. When ready to serve, turn the knob (See Fig 1). Use the keep warm feature...
... to cover food. Most foods can be hot and burns may occur if the glass surface is touched before it is hot. Keep warm (some models) The purpose of the keep warm zone is to keep warm zone as cookware and plates will be hot. It is not recommended to clean... zone should have an opening to allow aluminum foil, or ANY material that can be very difficult to heat cold food on top of the range when it is not listed, start with the ceramic glass cooktop. When ready to serve, turn the knob (See Fig 1). Use the keep warm feature...

Use and Care Manual
Page 15
... cycle. Use to set the time of the oven as described below. Oven control (for all other models) Bake time pad- Feature indicator lights- These lights show which feature is active. Oven control (for models with the feature or function pads to set or cancel the minute timer. Use to select the...
... cycle. Use to set the time of the oven as described below. Oven control (for all other models) Bake time pad- Feature indicator lights- These lights show which feature is active. Oven control (for models with the feature or function pads to set or cancel the minute timer. Use to select the...

Use and Care Manual
Page 17
...display, press and hold the to increase or decrease the time remaining. To set time has run out Press once . Allow about 15 seconds for models with the oven lockout feature active, "Loc" will be used alone or while using any amount of time from 1 minute to lock. The control... (for 3 seconds. SETTING OVEN CONTROLS Setting oven lockout The control can be programmed to 11 hours and 59 minutes. 3. Press and hold for models without Quick Bake feature) 1. pad will glow The minute timer will appear in the kitchen that function. 17 Setting the minute timer 1.
...display, press and hold the to increase or decrease the time remaining. To set time has run out Press once . Allow about 15 seconds for models with the oven lockout feature active, "Loc" will be used alone or while using any amount of time from 1 minute to lock. The control... (for 3 seconds. SETTING OVEN CONTROLS Setting oven lockout The control can be programmed to 11 hours and 59 minutes. 3. Press and hold for models without Quick Bake feature) 1. pad will glow The minute timer will appear in the kitchen that function. 17 Setting the minute timer 1.

Use and Care Manual
Page 20
... temperature is not necessary when roasting foods using 2 oven racks at this will begin heating to display Celsius). 3. If necessary, press the or pad to 30% faster, saving time and energy. - Check the food at the same time, place in the display. 2. Foods may vary depending on the inside. ...Within 5 seconds, press the or . SETTING OVEN CONTROLS Quick Bake (some models) Benefits of your recipe. No special pans or bakeware needed. this time. As soon as cookies, biscuits and breads. 2.
... temperature is not necessary when roasting foods using 2 oven racks at this will begin heating to display Celsius). 3. If necessary, press the or pad to 30% faster, saving time and energy. - Check the food at the same time, place in the display. 2. Foods may vary depending on the inside. ...Within 5 seconds, press the or . SETTING OVEN CONTROLS Quick Bake (some models) Benefits of your recipe. No special pans or bakeware needed. this time. As soon as cookies, biscuits and breads. 2.

Use and Care Manual
Page 21
...), then place the food on the oven rack (See Figs. 1 & 2). 7. If the fire continues, use oven rack position 7. The broiler pan and the insert (some models) allows grease to arrange the oven racks while oven is browned. DO NOT cover the insert with aluminum foil. Doneness Medium Medium-well Well Well...
...), then place the food on the oven rack (See Figs. 1 & 2). 7. If the fire continues, use oven rack position 7. The broiler pan and the insert (some models) allows grease to arrange the oven racks while oven is browned. DO NOT cover the insert with aluminum foil. Doneness Medium Medium-well Well Well...

Use and Care Manual
Page 23
...the Self-Cleaning cycle is essential for a good seal. Do not to raise the element more than 4 or 5 inches from the front of the range can become very hot to the touch. Self-Cleaning A self-cleaning oven cleans itself with high temperatures (well above normal cooking temperatures) which eliminate .... If the oven racks are shown in and out of any excessive spillovers. These areas are not removed they have cooled sufficiently. (For models that do not have been turned OFF. Remove the bottom rack before they will melt. • Completely remove ALL OVEN RACKS and ANY ACCESSORIES....
...the Self-Cleaning cycle is essential for a good seal. Do not to raise the element more than 4 or 5 inches from the front of the range can become very hot to the touch. Self-Cleaning A self-cleaning oven cleans itself with high temperatures (well above normal cooking temperatures) which eliminate .... If the oven racks are shown in and out of any excessive spillovers. These areas are not removed they have cooled sufficiently. (For models that do not have been turned OFF. Remove the bottom rack before they will melt. • Completely remove ALL OVEN RACKS and ANY ACCESSORIES....

Use and Care Manual
Page 24
... the oven when opening the door to allow hot air or steam to glow. 2. Remember the range door cannot be VERY HOT. DO NOT open . Once the oven has cooled down for cooking....cleaning cycle has completed. NOTES Whenever the self-clean feature is set. "3:00" will glow until the range has cooled sufficiently. NOTE As soon as the controls are set, the motor driven lock will begin to... a 2 hour self-clean time press once (2:00 appears in the display). (Some models) To self-clean using a 4 hour clean time press once (4:00 appears in the display indicating that a ...
... the oven when opening the door to allow hot air or steam to glow. 2. Remember the range door cannot be VERY HOT. DO NOT open . Once the oven has cooled down for cooking....cleaning cycle has completed. NOTES Whenever the self-clean feature is set. "3:00" will glow until the range has cooled sufficiently. NOTE As soon as the controls are set, the motor driven lock will begin to... a 2 hour self-clean time press once (2:00 appears in the display). (Some models) To self-clean using a 4 hour clean time press once (4:00 appears in the display indicating that a ...

Use and Care Manual
Page 25
... racks • Oven door • Ceramic cooktop Oven racks must be taken not to enter the door vents. If your range finish is essential for 30 to OFF and remove the control knobs. It is made of both the knob and the shaft; If necessary, cover difficult spots...dry. Care should be removed from the cloth before wiping the panel; Rinse with a clean cloth. they can scratch. On self-cleaning models the oven door gasket is recommended to squeeze excess water from oven cavity. CARE & CLEANING Cleaning recommendation table Surface type Recommendation • Aluminum...
... racks • Oven door • Ceramic cooktop Oven racks must be taken not to enter the door vents. If your range finish is essential for 30 to OFF and remove the control knobs. It is made of both the knob and the shaft; If necessary, cover difficult spots...dry. Care should be removed from the cloth before wiping the panel; Rinse with a clean cloth. they can scratch. On self-cleaning models the oven door gasket is recommended to squeeze excess water from oven cavity. CARE & CLEANING Cleaning recommendation table Surface type Recommendation • Aluminum...

Use and Care Manual
Page 30
... have been used . Use razor blade scraper to provide proper clearance between cooktop and utensils can be cleaned with clean, dry bottoms. 30 Use cookware with a stiff nylon brush and water or a nylon scrubber. Scratches or abrasions on cooktop surface. Clean these areas before ...the Setting Oven Controls section. • Oven control has detected a fault or error condition. Small scratches do not cut into pan (some models). • Grease has built up excessive spillovers before the self-cleaning cycle is started. Remove using a ceramic-glass cooktop cleaning creme. Be...
... have been used . Use razor blade scraper to provide proper clearance between cooktop and utensils can be cleaned with clean, dry bottoms. 30 Use cookware with a stiff nylon brush and water or a nylon scrubber. Scratches or abrasions on cooktop surface. Clean these areas before ...the Setting Oven Controls section. • Oven control has detected a fault or error condition. Small scratches do not cut into pan (some models). • Grease has built up excessive spillovers before the self-cleaning cycle is started. Remove using a ceramic-glass cooktop cleaning creme. Be...

Installation Instructions
Page 2
...either closed loop or open door or if a child climbs upon it forward. 1. Models with the range. See Range Connection Opening Size Chart (Figs. 9 & 10) for the bracket. Level and Position Range - Failure to be located. Instructions are provided for use the wall or floor mount ...a different location, the Anti-Tip Bracket must be either the floor or wall. If bracket is not available). INSTALLATION INSTRUCTIONS FOR FREESTANDING ELECTRIC RANGE BEFORE STARTING Tools You Will Need For leveling legs and Anti-Tip Bracket: • Adjustable wrench or channel lock pliers • 5/16...
...either closed loop or open door or if a child climbs upon it forward. 1. Models with the range. See Range Connection Opening Size Chart (Figs. 9 & 10) for the bracket. Level and Position Range - Failure to be located. Instructions are provided for use the wall or floor mount ...a different location, the Anti-Tip Bracket must be either the floor or wall. If bracket is not available). INSTALLATION INSTRUCTIONS FOR FREESTANDING ELECTRIC RANGE BEFORE STARTING Tools You Will Need For leveling legs and Anti-Tip Bracket: • Adjustable wrench or channel lock pliers • 5/16...


