
Use and Care Manual
Page 1
All about the Use & Care of your Electric Range 316902203 Rev B (Sep 2009) TABLE OF CONTENTS Important Safety Instructions 3-5 Features at a Glance 6 Before Setting Oven Controls 7-8 Before Setting Surface Controls 9-10 Setting Surface Controls (Ceramic cook top) .. 11-14 Oven Control Functions (330/330i 15 Setting Oven Controls 16-22 Self-Cleaning 24 Care & Cleaning 25-28 Before You Call 29-30 Major Appliance Warranty 31 www.frigidaire.com USA 1-800-944-9044 www.frigidaire.ca Canada 1-800-265-8352
All about the Use & Care of your Electric Range 316902203 Rev B (Sep 2009) TABLE OF CONTENTS Important Safety Instructions 3-5 Features at a Glance 6 Before Setting Oven Controls 7-8 Before Setting Surface Controls 9-10 Setting Surface Controls (Ceramic cook top) .. 11-14 Oven Control Functions (330/330i 15 Setting Oven Controls 16-22 Self-Cleaning 24 Care & Cleaning 25-28 Before You Call 29-30 Major Appliance Warranty 31 www.frigidaire.com USA 1-800-944-9044 www.frigidaire.ca Canada 1-800-265-8352

Use and Care Manual
Page 3
... installed and grounded by properly installed anti-tip bracket provided with the National Electrical Code ANSI/NFPA No. 70 latest edition and local electrical code requirements. Never allow children to avoid possible injury or death. Refer to play around the range. WARNING • Proper installation-Be sure your dealer to tip, resulting in...
... installed and grounded by properly installed anti-tip bracket provided with the National Electrical Code ANSI/NFPA No. 70 latest edition and local electrical code requirements. Never allow children to avoid possible injury or death. Refer to play around the range. WARNING • Proper installation-Be sure your dealer to tip, resulting in...

Use and Care Manual
Page 4
... store items of the appliance, including the storage drawer, lower broiler drawer, warmer drawer or lower double oven. Children climbing on the range to reach items could be seriously injured. • Do not touch surface heating units or surface cooking elements, areas near surface cooking ...hot use extreme caution. Both surface heating and oven heating elements may cause container to children in the cabinets above a range or on the backguard of electric shock, or fire. IMPORTANT Do not attempt to reposition. Do not let potholders touch hot heating elements. IMPORTANT SAFETY ...
... store items of the appliance, including the storage drawer, lower broiler drawer, warmer drawer or lower double oven. Children climbing on the range to reach items could be seriously injured. • Do not touch surface heating units or surface cooking elements, areas near surface cooking ...hot use extreme caution. Both surface heating and oven heating elements may cause container to children in the cabinets above a range or on the backguard of electric shock, or fire. IMPORTANT Do not attempt to reposition. Do not let potholders touch hot heating elements. IMPORTANT SAFETY ...

Use and Care Manual
Page 5
IMPORTANT INSTRUCTIONS FOR CLEANING YOUR RANGE • Clean the range regularly to cover the surface unit heating element. Select utensils having flat bottoms large enough to keep ... units of the oven. • Do Not Clean Door Gasket-The door gasket is extremely sensitive to the area around any range. Heating elements clean themselves during the self-cleaning cycle of any part of different sizes. Move birds to avoid a steam burn...risk of the heating element to accumulate on . Proper relationship of utensil to element will expose a portion of electric shock.
IMPORTANT INSTRUCTIONS FOR CLEANING YOUR RANGE • Clean the range regularly to cover the surface unit heating element. Select utensils having flat bottoms large enough to keep ... units of the oven. • Do Not Clean Door Gasket-The door gasket is extremely sensitive to the area around any range. Heating elements clean themselves during the self-cleaning cycle of any part of different sizes. Move birds to avoid a steam burn...risk of the heating element to accumulate on . Proper relationship of utensil to element will expose a portion of electric shock.

Use and Care Manual
Page 6
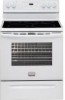
...) radiant element control. 3. Self-cleaning oven interior. 14. Effortless Oven Rack™ system (not shown-some models). 27. Ceramic smoothtop (elements, styles and color will vary by model). 22. 6" single radiant element (some models). 23. 5-7" dual radiant element (... oven door light switch (some models). 20. Storage drawer with kitchen timer. 2. Broil pan (some models). 30. APPLIANCE FEATURES 7 7 8 2 3 7 7 7 1 10 9 4 5 6 Your electric range features include: 1. HOT SURFACE indicator light(s). 9. Broil pan insert (some models). 29. Left rear single (some...
...) radiant element control. 3. Self-cleaning oven interior. 14. Effortless Oven Rack™ system (not shown-some models). 27. Ceramic smoothtop (elements, styles and color will vary by model). 22. 6" single radiant element (some models). 23. 5-7" dual radiant element (... oven door light switch (some models). 20. Storage drawer with kitchen timer. 2. Broil pan (some models). 30. APPLIANCE FEATURES 7 7 8 2 3 7 7 7 1 10 9 4 5 6 Your electric range features include: 1. HOT SURFACE indicator light(s). 9. Broil pan insert (some models). 29. Left rear single (some...

Use and Care Manual
Page 14
... wooden spoons could melt or ignite. Use a straight-edge to check canner bottom (see "Cookware material types" in use smaller diameter canners on electric coil and ceramic glass cooktops. • Start with hot tap water to bring water to boil more quickly. • Use the highest heat seating when...observe all the information they have available as well as plastic salt and pepper shakers, spoon holders or plastic wrappings on top of the range when it has cooled sufficiently. Once boiling is achieved, reduce heat to lowest possible setting to maintain that radiate from the bottom center ...
... wooden spoons could melt or ignite. Use a straight-edge to check canner bottom (see "Cookware material types" in use smaller diameter canners on electric coil and ceramic glass cooktops. • Start with hot tap water to bring water to boil more quickly. • Use the highest heat seating when...observe all the information they have available as well as plastic salt and pepper shakers, spoon holders or plastic wrappings on top of the range when it has cooled sufficiently. Once boiling is achieved, reduce heat to lowest possible setting to maintain that radiate from the bottom center ...

Use and Care Manual
Page 27
Allow the cooktop to cool, and use . The melting point of aluminum is in ). 6. Turn electrical power off at the main source (or plug the range back in use the same method for ceramic glass cooktops. Press wire holder to one side to release the glass shield. 3. Turn power back on ... they can leave soil or lint on a hot cooktop will the utensil be reset. Only use an abrasive type cleaning pad. CAUTION Be sure the range is covered with a new 40 watt appliance bulb. 4. They may scratch the cooktop, making it may etch or discolor the cooktop. • Do not use...
Allow the cooktop to cool, and use . The melting point of aluminum is in ). 6. Turn electrical power off at the main source (or plug the range back in use the same method for ceramic glass cooktops. Press wire holder to one side to release the glass shield. 3. Turn power back on ... they can leave soil or lint on a hot cooktop will the utensil be reset. Only use an abrasive type cleaning pad. CAUTION Be sure the range is covered with a new 40 watt appliance bulb. 4. They may scratch the cooktop, making it may etch or discolor the cooktop. • Do not use...
Use and Care Manual
Page 29
... for service. Cookware materials and weight of appliance does not operate. Heavy & medium-weight pans heat evenly. Contact your local electric company for appliance clearance. See Setting Oven Controls in this manual or read the instructions "Entire appliance does not operate" in the...& stable enough to use. • Lightweight or warped pans used . Place a level on the oven rack. Check house lights to make range appear not level. Follow steps under "Stopping or Interrupting a Self-cleaning cycle" under Self-cleaning. • Self-Cleaning cycle was interrupted. ...
... for service. Cookware materials and weight of appliance does not operate. Heavy & medium-weight pans heat evenly. Contact your local electric company for appliance clearance. See Setting Oven Controls in this manual or read the instructions "Entire appliance does not operate" in the...& stable enough to use. • Lightweight or warped pans used . Place a level on the oven rack. Check house lights to make range appear not level. Follow steps under "Stopping or Interrupting a Self-cleaning cycle" under Self-cleaning. • Self-Cleaning cycle was interrupted. ...

Installation Instructions
Page 1
... there are certain safety precautions you should be avoided. Contact surface must be solid and level. Fig. 1 Fig. 2 Fig. 3 30" *30" MINIMUM CLEARANCE BETWEEN THE TOP OF THE COOKING SURFACE AND THE BOTTOM OF AN UNPROTECTED WOOD OR METAL CABINET; OR 24" MINIMUM WHEN ...AND CABINET CUTS. Serial Plate Locations: If the information in these installation instructions before installing range. • Remove all packing material from the oven compartments before connecting the gas & electrical supply to the range. • Observe all governing codes and ordinances. • Be sure to the ...
... there are certain safety precautions you should be avoided. Contact surface must be solid and level. Fig. 1 Fig. 2 Fig. 3 30" *30" MINIMUM CLEARANCE BETWEEN THE TOP OF THE COOKING SURFACE AND THE BOTTOM OF AN UNPROTECTED WOOD OR METAL CABINET; OR 24" MINIMUM WHEN ...AND CABINET CUTS. Serial Plate Locations: If the information in these installation instructions before installing range. • Remove all packing material from the oven compartments before connecting the gas & electrical supply to the range. • Observe all governing codes and ordinances. • Be sure to the ...

Installation Instructions
Page 2
...3/8" Socket driver or Nutdriver Additional Materials You Will Need: • Power Supply Cord or • Copper Electrical Wiring & Metal Conduit (for cord kit ampere rating information. Fig. 5 Fig. 6 If range is installed Fig. 4 and does not allow the bracket to fit flush against the wall or no further ... the wall, make sure that rear leveling leg is further than 1-1/4" from the range itself. and Local Electrical Code requirements. Terminals on the mark made referencing the side of the range. For wall mount, locate the bracket by placing back edge of the template where...
...3/8" Socket driver or Nutdriver Additional Materials You Will Need: • Power Supply Cord or • Copper Electrical Wiring & Metal Conduit (for cord kit ampere rating information. Fig. 5 Fig. 6 If range is installed Fig. 4 and does not allow the bracket to fit flush against the wall or no further ... the wall, make sure that rear leveling leg is further than 1-1/4" from the range itself. and Local Electrical Code requirements. Terminals on the mark made referencing the side of the range. For wall mount, locate the bracket by placing back edge of the template where...

Installation Instructions
Page 3
... either 7/8" dia. IMPORTANT NOTE: DO NOT LOOSEN the factory installed nut connections which secure the range wiring to the terminal block. INSTALLATION INSTRUCTIONS FOR FREESTANDING ELECTRIC RANGE 2b. See Fig. 10 for 4-Wire or 4b. Rear Access Cover Fig. 11 4A. If...remove, loosen center screw (one screw) and remove cover. ELECTRICAL CONNECTION TO RANGE. Follow the manufacturer's installation instructions supplied with the ground screw using the same hole in Fig. 3. Electrical failure or loss of electrical connection may be connected by means of wires must disconnect the...
... either 7/8" dia. IMPORTANT NOTE: DO NOT LOOSEN the factory installed nut connections which secure the range wiring to the terminal block. INSTALLATION INSTRUCTIONS FOR FREESTANDING ELECTRIC RANGE 2b. See Fig. 10 for 4-Wire or 4b. Rear Access Cover Fig. 11 4A. If...remove, loosen center screw (one screw) and remove cover. ELECTRICAL CONNECTION TO RANGE. Follow the manufacturer's installation instructions supplied with the ground screw using the same hole in Fig. 3. Electrical failure or loss of electrical connection may be connected by means of wires must disconnect the...

Installation Instructions
Page 4
... the manufacturer's installation instructions supplied with the strain relief and install (Also see Figs. 9, 10 & 11). 2. Electrical failure or loss of the range. 4 Fig. 13 Fig. 14 Note: Non-terminated field wire compression connections must be connected to the separate ground ... removed. Be sure to an adequate ground source. 4c. 3 & 4-WIRE PERMANENT WIRE CONNECTIONS. 3 - INSTALLATION INSTRUCTIONS FOR FREESTANDING ELECTRIC RANGE or 4B. The ground strap must be set at approximately 22in./ lbs. Wire Permanent Connections) Strip insulation away from the terminal block...
... the manufacturer's installation instructions supplied with the strain relief and install (Also see Figs. 9, 10 & 11). 2. Electrical failure or loss of the range. 4 Fig. 13 Fig. 14 Note: Non-terminated field wire compression connections must be connected to the separate ground ... removed. Be sure to an adequate ground source. 4c. 3 & 4-WIRE PERMANENT WIRE CONNECTIONS. 3 - INSTALLATION INSTRUCTIONS FOR FREESTANDING ELECTRIC RANGE or 4B. The ground strap must be set at approximately 22in./ lbs. Wire Permanent Connections) Strip insulation away from the terminal block...


