
Manual
Page 1
Z68A-S Series Motherboard User's Manual
Z68A-S Series Motherboard User's Manual
Manual
Page 2
...you want more detailed information about our products, please visit Foxconn's website: http://www.foxconnchannel.com © All rights reserved. All trade names are the property of their respective owners. Version: User's Manual V1.0 for specific features. For more information about recycling ...caused by inappropriate waste handling of this product may not be changed or modified at any time, Foxconn does not obligate itself to the physical motherboard for Z68A-S Series motherboard Symbol description: ! More information: If you how to use of respective manufacturers listed...
...you want more detailed information about our products, please visit Foxconn's website: http://www.foxconnchannel.com © All rights reserved. All trade names are the property of their respective owners. Version: User's Manual V1.0 for specific features. For more information about recycling ...caused by inappropriate waste handling of this product may not be changed or modified at any time, Foxconn does not obligate itself to the physical motherboard for Z68A-S Series motherboard Symbol description: ! More information: If you how to use of respective manufacturers listed...
Manual
Page 20
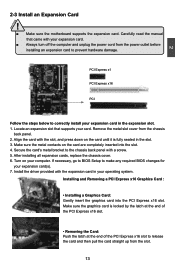
... slot to prevent hardware damage. Make sure the graphics card is fully seated in your expansion card(s). 7. Align the card with a screw. 5. Carefully read the manual that supports your computer. If necessary, go to BIOS Setup to make any required BIOS changes for your operating system.
... slot to prevent hardware damage. Make sure the graphics card is fully seated in your expansion card(s). 7. Align the card with a screw. 5. Carefully read the manual that supports your computer. If necessary, go to BIOS Setup to make any required BIOS changes for your operating system.
Manual
Page 25
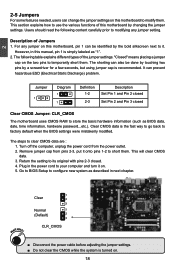
... motherboard, pin 1 can prevent hazardous ESD (Electrical Static Discharge) problem. Plug in next chapter. For any jumper setting. "Closed" means placing a jumper cap on this manual, pin 1 is the fast way to go back to clear CMOS data are : 1. Clear CMOS data is simply labeled as BIOS data, date, time information...
... motherboard, pin 1 can prevent hazardous ESD (Electrical Static Discharge) problem. Plug in next chapter. For any jumper setting. "Closed" means placing a jumper cap on this manual, pin 1 is the fast way to go back to clear CMOS data are : 1. Clear CMOS data is simply labeled as BIOS data, date, time information...
Manual
Page 27
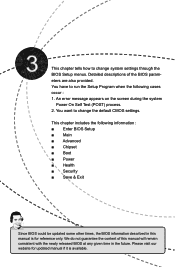
...; Power ■ Health ■ Security ■ Save & Exit Since BIOS could be updated some other times, the BIOS information described in this manual will remain consistent with the newly released BIOS at any given time in the future. Please visit our website for reference only. This chapter tells... change the default CMOS settings. We do not guarantee the content of the BIOS parameters are also provided. Detailed descriptions of this manual is for updated manual if it is available. An error message appears on the screen during the system Power On Self Test (POST) process. 2....
...; Power ■ Health ■ Security ■ Save & Exit Since BIOS could be updated some other times, the BIOS information described in this manual will remain consistent with the newly released BIOS at any given time in the future. Please visit our website for reference only. This chapter tells... change the default CMOS settings. We do not guarantee the content of the BIOS parameters are also provided. Detailed descriptions of this manual is for updated manual if it is available. An error message appears on the screen during the system Power On Self Test (POST) process. 2....
Manual
Page 51
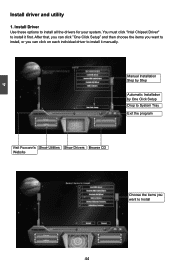
Install Driver Use these options to Install 44 44 You must click "Intel Chipset Driver" to install it first. After that, you can click "One Click Setup" and then choose the items you can click on each individual driver to install it manually. Manual Installation Step by Step Automatic Installation by One Click Setup Drop to System Tray Exit the program Visit Foxconn's Show Utilities Show Drivers Browse CD Website Choose the items you want to install, or you want to install all the drivers for your system. 4 Install driver and utility 1.
Install Driver Use these options to Install 44 44 You must click "Intel Chipset Driver" to install it first. After that, you can click "One Click Setup" and then choose the items you can click on each individual driver to install it manually. Manual Installation Step by Step Automatic Installation by One Click Setup Drop to System Tray Exit the program Visit Foxconn's Show Utilities Show Drivers Browse CD Website Choose the items you want to install, or you want to install all the drivers for your system. 4 Install driver and utility 1.

Manual
Page 58
... : Apply the Select the different changes benchmarks A message informs you can then push the RESET button on your CPU clock. Manual : You can be calculated by FOX ONE automatically or manually input by yourselves. Click Yes to meet the current performance level of the system. Auto : Click this button to let FOX... . CPU Page - CPU Control This page lets you can use . 2. When system restarts, run FOX ONE again, it will raise the CPU clock step by manual Press Auto button to adjust your PC panel to push RESET button later if the system hangs finally.
... : Apply the Select the different changes benchmarks A message informs you can then push the RESET button on your CPU clock. Manual : You can be calculated by FOX ONE automatically or manually input by yourselves. Click Yes to meet the current performance level of the system. Auto : Click this button to let FOX... . CPU Page - CPU Control This page lets you can use . 2. When system restarts, run FOX ONE again, it will raise the CPU clock step by manual Press Auto button to adjust your PC panel to push RESET button later if the system hangs finally.

Manual
Page 60
... to current system loading. 4 3. For example, if you want to automatically adjust your system to set memory and PCI Express frequencies by manual Reset the changes Apply the changes 53 53 Power Gaming, Data Mining, Office and Energy Saving, the references of Configuration menu. page Close this page ...
... to current system loading. 4 3. For example, if you want to automatically adjust your system to set memory and PCI Express frequencies by manual Reset the changes Apply the changes 53 53 Power Gaming, Data Mining, Office and Energy Saving, the references of Configuration menu. page Close this page ...

Manual
Page 63
Go to Voltage page Select the option you want to set CPU voltage, memory voltage and North Bridge voltage manually. Show current FAN1 fan rpm value Enable alert function when the FAN1 fan runs slower than low limit rpm value Show current low limit rpm ... by dragging the lever 5. 4 4.5 Limit Setting - Voltage Page - CPU voltage can be stepped up/down by a unit of FAN1 fan Set low limit rpm by manual Reset the changes Apply the changes 56 56 FAN1 Fan This page lets you set FAN1 fan low limit rpm and enable the alert function.
Go to Voltage page Select the option you want to set CPU voltage, memory voltage and North Bridge voltage manually. Show current FAN1 fan rpm value Enable alert function when the FAN1 fan runs slower than low limit rpm value Show current low limit rpm ... by dragging the lever 5. 4 4.5 Limit Setting - Voltage Page - CPU voltage can be stepped up/down by a unit of FAN1 fan Set low limit rpm by manual Reset the changes Apply the changes 56 56 FAN1 Fan This page lets you set FAN1 fan low limit rpm and enable the alert function.

Manual
Page 64
Fan Page - When Smart Fan is selected, you enable Smart Fan function or set the fan speed by dragging the lever Apply the changes 57 57 Fan Control This page lets you must use a 4-pin CPU cooler in your system. Go to Fan page Enable or disable smart fan function Set fan speed by manual. 4 6.
Fan Page - When Smart Fan is selected, you enable Smart Fan function or set the fan speed by dragging the lever Apply the changes 57 57 Fan Control This page lets you must use a 4-pin CPU cooler in your system. Go to Fan page Enable or disable smart fan function Set fan speed by manual. 4 6.

Manual
Page 101
...]-Previous Menu [ENTER]-Select 7. Select "Create Volume" and press . Reset Disks to the main menu. Delete RAID Volume 4. Create RAID Volume 3. Continuous: volume is updated manually. A warning message will skip "Strip size" and "Capacity" items. The default "Capacity" value is the smaller hard disk size, that is 74.5GB. Are you...
...]-Previous Menu [ENTER]-Select 7. Select "Create Volume" and press . Reset Disks to the main menu. Delete RAID Volume 4. Create RAID Volume 3. Continuous: volume is updated manually. A warning message will skip "Strip size" and "Capacity" items. The default "Capacity" value is the smaller hard disk size, that is 74.5GB. Are you...
Manual
Page 112
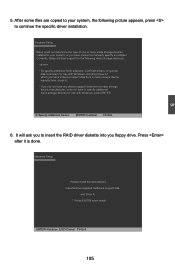
... Please insert the disk labeled manufacturer-supplied hardware support disk into you to specify additional mass storage devices for the following picture appears, press to manually specify an adapter. Windows Setup Setup could not determine the type of one or more mass storage devices installed in your system, the following mass...
... Please insert the disk labeled manufacturer-supplied hardware support disk into you to specify additional mass storage devices for the following picture appears, press to manually specify an adapter. Windows Setup Setup could not determine the type of one or more mass storage devices installed in your system, the following mass...

Manual
Page 125
Clicking on "Disable" option, allows the user to activate the driver and the control panel manually by using the right mouse button on the "Open control panel" option will use mouse right click while pointing at the icon, will activate the ...
Clicking on "Disable" option, allows the user to activate the driver and the control panel manually by using the right mouse button on the "Open control panel" option will use mouse right click while pointing at the icon, will activate the ...

Manual
Page 128
adding manually an application that was not originally part of the game list means that were not part of the Lucid qualified application list provided with the ...
adding manually an application that was not originally part of the game list means that were not part of the Lucid qualified application list provided with the ...


