

User Guide
Page 3
Contents Dryer Safety Important Safety Instructions Warranty Installation Instructions Installer Responsibilities, Location Requirements Dimensions Mobile Home Installation Exhausting Alternative Installation for Help ..., Towels, Shirts, Lingerie Freshen Up, Warm Up, Dry Clean Blankets, Jeans, Comforter Using Your Dryer Sorting, Loading Lint Bucket Lidlock Power failure Care Labels Cleaning If your Intuitive™ Dryer Beeps for Close Clearances Exhaust Venting Installation Grounding Instructions Electrical Requirements Gas Requirements Level Machine, Final Installation Checklist...
Contents Dryer Safety Important Safety Instructions Warranty Installation Instructions Installer Responsibilities, Location Requirements Dimensions Mobile Home Installation Exhausting Alternative Installation for Help ..., Towels, Shirts, Lingerie Freshen Up, Warm Up, Dry Clean Blankets, Jeans, Comforter Using Your Dryer Sorting, Loading Lint Bucket Lidlock Power failure Care Labels Cleaning If your Intuitive™ Dryer Beeps for Close Clearances Exhaust Venting Installation Grounding Instructions Electrical Requirements Gas Requirements Level Machine, Final Installation Checklist...

User Guide
Page 4
...messages and instructions; We hope you enjoy using the Intuitive™ dryer as much as we have enjoyed designing it is very important. Located on your dryer and throughout this dryer to treat your new Intuitive™ dryer. it . We know you to read this User Guide carefully....Your safety, and the safety of its easy loading drum, reverse tumbling and lint removal system. It will look better for buying a Fisher & Paykel Intuitive™ dryer. Thank you understand and follow them gently so they will help you 'll enjoy the benefits of others is important that you for ...
...messages and instructions; We hope you enjoy using the Intuitive™ dryer as much as we have enjoyed designing it is very important. Located on your dryer and throughout this dryer to treat your new Intuitive™ dryer. it . We know you to read this User Guide carefully....Your safety, and the safety of its easy loading drum, reverse tumbling and lint removal system. It will look better for buying a Fisher & Paykel Intuitive™ dryer. Thank you understand and follow them gently so they will help you 'll enjoy the benefits of others is important that you for ...

User Guide
Page 5
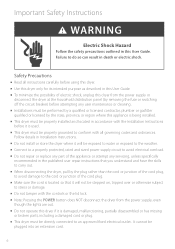
This is important to always act with caution and use common sense when operating your dryer. The safety alert symbol and the word DANGER or WARNING will be used in this Guide to highlight when extra care is required. All safety ...'t WARNING follow instructions. You can be killed or seriously injured if you and others. Use only as per instructed by these at all safety messages. Dryer Safety US CA Symbols Symbols will precede all times to ensure you what can happen if the instructions are not harmed while operating your...
This is important to always act with caution and use common sense when operating your dryer. The safety alert symbol and the word DANGER or WARNING will be used in this Guide to highlight when extra care is required. All safety ...'t WARNING follow instructions. You can be killed or seriously injured if you and others. Use only as per instructed by these at all safety messages. Dryer Safety US CA Symbols Symbols will precede all times to ensure you what can happen if the instructions are not harmed while operating your...
User Guide
Page 6
...the Installation Instructions before it will be directly connected to stress or damage. Safety Precautions Read all governing codes and ordinances. This dryer must be stepped on, tripped over or otherwise subject to an approved fixed electrical outlet. Do not repair or replace any ...To minimize the possibility of the cord plug. Connect to a properly protected, rated and sized power supply circuit to the weather. This dryer must be performed by a qualified or licensed contractor, plumber or gasfitter qualified or licensed by removing the fuse or switching off the circuit...
...the Installation Instructions before it will be directly connected to stress or damage. Safety Precautions Read all governing codes and ordinances. This dryer must be stepped on, tripped over or otherwise subject to an approved fixed electrical outlet. Do not repair or replace any ...To minimize the possibility of the cord plug. Connect to a properly protected, rated and sized power supply circuit to the weather. This dryer must be performed by a qualified or licensed contractor, plumber or gasfitter qualified or licensed by removing the fuse or switching off the circuit...

User Guide
Page 7
...WARNING Fire Hazard Only dry fabrics that may burn or melt (such as paper materials, plastics or plastic containers etc) next to the dryer. Do not leave hot oil-affected items in domestic environments include acetone, denatured alcohol, gasoline, kerosene, some brands of combustible materials such... might melt or burn. Do not store any other appliance. Dry on the AIR DRY cycle. Failure to heat sources such as a tumble dryer. This oxidation creates heat. The items become hot enough to prevent the accumulation of the transparent section. (usually once a week). 7 Unless ...
...WARNING Fire Hazard Only dry fabrics that may burn or melt (such as paper materials, plastics or plastic containers etc) next to the dryer. Do not leave hot oil-affected items in domestic environments include acetone, denatured alcohol, gasoline, kerosene, some brands of combustible materials such... might melt or burn. Do not store any other appliance. Dry on the AIR DRY cycle. Failure to heat sources such as a tumble dryer. This oxidation creates heat. The items become hot enough to prevent the accumulation of the transparent section. (usually once a week). 7 Unless ...

User Guide
Page 8
...Guide (refer to the Warranty section at the back of slipping. SAVE THESE INSTRUCTIONS Warranty Your dryer has been made to the dryer can result if the metal reinforcements come loose during drying. If your Fisher & Paykel Authorized Service Agent or our Customer Care Center (Toll Free 1 888 9 FNP USA (1 888... 9 367 872)) rather than attempting to fix it open. Do not reach into , or stand on the dryer top, lid or drum. Years of the...
...Guide (refer to the Warranty section at the back of slipping. SAVE THESE INSTRUCTIONS Warranty Your dryer has been made to the dryer can result if the metal reinforcements come loose during drying. If your Fisher & Paykel Authorized Service Agent or our Customer Care Center (Toll Free 1 888 9 FNP USA (1 888... 9 367 872)) rather than attempting to fix it open. Do not reach into , or stand on the dryer top, lid or drum. Years of the...

User Guide
Page 9
...vent) Gloves Safety glasses Knife Duct tape Parts Supplied 2 feet inserts for gas pipe connections that is supplied already connected to the gas dryer (Gas models only) Check to correctly install this appliance. A power supply cord is resistant to Natural Gas Conversion Kit Part No 395490...read electrical, gas and venting requirements before you have all the tools and parts necessary to make sure you start installing the dryer. Check to make sure all parts have been supplied. Installation Instructions US CA Read the Important Safety Instructions on pages 6 - 8...
...vent) Gloves Safety glasses Knife Duct tape Parts Supplied 2 feet inserts for gas pipe connections that is supplied already connected to the gas dryer (Gas models only) Check to correctly install this appliance. A power supply cord is resistant to Natural Gas Conversion Kit Part No 395490...read electrical, gas and venting requirements before you have all the tools and parts necessary to make sure you start installing the dryer. Check to make sure all parts have been supplied. Installation Instructions US CA Read the Important Safety Instructions on pages 6 - 8...
User Guide
Page 10
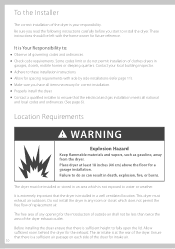
... home owner for intake air. 10 Check code requirements. Location Requirements WARNING Explosion Hazard Keep flammable materials and vapors, such as gasoline, away from the dryer. Adhere to water or weather. Some codes limit or do so can result in any opening for the introduction of the... side of outside air shall not be left with side by side installations (refer page 11). The air intake is Your Responsibility to install the dryer. It is extremely important that the electrical and gas installation meets all items necessary for a garage installation. Before installing the...
... home owner for intake air. 10 Check code requirements. Location Requirements WARNING Explosion Hazard Keep flammable materials and vapors, such as gasoline, away from the dryer. Adhere to water or weather. Some codes limit or do so can result in any opening for the introduction of the... side of outside air shall not be left with side by side installations (refer page 11). The air intake is Your Responsibility to install the dryer. It is extremely important that the electrical and gas installation meets all items necessary for a garage installation. Before installing the...

User Guide
Page 11
... top opening area in the door must be a minimum of lint. A dryer produces combustible lint so the area around the dryer must be WA R N I N G exhausted to the outdoors. Alcove or Closet Installation When installing a dryer in a closet/alcove it must be cleaned regularly to keep it free of..." (310cm2) total ventation area 72 sq" (465cm2) 24 sq" (155cm2) 11 Minimum installation clearances are required but more clearance is recommended. This dryer can only be vented from the rear and must be kept clear and free from combustible materials, gasoline and other fuel burning appliance can be...
... top opening area in the door must be a minimum of lint. A dryer produces combustible lint so the area around the dryer must be WA R N I N G exhausted to the outdoors. Alcove or Closet Installation When installing a dryer in a closet/alcove it must be cleaned regularly to keep it free of..." (310cm2) total ventation area 72 sq" (465cm2) 24 sq" (155cm2) 11 Minimum installation clearances are required but more clearance is recommended. This dryer can only be vented from the rear and must be kept clear and free from combustible materials, gasoline and other fuel burning appliance can be...
User Guide
Page 13
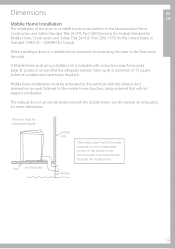
... mobile home structure, using materials that will not support combustion. A Mobile Home anchoring installation kit is required). Z240MH for anchoring the dryer to the floor must be made. Mobile home installations must be securely fastened to a non-combustible portion of the mobile home structure... and must not terminate beneath the mobile home. When installing a dryer in a mobile home, provisions for Canada. See the section on exhausting for the United States or Standard CAN/CSA - skirting 13 ...
... mobile home structure, using materials that will not support combustion. A Mobile Home anchoring installation kit is required). Z240MH for anchoring the dryer to the floor must be made. Mobile home installations must be securely fastened to a non-combustible portion of the mobile home structure... and must not terminate beneath the mobile home. When installing a dryer in a mobile home, provisions for Canada. See the section on exhausting for the United States or Standard CAN/CSA - skirting 13 ...

User Guide
Page 14
... install a screen over the exhaust outlet. 14 12" (305mm) Using straight rigid metal ducting will accumulate lint. Do not exhaust the dryer into a window well or other area that will minimize lint accumulation. Never use exhaust hoods with a swing out damper to prevent back drafts... concealed space in more lint accumulating. Failure to secure joints. This appliance must always be punctured, reduce airflow, extend drying times and affect dryer operation. Using ducts larger than 4 inches (100mm) diameter may squash the duct and cause blockages. Do not use a metal foil exhaust ...
... install a screen over the exhaust outlet. 14 12" (305mm) Using straight rigid metal ducting will accumulate lint. Do not exhaust the dryer into a window well or other area that will minimize lint accumulation. Never use exhaust hoods with a swing out damper to prevent back drafts... concealed space in more lint accumulating. Failure to secure joints. This appliance must always be punctured, reduce airflow, extend drying times and affect dryer operation. Using ducts larger than 4 inches (100mm) diameter may squash the duct and cause blockages. Do not use a metal foil exhaust ...

User Guide
Page 15
... Frequently check that : No plastic or other potentially combustible duct or flexible metal foil ducting has been used. Determine Vent Duct Length This dryer can only be vented from the rear and must be inspected and cleaned at least once a year to the outdoors. The exhaust duct ...system meets all relevant local, state and national codes. The duct does not exceed the maximum recommended length for a dryer ensure that the damper on Air Dry (no heat) setting. Exhausting US CA To reduce condensation, insulate any ducting which passes through unheated areas...
... Frequently check that : No plastic or other potentially combustible duct or flexible metal foil ducting has been used. Determine Vent Duct Length This dryer can only be vented from the rear and must be inspected and cleaned at least once a year to the outdoors. The exhaust duct ...system meets all relevant local, state and national codes. The duct does not exceed the maximum recommended length for a dryer ensure that the damper on Air Dry (no heat) setting. Exhausting US CA To reduce condensation, insulate any ducting which passes through unheated areas...

User Guide
Page 16
... to next page). 16 recommended acceptable Maximum Length of Exhaust Duct The maximum length of the exhaust duct system depends upon: The type of the dryer. Exhaust duct systems longer than specified in longer drying times and an increased energy usage. 2 Determine the number of elbows/bends you will provide the...
... to next page). 16 recommended acceptable Maximum Length of Exhaust Duct The maximum length of the exhaust duct system depends upon: The type of the dryer. Exhaust duct systems longer than specified in longer drying times and an increased energy usage. 2 Determine the number of elbows/bends you will provide the...

User Guide
Page 18
sections separate, fittings can face same or opposite swivel collar Extra long band-clamp for your installation. A close-clearance installation is 8ft (2.4m). Refer to the venting system kit manufacturers instructions. 18 Select the type best for dryer connection swivel collar wall connection telescoping sections beveled edges allow corner installations The maximum length using a 2" x 6" (5cm x 15cm) rectangular duct with two elbows and a 2 ½"(6.3cm) exhaust hood is shown. Alternative Installation for Close Clearances Venting systems come in many varieties.
sections separate, fittings can face same or opposite swivel collar Extra long band-clamp for your installation. A close-clearance installation is 8ft (2.4m). Refer to the venting system kit manufacturers instructions. 18 Select the type best for dryer connection swivel collar wall connection telescoping sections beveled edges allow corner installations The maximum length using a 2" x 6" (5cm x 15cm) rectangular duct with two elbows and a 2 ½"(6.3cm) exhaust hood is shown. Alternative Installation for Close Clearances Venting systems come in many varieties.

User Guide
Page 19
Failure to do so can be routed up, down, left, right or straight out the back of the dryer. Make sure you join the exhaust duct to determine the maximum allowable exhaust duct length. Always use a plastic exhaust duct. Do not use suitable duct ...tape. This will prevent lint and dust from escaping from the dryer and exhaust system. Do not use sheet metal screws when assembling ducting. Do not use thin metal foil exhaust duct. Never use plastic or thin...
Failure to do so can be routed up, down, left, right or straight out the back of the dryer. Make sure you join the exhaust duct to determine the maximum allowable exhaust duct length. Always use a plastic exhaust duct. Do not use suitable duct ...tape. This will prevent lint and dust from escaping from the dryer and exhaust system. Do not use sheet metal screws when assembling ducting. Do not use thin metal foil exhaust duct. Never use plastic or thin...
User Guide
Page 20
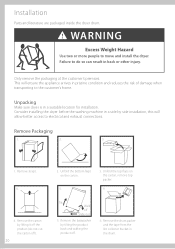
... for installation. Tilt Walk off ). 20 2. This will allow better access to move and install the dryer. Unpacking Make sure dryer is in back or other injury. Failure to the customer's home. Consider installing the dryer before the washing machine in a side by tilting the product back and walking the product off. 6. Remove..., this will ensure the appliance arrives in the drum. Only remove the packaging at the customer's premises. Installation Parts and literature are packaged inside the dryer drum. Unfold the bottom flaps on the carton, remove top packer. 6.
... for installation. Tilt Walk off ). 20 2. This will allow better access to move and install the dryer. Unpacking Make sure dryer is in back or other injury. Failure to the customer's home. Consider installing the dryer before the washing machine in a side by tilting the product back and walking the product off. 6. Remove..., this will ensure the appliance arrives in the drum. Only remove the packaging at the customer's premises. Installation Parts and literature are packaged inside the dryer drum. Unfold the bottom flaps on the carton, remove top packer. 6.

User Guide
Page 21
Installation US CA Fitting the Front Feet Note: Dryer is usually supplied with feet fitted and protruding the correct distance. 1 Tilt the dryer back using a hand trolley and making sure the trolley and dryer are secure. 2 Fit a rubber insert to each plastic foot as shown. 3 Screw the feet into the foot retainers on the left hand and right hand sides as shown. 4 Screw both feet in so they protrude ½" (12mm) below the bottom of the wall on the foot retainers. 21
Installation US CA Fitting the Front Feet Note: Dryer is usually supplied with feet fitted and protruding the correct distance. 1 Tilt the dryer back using a hand trolley and making sure the trolley and dryer are secure. 2 Fit a rubber insert to each plastic foot as shown. 3 Screw the feet into the foot retainers on the left hand and right hand sides as shown. 4 Screw both feet in so they protrude ½" (12mm) below the bottom of the wall on the foot retainers. 21

User Guide
Page 22
... with the National Electrical Code ANSI/NFPA 70, or the Canadian Electrical Code, CSA C22.1. Grounding Instructions for Gas and Electric Dryers WARNING Electrical Shock Hazard Make sure appliance is wired or plugged into an appropriate outlet that is properly installed and grounded in accordance... result in a risk of malfunction or breakdown, grounding will not fit the outlet. Do not use an extension cord. Grounding for electric dryers. 22 In the event of electric shock. Refer to follow these instructions can result in death, fire, or electrical shock. Failure to...
... with the National Electrical Code ANSI/NFPA 70, or the Canadian Electrical Code, CSA C22.1. Grounding Instructions for Gas and Electric Dryers WARNING Electrical Shock Hazard Make sure appliance is wired or plugged into an appropriate outlet that is properly installed and grounded in accordance... result in a risk of malfunction or breakdown, grounding will not fit the outlet. Do not use an extension cord. Grounding for electric dryers. 22 In the event of electric shock. Refer to follow these instructions can result in death, fire, or electrical shock. Failure to...

User Guide
Page 23
...electrical service requirements can result in death, fire, or electrical shock. If a power cord is located on the data label that is used . If the dryer is located in (1) a new branch circuit installation, (2) a mobile home, (3) a recreational vehicle, (4) an area where local codes do not permit ...remove the grounding link and connect the ground wire to do not use an extension cord. The power cord is supplied with U.S. This dryer is NOT provided with the cabinet grounded through the neutral conductor, the appliance grounding link must be removed and a 4-wire power cord/...
...electrical service requirements can result in death, fire, or electrical shock. If a power cord is located on the data label that is used . If the dryer is located in (1) a new branch circuit installation, (2) a mobile home, (3) a recreational vehicle, (4) an area where local codes do not permit ...remove the grounding link and connect the ground wire to do not use an extension cord. The power cord is supplied with U.S. This dryer is NOT provided with the cabinet grounded through the neutral conductor, the appliance grounding link must be removed and a 4-wire power cord/...

User Guide
Page 24
... circuit conductors and connected to the equipment-grounding terminal on the appliance. 24 Grounding for a Direct Wired Appliance This appliance must be connected to the dryer. All current-carrying wires must match power supply (4-wire or 3-wire) and be: Flexible armoured or non-metallic sheathed copper cable (with it shall ...to a grounded metal permanent wiring system, or an equipment grounding conductor must be insulated. 10 gauge AWG solid copper wire (do not use for clothes dryers shall be suitable for the installation. The UL-rated strain relief included with ground wire).
... circuit conductors and connected to the equipment-grounding terminal on the appliance. 24 Grounding for a Direct Wired Appliance This appliance must be connected to the dryer. All current-carrying wires must match power supply (4-wire or 3-wire) and be: Flexible armoured or non-metallic sheathed copper cable (with it shall ...to a grounded metal permanent wiring system, or an equipment grounding conductor must be insulated. 10 gauge AWG solid copper wire (do not use for clothes dryers shall be suitable for the installation. The UL-rated strain relief included with ground wire).


