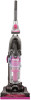
Owner's Guide
Page 2
...: 1) Push the on floor with the handle in upright position while using attachments. • Do not pick up anything that protects the vacuum in one blade is not working as a toy. Turn off (l) and unplug the vacuum. 2) Check the vacuum for an extended period of electric shock, this manual...., damaged, left outdoors, or dropped into the outlet, reverse the plug. Do not place vacuum at any object into openings. If it should always be used by cord, use in a cool, dry area. • Keep your vacuum, please visit www.eureka.com or call the Eureka customer service helpline.
...: 1) Push the on floor with the handle in upright position while using attachments. • Do not pick up anything that protects the vacuum in one blade is not working as a toy. Turn off (l) and unplug the vacuum. 2) Check the vacuum for an extended period of electric shock, this manual...., damaged, left outdoors, or dropped into the outlet, reverse the plug. Do not place vacuum at any object into openings. If it should always be used by cord, use in a cool, dry area. • Keep your vacuum, please visit www.eureka.com or call the Eureka customer service helpline.
Owner's Guide
Page 6
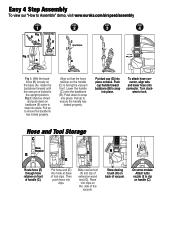
... connector, align tabs and lower hose onto connector. Easy 4 Step Assembly To view our "How to Assemble" demo, visit www.eureka.com/airspeed/assembly STEP STEP STEP STEP 1 2 3 4 Fig. 1 B A Alternate View B A C Hose Retainer Fig...models: Attach turbo nozzle (I G H E Route hose (E) through hose retainer on the side of the vacuum. Hose and Tool Storage C Hose Retainer E I ) to snap into place. Lower the handle (C) onto... dusting brush (H) on the handle (C) is locked in the upright position. Align so that the hose retainer on back of handle (C). Push down on base....
... connector, align tabs and lower hose onto connector. Easy 4 Step Assembly To view our "How to Assemble" demo, visit www.eureka.com/airspeed/assembly STEP STEP STEP STEP 1 2 3 4 Fig. 1 B A Alternate View B A C Hose Retainer Fig...models: Attach turbo nozzle (I G H E Route hose (E) through hose retainer on the side of the vacuum. Hose and Tool Storage C Hose Retainer E I ) to snap into place. Lower the handle (C) onto... dusting brush (H) on the handle (C) is locked in the upright position. Align so that the hose retainer on back of handle (C). Push down on base....


