

Installation Guide
Page 1
Maximum UL Load Capacity: 50 lb (22.6 kg) Manufactured by a qualified professional R installer. North Ave. • Melrose Park, IL 60160 • (800) 865-2112 or (708) 865-8870 • Fax: (708) 865-2941 • www.peerlessmounts.com It must be installed by Peerless Industries, Inc. 3215 W. Installation and Assembly: Adjustable Suspended Ceiling Channel Kit Model: ELPMBP01 This product is UL Listed.
Maximum UL Load Capacity: 50 lb (22.6 kg) Manufactured by a qualified professional R installer. North Ave. • Melrose Park, IL 60160 • (800) 865-2112 or (708) 865-8870 • Fax: (708) 865-2941 • www.peerlessmounts.com It must be installed by Peerless Industries, Inc. 3215 W. Installation and Assembly: Adjustable Suspended Ceiling Channel Kit Model: ELPMBP01 This product is UL Listed.
Installation Guide
Page 2
...; When installing or adjusting the ceiling mount, do not overtighten. Tools Needed for Assembly • stud finder ("edge to edge" stud finder is intended for wood studs Table of Contents Parts List ...3 Installation to Suspended Ceiling ...4 Anchoring Ceiling Plate ...5 Warranty Information ...6 Visit the Peerless Web Site at www... to the projector. Use of 6 ISSUED: 02-13-08 SHEET #: 128-9029-2 07-10-08 For Technical Support Contact Peerless Mounts at 1-800-729-0307. • This product should only be installed by someone of good mechanical aptitude, has experience with...
...; When installing or adjusting the ceiling mount, do not overtighten. Tools Needed for Assembly • stud finder ("edge to edge" stud finder is intended for wood studs Table of Contents Parts List ...3 Installation to Suspended Ceiling ...4 Anchoring Ceiling Plate ...5 Warranty Information ...6 Visit the Peerless Web Site at www... to the projector. Use of 6 ISSUED: 02-13-08 SHEET #: 128-9029-2 07-10-08 For Technical Support Contact Peerless Mounts at 1-800-729-0307. • This product should only be installed by someone of good mechanical aptitude, has experience with...
Installation Guide
Page 3
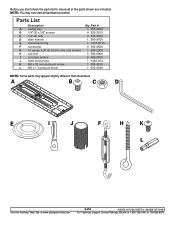
Before you start check the parts list to insure all hardware provided. Parts List Description A ceiling tray B 1/4"-20 x 3/8" screws C 1/4"-20 nuts D allen wrench E escutcheon ring F turnbuckle G 12 gauge x 20' (6.1m) tie wire (not shown) H eye bolt I J F H K L Visit the Peerless Web Site at www.peerlessmounts.com 3 of the parts shown are included. NOTE: You...-9010 1 520-9249 NOTE: Some parts may not need all of 6 ISSUED: 02-13-08 SHEET #: 128-9029-2 07-10-08 For Technical Support Contact Peerless Mounts at 1-800-729-0307 or 708-865-8870.
Before you start check the parts list to insure all hardware provided. Parts List Description A ceiling tray B 1/4"-20 x 3/8" screws C 1/4"-20 nuts D allen wrench E escutcheon ring F turnbuckle G 12 gauge x 20' (6.1m) tie wire (not shown) H eye bolt I J F H K L Visit the Peerless Web Site at www.peerlessmounts.com 3 of the parts shown are included. NOTE: You...-9010 1 520-9249 NOTE: Some parts may not need all of 6 ISSUED: 02-13-08 SHEET #: 128-9029-2 07-10-08 For Technical Support Contact Peerless Mounts at 1-800-729-0307 or 708-865-8870.

Installation Guide
Page 4
..." conventional suspended ceiling. fig. 2 Visit the Peerless Web Site at www.peerlessmounts.com 4 of ceiling tray (A) rests on ceiling runners as shown in detail 1. Slide collar mount plate out of a conventional suspended ceiling system. CEILING RUNNER NYLOCK NUT fig. 1 For Flush Mounting Applications 2 From the top down, thread flush mount tube (J) down through retaining collar in adjustable collar mount...
..." conventional suspended ceiling. fig. 2 Visit the Peerless Web Site at www.peerlessmounts.com 4 of ceiling tray (A) rests on ceiling runners as shown in detail 1. Slide collar mount plate out of a conventional suspended ceiling system. CEILING RUNNER NYLOCK NUT fig. 1 For Flush Mounting Applications 2 From the top down, thread flush mount tube (J) down through retaining collar in adjustable collar mount...
Installation Guide
Page 5
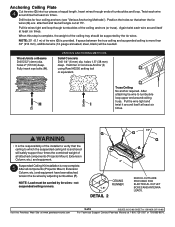
... ANTENNA LEADS. Position the holes so that the ceiling to which the suspended ceiling kit is anchored will safely support four times the combined weight of the ceiling tray should be carried by adjusting turnbuckles (F). Again twist each wire around ceiling truss. WARNING • It is complete, the... of 6 ISSUED: 02-13-08 SHEET #: 128-9029-2 07-10-08 For Technical Support Contact Peerless Mounts at least six times. holes 2" (51mm) deep. Visit the Peerless Web Site at www.peerlessmounts.com 5 of the installer to turnbuckle loop upper end around itself at 15O...
... ANTENNA LEADS. Position the holes so that the ceiling to which the suspended ceiling kit is anchored will safely support four times the combined weight of the ceiling tray should be carried by adjusting turnbuckles (F). Again twist each wire around ceiling truss. WARNING • It is complete, the... of 6 ISSUED: 02-13-08 SHEET #: 128-9029-2 07-10-08 For Technical Support Contact Peerless Mounts at least six times. holes 2" (51mm) deep. Visit the Peerless Web Site at www.peerlessmounts.com 5 of the installer to turnbuckle loop upper end around itself at 15O...