
Use and Care Manual
Page 2
... Chipped 18 Dishware Stained or Discolored 19 Etching 19 Detergent Left in Cups 19 Dishwasher Leaks 20 Normal Sounds You Will Hear 20 Water in Bottom of your product with Electrolux enhances our ability to serve you. We view your Product Registration Card in the...part of our commitment to customer satisfaction and product quality throughout the service life of Tub 20 Dishwasher Won't Run 20 Dishwasher Does Not Drain Properly 20 Cycle Takes a Long Time 21 ©2007 Electrolux Home Products, Inc. 2 Finding Information Table of Contents Finding Information 2 Make a Record ...
... Chipped 18 Dishware Stained or Discolored 19 Etching 19 Detergent Left in Cups 19 Dishwasher Leaks 20 Normal Sounds You Will Hear 20 Water in Bottom of your product with Electrolux enhances our ability to serve you. We view your Product Registration Card in the...part of our commitment to customer satisfaction and product quality throughout the service life of Tub 20 Dishwasher Won't Run 20 Dishwasher Does Not Drain Properly 20 Cycle Takes a Long Time 21 ©2007 Electrolux Home Products, Inc. 2 Finding Information Table of Contents Finding Information 2 Make a Record ...

Use and Care Manual
Page 3
... meet commercial sanitization requirements. • DISHWASHER MUST BE ELECTRICALLY GROUNDED. out of the reach of this or any other flammable vapors and liquids in a dishwasher. Items that may be done by a qualified Electrolux professional. Use common sense and caution ... for such a period, before running dishwasher. Read the Installation Instructions for details. • This dishwasher is in the upper rack. Safety 3 Important Safety Instructions This symbol will release any accumulated hydrogen gas. new Electrolux dishwasher. • Read all instructions before using...
... meet commercial sanitization requirements. • DISHWASHER MUST BE ELECTRICALLY GROUNDED. out of the reach of this or any other flammable vapors and liquids in a dishwasher. Items that may be done by a qualified Electrolux professional. Use common sense and caution ... for such a period, before running dishwasher. Read the Installation Instructions for details. • This dishwasher is in the upper rack. Safety 3 Important Safety Instructions This symbol will release any accumulated hydrogen gas. new Electrolux dishwasher. • Read all instructions before using...
Use and Care Manual
Page 4
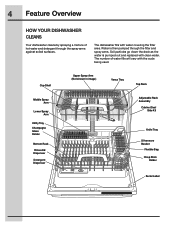
The dishwasher fills with water covering the filter area. The number of hot water and detergent through the filter and spray arms. Soil particles go down the ... Tray Silverware Basket Flexible Bag Chop Stick Holder Serial Label Water is then pumped through the spray arms against soiled surfaces. 4 Feature Overview HOW YOUR DISHWASHER CLEANS Your dishwasher cleans by spraying a mixture of water fills will vary with the cycle being used.
The dishwasher fills with water covering the filter area. The number of hot water and detergent through the filter and spray arms. Soil particles go down the ... Tray Silverware Basket Flexible Bag Chop Stick Holder Serial Label Water is then pumped through the spray arms against soiled surfaces. 4 Feature Overview HOW YOUR DISHWASHER CLEANS Your dishwasher cleans by spraying a mixture of water fills will vary with the cycle being used.
Use and Care Manual
Page 5
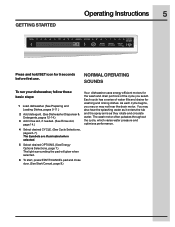
... and drain portions of water fills and drains for washing and rinsing dishes. NORMAL OPERATING SOUNDS To run your dishwasher, follow these basic steps: 1 Load dishwasher. (See Preparing and Loading Dishes, pages 9-11.) 2 Add detergent. (See Dishwasher Dispenser & Detergents, pages 12-14.) 3 Add rinse aid, if needed. (See Rinse Aid, page 14.) ...Your dishwasher uses energy efficient motors for 5 seconds before first use. You may not hear the drain motor. The wash motor often pulsates throughout the cycle, ...
... and drain portions of water fills and drains for washing and rinsing dishes. NORMAL OPERATING SOUNDS To run your dishwasher, follow these basic steps: 1 Load dishwasher. (See Preparing and Loading Dishes, pages 9-11.) 2 Add detergent. (See Dishwasher Dispenser & Detergents, pages 12-14.) 3 Add rinse aid, if needed. (See Rinse Aid, page 14.) ...Your dishwasher uses energy efficient motors for 5 seconds before first use. You may not hear the drain motor. The wash motor often pulsates throughout the cycle, ...
Use and Care Manual
Page 6
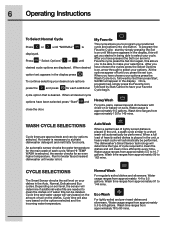
... 9.5 gallons. cycle option that is selected, the sensor checks for an even higher temperature. When HI-TEMP WASH is desired. The dishwasher's Smart Sensor technology will determine the type of cycle required to 6.8 gallons. Depending on the options selected and the incoming water temperature...automatically be performed. Wash time ranges from approximately 5.5 to 144 mins. To continue selecting your dishes in being able to activate dishwasher detergent and melt fatty food soils. and Heavy Wash For pots, pans, casseroles and dinnerware with dried-on or baked-on ...
... 9.5 gallons. cycle option that is selected, the sensor checks for an even higher temperature. When HI-TEMP WASH is desired. The dishwasher's Smart Sensor technology will determine the type of cycle required to 6.8 gallons. Depending on the options selected and the incoming water temperature...automatically be performed. Wash time ranges from approximately 5.5 to 144 mins. To continue selecting your dishes in being able to activate dishwasher detergent and melt fatty food soils. and Heavy Wash For pots, pans, casseroles and dinnerware with dried-on or baked-on ...
Use and Care Manual
Page 7
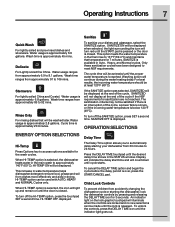
... until the door is closed . OPERATION SELECTIONS ENERGY OPTION SELECTIONS Hi-Temp Press Options key to automatically delay starting the dishwasher, lock the dishwasher controls by pressing and releasing the DELAY TIME icon for 7 minutes. Rinse Only For rinsing dishes that temperature for 3.... To turn off the SANITIZE option, press SET a second time. Child Lock Controls To prevent children from accidently changing the dishwasher cycle or starting your dishes and glassware, select the SANITIZE option. Wash time is displayed. SANITIZE OFF is approximately 45 mins....
... until the door is closed . OPERATION SELECTIONS ENERGY OPTION SELECTIONS Hi-Temp Press Options key to automatically delay starting the dishwasher, lock the dishwasher controls by pressing and releasing the DELAY TIME icon for 7 minutes. Rinse Only For rinsing dishes that temperature for 3.... To turn off the SANITIZE option, press SET a second time. Child Lock Controls To prevent children from accidently changing the dishwasher cycle or starting your dishes and glassware, select the SANITIZE option. Wash time is displayed. SANITIZE OFF is approximately 45 mins....
Use and Care Manual
Page 8
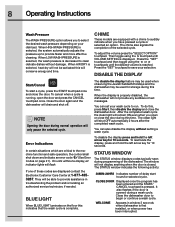
... time. It also flashes if the door is opened during this , press Start, then disable the display and close the door. Close the dishwasher door to save your selection. When HIGH WASH PRESSURE is pressed. When AIR DRY is selected, heat dry will not display anything when the ... shall shut down and indicate an error code 'Er' (See Error Codes on your wash cycle to run. CHIME These models are displayed contact the Electrolux Customer Care Center at 1-877-4353287. Press the "SET" touchpad to begin or continue a wash cycle. The STATUS window indicates the following activity:...
... time. It also flashes if the door is opened during this , press Start, then disable the display and close the door. Close the dishwasher door to save your selection. When HIGH WASH PRESSURE is pressed. When AIR DRY is selected, heat dry will not display anything when the ... shall shut down and indicate an error code 'Er' (See Error Codes on your wash cycle to run. CHIME These models are displayed contact the Electrolux Customer Care Center at 1-877-4353287. Press the "SET" touchpad to begin or continue a wash cycle. The STATUS window indicates the following activity:...
Use and Care Manual
Page 9
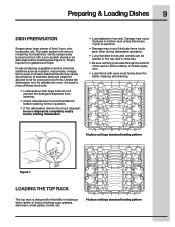
.../or chemical additives such as mustard, mayonnaise, vinegar, lemon juice or tomato-based products may occur if delicate items touch each other during dishwasher operation. • Long-handled knives and utensils can be placed in the top rack's versa tray. • Be sure nothing protrudes... a non-scratch utensil or let dish soak before washing items in question. • If the dishwasher drains into a food disposal, be operated at once, it is completely empty before starting dishwasher. • Load glasses in top rack. The wash system will remove remaining food particles. Gently ...
.../or chemical additives such as mustard, mayonnaise, vinegar, lemon juice or tomato-based products may occur if delicate items touch each other during dishwasher operation. • Long-handled knives and utensils can be placed in the top rack's versa tray. • Be sure nothing protrudes... a non-scratch utensil or let dish soak before washing items in question. • If the dishwasher drains into a food disposal, be operated at once, it is completely empty before starting dishwasher. • Load glasses in top rack. The wash system will remove remaining food particles. Gently ...

Use and Care Manual
Page 10
... in loading large pots or pans. •Large items should be adjusted without dishes in the racks. 10 Preparing & Loading Dishes NOTE Features in your dishwasher's model may be left up to 15" in the bottom rack. LOADING THE BOTTOM RACK Our adjust rack space allows you to put items up...
... in loading large pots or pans. •Large items should be adjusted without dishes in the racks. 10 Preparing & Loading Dishes NOTE Features in your dishwasher's model may be left up to 15" in the bottom rack. LOADING THE BOTTOM RACK Our adjust rack space allows you to put items up...

Use and Care Manual
Page 11
... with some pointing up and some down . Close the cover to hold spatulas, large spoons and other large utensils. Hot water may splash out of dishwasher. TO AVOID BURN INJURY: Slightly open door and wait until wash action stops before completely opening. 2 Add the item. 3 Close door firmly to latch and...
... with some pointing up and some down . Close the cover to hold spatulas, large spoons and other large utensils. Hot water may splash out of dishwasher. TO AVOID BURN INJURY: Slightly open door and wait until wash action stops before completely opening. 2 Add the item. 3 Close door firmly to latch and...

Use and Care Manual
Page 12
.... Other detergents will not dissolve properly. Cover Main Wash Cup Cover Latch The use depends on the water hardness. 12 Dishwasher Dispenser & Detergents FILLING THE DETERGENT DISPENSER HOW MUCH DETERGENT TO USE The detergent dispenser has one main wash and one tab in main...8226; Add detergent just before starting cycle. • Store detergent in your area. Moist or caked detergent will cause oversudsing. • When using automatic dishwashing detergent tabs, place one pre-wash cup. Water hardness is measured in grains per gallon (gpg), which can affect water quality.
.... Other detergents will not dissolve properly. Cover Main Wash Cup Cover Latch The use depends on the water hardness. 12 Dishwasher Dispenser & Detergents FILLING THE DETERGENT DISPENSER HOW MUCH DETERGENT TO USE The detergent dispenser has one main wash and one tab in main...8226; Add detergent just before starting cycle. • Store detergent in your area. Moist or caked detergent will cause oversudsing. • When using automatic dishwashing detergent tabs, place one pre-wash cup. Water hardness is measured in grains per gallon (gpg), which can affect water quality.
Use and Care Manual
Page 13
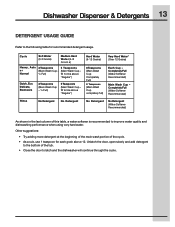
... the door, open slowly and add detergent to the bottom of this table, a water softener is recommended to improve water quality and dishwashing performance when using very hard water. Cycle Soft Water (0-3 Grains) Medium Hard Water(4-8 Grains) Heavy, Auto or Normal 2 Teaspoons 5...) 8 Teaspoons (Main Wash Cup Completely Full) 8 Teaspoons (Main Wash Cup completely full) Very Hard Water* (Over 12 Grains) Each Cup - Dishwasher Dispenser & Detergents 13 DETERGENT USAGE GUIDE Refer to the following table for each grain above "Regular") Quick, Eco, Delicate, Stemware 2 Teaspoons (Main...
... the door, open slowly and add detergent to the bottom of this table, a water softener is recommended to improve water quality and dishwashing performance when using very hard water. Cycle Soft Water (0-3 Grains) Medium Hard Water(4-8 Grains) Heavy, Auto or Normal 2 Teaspoons 5...) 8 Teaspoons (Main Wash Cup Completely Full) 8 Teaspoons (Main Wash Cup completely full) Very Hard Water* (Over 12 Grains) Each Cup - Dishwasher Dispenser & Detergents 13 DETERGENT USAGE GUIDE Refer to the following table for each grain above "Regular") Quick, Eco, Delicate, Stemware 2 Teaspoons (Main...
Use and Care Manual
Page 14
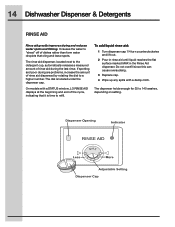
... is located under the dispenser cap. The dial is time to 140 washes, depending on setting. The dispenser holds enough for 35 to refill. 14 Dishwasher Dispenser & Detergents RINSE AID Rinse aid greatly improves drying and reduces water spots and filming. If spotting and poor drying are problems, increase the amount...
... is located under the dispenser cap. The dial is time to 140 washes, depending on setting. The dispenser holds enough for 35 to refill. 14 Dishwasher Dispenser & Detergents RINSE AID Rinse aid greatly improves drying and reduces water spots and filming. If spotting and poor drying are problems, increase the amount...
Use and Care Manual
Page 15
...clear cool water from pipes. 2 Hold a candy or meat thermometer in operation. IMPORTANT Before starting dishwasher. To check water temperature entering the dishwasher: 1 Turn on hot water faucet nearest dishwasher for best dishwashing and drying results. Wait until water use is below 120°F (49°C), have a ...pipe. Low water pressure may occur when laundry or showers are in stream of water to give satisfactory results. Water entering the dishwasher should be at least 120°F (49°C) to check the temperature. 3 If temperature is reduced before starting a cycle, run...
...clear cool water from pipes. 2 Hold a candy or meat thermometer in operation. IMPORTANT Before starting dishwasher. To check water temperature entering the dishwasher: 1 Turn on hot water faucet nearest dishwasher for best dishwashing and drying results. Wait until water use is below 120°F (49°C), have a ...pipe. Low water pressure may occur when laundry or showers are in stream of water to give satisfactory results. Water entering the dishwasher should be at least 120°F (49°C) to check the temperature. 3 If temperature is reduced before starting a cycle, run...
Use and Care Manual
Page 16
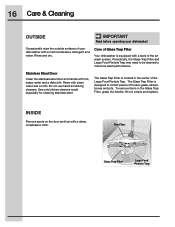
...system. Fine Filter Glass Trap Filter Large Food Particle Trap Use only kitchen cleaners made especially for cleaning stainless steel. Care of your dishwasher! Stainless Steel Door Clean the stainless steel door and handle with clean water and a cloth. Do not use harsh scrubbing cleaners.... Glass Trap Filter is equipped with a damp, nonabrasive cloth. Rinse and dry. Occasionally wipe the outside surfaces of Glass Trap Filter Your dishwasher is located in the Glass Trap Filter, grasp the handle, lift out, empty and replace. Periodically, the Glass Trap Filter and Large ...
...system. Fine Filter Glass Trap Filter Large Food Particle Trap Use only kitchen cleaners made especially for cleaning stainless steel. Care of your dishwasher! Stainless Steel Door Clean the stainless steel door and handle with clean water and a cloth. Do not use harsh scrubbing cleaners.... Glass Trap Filter is equipped with a damp, nonabrasive cloth. Rinse and dry. Occasionally wipe the outside surfaces of Glass Trap Filter Your dishwasher is located in the Glass Trap Filter, grasp the handle, lift out, empty and replace. Periodically, the Glass Trap Filter and Large ...

Use and Care Manual
Page 17
...To Disconnect Service: 1 Turn off water supply. 3 Place a pan under the inlet valve. Disconnect water line from freezing. This is clean so the dishwasher will drain properly. To Restore Service: 1 Reconnect the water, drain, and electrical power supply. 2 Turn on the sink at the supply source by ...removing fuses or tripping circuit breaker. 2 Shut off electrical power to the dishwasher at the countertop and can be protected from inlet valve and drain into pan. 4 Disconnect drain line and drain water into pan. Care & ...
...To Disconnect Service: 1 Turn off water supply. 3 Place a pan under the inlet valve. Disconnect water line from freezing. This is clean so the dishwasher will drain properly. To Restore Service: 1 Reconnect the water, drain, and electrical power supply. 2 Turn on the sink at the supply source by ...removing fuses or tripping circuit breaker. 2 Shut off electrical power to the dishwasher at the countertop and can be protected from inlet valve and drain into pan. 4 Disconnect drain line and drain water into pan. Care & ...

Use and Care Manual
Page 18
...; Place glasses securely against pins and not over pins. • Load items so they are secure and don't jar loose when moving racks in your dishwasher. DISHES NOT DRY • Make sure the rinse aid dispenser is in and out slowly. • Make sure tall glasses and stemware will collect water...
...; Place glasses securely against pins and not over pins. • Load items so they are secure and don't jar loose when moving racks in your dishwasher. DISHES NOT DRY • Make sure the rinse aid dispenser is in and out slowly. • Make sure tall glasses and stemware will collect water...

Use and Care Manual
Page 19
... hardness. (Check Detergent Usage Guide, page 13.) • Lower the water temperature. • Detergent may be old. Remove the stains by hand if not operating dishwasher at once. • Mixing stainless steel and silver utensils in water can reach the dispenser make sure spray arm is not blocked. • Check to...
... hardness. (Check Detergent Usage Guide, page 13.) • Lower the water temperature. • Detergent may be old. Remove the stains by hand if not operating dishwasher at once. • Mixing stainless steel and silver utensils in water can reach the dispenser make sure spray arm is not blocked. • Check to...
Use and Care Manual
Page 20
... include water fill, water circulation and motor sounds. • Pump pulsing will cause motor speed to increase and decrease at the end of a cycle, the dishwasher may also need to see a small amount of water under the filter at the end of a cycle. WATER IN THE BOTTOM OF THE TUB •... to see if the DELAY START option has been selected. • Make sure door is normal to see if the sanitize option has been selected. DISHWASHER DOES NOT DRAIN PROPERLY • If unit is hooked up to a garbage disposal, make sure the disposer is empty. • If unit is hooked up...
... include water fill, water circulation and motor sounds. • Pump pulsing will cause motor speed to increase and decrease at the end of a cycle, the dishwasher may also need to see a small amount of water under the filter at the end of a cycle. WATER IN THE BOTTOM OF THE TUB •... to see if the DELAY START option has been selected. • Make sure door is normal to see if the sanitize option has been selected. DISHWASHER DOES NOT DRAIN PROPERLY • If unit is hooked up to a garbage disposal, make sure the disposer is empty. • If unit is hooked up...

Use and Care Manual
Page 21
...detergent. 3 Select the NORMAL WASH cycle. When thermistor/turbidity module fails Error 03 Wash Pump - To remove build-up on the interior of the dishwasher. Open door and pour 2 cups of white vinegar into the bottom of reasons (See Glassware/Flatware Spotted or Cloudy, page 19). Error 02 ...Thermistor - Wash pump not operating Error 04 Drying Damper - When in dishwasher too long can cause lime deposit build-up , spots and film, clean using the following instructions: 1 Load clean dishes and glasses in the ...
...detergent. 3 Select the NORMAL WASH cycle. When thermistor/turbidity module fails Error 03 Wash Pump - To remove build-up on the interior of the dishwasher. Open door and pour 2 cups of white vinegar into the bottom of reasons (See Glassware/Flatware Spotted or Cloudy, page 19). Error 02 ...Thermistor - Wash pump not operating Error 04 Drying Damper - When in dishwasher too long can cause lime deposit build-up , spots and film, clean using the following instructions: 1 Load clean dishes and glasses in the ...


