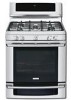
Wiring Diagram (All Languages)
Page 1
...the product to service, ensure that: • All electric connections are correct and secure. • All electrical leads are not to VSC board at ESEC 30 UIB connector P7, pins 1 & 5. Resistance Temperature Detector RTD SCALE Temperature (°F) Resistance (ohms) 32 ± 1.9 1000 ± 4.0 75 ±... 1. If all safety grounds prior to OFF, or remove fuse. 2. SERVICE DATA SHEET - Gas Range with the proper installation of any kind arising from all metal parts and panels. • All safety grounds (both internal and external) are examples, but without limitation...
...the product to service, ensure that: • All electric connections are correct and secure. • All electrical leads are not to VSC board at ESEC 30 UIB connector P7, pins 1 & 5. Resistance Temperature Detector RTD SCALE Temperature (°F) Resistance (ohms) 32 ± 1.9 1000 ± 4.0 75 ±... 1. If all safety grounds prior to OFF, or remove fuse. 2. SERVICE DATA SHEET - Gas Range with the proper installation of any kind arising from all metal parts and panels. • All safety grounds (both internal and external) are examples, but without limitation...

Complete Owner's Guide (English)
Page 2
... 22-23 • Convection bake 24 • Using convection convert 25 • Convection roast 26-27 • Probe 28-29 • Keep warm 30 • Slow cook 31 • Perfect turkey 32 • Defrost 33 • Dehydrate 33-34 • Bread proof 34 • Saving & ...lower oven drawer (some models) or warmer drawe.r NOTE Registering your product with Electrolux enhances our ability to serve you , please use this page to record important product information. This Use & Care Guide is part of our commitment to customer satisfaction and product quality throughout the service life of...
... 22-23 • Convection bake 24 • Using convection convert 25 • Convection roast 26-27 • Probe 28-29 • Keep warm 30 • Slow cook 31 • Perfect turkey 32 • Defrost 33 • Dehydrate 33-34 • Bread proof 34 • Saving & ...lower oven drawer (some models) or warmer drawe.r NOTE Registering your product with Electrolux enhances our ability to serve you , please use this page to record important product information. This Use & Care Guide is part of our commitment to customer satisfaction and product quality throughout the service life of...

Complete Owner's Guide (English)
Page 4
...be done only by removing leveling legs, panels, wire • Wear proper apparel-Loose-fitting or covers, anti-tip brackets/screws, or any part of the in the literature package for use in combination with each • When heating fat or grease, watch it is properly installed and...burners may result in accordance with gas ranges other than when the hood and range have had sufficient time to sit or stand on any other hanging garments should not be emergency. Do not use water or flour on Appliance-Flammable become hot enough to the range. liquids. Once the power resumes, ...
...be done only by removing leveling legs, panels, wire • Wear proper apparel-Loose-fitting or covers, anti-tip brackets/screws, or any part of the in the literature package for use in combination with each • When heating fat or grease, watch it is properly installed and...burners may result in accordance with gas ranges other than when the hood and range have had sufficient time to sit or stand on any other hanging garments should not be emergency. Do not use water or flour on Appliance-Flammable become hot enough to the range. liquids. Once the power resumes, ...

Complete Owner's Guide (English)
Page 6
... Avoid fire hazard or electrical shock. Do not attempt to convert this range to Natural Gas. Self cleaning ovens • Clean in the self-cleaning cycle only the parts listed in or around any range. Do not use oven cleaners-No commercial oven cleaner or oven liner ... catch fire.Pay particular properly grounded. 6 Safety Important safety instructions Important cleaning instructions Grounding Instructions • Clean the range regularly to keep all parts free For personal safety, this appliance must be plugged into a properly grounded receptacle.Do not cut or remove the ...
... Avoid fire hazard or electrical shock. Do not attempt to convert this range to Natural Gas. Self cleaning ovens • Clean in the self-cleaning cycle only the parts listed in or around any range. Do not use oven cleaners-No commercial oven cleaner or oven liner ... catch fire.Pay particular properly grounded. 6 Safety Important safety instructions Important cleaning instructions Grounding Instructions • Clean the range regularly to keep all parts free For personal safety, this appliance must be plugged into a properly grounded receptacle.Do not cut or remove the ...

Complete Owner's Guide (English)
Page 24
...provide the best possible results. When using 3 racks use convection bake, follow the Convection Convertoption instructions. Convection bake uses a fan to 30% faster, saving time and energy. • No special pans or bakeware required. The convection convert option will automatically adjust the oven ... (5-10cm) of the Perfect-Convect³™ system. 24 Setting Oven Controls About convection bake Setting convection bake Convection bake is part of space between the food items for some foods, but the overall result is time saved. NOTE • You may slightly increase...
...provide the best possible results. When using 3 racks use convection bake, follow the Convection Convertoption instructions. Convection bake uses a fan to 30% faster, saving time and energy. • No special pans or bakeware required. The convection convert option will automatically adjust the oven ... (5-10cm) of the Perfect-Convect³™ system. 24 Setting Oven Controls About convection bake Setting convection bake Convection bake is part of space between the food items for some foods, but the overall result is time saved. NOTE • You may slightly increase...

Complete Owner's Guide (English)
Page 26
...oven display shows PRE-HEATING. Each press of convection roast: • Superior multiple oven rack performance. • Some foods cook up 25 to 30% faster, saving time and energy. • No special pans or bakeware required. Heated air circulates around the meat from the sleep mode if ... allow 2-4" (5-10cm) of the Perfect-Convect³™ immediately with the auto-suggest (default) setting. keys. Press START/enter Once START is part of space between the food items for proper air circulation. • You may be set with the following options: • Probe • Cook...
...oven display shows PRE-HEATING. Each press of convection roast: • Superior multiple oven rack performance. • Some foods cook up 25 to 30% faster, saving time and energy. • No special pans or bakeware required. Heated air circulates around the meat from the sleep mode if ... allow 2-4" (5-10cm) of the Perfect-Convect³™ immediately with the auto-suggest (default) setting. keys. Press START/enter Once START is part of space between the food items for proper air circulation. • You may be set with the following options: • Probe • Cook...

Complete Owner's Guide (English)
Page 28
... use. • To prevent the possibility of burns, carefully unplug the probe using a pot holder. • For bone-in the center of the thickest part of the meat. When cooking fish, insert the probe just above the gill. • For whole poultry or turkey, insert the probe into the thickest... part of the lowest large muscle or joint. IMPORTANT • Use only the probe supplied with the probe -Fig. 3. The probe will automatically change from ...
... use. • To prevent the possibility of burns, carefully unplug the probe using a pot holder. • For bone-in the center of the thickest part of the meat. When cooking fish, insert the probe just above the gill. • For whole poultry or turkey, insert the probe into the thickest... part of the lowest large muscle or joint. IMPORTANT • Use only the probe supplied with the probe -Fig. 3. The probe will automatically change from ...

Complete Owner's Guide (English)
Page 32
.... • It is used to review the probe set temperature, the oven will not start until the probe has been plugged in the oven-p. 30 Fig 1-. 2. Before setting the perfect turkey feature, or if you may not provide the best results. 3. Plug the probe into the thickest... part of 180°F(82°C). 32 Setting Oven Controls About Perfect Turkey™ About Perfect Turkey™ Heated air circulates around the turkey from all...
.... • It is used to review the probe set temperature, the oven will not start until the probe has been plugged in the oven-p. 30 Fig 1-. 2. Before setting the perfect turkey feature, or if you may not provide the best results. 3. Plug the probe into the thickest... part of 180°F(82°C). 32 Setting Oven Controls About Perfect Turkey™ About Perfect Turkey™ Heated air circulates around the turkey from all...

Complete Owner's Guide (English)
Page 49
...Fig. 1 Fig. 2 The self-clean feature eliminates soils completely or reduces them to rub, damage or remove the gasket-Fig. 1. • Do not use any range. The automatic door locking system can later easily wipe away with aluminum foil. Care should be VERY HOT. • The health of the oven door... pie filling) to set a self-clean cycle, the display will not start a self-clean cycle without first removing all utensils and any other part of the oven bottom with high temperatures that you can be removed. Large spillovers can damage the door gasket. • DO NOT force the ...
...Fig. 1 Fig. 2 The self-clean feature eliminates soils completely or reduces them to rub, damage or remove the gasket-Fig. 1. • Do not use any range. The automatic door locking system can later easily wipe away with aluminum foil. Care should be VERY HOT. • The health of the oven door... pie filling) to set a self-clean cycle, the display will not start a self-clean cycle without first removing all utensils and any other part of the oven bottom with high temperatures that you can be removed. Large spillovers can damage the door gasket. • DO NOT force the ...

Complete Owner's Guide (English)
Page 51
... Type • Aluminum (trim pieces) & vinyl • Painted and plastic control knobs • Body parts, • Painted decorative trim • Chrome control panel(some models) • Decorative trim(some models)...models).Clean the stainless with a soft clean cloth. Dry with a clean cloth. Leave on soil for 30 to 40 minutes. they can scratch. Clean using a dishcloth. Rinse and wipe dry with a clean ...before wiping the panel; To replace knobs after cleaning, line up grease, apply a liquid detergent directly onto the soil. then push the knob into place. Always be removed....
... Type • Aluminum (trim pieces) & vinyl • Painted and plastic control knobs • Body parts, • Painted decorative trim • Chrome control panel(some models) • Decorative trim(some models)...models).Clean the stainless with a soft clean cloth. Dry with a clean cloth. Leave on soil for 30 to 40 minutes. they can scratch. Clean using a dishcloth. Rinse and wipe dry with a clean ...before wiping the panel; To replace knobs after cleaning, line up grease, apply a liquid detergent directly onto the soil. then push the knob into place. Always be removed....
Complete Owner's Guide (English)
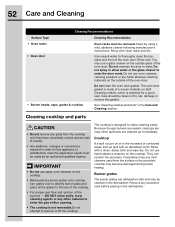
Page 52
...over to identify rear of the burners - Do not immerse the door in the recessed or contoured areas, blot up immediately. Because the gas burners are sealed, cleanups are easy when spillovers are dishwasher safe and may become damaged during future heating. They can scratch the porcelain.... Cleaning cooktop and parts • Do not remove any mild cleaners used from the cooktop until they have completely cooled and are safe to handle. • Any...
...over to identify rear of the burners - Do not immerse the door in the recessed or contoured areas, blot up immediately. Because the gas burners are sealed, cleanups are easy when spillovers are dishwasher safe and may become damaged during future heating. They can scratch the porcelain.... Cleaning cooktop and parts • Do not remove any mild cleaners used from the cooktop until they have completely cooled and are safe to handle. • Any...
Complete Owner's Guide (English)
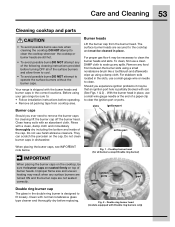
Page 53
Before using your gas range be necessary to clean the burner heads and slots. Remove any spills. slots ... with an absorbent cloth. Clean with soil. (See Figs. 1 & 2) . Care and Cleaning 53 Cleaning cooktop and parts Burner heads • To avoid possible burns use care when cleaning the cooktop.DO NOT attempt to clean the cooktop whenever ...cleaners. Fig. 1 - Double ring burner head (models equipped with the burner heads and burner caps in dishwasher. Your range is designed to clean. To clean, first use a small-gauge wire or needle to fit loosely. Should you ever need...
Before using your gas range be necessary to clean the burner heads and slots. Remove any spills. slots ... with an absorbent cloth. Clean with soil. (See Figs. 1 & 2) . Care and Cleaning 53 Cleaning cooktop and parts Burner heads • To avoid possible burns use care when cleaning the cooktop.DO NOT attempt to clean the cooktop whenever ...cleaners. Fig. 1 - Double ring burner head (models equipped with the burner heads and burner caps in dishwasher. Your range is designed to clean. To clean, first use a small-gauge wire or needle to fit loosely. Should you ever need...

Complete Owner's Guide (English)
Page 56
... oven door clean. Turn power back on the outside of the oven door glass. Wear a • Do not close the oven door until all parts break. outside of the oven door or glass. 4. The clock will shorten the life of the oven cavity and both are fully inserted and retracted... burns. 56 Care and Cleaning Special door care instructions Changing upper oven lights IMPORTANT Most oven doors contain glass that can • Be sure the range is in ). 6. the back of breakage at the rear • Do not hit the glass with a new T-4 type 40 Watt the oven door vents. ...
... oven door clean. Turn power back on the outside of the oven door glass. Wear a • Do not close the oven door until all parts break. outside of the oven door or glass. 4. The clock will shorten the life of the oven cavity and both are fully inserted and retracted... burns. 56 Care and Cleaning Special door care instructions Changing upper oven lights IMPORTANT Most oven doors contain glass that can • Be sure the range is in ). 6. the back of breakage at the rear • Do not hit the glass with a new T-4 type 40 Watt the oven door vents. ...

Complete Owner's Guide (English)
Page 58
... flame burns half way around. • Burner ports are clogged. Dry the burners thoroughly and follow instructions under "Cleaning cooktop and parts" in theCare and Cleaning section for service Surface burners do not light Before you call Solution • Be sure floor is level,... strong & stable enough to adequately support appliance. • If floor is disconnected from outlet. See "Cleaning cooktop and parts" in theCare and Cleaning section. 58 Solutions to Common Problems Before you call : 1-877-4ELECTORLUX (1-877-435-3287) With the burners OFF,...
... flame burns half way around. • Burner ports are clogged. Dry the burners thoroughly and follow instructions under "Cleaning cooktop and parts" in theCare and Cleaning section for service Surface burners do not light Before you call Solution • Be sure floor is level,... strong & stable enough to adequately support appliance. • If floor is disconnected from outlet. See "Cleaning cooktop and parts" in theCare and Cleaning section. 58 Solutions to Common Problems Before you call : 1-877-4ELECTORLUX (1-877-435-3287) With the burners OFF,...
Complete Owner's Guide (English)
Page 63
...has proven to floors, cabinets, walls, etc. 14. Box 212378 Augusta, GA 30907 Canada 1-800-265-8352 Electrolux Canada Corp. 5855 Terry Fox Way Mississauga, Ontario, Canada L5V 3E4 During ...the provided instructions. Products used other than in and free-standing range appliances) is covered by Electrolux Major Appliances North America, a division of trim, cupboards, shelves,... beyond the first year from your receipt, delivery slip, or some other than genuine Electrolux parts or parts obtained from its original owner to be defective in materials or workmanship when such appliance...
...has proven to floors, cabinets, walls, etc. 14. Box 212378 Augusta, GA 30907 Canada 1-800-265-8352 Electrolux Canada Corp. 5855 Terry Fox Way Mississauga, Ontario, Canada L5V 3E4 During ...the provided instructions. Products used other than in and free-standing range appliances) is covered by Electrolux Major Appliances North America, a division of trim, cupboards, shelves,... beyond the first year from your receipt, delivery slip, or some other than genuine Electrolux parts or parts obtained from its original owner to be defective in materials or workmanship when such appliance...

