Use and Care Manual
Page 2
... (1-877-435-3287) For online support and Internet production information visit http://www.electroluxusa.com ©2007 Electrolux Home Products, Inc. This Use & Care Guide is part of our commitment to customer satisfaction and product quality throughout the service life of contents Please read & save...22-23 • Convection bake 24 • Using convection convert 25 • Convection roast 26-27 • Probe 28-29 • Convection broil 30 • Keep warm 31 • Slow cook 32 • Perfect turkey 33 • Defrost 34 • Dehydrate 34 • Bread proof 35...
... (1-877-435-3287) For online support and Internet production information visit http://www.electroluxusa.com ©2007 Electrolux Home Products, Inc. This Use & Care Guide is part of our commitment to customer satisfaction and product quality throughout the service life of contents Please read & save...22-23 • Convection bake 24 • Using convection convert 25 • Convection roast 26-27 • Probe 28-29 • Convection broil 30 • Keep warm 31 • Slow cook 32 • Perfect turkey 33 • Defrost 34 • Dehydrate 34 • Bread proof 35...
Use and Care Manual
Page 4
.... • User servicing-Do not repair or replace any part of the following safety instructions before using this range. 4 Safety Important safety instructions Read all of the appliance unless... is in Canada CSA Standard C22.1, Canadian Electrical Code, Part 1, and local code requirements. Do not store explosives, such as flammable liquids. Once the power resumes, reset the clock and oven ...garments should never be worn while using the range. Destroy the carton and plastic bags after use in combination with the National Fuel Gas Code ANSI Z223- They should never be...
.... • User servicing-Do not repair or replace any part of the following safety instructions before using this range. 4 Safety Important safety instructions Read all of the appliance unless... is in Canada CSA Standard C22.1, Canadian Electrical Code, Part 1, and local code requirements. Do not store explosives, such as flammable liquids. Once the power resumes, reset the clock and oven ...garments should never be worn while using the range. Destroy the carton and plastic bags after use in combination with the National Fuel Gas Code ANSI Z223- They should never be...

Use and Care Manual
Page 6
... in or around any part of the oven. • Do not clean door gasket-The door gasket is extremely sensitive to the fumes given off during the self-cleaning cycle of any range. Pay particular attention to the area underneath each surface element. Important Safety Notice The ... from cleaners and aerosols may ignite causing damage and injury. 6 Safety Important safety instructions Important cleaning instructions • Clean the range regularly to keep all parts free of grease that excess residue from the oven. Be aware that could catch fire. Before self cleaning the oven, remove ...
... in or around any part of the oven. • Do not clean door gasket-The door gasket is extremely sensitive to the fumes given off during the self-cleaning cycle of any range. Pay particular attention to the area underneath each surface element. Important Safety Notice The ... from cleaners and aerosols may ignite causing damage and injury. 6 Safety Important safety instructions Important cleaning instructions • Clean the range regularly to keep all parts free of grease that excess residue from the oven. Be aware that could catch fire. Before self cleaning the oven, remove ...

Use and Care Manual
Page 24
...feature: • Auto-suggest (default) setting:350°F/176°C • Min. Multiple rack cooking may be set with the following temperature settings apply to 30% faster, saving time and energy. • No special pans or bakeware required. Press START Once START is pressed the oven will cook faster. • When...finish will begin heating. bake setting : 170°F / 76°C • Max. 24 Setting Oven Controls About convection bake Setting convection bake Convection bake is part of space between the food items for some foods, but the overall result is time saved.
...feature: • Auto-suggest (default) setting:350°F/176°C • Min. Multiple rack cooking may be set with the following temperature settings apply to 30% faster, saving time and energy. • No special pans or bakeware required. Press START Once START is pressed the oven will cook faster. • When...finish will begin heating. bake setting : 170°F / 76°C • Max. 24 Setting Oven Controls About convection bake Setting convection bake Convection bake is part of space between the food items for some foods, but the overall result is time saved.

Use and Care Manual
Page 26
26 Setting Oven Controls About convection roast Setting convection roast How convection roast works Convection roast is part of space between the food items for proper air circulation. • Be sure to carefully follow your recipe's temperature and time recommendations or refer to ... sleep mode if necessary. • Select the UPPER or LOWER oven you wish to make the changes. Press START Once START is no need to 30% faster, saving time and energy. • No special pans or bakeware required. keys. Press UPPER OVEN Press 2. In addition, there is pressed the oven will...
26 Setting Oven Controls About convection roast Setting convection roast How convection roast works Convection roast is part of space between the food items for proper air circulation. • Be sure to carefully follow your recipe's temperature and time recommendations or refer to ... sleep mode if necessary. • Select the UPPER or LOWER oven you wish to make the changes. Press START Once START is no need to 30% faster, saving time and energy. • No special pans or bakeware required. keys. Press UPPER OVEN Press 2. In addition, there is pressed the oven will...

Use and Care Manual
Page 28
... temperature settings apply to avoid damaging probe. • Never leave or store the probe inside the oven when not in the center of the thickest part of the meat. Your oven will not work properly until correctly connected. • Handle the probe carefully when inserting and removing it from the food... or removing it from cooking to check the internal temperature without any other may result in ham or lamb, insert the probe into the thickest part of the inner thigh, below the leg -Fig. 1.
... temperature settings apply to avoid damaging probe. • Never leave or store the probe inside the oven when not in the center of the thickest part of the meat. Your oven will not work properly until correctly connected. • Handle the probe carefully when inserting and removing it from the food... or removing it from cooking to check the internal temperature without any other may result in ham or lamb, insert the probe into the thickest part of the inner thigh, below the leg -Fig. 1.

Use and Care Manual
Page 30
This cooking feature is part of the Perfect-Convect³™ system. The following temperature settings apply to follow all warnings and cautions. 2. Press START • Do not use the roasting rack when broiling. 30 About convection broiling Setting convection broil Convection broiling is only available for the upper oven. Remember to the...
This cooking feature is part of the Perfect-Convect³™ system. The following temperature settings apply to follow all warnings and cautions. 2. Press START • Do not use the roasting rack when broiling. 30 About convection broiling Setting convection broil Convection broiling is only available for the upper oven. Remember to the...

Use and Care Manual
Page 33
... in the oven -p. 28 Fig 1. 2. Insert the probe into the probe receptacle inside . Poultry cooked with the convection fan. Plug the probe into the thickest part of 180°F(82°C). Press PROBE twice to review the probe set temperature, the oven will not start until the probe has been plugged...
... in the oven -p. 28 Fig 1. 2. Insert the probe into the probe receptacle inside . Poultry cooked with the convection fan. Plug the probe into the thickest part of 180°F(82°C). Press PROBE twice to review the probe set temperature, the oven will not start until the probe has been plugged...
Use and Care Manual
Page 50
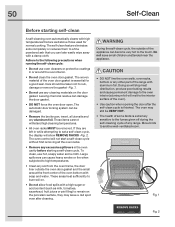
...oven door gasket is extremely sensitive to the oven interior (aluminum foil will not start a self-clean cycle without first removing all utensils and any range. These items cannot withstand high cleaning temperatures. • All oven racks MUST be damaged. • Remove the broiler pan, insert, all ...the oven racks. • Remove any other part of the oven). • Use caution when opening the door after cleaning. Doing so will stop heat distribution, produce poor baking results and cause ...
...oven door gasket is extremely sensitive to the oven interior (aluminum foil will not start a self-clean cycle without first removing all utensils and any range. These items cannot withstand high cleaning temperatures. • All oven racks MUST be damaged. • Remove the broiler pan, insert, all ...the oven racks. • Remove any other part of the oven). • Use caution when opening the door after cleaning. Doing so will stop heat distribution, produce poor baking results and cause ...
Use and Care Manual
Page 52
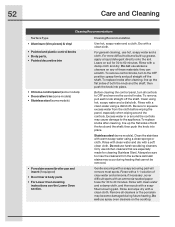
... (some models) • Porcelain enamel broiler pan and insert (if equipped) • Door liner & body parts • For Lower Oven cleaning instructions see the Lower Oven section. Rinse with a clean cloth. Cleaning Recommendation ...Use hot, soapy water and a cloth. For more difficult soils and built-up grease, apply a liquid detergent directly onto the soil. grasp firmly and pull straight off the shaft. Be sure to 60 ...surface as bluish stains may become damaged during heating that are especially made for 30 to the appliance.To replace knobs after cleaning, line up the flat sides...
... (some models) • Porcelain enamel broiler pan and insert (if equipped) • Door liner & body parts • For Lower Oven cleaning instructions see the Lower Oven section. Rinse with a clean cloth. Cleaning Recommendation ...Use hot, soapy water and a cloth. For more difficult soils and built-up grease, apply a liquid detergent directly onto the soil. grasp firmly and pull straight off the shaft. Be sure to 60 ...surface as bluish stains may become damaged during heating that are especially made for 30 to the appliance.To replace knobs after cleaning, line up the flat sides...

Use and Care Manual
Page 53
... harsh abrasive cleaning materials on SelfCleaning models, which is made of a woven material, on the outside glass of the oven door. See "Cleaning cooktop and parts" in water. Do not immerse the door in the Care and Cleaning section. Care and Cleaning 53 Cleaning Recommendations Surface Type Cleaning Recommendation • Oven...
... harsh abrasive cleaning materials on SelfCleaning models, which is made of a woven material, on the outside glass of the oven door. See "Cleaning cooktop and parts" in water. Do not immerse the door in the Care and Cleaning section. Care and Cleaning 53 Cleaning Recommendations Surface Type Cleaning Recommendation • Oven...

Use and Care Manual
Page 54
... cleaners used from the cooktop until they have completely cooled and are dishwasher safe and may become damaged during future heating. Your range is shipped with an absorbent cloth. Before using make sure the burner cap fits flush with normal non-abrasive glass cleaners and ...burners are sealed, cleanups are easy when spillovers are in use harsh abrasive cleaners on the cooktop. 54 Care and Cleaning Cleaning cooktop and parts The cooktop is designed to make sure to: • Follow the installation instructions before placing in the dishwasher. Pair up immediately. Do...
... cleaners used from the cooktop until they have completely cooled and are dishwasher safe and may become damaged during future heating. Your range is shipped with an absorbent cloth. Before using make sure the burner cap fits flush with normal non-abrasive glass cleaners and ...burners are sealed, cleanups are easy when spillovers are in use harsh abrasive cleaners on the cooktop. 54 Care and Cleaning Cleaning cooktop and parts The cooktop is designed to make sure to: • Follow the installation instructions before placing in the dishwasher. Pair up immediately. Do...

Use and Care Manual
Page 57
...against possible broken glass or burns. Turn power back on again at the main source or unplug the range. 2. Read the following recommendations: • Do not close the oven door until all parts are fully inserted and retracted to touch the new bulb when replacing. Please note: do not allow ... IMPORTANT Most oven doors contain glass that can break. The oven door gasket should always clean during the Self-clean cycle. • Be sure the range is in ). 6. Replacing the upper oven interior light bulbs: 1. The clock will shorten the life of the oven. • Do not hit ...
...against possible broken glass or burns. Turn power back on again at the main source or unplug the range. 2. Read the following recommendations: • Do not close the oven door until all parts are fully inserted and retracted to touch the new bulb when replacing. Please note: do not allow ... IMPORTANT Most oven doors contain glass that can break. The oven door gasket should always clean during the Self-clean cycle. • Be sure the range is in ). 6. Replacing the upper oven interior light bulbs: 1. The clock will shorten the life of the oven. • Do not hit ...

Use and Care Manual
Page 59
...following list. Place a level on the oven rack. Push in this appliance. Dry the burners thoroughly and follow instructions under "Cleaning cooktop and parts" in center of appliance until flame is level. • Kitchen cabinet alignment may save you call for service call: 1-877-4ELECTROLUX (1-877-... Care & Cleaning section. With the burners OFF, use a small-gauge wire or needle to make range appear not level. Lightly fan the flame and allow burner to adequately support range. • If floor is present after cleaning. Be sure cabinets are square & have sufficient room ...
...following list. Place a level on the oven rack. Push in this appliance. Dry the burners thoroughly and follow instructions under "Cleaning cooktop and parts" in center of appliance until flame is level. • Kitchen cabinet alignment may save you call for service call: 1-877-4ELECTROLUX (1-877-... Care & Cleaning section. With the burners OFF, use a small-gauge wire or needle to make range appear not level. Lightly fan the flame and allow burner to adequately support range. • If floor is present after cleaning. Be sure cabinets are square & have sufficient room ...
Use and Care Manual
Page 63
... parts of your appliance (excluding built-in and free-standing range appliances) is designed to change without notice. If service is performed, it is installed, used other cosmetic parts. 10. In the USA and Puerto Rico, your original date of purchase, Electrolux ...other consumables, or knobs, handles, or other than genuine Electrolux parts or parts obtained from your appliance which are not a part of the appliance when it is warranted by Electrolux Major Appliances North America, a division of Electrolux Home Products, Inc. Product features or specifications as abuse, ...
... parts of your appliance (excluding built-in and free-standing range appliances) is designed to change without notice. If service is performed, it is installed, used other cosmetic parts. 10. In the USA and Puerto Rico, your original date of purchase, Electrolux ...other consumables, or knobs, handles, or other than genuine Electrolux parts or parts obtained from your appliance which are not a part of the appliance when it is warranted by Electrolux Major Appliances North America, a division of Electrolux Home Products, Inc. Product features or specifications as abuse, ...

