Use and Care Manual
Page 2
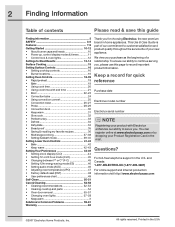
... information. Questions? We view your Product Registration Card in home appliances. and Canada: 1-877-4ELECTROLUX (1-877-435-3287) For online support and Internet production information visit http://www.electroluxusa.com ©2007 Electrolux Home Products, Inc. 2 Finding Information Table of contents Please ...23 • Convection bake 24 • Using convection convert 25 • Convection roast 26-27 • Probe 28-29 • Convection broil 30 • Keep warm 31 • Slow cook 32 • Perfect turkey 33 • Defrost 34 • Dehydrate 34 • Bread ...
... information. Questions? We view your Product Registration Card in home appliances. and Canada: 1-877-4ELECTROLUX (1-877-435-3287) For online support and Internet production information visit http://www.electroluxusa.com ©2007 Electrolux Home Products, Inc. 2 Finding Information Table of contents Please ...23 • Convection bake 24 • Using convection convert 25 • Convection roast 26-27 • Probe 28-29 • Convection broil 30 • Keep warm 31 • Slow cook 32 • Perfect turkey 33 • Defrost 34 • Dehydrate 34 • Bread ...
Use and Care Manual
Page 3
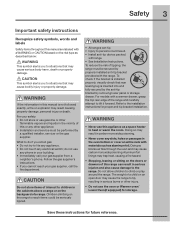
...oven/ Lower Oven(if equipped) for storage. Do not store items of interest to lite any appliance. • Do not touch any other flammable vapors and liquids in the cabinets above a range or on the range to reach items could result. • Install anti-tip device packed. To reduce the risk... of the range and carefully attempt to persons could be performed by removing lower panel or storage drawer...
...oven/ Lower Oven(if equipped) for storage. Do not store items of interest to lite any appliance. • Do not touch any other flammable vapors and liquids in the cabinets above a range or on the range to reach items could result. • Install anti-tip device packed. To reduce the risk... of the range and carefully attempt to persons could be performed by removing lower panel or storage drawer...
Use and Care Manual
Page 4
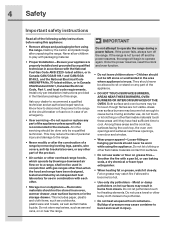
.... • Use only dry potholders - Do not store explosives, such as flammable liquids. Moist or damp potholders on Appliance-Flammable materials should not be stored in an oven, warmer drawer, near the range. Install only per installation instructions provided in combination with a pan lid, or use baking...function. • Do not leave children alone-Children should never be left alone or unattended in the area where appliance is in accordance with the National Fuel Gas Code ANSI Z223- Areas near these openings, oven door and window. • Wear proper apparel-Loose-...
.... • Use only dry potholders - Do not store explosives, such as flammable liquids. Moist or damp potholders on Appliance-Flammable materials should not be stored in an oven, warmer drawer, near the range. Install only per installation instructions provided in combination with a pan lid, or use baking...function. • Do not leave children alone-Children should never be left alone or unattended in the area where appliance is in accordance with the National Fuel Gas Code ANSI Z223- Areas near these openings, oven door and window. • Wear proper apparel-Loose-...
Use and Care Manual
Page 5
... in the oven. • Keep Oven Vent Ducts Unobstructed. Place a pan of food on the burner before turning it on, and turn knob to the appliance. The oven vent is hot use extreme caution. Use potholders and grasp the rack with both hands to direct contact and may cause severe burns... Important instuctions for using your oven • Use care when opening oven door or lower oven drawer (if equipped)-Stand to the side of the range when opening the door of utensil to line surface burner pans, or oven bottom, except as suggested in the oven. To reduce the risk of...
... in the oven. • Keep Oven Vent Ducts Unobstructed. Place a pan of food on the burner before turning it on, and turn knob to the appliance. The oven vent is hot use extreme caution. Use potholders and grasp the rack with both hands to direct contact and may cause severe burns... Important instuctions for using your oven • Use care when opening oven door or lower oven drawer (if equipped)-Stand to the side of the range when opening the door of utensil to line surface burner pans, or oven bottom, except as suggested in the oven. To reduce the risk of...

Use and Care Manual
Page 6
Pay particular attention to accumulate. Before self cleaning the oven, remove the broiler pan and any range. IMPORTANT The cooktop burners are NOT designed for a good seal. Important Safety Notice The California Safe Drinking Water and Toxic Enforcement ...; Do not use . 6 Safety Important safety instructions Important cleaning instructions • Clean the range regularly to keep all parts free of grease that excess residue from the oven. Care should be used in this appliance for use oven cleaners-No commercial oven cleaner or oven liner protective coating of any...
Pay particular attention to accumulate. Before self cleaning the oven, remove the broiler pan and any range. IMPORTANT The cooktop burners are NOT designed for a good seal. Important Safety Notice The California Safe Drinking Water and Toxic Enforcement ...; Do not use . 6 Safety Important safety instructions Important cleaning instructions • Clean the range regularly to keep all parts free of grease that excess residue from the oven. Care should be used in this appliance for use oven cleaners-No commercial oven cleaner or oven liner protective coating of any...
Use and Care Manual
Page 10
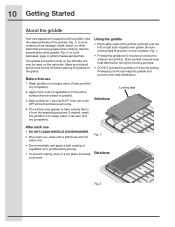
... be used on HI burner setting. Wash griddle in hot soapy water, rinse well, and dry completely. 10 Getting Started About the griddle Your new appliance is supplied with a stiff brush and hot water only. • Dry immediately and apply a light coating of vegetable oil to griddle before storing. • To...
... be used on HI burner setting. Wash griddle in hot soapy water, rinse well, and dry completely. 10 Getting Started About the griddle Your new appliance is supplied with a stiff brush and hot water only. • Dry immediately and apply a light coating of vegetable oil to griddle before storing. • To...

Use and Care Manual
Page 11
...than 1 minute the display will start to begin any function. time: 1 minute • Max. You will start cooking you first provide electric power to your appliance. • When your clock will need to wake the control to count down in seconds. To start with the oven control serve as day light... this mode as well as timers, oven light and the control lock. 1. Awake mode To awake the control -Fig. 2- If CANCEL is pressed your appliance is not touched again within the display panel. When the time runs out the active timer will beep, "00:00" will display and the timer...
...than 1 minute the display will start to begin any function. time: 1 minute • Max. You will start cooking you first provide electric power to your appliance. • When your clock will need to wake the control to count down in seconds. To start with the oven control serve as day light... this mode as well as timers, oven light and the control lock. 1. Awake mode To awake the control -Fig. 2- If CANCEL is pressed your appliance is not touched again within the display panel. When the time runs out the active timer will beep, "00:00" will display and the timer...
Use and Care Manual
Page 12
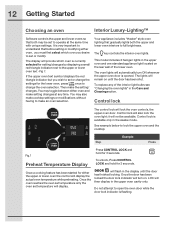
...while the door lock indicator is currently selected for 3 seconds. This model includes 2 halogen lights in the upper oven and one standard appliance light located on until the door has finished locking. Control lock is opened. LOC will not be set or change the settings for the...the display until the door has been shut. You may toggle between either oven, you must first select which oven is flashing. Your appliance includes "theater" style oven lighting that before setting or modifying either oven and make cooktop settings or modifications without having to lock the ...
...while the door lock indicator is currently selected for 3 seconds. This model includes 2 halogen lights in the upper oven and one standard appliance light located on until the door has finished locking. Control lock is opened. LOC will not be set or change the settings for the...the display until the door has been shut. You may toggle between either oven, you must first select which oven is flashing. Your appliance includes "theater" style oven lighting that before setting or modifying either oven and make cooktop settings or modifications without having to lock the ...

Use and Care Manual
Page 13
... best results when using 2 oven racks, place cookware on rack position 2 or 3. Setting for Best Results 13 Upper oven racks Types of oven racks Your appliance is suggested to place the rack near the oven bottom (rack positions 1 or 2) -
... best results when using 2 oven racks, place cookware on rack position 2 or 3. Setting for Best Results 13 Upper oven racks Types of oven racks Your appliance is suggested to place the rack near the oven bottom (rack positions 1 or 2) -
Use and Care Manual
Page 17
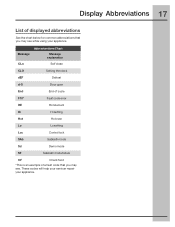
These codes will help your servicer repair your appliance. Display Abbreviations 17 List of a fault code that you may see . Message Abbreviantions Chart Message explanation CLn Self clean CLO Setting the clock dEF Defrost d-O ... failure CF Check food *This is an example of displayed abbreviations See the chart below for common abbreviations that you may see while using your appliance.
These codes will help your servicer repair your appliance. Display Abbreviations 17 List of a fault code that you may see . Message Abbreviantions Chart Message explanation CLn Self clean CLO Setting the clock dEF Defrost d-O ... failure CF Check food *This is an example of displayed abbreviations See the chart below for common abbreviations that you may see while using your appliance.

Use and Care Manual
Page 27
... the insert on oven rack in the oven. Do not cover the insert with foil to prevent overbrowning and drying of the skin. 30-40 20-30 20-25 30-40 Fig. 2 Place prepared food on the broiler pan. 3. Position food (fat side up) on bottom or next to the bottom oven... grease spills and the insert will help prevent grease splatters. Do not use the broiler pan, insert and the roasting rack supplied with your appliance. Setting Oven Controls 27 Roasting recommendations Roasting rack instructions When preparing meats for even cooking and helps to increase browning on top of the insert...
... the insert on oven rack in the oven. Do not cover the insert with foil to prevent overbrowning and drying of the skin. 30-40 20-30 20-25 30-40 Fig. 2 Place prepared food on the broiler pan. 3. Position food (fat side up) on bottom or next to the bottom oven... grease spills and the insert will help prevent grease splatters. Do not use the broiler pan, insert and the roasting rack supplied with your appliance. Setting Oven Controls 27 Roasting recommendations Roasting rack instructions When preparing meats for even cooking and helps to increase browning on top of the insert...

Use and Care Manual
Page 28
... food and the receptacle. • Do not use tongs to pull the cable when inserting or removing it from cooking to the probe or the appliance. • Be sure the probe is the most effective way of insuring that the tip rests in ham or lamb, insert the probe into the... center of the lowest large muscle or joint. To find the center of the food visually measure with your appliance; 28 Setting Oven Controls About the probe function Checking the internal temperature of your food is fully inserted into the probe receptacle. any guesswork. Fig...
... food and the receptacle. • Do not use tongs to pull the cable when inserting or removing it from cooking to the probe or the appliance. • Be sure the probe is the most effective way of insuring that the tip rests in ham or lamb, insert the probe into the... center of the lowest large muscle or joint. To find the center of the food visually measure with your appliance; 28 Setting Oven Controls About the probe function Checking the internal temperature of your food is fully inserted into the probe receptacle. any guesswork. Fig...

Use and Care Manual
Page 34
...; Cook time with heat from the sleep mode if necessary. • Select the UPPER or LOWER oven you wish to circulate around the food (this appliance). • Consult a food preservation book or library for information. 34 Setting Oven Controls About defrost Setting dehydrate Use the defrost feature to thaw small portions...
...; Cook time with heat from the sleep mode if necessary. • Select the UPPER or LOWER oven you wish to circulate around the food (this appliance). • Consult a food preservation book or library for information. 34 Setting Oven Controls About defrost Setting dehydrate Use the defrost feature to thaw small portions...
Use and Care Manual
Page 39
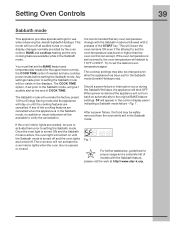
... is turned off and the oven lights are cancelled. This will not turn off . Try to verify the cancellation. When power is restored the appliance will insure the oven remains ON even if the attempt to set the BAKE feature and temperature(s) needed , be available to set incorrectly, the...may be followed with the Sabbath feature, please vist the web at the end of the START key. Setting Oven Controls 39 Sabbath mode This appliance provides special settings for the Sabbath mode (Jewish Holidays only). BAKE and cooktop heating are needed for proper usage and a complete list of ...
... is turned off and the oven lights are cancelled. This will not turn off . Try to verify the cancellation. When power is restored the appliance will insure the oven remains ON even if the attempt to set the BAKE feature and temperature(s) needed , be available to set incorrectly, the...may be followed with the Sabbath feature, please vist the web at the end of the START key. Setting Oven Controls 39 Sabbath mode This appliance provides special settings for the Sabbath mode (Jewish Holidays only). BAKE and cooktop heating are needed for proper usage and a complete list of ...

Use and Care Manual
Page 40
... and hold both the LO and HI keys together for the Sabbath mode are the numeric keys (0-9), , & . NOTES Example The only keys available once the appliance is set for 3 & seconds (a beep will sound) and release: Once properly set the BAKE feature you may change (170 to 550F°) and press START...
... and hold both the LO and HI keys together for the Sabbath mode are the numeric keys (0-9), , & . NOTES Example The only keys available once the appliance is set for 3 & seconds (a beep will sound) and release: Once properly set the BAKE feature you may change (170 to 550F°) and press START...

Use and Care Manual
Page 46
...-set 12hr energy saving mode -Fig. 1. 2. Press START to accept or press CANCEL to reject. The preheat and cook time features will shut off the appliance if the oven has been heating for continuous baking. Step Example Press 1. You may turn off and later return to choose the off option -Fig...
...-set 12hr energy saving mode -Fig. 1. 2. Press START to accept or press CANCEL to reject. The preheat and cook time features will shut off the appliance if the oven has been heating for continuous baking. Step Example Press 1. You may turn off and later return to choose the off option -Fig...

Use and Care Manual
Page 47
...;C) or decreased -35°F (-19°C) from normal. Setting Your Preferences 47 Adjusting oven temperature Adjusting lower oven User programmable offset (UPO) temperature (UPO) Your appliance has been factory calibrated and tested to increase the temperature in the upper oven. See the example below to press USER PREF until you reach...
...;C) or decreased -35°F (-19°C) from normal. Setting Your Preferences 47 Adjusting oven temperature Adjusting lower oven User programmable offset (UPO) temperature (UPO) Your appliance has been factory calibrated and tested to increase the temperature in the upper oven. See the example below to press USER PREF until you reach...
Use and Care Manual
Page 50
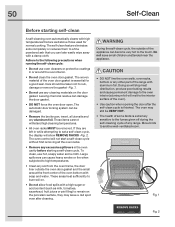
... damage or remove the gasket -Fig. 1. • Do not use any other part of the appliance can be damaged. • Remove the broiler pan, insert, all the oven racks. • Remove any range. To clean, use oven cleaners or protective coatings in the oven cavity before starting self-clean A ... the self-cleaning cycle of the oven). • Use caution when opening the door after cleaning. Do not leave small children unattended near the appliance. • DO NOT line the oven walls, oven racks, bottom or any cleaning materials on the porcelain surface, they are well above those...
... damage or remove the gasket -Fig. 1. • Do not use any other part of the appliance can be damaged. • Remove the broiler pan, insert, all the oven racks. • Remove any range. To clean, use oven cleaners or protective coatings in the oven cavity before starting self-clean A ... the self-cleaning cycle of the oven). • Use caution when opening the door after cleaning. Do not leave small children unattended near the appliance. • DO NOT line the oven walls, oven racks, bottom or any cleaning materials on the porcelain surface, they are well above those...

Use and Care Manual
Page 51
... cleaned. Press START Fig. 2 IMPORTANT • If a self-clean cycle was started but did not finish due to a power failure, your oven may take about 30-40 minutes to allow for a lite (2 hour) self-clean cycle to begin immediately using a medium (3 hour) setting. The example below shows setting the upper oven... the USER PREF key to set the 12hr energy saving mode (ES) to OFF and also set your appliance to perform a self-clean cycle sometime later (up to 24 hr. Remember to add 30-40 additional minutes for the oven to cool enough and the oven door to set for self-clean...
... cleaned. Press START Fig. 2 IMPORTANT • If a self-clean cycle was started but did not finish due to a power failure, your oven may take about 30-40 minutes to allow for a lite (2 hour) self-clean cycle to begin immediately using a medium (3 hour) setting. The example below shows setting the upper oven... the USER PREF key to set the 12hr energy saving mode (ES) to OFF and also set your appliance to perform a self-clean cycle sometime later (up to 24 hr. Remember to add 30-40 additional minutes for the oven to cool enough and the oven door to set for self-clean...
Use and Care Manual
Page 52
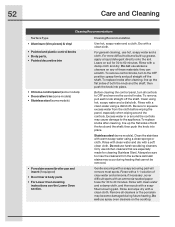
...-up the flat sides of these materials; To replace knobs after cleaning, line up grease, apply a liquid detergent directly onto the soil. Excess water in or around the controls. Rinse with clean water and a...1:1 solution of both the knob and the shaft; Before cleaning the control panel, turn to the appliance.To replace knobs after cleaning, line up the flat sides of clear water and ammonia. then push...water using hot, soapy water and a dishcloth. they can scratch. Leave on soil for 30 to squeeze excess water from the surface as bluish stains may cause damage to the OFF ...
...-up the flat sides of these materials; To replace knobs after cleaning, line up grease, apply a liquid detergent directly onto the soil. Excess water in or around the controls. Rinse with clean water and a...1:1 solution of both the knob and the shaft; Before cleaning the control panel, turn to the appliance.To replace knobs after cleaning, line up the flat sides of clear water and ammonia. then push...water using hot, soapy water and a dishcloth. they can scratch. Leave on soil for 30 to squeeze excess water from the surface as bluish stains may cause damage to the OFF ...
