Installation Instructions (All Languages)
Page 1
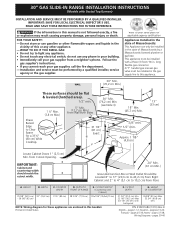
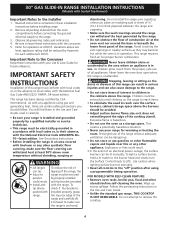
...) Min. 22 1/8" (56,2 cm) Max 24" (61 cm) Min. 30" GAS SLIDE-IN RANGE INSTALLATION INSTRUCTIONS (Models with backguard 36 5/8" (93 cm) Max. 35 3/4" (90.8 cm) Min. READ AND SAVE THESE INSTRUCTIONS FOR FUTURE REFERENCE. Follow the gas supplier's instructions. • If you cannot reach your gas supplier, call your building. • Immediately call the fire...
...) Min. 22 1/8" (56,2 cm) Max 24" (61 cm) Min. 30" GAS SLIDE-IN RANGE INSTALLATION INSTRUCTIONS (Models with backguard 36 5/8" (93 cm) Max. 35 3/4" (90.8 cm) Min. READ AND SAVE THESE INSTRUCTIONS FOR FUTURE REFERENCE. Follow the gas supplier's instructions. • If you cannot reach your gas supplier, call your building. • Immediately call the fire...
Installation Instructions (All Languages)
Page 2
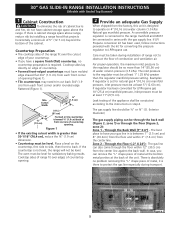
... cooktop breakage for door depth when it . CUTOUT DEPTH 21 3/4" (55,2 cm) Min. 22 1/8" (56,2 cm) Max 24" (61 cm) Min. 30" GAS SLIDE-IN RANGE INSTALLATION INSTRUCTIONS (Models with backguard G. Door Open 30" (76,2 cm) minimum clearance when (see page 3), insert the appliance in the counter opening while pushing into it is centered in...
... cooktop breakage for door depth when it . CUTOUT DEPTH 21 3/4" (55,2 cm) Min. 22 1/8" (56,2 cm) Max 24" (61 cm) Min. 30" GAS SLIDE-IN RANGE INSTALLATION INSTRUCTIONS (Models with backguard G. Door Open 30" (76,2 cm) minimum clearance when (see page 3), insert the appliance in the counter opening while pushing into it is centered in...
Installation Instructions (All Languages)
Page 3
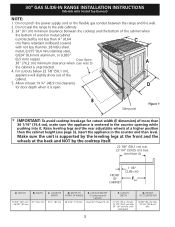
...at least 1/16" (see illustration 1) from the floor to the underside of the metal Edge to Clear Space for proper unit support. 30" GAS SLIDE-IN RANGE INSTALLATION INSTRUCTIONS (Models with the center of the cabinet cut -out should be flat and leveled (see hatched area on illustration 1). 2 ...step 2. Illustration 2 3 Metal Flange After the installation, MAKE SURE that the 3 height from the floor to the top of the counter. Level the range using the two (2) front leveling legs Shave Raised 1 ½" Max. (3.8 cm Max.) and the two (2) adjustable leveling wheel, so that the unit...
...at least 1/16" (see illustration 1) from the floor to the underside of the metal Edge to Clear Space for proper unit support. 30" GAS SLIDE-IN RANGE INSTALLATION INSTRUCTIONS (Models with the center of the cabinet cut -out should be flat and leveled (see hatched area on illustration 1). 2 ...step 2. Illustration 2 3 Metal Flange After the installation, MAKE SURE that the 3 height from the floor to the top of the counter. Level the range using the two (2) front leveling legs Shave Raised 1 ½" Max. (3.8 cm Max.) and the two (2) adjustable leveling wheel, so that the unit...
Installation Instructions (All Languages)
Page 4
...all controls to persons could result. • Install antitip device packed with range. Be sure to LITE. Never leave the oven door open when the range is in the Use and Care Guide. • Unlike the standard gas range, THIS COOKTOP IS NOT REMOVABLE. To light a surface burner, hold a... burner combustion. You will find them the proper, safe use the oven as they may become hot while the oven is unattended. 30" GAS SLIDE-IN RANGE INSTALLATION INSTRUCTIONS (Models with Sealed Top Burners) Important Notes to the Consumer Keep these instructions with your Use & Care Guide for future...
...all controls to persons could result. • Install antitip device packed with range. Be sure to LITE. Never leave the oven door open when the range is in the Use and Care Guide. • Unlike the standard gas range, THIS COOKTOP IS NOT REMOVABLE. To light a surface burner, hold a... burner combustion. You will find them the proper, safe use the oven as they may become hot while the oven is unattended. 30" GAS SLIDE-IN RANGE INSTALLATION INSTRUCTIONS (Models with Sealed Top Burners) Important Notes to the Consumer Keep these instructions with your Use & Care Guide for future...
Installation Instructions (All Languages)
Page 5
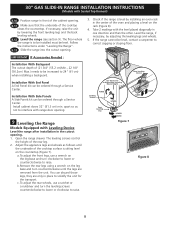
... manifold pressure setting. Through the Floor (~2" X 24") - In case, you have cabinet storage space above range, reduce risk by installing a range hood that projects horizontally a minimum of 5" (12.7 cm) beyond the bottom of the cabinet. 30" GAS SLIDE-IN RANGE INSTALLATION INSTRUCTIONS (Models with Sealed Top Burners) 1 Cabinet Construction To eliminate the risk of cabinet burns...
... manifold pressure setting. Through the Floor (~2" X 24") - In case, you have cabinet storage space above range, reduce risk by installing a range hood that projects horizontally a minimum of 5" (12.7 cm) beyond the bottom of the cabinet. 30" GAS SLIDE-IN RANGE INSTALLATION INSTRUCTIONS (Models with Sealed Top Burners) 1 Cabinet Construction To eliminate the risk of cabinet burns...

Installation Instructions (All Languages)
Page 6
30" GAS SLIDE-IN RANGE INSTALLATION INSTRUCTIONS (Models with Natural gas or LP/ Propane gas. Do not make the connection too tight. If flexible connectors are not kinked. Once regulator is installed. 4 Connect the range to the gas supply Important: Remove all gas connections. After connecting the range to convert your range...). Overtightening may result in the following order: 1. Tighten all external pipe threads. Isolate the range from the gas supply pipe to gas supply line Figure 5 The supply line must be certain connectors are used with Sealed Top Burners...
30" GAS SLIDE-IN RANGE INSTALLATION INSTRUCTIONS (Models with Natural gas or LP/ Propane gas. Do not make the connection too tight. If flexible connectors are not kinked. Once regulator is installed. 4 Connect the range to the gas supply Important: Remove all gas connections. After connecting the range to convert your range...). Overtightening may result in the following order: 1. Tighten all external pipe threads. Isolate the range from the gas supply pipe to gas supply line Figure 5 The supply line must be certain connectors are used with Sealed Top Burners...

Installation Instructions (All Languages)
Page 7
...out of the cut -out opening. Refer to make the appropriate conversion can result in place to pinch the flexible gas conduit at the front and slide it by a 15 amp circuit breaker or time delay fuse. Proper adjustments to make the top flat should be checked... Install cabinet doors 32" (81.3 cm) min. Do not, under any circumstances, cut , remove, or bypass the grounding prong. 30" GAS SLIDE-IN RANGE INSTALLATION INSTRUCTIONS (Models with Sealed Top Burners) The conversion must be performed by a properly grounded 3-prong wall receptacle. The qualified agency performing...
...out of the cut -out opening. Refer to make the appropriate conversion can result in place to pinch the flexible gas conduit at the front and slide it by a 15 amp circuit breaker or time delay fuse. Proper adjustments to make the top flat should be checked... Install cabinet doors 32" (81.3 cm) min. Do not, under any circumstances, cut , remove, or bypass the grounding prong. 30" GAS SLIDE-IN RANGE INSTALLATION INSTRUCTIONS (Models with Sealed Top Burners) The conversion must be performed by a properly grounded 3-prong wall receptacle. The qualified agency performing...
Installation Instructions (All Languages)
Page 8
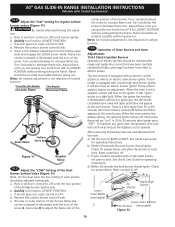
30" GAS SLIDE-IN RANGE INSTALLATION INSTRUCTIONS (Models with Sealed Top Burners) 8.10 Position range in front of the cabinet opening. 8.11 Make sure that the underside of the oven and placing a level on the rack (Figure 8). 4. The floor where the range is to correct sagging or sloping floor. Check if the range... Leveling Leg LOWER LOWER RAISE Figure 7 RAISE LOWER Figure 8 8 Follow the instructions under "Leveling the Range". 8.13 Slide the range into the cutout opening . 1. Level the range, if necessary, by lowering the front leveling legs and the back leveling wheels. 8.12 Level the...
30" GAS SLIDE-IN RANGE INSTALLATION INSTRUCTIONS (Models with Sealed Top Burners) 8.10 Position range in front of the cabinet opening. 8.11 Make sure that the underside of the oven and placing a level on the rack (Figure 8). 4. The floor where the range is to correct sagging or sloping floor. Check if the range... Leveling Leg LOWER LOWER RAISE Figure 7 RAISE LOWER Figure 8 8 Follow the instructions under "Leveling the Range". 8.13 Slide the range into the cutout opening . 1. Level the range, if necessary, by lowering the front leveling legs and the back leveling wheels. 8.12 Level the...

Installation Instructions (All Languages)
Page 9
... on the surface. Be sure that burner has lit. 3.Once the burner lights, the control knob should light when gas is equipped with the range for operating instructions and for each knob separately until all the burner caps and the triple burner head are no burner ... the elements or burners. They may be rotated out of your cooktop. Unpack the burner grates. Burner Cap Gas Opening Burner Head Electrode Figure 9 Burner Cap C. 30" GAS SLIDE-IN RANGE INSTALLATION INSTRUCTIONS (Models with Sealed Top Burners) 10 Check Operation Refer to the Use and Care Guide packaged with...
... on the surface. Be sure that burner has lit. 3.Once the burner lights, the control knob should light when gas is equipped with the range for operating instructions and for each knob separately until all the burner caps and the triple burner head are no burner ... the elements or burners. They may be rotated out of your cooktop. Unpack the burner grates. Burner Cap Gas Opening Burner Head Electrode Figure 9 Burner Cap C. 30" GAS SLIDE-IN RANGE INSTALLATION INSTRUCTIONS (Models with Sealed Top Burners) 10 Check Operation Refer to the Use and Care Guide packaged with...
Installation Instructions (All Languages)
Page 10
... extinguishing the flame. Adjust flame until you can quickly turn of the screw. e. See Use & Care Guide for operating instructions. 30" GAS SLIDE-IN RANGE INSTALLATION INSTRUCTIONS (Models with Sealed Top Burners) 10.4 Adjust the "low" setting for regular surface burner valves (Figure 11) Be...of each portion should be adjusted individually. Turn counterclockwise to LOWEST POSITION. Note: Air mixture adjustment is set oven to 30 seconds after range and supply line connectors have an electric burner igniter. The burner flame will "glow" similar to OFF. The rear ...
... extinguishing the flame. Adjust flame until you can quickly turn of the screw. e. See Use & Care Guide for operating instructions. 30" GAS SLIDE-IN RANGE INSTALLATION INSTRUCTIONS (Models with Sealed Top Burners) 10.4 Adjust the "low" setting for regular surface burner valves (Figure 11) Be...of each portion should be adjusted individually. Turn counterclockwise to LOWEST POSITION. Note: Air mixture adjustment is set oven to 30 seconds after range and supply line connectors have an electric burner igniter. The burner flame will "glow" similar to OFF. The rear ...

Installation Instructions (All Languages)
Page 11
... flame is yellow, increase air shutter opening size (see "3" in Figure 13). Your serial plate also tells you time and expense. 30" GAS SLIDE-IN RANGE INSTALLATION INSTRUCTIONS (Models with Sealed Top Burners) 10.6.2 Air Shutter-Oven Burner The approximate oven burner flame length is unobstructed. To determine... of combustion and ventilation air to broil. Make sure the flow of blue flame). When ordering parts for when it left in your range. Before You Call for service phone numbers. 3 Lock Screw 2 Air Shutter 1 Orifice Hood Figure 13 11 Model and Serial Number ...
... flame is yellow, increase air shutter opening size (see "3" in Figure 13). Your serial plate also tells you time and expense. 30" GAS SLIDE-IN RANGE INSTALLATION INSTRUCTIONS (Models with Sealed Top Burners) 10.6.2 Air Shutter-Oven Burner The approximate oven burner flame length is unobstructed. To determine... of combustion and ventilation air to broil. Make sure the flow of blue flame). When ordering parts for when it left in your range. Before You Call for service phone numbers. 3 Lock Screw 2 Air Shutter 1 Orifice Hood Figure 13 11 Model and Serial Number ...

Installation Instructions (All Languages)
Page 12
... These parts are at the highest position they can be drilled into place making sure structure of the range is sitting level on the template. 30" GAS SLIDE-IN RANGE INSTALLATION INSTRUCTIONS (Models with Sealed Top Burners) 11 Anti-Tip Brackets Installation Instructions To reduce the risk ...of tipping of the range, the range must be secured to the floor by properly installed anti-tip bracket and screws ...
... These parts are at the highest position they can be drilled into place making sure structure of the range is sitting level on the template. 30" GAS SLIDE-IN RANGE INSTALLATION INSTRUCTIONS (Models with Sealed Top Burners) 11 Anti-Tip Brackets Installation Instructions To reduce the risk ...of tipping of the range, the range must be secured to the floor by properly installed anti-tip bracket and screws ...
Product Specifications Sheet (English)
Page 1
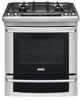
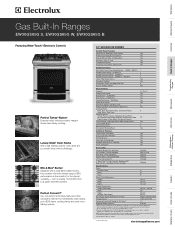
...on the web at electroluxappliances.com. PN # 316534001 Wok Ring - Refer to 30% faster cooking times and even more baking options. 30" GAS BUILT-IN RANGES Control Panel Features Wave-Touch™ Electronic Oven Control Yes Professional-Grade Burner Controls ... Leveling Legs Yes Sabbath Mode (Star-K® Certified) Yes A.D.A. Wall Ovens Warmer Drawers Gas Built-In Ranges EW30GS65G S, EW30GS65G W, EW30GS65G B Cooktops Built-In Ranges Freestanding Ranges Microwaves Vent Hoods Featuring Wave-Touch™ Electronic Controls Perfect Turkey® Button1 Ensures moist...
...on the web at electroluxappliances.com. PN # 316534001 Wok Ring - Refer to 30% faster cooking times and even more baking options. 30" GAS BUILT-IN RANGES Control Panel Features Wave-Touch™ Electronic Oven Control Yes Professional-Grade Burner Controls ... Leveling Legs Yes Sabbath Mode (Star-K® Certified) Yes A.D.A. Wall Ovens Warmer Drawers Gas Built-In Ranges EW30GS65G S, EW30GS65G W, EW30GS65G B Cooktops Built-In Ranges Freestanding Ranges Microwaves Vent Hoods Featuring Wave-Touch™ Electronic Controls Perfect Turkey® Button1 Ensures moist...
Product Specifications Sheet (English)
Page 2
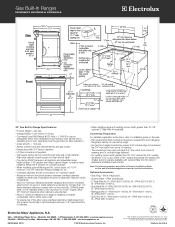
...8226; Mississauga, ON L5V 3E4 • 1-800-265-8352 • electroluxappliances.ca EW30GS65G 09/10 © 2010 Electrolux Home Products, Inc. Printed in all directions and adjustable range height at least 1/16" greater than No. 28 MGS sheet steel, 0.015" stainless...of opening and / or rounded edge flattened. • For existing cutout width greater than 30-1/16" reduce the 3/4" overlap dimension or for detailed instructions. Gas Built-In Ranges EW30GS65G S, EW30GS65G W, EW30GS65G B 30" Gas Built-In Range Specifications • Product Weight - 250 Lbs. • Voltage Rating - 120V / 60...
...8226; Mississauga, ON L5V 3E4 • 1-800-265-8352 • electroluxappliances.ca EW30GS65G 09/10 © 2010 Electrolux Home Products, Inc. Printed in all directions and adjustable range height at least 1/16" greater than No. 28 MGS sheet steel, 0.015" stainless...of opening and / or rounded edge flattened. • For existing cutout width greater than 30-1/16" reduce the 3/4" overlap dimension or for detailed instructions. Gas Built-In Ranges EW30GS65G S, EW30GS65G W, EW30GS65G B 30" Gas Built-In Range Specifications • Product Weight - 250 Lbs. • Voltage Rating - 120V / 60...
Complete Owner's Guide (English)
Page 1
Use & Care Guide Gas Slide-In Range 318 205 860 (1001) Rev. A
Use & Care Guide Gas Slide-In Range 318 205 860 (1001) Rev. A
Complete Owner's Guide (English)
Page 4
...instructions before using the appliance. Never allow children to play with packaging material. • Proper Installation-Be sure your new Electrolux range. ! Refer to the range at the circuit breaker or fuse box in case of an emergency. • User Servicing-Do not repair or replace any... causing property damage, personal injury or death. Installation and service must be performed by a qualified installer, servicer or the gas supplier. • All ranges can tip. • Injury to light any appliance. • Do not touch any other flammable vapors and liquids in this...
...instructions before using the appliance. Never allow children to play with packaging material. • Proper Installation-Be sure your new Electrolux range. ! Refer to the range at the circuit breaker or fuse box in case of an emergency. • User Servicing-Do not repair or replace any... causing property damage, personal injury or death. Installation and service must be performed by a qualified installer, servicer or the gas supplier. • All ranges can tip. • Injury to light any appliance. • Do not touch any other flammable vapors and liquids in this...
Complete Owner's Guide (English)
Page 5
... Not Heat Unopened Food Containers-Build up of this appliance as flammable liquids. Doing so may result in burns from any part of fire or gas leak, be sure to reach items could catch fire or spoil. They should never be allowed to sit or stand on the... range to turn the oven off the main gas shutoff valve. • Use Only Dry Potholders-Moist or damp potholders on or near these openings, oven door and window. • Wear...
... Not Heat Unopened Food Containers-Build up of this appliance as flammable liquids. Doing so may result in burns from any part of fire or gas leak, be sure to reach items could catch fire or spoil. They should never be allowed to sit or stand on the... range to turn the oven off the main gas shutoff valve. • Use Only Dry Potholders-Moist or damp potholders on or near these openings, oven door and window. • Wear...
Complete Owner's Guide (English)
Page 6
...the sudden change in temperature. If you use a stove top grill on a sealed gas burner, it will also improve efficiency. Check the manufacturer's recommendations for cooktop use. • Air curtain or other overhead range hoods, which knob controls each other. • Do not use aluminum foil to...utensils are touched. When you use your health. • Know which operate by blowing a downward air flow on to a range, shall not be used in conjunction with gas ranges other used of protective liners or aluminum foil may result in a risk of electric shock or fire or a short circuit. ...
...the sudden change in temperature. If you use a stove top grill on a sealed gas burner, it will also improve efficiency. Check the manufacturer's recommendations for cooktop use. • Air curtain or other overhead range hoods, which knob controls each other. • Do not use aluminum foil to...utensils are touched. When you use your health. • Know which operate by blowing a downward air flow on to a range, shall not be used in conjunction with gas ranges other used of protective liners or aluminum foil may result in a risk of electric shock or fire or a short circuit. ...
Complete Owner's Guide (English)
Page 51
..., etc., which are subject to change or add to use of God. USA 1-877-435-3287 Electrolux Major Appliances North America P.O. Box 212378 Augusta, GA 30907 Canada 1-800-265-8352 Electrolux Canada Corp. 5855 Terry Fox Way Mississauga, Ontario, Canada L5V 3E4 In addition, the glass cooktop ... by this warranty must be repaired in the USA, Puerto Rico and Canada. use your appliance (excluding built-in and free-standing range appliances) is installed, used in -home service costs during transportation or installation, including but not limited to another party or removed outside...
..., etc., which are subject to change or add to use of God. USA 1-877-435-3287 Electrolux Major Appliances North America P.O. Box 212378 Augusta, GA 30907 Canada 1-800-265-8352 Electrolux Canada Corp. 5855 Terry Fox Way Mississauga, Ontario, Canada L5V 3E4 In addition, the glass cooktop ... by this warranty must be repaired in the USA, Puerto Rico and Canada. use your appliance (excluding built-in and free-standing range appliances) is installed, used in -home service costs during transportation or installation, including but not limited to another party or removed outside...


