
Use and Care Manual
Page 3
...Convection Convert 25 Rapid Preheat 25 Convection Roasting 26 Keep Warm 27 Slow Cook 28 Dehydrating 29 Defrosting 29 Bread Proofing 30 Perfect Turkey 31 Temperature Probe 32 Multi Stage 33-34 Electronic Control Settings 35 User Preferences 35 User Preference Menu 35... Record for Future Use 2 Model and Serial Number Location 2 Questions 2 Table of Contents 3 Safety 4 Important Safety Instructions 4-7 Feature Overview 8 Your Slide-In Range 8-9 Oven Rack Supports and Oven Vents 10 Removing and Replacing Oven Racks 11 Oven Control Pad Functions 12-13 Getting Started 14 ...
...Convection Convert 25 Rapid Preheat 25 Convection Roasting 26 Keep Warm 27 Slow Cook 28 Dehydrating 29 Defrosting 29 Bread Proofing 30 Perfect Turkey 31 Temperature Probe 32 Multi Stage 33-34 Electronic Control Settings 35 User Preferences 35 User Preference Menu 35... Record for Future Use 2 Model and Serial Number Location 2 Questions 2 Table of Contents 3 Safety 4 Important Safety Instructions 4-7 Feature Overview 8 Your Slide-In Range 8-9 Oven Rack Supports and Oven Vents 10 Removing and Replacing Oven Racks 11 Oven Control Pad Functions 12-13 Getting Started 14 ...

Use and Care Manual
Page 9
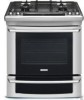
Feature Overview 9 YOUR SLIDE-IN RANGE OVEN DOOR LATCH OVEN VENT BROILING ELEMENT OVEN RACK SUPPORT SLIDEABLE OVEN RACKS CONVECTION FAN OVEN LIGHT OVEN RACK SUPPORT BRACKETS BROILER PAN BROILER PAN GRID CONVECTION ROASTING RACK
Feature Overview 9 YOUR SLIDE-IN RANGE OVEN DOOR LATCH OVEN VENT BROILING ELEMENT OVEN RACK SUPPORT SLIDEABLE OVEN RACKS CONVECTION FAN OVEN LIGHT OVEN RACK SUPPORT BRACKETS BROILER PAN BROILER PAN GRID CONVECTION ROASTING RACK
Use and Care Manual
Page 10
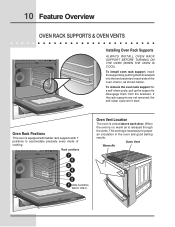
... venting is equipped with ladder rack supports with 7 positions to disengage them downward into the two brackets on , warm air is on each door. 10 Feature Overview OVEN RACK SUPPORTS & OVEN VENTS Installing Oven Rack Supports ALWAYS INSTALL OVEN RACK SUPPORT BEFORE TURNING ON THE OVEN (WHEN THE OVEN IS COOL).
... venting is equipped with ladder rack supports with 7 positions to disengage them downward into the two brackets on , warm air is on each door. 10 Feature Overview OVEN RACK SUPPORTS & OVEN VENTS Installing Oven Rack Supports ALWAYS INSTALL OVEN RACK SUPPORT BEFORE TURNING ON THE OVEN (WHEN THE OVEN IS COOL).

Use and Care Manual
Page 11
... into the oven rack supports by inserting the rack openings into the rack support Always arrange the oven racks when the oven is at once. 2. Feature Overview 11 REMOVING AND REPLACING OVEN RACKS Removing Sliding Oven Racks 1. Replacing Sliding Oven Racks To replace the oven racks, follow the intructions above in...
... into the oven rack supports by inserting the rack openings into the rack support Always arrange the oven racks when the oven is at once. 2. Feature Overview 11 REMOVING AND REPLACING OVEN RACKS Removing Sliding Oven Racks 1. Replacing Sliding Oven Racks To replace the oven racks, follow the intructions above in...

Use and Care Manual
Page 12
12 Feature Overview OVEN CONTROL PAD FUNCTIONS 1 234 56 7 8 9 10 11 12 13 14 15 16 17 18 19 20 1 Light Pad- Used to turn the oven ...
12 Feature Overview OVEN CONTROL PAD FUNCTIONS 1 234 56 7 8 9 10 11 12 13 14 15 16 17 18 19 20 1 Light Pad- Used to turn the oven ...

Use and Care Manual
Page 13
... the temperature and times. 35 + hi Pad- Used to enter temperature and times. 34 - Used to bring the user preference menu in the display. 30 Cancel Pad- Used to activate the warmer oven for cooking operation. 24 Warmer Oven Pad- Used to select the bread proof mode. 22 Clean Pad...of day and minute timer. Convert Pad- Used to a convection temperature. 29 User Preference Pad- Feature Overview 13 OVEN CONTROL PAD FUNCTIONS (CONTINUED) 21 22 23 25 24 26 28 27 29 33 31 31 30 32 34 35 21 Bread Proof Pad- Used to convert a standard temperature to raise the temperature...
... the temperature and times. 35 + hi Pad- Used to enter temperature and times. 34 - Used to bring the user preference menu in the display. 30 Cancel Pad- Used to activate the warmer oven for cooking operation. 24 Warmer Oven Pad- Used to select the bread proof mode. 22 Clean Pad...of day and minute timer. Convert Pad- Used to a convection temperature. 29 User Preference Pad- Feature Overview 13 OVEN CONTROL PAD FUNCTIONS (CONTINUED) 21 22 23 25 24 26 28 27 29 33 31 31 30 32 34 35 21 Bread Proof Pad- Used to convert a standard temperature to raise the temperature...

Use and Care Manual
Page 14
... temperature visual display will flash with a time of day to re-enter a valid time of day is on. Press 1 3 0 pads to the range has been interrupted, the timer in the oven. You will need to wake the control to place the food in the display will be active ...with a temperature visual display for 1:30): 1. To start with "12:00". This feature will remain in a sleep mode when not in their descriptions. Press START to accept the changes or CANCEL to start a cooking...
... temperature visual display will flash with a time of day to re-enter a valid time of day is on. Press 1 3 0 pads to the range has been interrupted, the timer in the oven. You will need to wake the control to place the food in the display will be active ...with a temperature visual display for 1:30): 1. To start with "12:00". This feature will remain in a sleep mode when not in their descriptions. Press START to accept the changes or CANCEL to start a cooking...

Use and Care Manual
Page 15
... the oven door while DOOR LOCK is opened. CONTROL LOCK The Control Lock feature automatically locks the upper oven door and the control panel. To toggle the Control Lock ON and OFF: 1. ...The Timer feature can also be used during any of day. It does not start the countdown. 4. The upper...turned OFF (not active). Getting Started 15 OVEN LIGHT Your appliance includes "theater" style oven lighting feature that will beep when the set time has run out. The clock will sound a chime that will be repeated ...
... the oven door while DOOR LOCK is opened. CONTROL LOCK The Control Lock feature automatically locks the upper oven door and the control panel. To toggle the Control Lock ON and OFF: 1. ...The Timer feature can also be used during any of day. It does not start the countdown. 4. The upper...turned OFF (not active). Getting Started 15 OVEN LIGHT Your appliance includes "theater" style oven lighting feature that will beep when the set time has run out. The clock will sound a chime that will be repeated ...

Use and Care Manual
Page 20
... your warming time (read their sections for example, rolls or pastries and dinner plates). Press CANCEL to stop or cancel the Keep Warm feature at serving temperature. The lower oven rack, compartment, cookware/plates may melt onto the drawer and be very difficult to clean. All food...hot foods hot such as shown below. Arrange interior warmer oven rack. 2. Do not cover crisp foods. The Cook Time, Timer and End Time features can be used in the vertical position as : vegetables, gravies, meats, casseroles, biscuits and rolls, pastries and heated dinner plates. Use the warmer...
... your warming time (read their sections for example, rolls or pastries and dinner plates). Press CANCEL to stop or cancel the Keep Warm feature at serving temperature. The lower oven rack, compartment, cookware/plates may melt onto the drawer and be very difficult to clean. All food...hot foods hot such as shown below. Arrange interior warmer oven rack. 2. Do not cover crisp foods. The Cook Time, Timer and End Time features can be used in the vertical position as : vegetables, gravies, meats, casseroles, biscuits and rolls, pastries and heated dinner plates. Use the warmer...
Use and Care Manual
Page 21
... racks, stagger as shown. Select oven by pressing UPPER OVEN . The oven display shows PRE-HEATING. 5. Cook Time, Timer and End Time features can be set to control your oven before using the bake mode. • During preheat, the 3 elements and the convection fan are used...OVEN 2. UPPER OVEN 3. To set target temperature and the PRE-HEATING message disappear. 6. Press BAKE . 4. Press CANCEL to stop or cancel the Bake feature at any time. Arrange interior oven racks. 2. Select oven by pressing UPPER OVEN . Press the HI + hi or LO lo pads to get to ...
... racks, stagger as shown. Select oven by pressing UPPER OVEN . The oven display shows PRE-HEATING. 5. Cook Time, Timer and End Time features can be set to control your oven before using the bake mode. • During preheat, the 3 elements and the convection fan are used...OVEN 2. UPPER OVEN 3. To set target temperature and the PRE-HEATING message disappear. 6. Press BAKE . 4. Press CANCEL to stop or cancel the Bake feature at any time. Arrange interior oven racks. 2. Select oven by pressing UPPER OVEN . Press the HI + hi or LO lo pads to get to ...

Use and Care Manual
Page 22
...modes. It can easily spoil such as milk, eggs, fish, meat or poultry, should be removed promptly when cooking is a 450°F Bake for 30 minutes which will always be shown in the display. 3. Press COOK TIME . 6. To set a delayed timed cooking (example is completed. Foods that ... time remaining will beep when the countdown is a 450°F Bake for 30 minutes): 1. The cook time will calculate the remaining time by itself . This feature can be programmed with the COOK TIME or END TIME features. Press START . The oven control will start and stop the audible alarm ...
...modes. It can easily spoil such as milk, eggs, fish, meat or poultry, should be removed promptly when cooking is a 450°F Bake for 30 minutes which will always be shown in the display. 3. Press COOK TIME . 6. To set a delayed timed cooking (example is completed. Foods that ... time remaining will beep when the countdown is a 450°F Bake for 30 minutes): 1. The cook time will calculate the remaining time by itself . This feature can be programmed with the COOK TIME or END TIME features. Press START . The oven control will start and stop the audible alarm ...

Use and Care Manual
Page 23
Cooking Modes 23 BROILING This mode is browned; Season and serve. • Always pull the rack out to the "stop or cancel the Broil feature at any time. Press BROIL . Figure 1 4. Press START . 5. Always use the broiler pan and its grid when broiling. Press CANCEL to broil at any temperature ...
Cooking Modes 23 BROILING This mode is browned; Season and serve. • Always pull the rack out to the "stop or cancel the Broil feature at any time. Press BROIL . Figure 1 4. Press START . 5. Always use the broiler pan and its grid when broiling. Press CANCEL to broil at any temperature ...

Use and Care Manual
Page 24
...the best culinary results when baking with a default temperature of cooking enables you can easily reduce the temperature using the Convection Convert feature. If your cooking time (read their sections for convection baking you to control your recipe has not had the temperature converted for ...directions). 7. The Temperature Probe, Cook Time, Timer, End Time and Rapid Preheat features can be used in positions 2 and 6 or 1, 4 and 7. • Most bakeries (except cakes) should be cooked. • When ...
...the best culinary results when baking with a default temperature of cooking enables you can easily reduce the temperature using the Convection Convert feature. If your cooking time (read their sections for convection baking you to control your recipe has not had the temperature converted for ...directions). 7. The Temperature Probe, Cook Time, Timer, End Time and Rapid Preheat features can be used in positions 2 and 6 or 1, 4 and 7. • Most bakeries (except cakes) should be cooked. • When ...

Use and Care Manual
Page 25
... disappears indicating that the oven has reached the set a rapid preheat (example is for single rack ONLY. IMPORTANT: The rapid preheat feature is designed to be 25°F lower than a regular preheat and then indicate when to automatically convert a standard baking recipe for ...in the display. When set properly, this time the oven control will light up . 4. Select oven by pressing UPPER OVEN . At this feature is for a 350°F Bake): 1. Bake, Convection Bake and Convection Roast. The cook options items will sound 3 long beeps at regular ...
... disappears indicating that the oven has reached the set a rapid preheat (example is for single rack ONLY. IMPORTANT: The rapid preheat feature is designed to be 25°F lower than a regular preheat and then indicate when to automatically convert a standard baking recipe for ...in the display. When set properly, this time the oven control will light up . 4. Select oven by pressing UPPER OVEN . At this feature is for a 350°F Bake): 1. Bake, Convection Bake and Convection Roast. The cook options items will sound 3 long beeps at regular ...

Use and Care Manual
Page 26
... 6 lbs. 4 to 6 lbs. 3 to 4 lbs. 5 to circulate the oven's heat evenly and continuously within the oven. Roasting To set to use the Convection Convert feature with this cooking mode. • DO NOT use oven mitts when removing hot pans from the oven. 7. Select oven by pressing UPPER OVEN . Figure 1 Broiler...* * * 180° F 180° F 180° F 180° F 160° F 160° F 160° F 160° F 25-30 25-30 15-25 8-10 10-15 12-16 12-16 30-40 20-30 20-25 30-40 * For beef: med rare 145°F, med 160°F, well done 170°F ** Stuffed turkey requires additional...
... 6 lbs. 4 to 6 lbs. 3 to 4 lbs. 5 to circulate the oven's heat evenly and continuously within the oven. Roasting To set to use the Convection Convert feature with this cooking mode. • DO NOT use oven mitts when removing hot pans from the oven. 7. Select oven by pressing UPPER OVEN . Figure 1 Broiler...* * * 180° F 180° F 180° F 180° F 160° F 160° F 160° F 160° F 25-30 25-30 15-25 8-10 10-15 12-16 12-16 30-40 20-30 20-25 30-40 * For beef: med rare 145°F, med 160°F, well done 170°F ** Stuffed turkey requires additional...
Use and Care Manual
Page 27
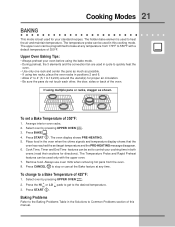
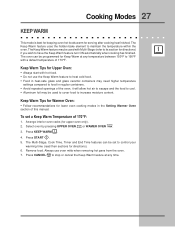
... oven by pressing UPPER OVEN UPPER OVEN or WAMER OVEN . 3. Press CANCEL to stop or cancel the Keep Warm feature at any time. Press START . 5. Remove food. The Keep Warm feature may be used to cover food to increase moisture content. The oven can be programmed for serving after cooking has... Warmer Oven section of this manual. Keep Warm Tips for Warmer Oven: • Follow recommandations for upper oven only). 2. The Keep Warm feature uses the hidden bake element to maintain the temperature within the oven. The Multi-Stage, Cook Time, Timer and End Time...
... oven by pressing UPPER OVEN UPPER OVEN or WAMER OVEN . 3. Press CANCEL to stop or cancel the Keep Warm feature at any time. Press START . 5. Remove food. The Keep Warm feature may be used to cover food to increase moisture content. The oven can be programmed for serving after cooking has... Warmer Oven section of this manual. Keep Warm Tips for Warmer Oven: • Follow recommandations for upper oven only). 2. The Keep Warm feature uses the hidden bake element to maintain the temperature within the oven. The Multi-Stage, Cook Time, Timer and End Time...

Use and Care Manual
Page 28
... in the center of the oven. • Position multiple racks to determine when the food is normal. The maximum cook time for the Slow Cook feature is ideal for high (HI) setting or lo low (Lo) setting. 5. Press START . 6. The Slow Cook mode uses the hidden bake element to... is done. • Preheating the oven will vary; There are 2 settings available, high (HI) or low (LO). The Cook Time, Timer and End Time features can be extended. • Cover the foods to maintain a low temperature in the oven. 28 Cooking Modes SLOW COOK This mode may be used in...
... in the center of the oven. • Position multiple racks to determine when the food is normal. The maximum cook time for the Slow Cook feature is ideal for high (HI) setting or lo low (Lo) setting. 5. Press START . 6. The Slow Cook mode uses the hidden bake element to... is done. • Preheating the oven will vary; There are 2 settings available, high (HI) or low (LO). The Cook Time, Timer and End Time features can be extended. • Cover the foods to maintain a low temperature in the oven. 28 Cooking Modes SLOW COOK This mode may be used in...

Use and Care Manual
Page 29
...Press START . 5. To set a Dehydrate Temperature of 120°F: 1. Press START to slowly remove moisture. The Cook Time, End Time and Timer features can spoil due to control your food at the room's temperature. UPPER OVEN 3. Suitable for directions). 6. Press DEFROST . 4. A "dEF" message ...items such as fruits, meats, vegetables and herbs. DEFROSTING This mode uses a fan controlled defrosting to stop or cancel the Defrost feature at the minimum drying time. • Treat fruits with antioxidants to use oven mitts when removing hot pans from the convection element....
...Press START . 5. To set a Dehydrate Temperature of 120°F: 1. Press START to slowly remove moisture. The Cook Time, End Time and Timer features can spoil due to control your food at the room's temperature. UPPER OVEN 3. Suitable for directions). 6. Press DEFROST . 4. A "dEF" message ...items such as fruits, meats, vegetables and herbs. DEFROSTING This mode uses a fan controlled defrosting to stop or cancel the Defrost feature at the minimum drying time. • Treat fruits with antioxidants to use oven mitts when removing hot pans from the convection element....
Use and Care Manual
Page 30
...to begin the bread proofing. 5. The oven can be programmed for this feature. • Proof bread until dough has doubled in the oven. 2. ...with the new setting. The Cook Time, Timer and End Time features can be set a Bread Proof temperature of the oven. •...baking by activating the yeast. Select oven by pressing UPPER OVEN . This feature is active: 1. Bread Proofing Tips: • No need to preheat for... OVEN 3. UPPER OVEN 2. Press CANCEL to stop or cancel the Bread Proof feature at any temperature between edge of pan and walls of 100°F: 1. Press...
...to begin the bread proofing. 5. The oven can be programmed for this feature. • Proof bread until dough has doubled in the oven. 2. ...with the new setting. The Cook Time, Timer and End Time features can be set a Bread Proof temperature of the oven. •...baking by activating the yeast. Select oven by pressing UPPER OVEN . This feature is active: 1. Bread Proofing Tips: • No need to preheat for... OVEN 3. UPPER OVEN 2. Press CANCEL to stop or cancel the Bread Proof feature at any temperature between edge of pan and walls of 100°F: 1. Press...

Use and Care Manual
Page 31
...increase browning on the underside. The roasting rack fits on the grid allowing the heated air to circulate under the food for the perfect turkey feature is required with this cooking mode (read the probe section on the grid in the juices. Insert the meat probe into the bird and connect... additional roasting time. Arrange interior oven racks and place food in the refrigerator at any time. Press CANCEL to stop or cancel the Perfect Turkey feature at any temperature between 170°F to 550°F with foil to 4 lbs. Oven Temp 325° F 325° F 325° F 350-375° F ...
...increase browning on the underside. The roasting rack fits on the grid allowing the heated air to circulate under the food for the perfect turkey feature is required with this cooking mode (read the probe section on the grid in the juices. Insert the meat probe into the bird and connect... additional roasting time. Arrange interior oven racks and place food in the refrigerator at any time. Press CANCEL to stop or cancel the Perfect Turkey feature at any temperature between 170°F to 550°F with foil to 4 lbs. Oven Temp 325° F 325° F 325° F 350-375° F ...
