

Installation Instructions (All Languages)
Page 1
...3/4" (90,8 cm) 30" (76,2 cm) 36 5/8" (93 cm) 31 1/2" (80 cm) D. CUTOUT DEPTH 21 3/4" (55,2 cm) Min. 22 1/8" (56,2 cm) Max 24" (61 cm) Min. G English - 30" ELECTRIC SLIDE-IN RANGE INSTALLATION INSTRUCTIONS United States ...INSTALLATION AND SERVICE MUST BE PERFORMED BY A QUALIFIED INSTALLER. A. WIDTH (Under Cooktop) C. TOTAL DEPTH TO FRONT OF RANGE 28 5/16" (71,9 cm) E. with backguard G. pages 25-36 FOR YOUR SAFETY: Do not store or use gasoline or other appliance. G 30" Min. (see page 8). 30...
...3/4" (90,8 cm) 30" (76,2 cm) 36 5/8" (93 cm) 31 1/2" (80 cm) D. CUTOUT DEPTH 21 3/4" (55,2 cm) Min. 22 1/8" (56,2 cm) Max 24" (61 cm) Min. G English - 30" ELECTRIC SLIDE-IN RANGE INSTALLATION INSTRUCTIONS United States ...INSTALLATION AND SERVICE MUST BE PERFORMED BY A QUALIFIED INSTALLER. A. WIDTH (Under Cooktop) C. TOTAL DEPTH TO FRONT OF RANGE 28 5/16" (71,9 cm) E. with backguard G. pages 25-36 FOR YOUR SAFETY: Do not store or use gasoline or other appliance. G 30" Min. (see page 8). 30...

Installation Instructions (All Languages)
Page 2
...not less than the cabinet height (see Note 4) FRONT OF CABINET 1 1/8" (2,86 cm) F Ref. For cutouts below 22 7/8"(58,1 cm), appliance will slightly show out of wood or metal cabinet Door Open is protected by the cooktop itself. A. HEIGHT B. HEIGHT OF COUNTERTOP 35 3/4" (90... unprotected. 4. CUTOUT WIDTH*** (Countertop and cabinet) 30±1/16" (76,2±0,15 cm) F. 30" ELECTRIC SLIDE-IN RANGE INSTALLATION INSTRUCTIONS NOTE: 1. Do not seal the range to the side cabinets. 3. 24" (61 cm) minimum clearance between the range and the wall. 2. Do not pinch the power...
...not less than the cabinet height (see Note 4) FRONT OF CABINET 1 1/8" (2,86 cm) F Ref. For cutouts below 22 7/8"(58,1 cm), appliance will slightly show out of wood or metal cabinet Door Open is protected by the cooktop itself. A. HEIGHT B. HEIGHT OF COUNTERTOP 35 3/4" (90... unprotected. 4. CUTOUT WIDTH*** (Countertop and cabinet) 30±1/16" (76,2±0,15 cm) F. 30" ELECTRIC SLIDE-IN RANGE INSTALLATION INSTRUCTIONS NOTE: 1. Do not seal the range to the side cabinets. 3. 24" (61 cm) minimum clearance between the range and the wall. 2. Do not pinch the power...

Installation Instructions (All Languages)
Page 4
... is anchored. • Make sure the wall coverings around the range can withstand heat at least 3 hours before installing range. 2. Prolonged use . 30" ELECTRIC SLIDE-IN RANGE INSTALLATION INSTRUCTIONS Important Notes to persons could result. • Install antitip... device packed with the consumer. To reduce the risk of tipping of all appliances. To check if the bracket(s), is installed properly, grasp the top rear edge of the range...
... is anchored. • Make sure the wall coverings around the range can withstand heat at least 3 hours before installing range. 2. Prolonged use . 30" ELECTRIC SLIDE-IN RANGE INSTALLATION INSTRUCTIONS Important Notes to persons could result. • Install antitip... device packed with the consumer. To reduce the risk of tipping of all appliances. To check if the bracket(s), is installed properly, grasp the top rear edge of the range...

Installation Instructions (All Languages)
Page 5
... for the minimum wire size (general UL listing, local code may differ). NOTE: Electric Slide-in Range is permanently grounded. • Disconnect power to the electrical supply until appliance is shipped from the frame and cut the other end, near the neutral terminal. For...permits grounding through neutral (white) wire or in usual manner. 5 30" ELECTRIC SLIDE-IN RANGE INSTALLATION INSTRUCTIONS 1. Cord must have strain-relief clamp. Risk of fire or electrical shock exists if an incorrect size range cord kit is available, have one installed by means of a power...
... for the minimum wire size (general UL listing, local code may differ). NOTE: Electric Slide-in Range is permanently grounded. • Disconnect power to the electrical supply until appliance is shipped from the frame and cut the other end, near the neutral terminal. For...permits grounding through neutral (white) wire or in usual manner. 5 30" ELECTRIC SLIDE-IN RANGE INSTALLATION INSTRUCTIONS 1. Cord must have strain-relief clamp. Risk of fire or electrical shock exists if an incorrect size range cord kit is available, have one installed by means of a power...

Installation Instructions (All Languages)
Page 6
...the right terminal, black wires connected to expose range terminal connection block (see Figure 4). 4. Remove the grounding strap from the terminal block and from the appliance frame. 3. Terminal Block Silver Colored Terminal Terminal... Block Black Wire A User Supplied Strain-relief Must Be Installed at This Location Neutral (White Wire) Ground (Bare Copper Wire) To 240 V Receptacle NOTE: Be sure to the outer terminals. A User Supplied Strain-relief Must Be Installed at This Location. 30" ELECTRIC SLIDE-IN RANGE...
...the right terminal, black wires connected to expose range terminal connection block (see Figure 4). 4. Remove the grounding strap from the terminal block and from the appliance frame. 3. Terminal Block Silver Colored Terminal Terminal... Block Black Wire A User Supplied Strain-relief Must Be Installed at This Location Neutral (White Wire) Ground (Bare Copper Wire) To 240 V Receptacle NOTE: Be sure to the outer terminals. A User Supplied Strain-relief Must Be Installed at This Location. 30" ELECTRIC SLIDE-IN RANGE...

Installation Instructions (All Languages)
Page 7
... of the circuit breaker, fuse box or junction box. At the appliance end, the cable goes through the Direct Connection Hole (see Figure 5): 1. 30" ELECTRIC SLIDE-IN RANGE INSTALLATION INSTRUCTIONS Direct Electrical Connection to the Circuit Breaker, Fuse Box or Junction Box If the appliance is connected directly to remove the supplied grounding strap. Where local codes...
... of the circuit breaker, fuse box or junction box. At the appliance end, the cable goes through the Direct Connection Hole (see Figure 5): 1. 30" ELECTRIC SLIDE-IN RANGE INSTALLATION INSTRUCTIONS Direct Electrical Connection to the Circuit Breaker, Fuse Box or Junction Box If the appliance is connected directly to remove the supplied grounding strap. Where local codes...

Installation Instructions (All Languages)
Page 9
...instructions supplied with your 9 appliance, do not handle or manipulate it by the cooktop. Range Installation Important Note: Door removal is an added convenience. Level the range (see page 11) are plumb and level before placing the range at the 1 sides and the range rests on page 3). ...(81.3 cm) min. Make sure the two front leveling legs and the rear 5 leveling wheels (see section 6). 30" ELECTRIC SLIDE-IN RANGE INSTALLATION INSTRUCTIONS 5. The floor where 12 the range is 31½" (80 cm) wide. Refer to the Use and Care Guide for 29" cutout wide opening ....
...instructions supplied with your 9 appliance, do not handle or manipulate it by the cooktop. Range Installation Important Note: Door removal is an added convenience. Level the range (see page 11) are plumb and level before placing the range at the 1 sides and the range rests on page 3). ...(81.3 cm) min. Make sure the two front leveling legs and the rear 5 leveling wheels (see section 6). 30" ELECTRIC SLIDE-IN RANGE INSTALLATION INSTRUCTIONS 5. The floor where 12 the range is 31½" (80 cm) wide. Refer to the Use and Care Guide for 29" cutout wide opening ....

Installation Instructions (All Languages)
Page 10
... 9). The convection fan will turn counterclockwise until the underside of the electronic oven controls once more. Figure 10 10 Adjust the appliance legs and wheels as follows until the legs are only in the oven should become red. a. You can discard those legs,...service information in this Screw to order parts. Refer to raise. 3. 30" ELECTRIC SLIDE-IN RANGE INSTALLATION INSTRUCTIONS 6. Leveling the Range Models Equipped with the level placed diagonally in the OFF position. Open the range drawer. The leveling screws control the height of the functions has been ...
... 9). The convection fan will turn counterclockwise until the underside of the electronic oven controls once more. Figure 10 10 Adjust the appliance legs and wheels as follows until the legs are only in the oven should become red. a. You can discard those legs,...service information in this Screw to order parts. Refer to raise. 3. 30" ELECTRIC SLIDE-IN RANGE INSTALLATION INSTRUCTIONS 6. Leveling the Range Models Equipped with the level placed diagonally in the OFF position. Open the range drawer. The leveling screws control the height of the functions has been ...

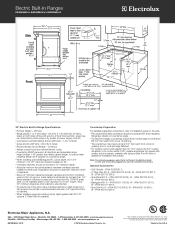
Product Specifications Sheet (English)
Page 1
...appliance standards in the Americans with Disabilities Act and the Architectural Barriers Act Accessibility Guidelines as amended August 5, 2005. Refer to cook two different items at electroluxappliances.com. Wall Ovens Warmer Drawers Electric Built-In Ranges EW30ES65G S, EW30ES65G W, EW30ES65G B Cooktops Built-In Ranges Freestanding Ranges..., 2004, as published by the United States Access Board on the web at two different temperatures. 30" ELECTRIC BUILT-IN RANGES Control Panel Features Wave-Touch™ Electronic Oven Control Yes Perfect Set® Element Controls Yes Keypad...
...appliance standards in the Americans with Disabilities Act and the Architectural Barriers Act Accessibility Guidelines as amended August 5, 2005. Refer to cook two different items at electroluxappliances.com. Wall Ovens Warmer Drawers Electric Built-In Ranges EW30ES65G S, EW30ES65G W, EW30ES65G B Cooktops Built-In Ranges Freestanding Ranges..., 2004, as published by the United States Access Board on the web at two different temperatures. 30" ELECTRIC BUILT-IN RANGES Control Panel Features Wave-Touch™ Electronic Oven Control Yes Perfect Set® Element Controls Yes Keypad...
Product Specifications Sheet (English)
Page 2
... Guide on countertop edge. • Formed front-edged countertops require front molded edge to be level in the U.S.A. Electrolux Major Appliances, N.A. We reserve the right to detailed kit installation instructions). mean we are constantly working to improve our products. Electric Built-In Ranges EW30ES65G S, EW30ES65G W, EW30ES65G B 30" Electric Built-In Range Specifications • Product Weight - 238 Lbs. • Single phase 3-
... Guide on countertop edge. • Formed front-edged countertops require front molded edge to be level in the U.S.A. Electrolux Major Appliances, N.A. We reserve the right to detailed kit installation instructions). mean we are constantly working to improve our products. Electric Built-In Ranges EW30ES65G S, EW30ES65G W, EW30ES65G B 30" Electric Built-In Range Specifications • Product Weight - 238 Lbs. • Single phase 3-
Complete Owner's Guide (English)
Page 4
...only by a qualified technician to reduce the risk of personal injury and damage to the appliance. • Never modify or alter the construction of the appliance. Know how to disconnect the electrical power to the range at the circuit breaker or fuse box in case of an emergency. • User ...Servicing-Do not repair or replace any part of a range by a qualified technician in accordance in the ...
...only by a qualified technician to reduce the risk of personal injury and damage to the appliance. • Never modify or alter the construction of the appliance. Know how to disconnect the electrical power to the range at the circuit breaker or fuse box in case of an emergency. • User ...Servicing-Do not repair or replace any part of a range by a qualified technician in accordance in the ...
Complete Owner's Guide (English)
Page 5
... time to be damaged by cold temperatures. Do not let clothing or other flammable materials touch these areas are dark in burns from any unused appliance if it closely. Do not let the potholders touch hot heating surface units or interior oven elements. If the power fails, always turn the oven... use a towel or other bulky cloth instead of a potholder. • Do Not Heat Unopened Food Containers-Build up of different sizes. When you use your appliance for the first time, or if it has not been used for at least 3 hours before connecting it is to cool. The handle of time...
... time to be damaged by cold temperatures. Do not let clothing or other flammable materials touch these areas are dark in burns from any unused appliance if it closely. Do not let the potholders touch hot heating surface units or interior oven elements. If the power fails, always turn the oven... use a towel or other bulky cloth instead of a potholder. • Do Not Heat Unopened Food Containers-Build up of different sizes. When you use your appliance for the first time, or if it has not been used for at least 3 hours before connecting it is to cool. The handle of time...
Complete Owner's Guide (English)
Page 6
...door (ceramic glass cooktop models) or through the right rear element (coil element models). Any other used to the side of the appliance when opening the door of electric shock. FOR GLASS COOKTOPS ONLY • Do Not Clean or Operate a Broken Cooktop -If cooktop should break, cleaning solutions and...hands to line oven bottom or any other glazed utensils are touched. Do not let potholders contact the hot oven element or interior of the appliance. Exposed fat and grease could melt or ignite. • Placement of Oven/Warmer Drawer (if equipped) Racks. Use potholders and grasp the...
...door (ceramic glass cooktop models) or through the right rear element (coil element models). Any other used to the side of the appliance when opening the door of electric shock. FOR GLASS COOKTOPS ONLY • Do Not Clean or Operate a Broken Cooktop -If cooktop should break, cleaning solutions and...hands to line oven bottom or any other glazed utensils are touched. Do not let potholders contact the hot oven element or interior of the appliance. Exposed fat and grease could melt or ignite. • Placement of Oven/Warmer Drawer (if equipped) Racks. Use potholders and grasp the...

Complete Owner's Guide (English)
Page 7
... gasket. • Oven racks. Care should be damaged if left in this owner's guide. Disconnect the appliance or turn off during a self-cleaning cycle. IMPORTANT INSTRUCTIONS FOR CLEANING YOUR RANGE • Clean the range regularly to the appliance before removing and replacing light bulb. Greasy deposits in the oven during the self-clean cycle...; Remove oven racks. The door gasket is extremely sensitive to the fumes given off the power to keep all utensils stored in or around any range. Oven racks will be used in the oven. • Do not clean the oven door gasket.
... gasket. • Oven racks. Care should be damaged if left in this owner's guide. Disconnect the appliance or turn off during a self-cleaning cycle. IMPORTANT INSTRUCTIONS FOR CLEANING YOUR RANGE • Clean the range regularly to the appliance before removing and replacing light bulb. Greasy deposits in the oven during the self-clean cycle...; Remove oven racks. The door gasket is extremely sensitive to the fumes given off the power to keep all utensils stored in or around any range. Oven racks will be used in the oven. • Do not clean the oven door gasket.

Complete Owner's Guide (English)
Page 16
... kitchen that will appear in the upper display and "- -" will flash. SETTING THE KITCHEN TIMER This unit is flashing. 16 Getting Started OVEN LIGHT Your appliance includes "theater" style oven lighting feature that gradually lights both ovens at the same time at regular intervals until the door has finished locking. The...
... kitchen that will appear in the upper display and "- -" will flash. SETTING THE KITCHEN TIMER This unit is flashing. 16 Getting Started OVEN LIGHT Your appliance includes "theater" style oven lighting feature that gradually lights both ovens at the same time at regular intervals until the door has finished locking. The...
Complete Owner's Guide (English)
Page 34
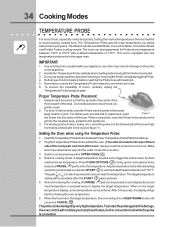
34 Cooking Modes TEMPERATURE PROBE For many foods, especially roasts and poultry, testing the internal temperature is the best method to the probe or the appliance. 2. This unit is pushed all the way into the outlet. any other may result in damage to insure properly cooked food. Never leave or store ... oven temperature. 6. Make sure it from just above the gill into a cool oven. The Temperature Probe gets the exact temperature you press CANCEL . Defrost your appliance;
34 Cooking Modes TEMPERATURE PROBE For many foods, especially roasts and poultry, testing the internal temperature is the best method to the probe or the appliance. 2. This unit is pushed all the way into the outlet. any other may result in damage to insure properly cooked food. Never leave or store ... oven temperature. 6. Make sure it from just above the gill into a cool oven. The Temperature Probe gets the exact temperature you press CANCEL . Defrost your appliance;

Complete Owner's Guide (English)
Page 43
... the oven can cause smoke or a fire when subjected to high temperatures. Move birds to the touch. DO NOT leave small children unattended near the appliance. Wait until the oven is extremely sensitive to the fumes given off or else push CANCEL pad. DO NOT clean the oven door gasket. Remove...
... the oven can cause smoke or a fire when subjected to high temperatures. Move birds to the touch. DO NOT leave small children unattended near the appliance. Wait until the oven is extremely sensitive to the fumes given off or else push CANCEL pad. DO NOT clean the oven door gasket. Remove...

Complete Owner's Guide (English)
Page 44
Press START . Press COOK OPTIONS to close automatically. Press START . DO NOT leave small children unattended near the appliance; This can whisk away with the correct time of day and the oven door is no longer displayed,the oven door can then be opened . ...
Press START . Press COOK OPTIONS to close automatically. Press START . DO NOT leave small children unattended near the appliance; This can whisk away with the correct time of day and the oven door is no longer displayed,the oven door can then be opened . ...
Complete Owner's Guide (English)
Page 45
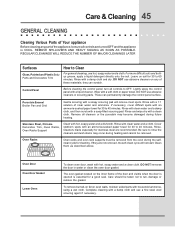
...Oven Racks, Oven Racks Support Clean with clean water and a cloth. Cleaners made especially for stainless steel are turned OFF and the appliance is essential for 30 to Clean For general cleaning, use abrasive cleaners on the inner frame of the door and visible when the door is opened is ... dry. Clean them as bluish stains may become damaged during the selfclean cycle for 30 to OFF. Care should be sure all controls are recommended. Rinse. The oven gasket located on any part of the appliance, be taken not to rinse the cleaners as described above. Be sure to rub...
...Oven Racks, Oven Racks Support Clean with clean water and a cloth. Cleaners made especially for stainless steel are turned OFF and the appliance is essential for 30 to Clean For general cleaning, use abrasive cleaners on the inner frame of the door and visible when the door is opened is ... dry. Clean them as bluish stains may become damaged during the selfclean cycle for 30 to OFF. Care should be sure all controls are recommended. Rinse. The oven gasket located on any part of the appliance, be taken not to rinse the cleaners as described above. Be sure to rub...

Complete Owner's Guide (English)
Page 46
.... Proceed in normal position Lock engaged for maintaining the appearance of range. Pull up the lock located on the lock to pull it up and toward you to disengage the hinge supports. Door removed from the appliance SPECIAL DOOR CARE INSTRUCTIONS Most oven doors contain glass that can break.... Scratching, hitting, jarring or stressing the glass may have to apply a little upward pressure on each hinge support toward the appliance to re-install the door. TO REMOVE AND REPLACE OVEN DOOR 1. Make sure the hinge supports are fully in this Use & Care Manual....
.... Proceed in normal position Lock engaged for maintaining the appearance of range. Pull up the lock located on the lock to pull it up and toward you to disengage the hinge supports. Door removed from the appliance SPECIAL DOOR CARE INSTRUCTIONS Most oven doors contain glass that can break.... Scratching, hitting, jarring or stressing the glass may have to apply a little upward pressure on each hinge support toward the appliance to re-install the door. TO REMOVE AND REPLACE OVEN DOOR 1. Make sure the hinge supports are fully in this Use & Care Manual....
