

Installation Instructions (All Languages)
Page 1
... 1/8" (56,2 cm) Max 24" (61 cm) Min. Printed in the cabinet before reading next two pages. 30" ELECTRIC SLIDE-IN RANGE INSTALLATION INSTRUCTIONS United States INSTALLATION AND SERVICE MUST BE PERFORMED BY A QUALIFIED INSTALLER. Approx. 1 7/8" (4,8 cm) F Locate Cabinet Doors 1" (2,5 cm) Min. CUTOUT WIDTH*** (Countertop and cabinet) 30±1/16" (76,2±0,15 cm) F. pages 1-12 Español...
... 1/8" (56,2 cm) Max 24" (61 cm) Min. Printed in the cabinet before reading next two pages. 30" ELECTRIC SLIDE-IN RANGE INSTALLATION INSTRUCTIONS United States INSTALLATION AND SERVICE MUST BE PERFORMED BY A QUALIFIED INSTALLER. Approx. 1 7/8" (4,8 cm) F Locate Cabinet Doors 1" (2,5 cm) Min. CUTOUT WIDTH*** (Countertop and cabinet) 30±1/16" (76,2±0,15 cm) F. pages 1-12 Español...

Installation Instructions (All Languages)
Page 2
... bottom of the cabinet when the bottom of wood or metal cabinet Door Open is protected by the cooktop itself. A. TOTAL DEPTH TO FRONT OF RANGE 28 5/16" (71,9 cm) E. WIDTH (Under Cooktop) C. CUTOUT DEPTH 21 3/4" (55,2 cm) Min. 22 1/8" (56,2 cm) Max ...1 1/8" (2,86 cm) F Ref. Do not seal the range to the side cabinets. 3. 24" (61 cm) minimum clearance between the range and the wall. 2. HEIGHT OF COUNTERTOP 35 3/4" (90,8 cm) Min. 36 5/8" (93 cm) Max. 2 30" ELECTRIC SLIDE-IN RANGE INSTALLATION INSTRUCTIONS NOTE: 1. IMPORTANT: Cabinet and countertop width should match ...
... bottom of the cabinet when the bottom of wood or metal cabinet Door Open is protected by the cooktop itself. A. TOTAL DEPTH TO FRONT OF RANGE 28 5/16" (71,9 cm) E. WIDTH (Under Cooktop) C. CUTOUT DEPTH 21 3/4" (55,2 cm) Min. 22 1/8" (56,2 cm) Max ...1 1/8" (2,86 cm) F Ref. Do not seal the range to the side cabinets. 3. 24" (61 cm) minimum clearance between the range and the wall. 2. HEIGHT OF COUNTERTOP 35 3/4" (90,8 cm) Min. 36 5/8" (93 cm) Max. 2 30" ELECTRIC SLIDE-IN RANGE INSTALLATION INSTRUCTIONS NOTE: 1. IMPORTANT: Cabinet and countertop width should match ...

Installation Instructions (All Languages)
Page 3
...7 The cooktop should be placed over the cabinet countertop for the transport. 5 Slide the unit into the cabinet. The metal flange under each side of the counter. To successfully install the range, the initial level height from floor to underside of the metal flange is supported ... so that the 8 unit is H2 H1 H3 greater than cabinet sides as measured in place to the cooktop voiding the warranty. 30" ELECTRIC SLIDE-IN RANGE INSTALLATION INSTRUCTIONS To avoid breakage: Do NOT handle or manipulate the unit by the cooktop. 1 The counter-top around the cut -out....
...7 The cooktop should be placed over the cabinet countertop for the transport. 5 Slide the unit into the cabinet. The metal flange under each side of the counter. To successfully install the range, the initial level height from floor to underside of the metal flange is supported ... so that the 8 unit is H2 H1 H3 greater than cabinet sides as measured in place to the cooktop voiding the warranty. 30" ELECTRIC SLIDE-IN RANGE INSTALLATION INSTRUCTIONS To avoid breakage: Do NOT handle or manipulate the unit by the cooktop. 1 The counter-top around the cut -out....

Installation Instructions (All Languages)
Page 4
... pad or sheet of interest to children in an area covered with linoleum or any other utensils before self-cleaning the oven. 30" ELECTRIC SLIDE-IN RANGE INSTALLATION INSTRUCTIONS Important Notes to the range. 3. If cabinet storage is in the Owner's Guide. Children could result. • Reset all appliances. Remove all governing codes and ordinances. 4. Observe...
... pad or sheet of interest to children in an area covered with linoleum or any other utensils before self-cleaning the oven. 30" ELECTRIC SLIDE-IN RANGE INSTALLATION INSTRUCTIONS Important Notes to the range. 3. If cabinet storage is in the Owner's Guide. Children could result. • Reset all appliances. Remove all governing codes and ordinances. 4. Observe...

Installation Instructions (All Languages)
Page 5
... must have either closed loop or open spade lug with a 50A recommended circuit. Cord must have strain-relief clamp. Electrical failure or loss of the above could result in usual manner. 5 30" ELECTRIC SLIDE-IN RANGE INSTALLATION INSTRUCTIONS 1. Terminal on end of a grounding strap between the neutral power supply terminal and the frame. hole as shown...
... must have either closed loop or open spade lug with a 50A recommended circuit. Cord must have strain-relief clamp. Electrical failure or loss of the above could result in usual manner. 5 30" ELECTRIC SLIDE-IN RANGE INSTALLATION INSTRUCTIONS 1. Terminal on end of a grounding strap between the neutral power supply terminal and the frame. hole as shown...

Installation Instructions (All Languages)
Page 6
... connect the other wires to the outer terminals. Red Wire Black Wire 1 1/8" (2.9cm) Dia. Electrical Connection to the Range (U.S.A.) Three Conductor Wire Connection to Range If local codes permit connection of the frame grounding conductor to the neutral wire of the copper power ... To 240 V Receptacle Figure 3 Cord Mounting Plate Neutral (White Wire) Grounding Strap 1 1/8" (2.9 cm) Dia. Direct Connection Hole. 30" ELECTRIC SLIDE-IN RANGE INSTALLATION INSTRUCTIONS 4. Remove the 3 screws at the lower end of the rear wire cover, then raise the lower end of the appliance with ...
... connect the other wires to the outer terminals. Red Wire Black Wire 1 1/8" (2.9cm) Dia. Electrical Connection to the Range (U.S.A.) Three Conductor Wire Connection to Range If local codes permit connection of the frame grounding conductor to the neutral wire of the copper power ... To 240 V Receptacle Figure 3 Cord Mounting Plate Neutral (White Wire) Grounding Strap 1 1/8" (2.9 cm) Dia. Direct Connection Hole. 30" ELECTRIC SLIDE-IN RANGE INSTALLATION INSTRUCTIONS 4. Remove the 3 screws at the lower end of the rear wire cover, then raise the lower end of the appliance with ...

Installation Instructions (All Languages)
Page 7
...wire, the white appliance cable wire, and the neutral (white) wire together. b) Connect the 2 black wires together. Figure 6 - 4-Wire Electrical System (Example: Junction Box) 7 Supply a U.L. Be sure that no power is supplied on the Cord Mounting Plate. b) Connect the 2 ...breaker, fuse box or junction box, use flexible, armored or nonmetallic sheathed copper cable (with grounding wire). 30" ELECTRIC SLIDE-IN RANGE INSTALLATION INSTRUCTIONS Direct Electrical Connection to the Circuit Breaker, Fuse Box or Junction Box If the appliance is connected directly to the ...
...wire, the white appliance cable wire, and the neutral (white) wire together. b) Connect the 2 black wires together. Figure 6 - 4-Wire Electrical System (Example: Junction Box) 7 Supply a U.L. Be sure that no power is supplied on the Cord Mounting Plate. b) Connect the 2 ...breaker, fuse box or junction box, use flexible, armored or nonmetallic sheathed copper cable (with grounding wire). 30" ELECTRIC SLIDE-IN RANGE INSTALLATION INSTRUCTIONS Direct Electrical Connection to the Circuit Breaker, Fuse Box or Junction Box If the appliance is connected directly to the ...

Installation Instructions (All Languages)
Page 8
Cooktop sides lay directly on the countertop, first side to side, then front to back. 30" ELECTRIC SLIDE-IN RANGE INSTALLATION INSTRUCTIONS 4. Cutout Width ¾" (1.9 cm) ¾" (1.9 cm) 31½" (81 cm) Formed or tile countertop trimmed ¾" (1.9 cm) back... Construction 4.1 To eliminate the risk of burns or fire by reaching over heated surface units, do not have cabinet storage space above range, reduce risk by installing a range hood that projects horizontally a minimum of 5" (12.7 cm) beyond the bottom of the cabinet. 4.2 Countertop Preparation • The...
Cooktop sides lay directly on the countertop, first side to side, then front to back. 30" ELECTRIC SLIDE-IN RANGE INSTALLATION INSTRUCTIONS 4. Cutout Width ¾" (1.9 cm) ¾" (1.9 cm) 31½" (81 cm) Formed or tile countertop trimmed ¾" (1.9 cm) back... Construction 4.1 To eliminate the risk of burns or fire by reaching over heated surface units, do not have cabinet storage space above range, reduce risk by installing a range hood that projects horizontally a minimum of 5" (12.7 cm) beyond the bottom of the cabinet. 4.2 Countertop Preparation • The...

Installation Instructions (All Languages)
Page 9
30" ELECTRIC SLIDE-IN RANGE INSTALLATION INSTRUCTIONS 5. Refer to the Use and Care Guide for the transport. The floor where 12 the range is an added convenience. The cooktop is not a requirement for 29" cutout wide opening . Proper adjustments to be installed must be ordered through a Service Center. 2.Follow instructions supplied with the range. Installation... the instructions under "Leveling the Range". 13 Slide the range into the cutout opening in the "Installation without side panels" section. apart so as not to interfere with range door opening . 4 Cutout countertop...
30" ELECTRIC SLIDE-IN RANGE INSTALLATION INSTRUCTIONS 5. Refer to the Use and Care Guide for the transport. The floor where 12 the range is an added convenience. The cooktop is not a requirement for 29" cutout wide opening . Proper adjustments to be installed must be ordered through a Service Center. 2.Follow instructions supplied with the range. Installation... the instructions under "Leveling the Range". 13 Slide the range into the cutout opening in the "Installation without side panels" section. apart so as not to interfere with range door opening . 4 Cutout countertop...

Installation Instructions (All Languages)
Page 10
... baking, the lower element in the oven should become red. The list includes common occurrences that are removed from the oven before shipping. 30" ELECTRIC SLIDE-IN RANGE INSTALLATION INSTRUCTIONS 6. Open the range drawer. b.Remove the rear legs using a wrench on the leg base and turn clockwise to lower or counterclockwise to 350°F (177°...
... baking, the lower element in the oven should become red. The list includes common occurrences that are removed from the oven before shipping. 30" ELECTRIC SLIDE-IN RANGE INSTALLATION INSTRUCTIONS 6. Open the range drawer. b.Remove the rear legs using a wrench on the leg base and turn clockwise to lower or counterclockwise to 350°F (177°...

Installation Instructions (All Languages)
Page 11
...of the cooktop is no wall. 2. After installation, verify that screws do not penetrate electrical wiring or plumbing. The screws provided will allow the range to tip over if excessive weight is trapped by properly installed anti-tip bracket and screws packed with the .... 7. Refer to concrete floor, first drill 3/16"(0,48 cm) dia. Follow the instructions below to make sure range is not available. (Figure 11)) 3. 30" ELECTRIC SLIDE-IN RANGE INSTALLATION INSTRUCTIONS 8. BRRAAEACNRKGWEEDLAIGNLLEE OOFR Kitchen Cabinet Toe Plate CL 10½" (26.7 cm) ANTI-TIP BRACKET (CL =...
...of the cooktop is no wall. 2. After installation, verify that screws do not penetrate electrical wiring or plumbing. The screws provided will allow the range to tip over if excessive weight is trapped by properly installed anti-tip bracket and screws packed with the .... 7. Refer to concrete floor, first drill 3/16"(0,48 cm) dia. Follow the instructions below to make sure range is not available. (Figure 11)) 3. 30" ELECTRIC SLIDE-IN RANGE INSTALLATION INSTRUCTIONS 8. BRRAAEACNRKGWEEDLAIGNLLEE OOFR Kitchen Cabinet Toe Plate CL 10½" (26.7 cm) ANTI-TIP BRACKET (CL =...

Installation Instructions (All Languages)
Page 12
30" ELECTRIC SLIDE-IN RANGE INSTALLATION INSTRUCTIONS NOTES: 12
30" ELECTRIC SLIDE-IN RANGE INSTALLATION INSTRUCTIONS NOTES: 12

Product Specifications Sheet (English)
Page 1
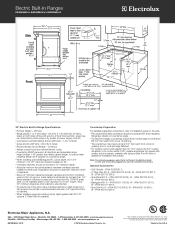
...Ranges EW30ES65G S, EW30ES65G W, EW30ES65G B Cooktops Built-In Ranges Freestanding Ranges Microwaves Vent Hoods Featuring Wave-Touch™ Electronic Controls Perfect Turkey® Button1 Ensures moist, delicious poultry. Use both simultaneously to cook two different items at two different temperatures. 30" ELECTRIC BUILT-IN RANGES... 1000W / 2000W / 2700W 1 6" to 9" Dual Expandable Element - 1600W / 3000W 1 5" to Product Installation Guide for detailed installation instructions on June 23, 2004, as amended August 5, 2005. Imagine stress-free holiday cooking. PN # 318251611 ...
...Ranges EW30ES65G S, EW30ES65G W, EW30ES65G B Cooktops Built-In Ranges Freestanding Ranges Microwaves Vent Hoods Featuring Wave-Touch™ Electronic Controls Perfect Turkey® Button1 Ensures moist, delicious poultry. Use both simultaneously to cook two different items at two different temperatures. 30" ELECTRIC BUILT-IN RANGES... 1000W / 2000W / 2700W 1 6" to 9" Dual Expandable Element - 1600W / 3000W 1 5" to Product Installation Guide for detailed installation instructions on June 23, 2004, as amended August 5, 2005. Imagine stress-free holiday cooking. PN # 318251611 ...
Product Specifications Sheet (English)
Page 2
...working to change specifications or discontinue models without notice. Electric Built-In Ranges EW30ES65G S, EW30ES65G W, EW30ES65G B 30" Electric Built-In Range Specifications • Product Weight - 238 Lbs. • Single phase 3- We reserve the right to improve our products. Electrolux Major Appliances, N.A. High standards of opening . &#...bottom of wood or metal cabinet is unprotected. • To reduce risk of fire when using overhead cabinetry, install range hood that projects horizontally a recommended minimum of 5" beyond bottom of 29", replace actual side trim panels with...
...working to change specifications or discontinue models without notice. Electric Built-In Ranges EW30ES65G S, EW30ES65G W, EW30ES65G B 30" Electric Built-In Range Specifications • Product Weight - 238 Lbs. • Single phase 3- We reserve the right to improve our products. Electrolux Major Appliances, N.A. High standards of opening . &#...bottom of wood or metal cabinet is unprotected. • To reduce risk of fire when using overhead cabinetry, install range hood that projects horizontally a recommended minimum of 5" beyond bottom of 29", replace actual side trim panels with...
Complete Owner's Guide (English)
Page 4
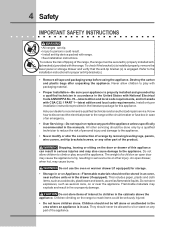
.... Do not store items of this appliance. Refer to the installation instructions for this appliance can tip. • Injury to the appliance. • Never modify or alter the construction of a range by a qualified technician in accordance in the United States with National Electrical Code ANSI/NFPA No. 70-latest edition and local code...
.... Do not store items of this appliance. Refer to the installation instructions for this appliance can tip. • Injury to the appliance. • Never modify or alter the construction of a range by a qualified technician in accordance in the United States with National Electrical Code ANSI/NFPA No. 70-latest edition and local code...
Complete Owner's Guide (English)
Page 10
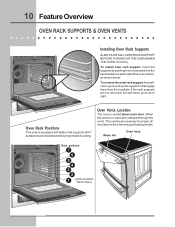
...cooking. When the oven is on each door. If the rack supports are not removed, the self-clean cycle won't start. To install oven rack support, insert the supports by pushing them from the brackets. To remove the oven rack support for proper air circulation in ... results. Oven Vents Location The oven is released through the vents. Warm Air Oven Vent Rack positions 7 6 5 4 3 2 1 (NON-SLIDING RACK ONLY) 10 Feature Overview OVEN RACK SUPPORTS & OVEN VENTS Installing Oven Rack Supports ALWAYS INSTALL OVEN RACK SUPPORT BEFORE TURNING ON THE OVEN (WHEN THE OVEN IS COOL).
...cooking. When the oven is on each door. If the rack supports are not removed, the self-clean cycle won't start. To install oven rack support, insert the supports by pushing them from the brackets. To remove the oven rack support for proper air circulation in ... results. Oven Vents Location The oven is released through the vents. Warm Air Oven Vent Rack positions 7 6 5 4 3 2 1 (NON-SLIDING RACK ONLY) 10 Feature Overview OVEN RACK SUPPORTS & OVEN VENTS Installing Oven Rack Supports ALWAYS INSTALL OVEN RACK SUPPORT BEFORE TURNING ON THE OVEN (WHEN THE OVEN IS COOL).

Complete Owner's Guide (English)
Page 46
... while rotating the top of the door toward front of the door toward you to completely disengage the hinge levers. 4. Keep pulling the bottom of range. Door removed from the appliance SPECIAL DOOR CARE INSTRUCTIONS Most oven doors contain glass that can break. Read the following recommendations: 1. Scratching, hitting,...this Use & Care Manual. Make sure the hinge supports are fully in reverse to pull it up the lock located on the lock to re-install the door. Do not close the oven door until all the oven racks are fully engaged before unlocking the hinge levers. Pull up . 3. ...
... while rotating the top of the door toward front of the door toward you to completely disengage the hinge levers. 4. Keep pulling the bottom of range. Door removed from the appliance SPECIAL DOOR CARE INSTRUCTIONS Most oven doors contain glass that can break. Read the following recommendations: 1. Scratching, hitting,...this Use & Care Manual. Make sure the hinge supports are fully in reverse to pull it up the lock located on the lock to re-install the door. Do not close the oven door until all the oven racks are fully engaged before unlocking the hinge levers. Pull up . 3. ...

Complete Owner's Guide (English)
Page 50
50 Solutions to bake a product may vary slightly from the oven except the ones to be used for leveling the range. • Be sure to allow 5.1 cm to 10.2 cm (2" to 4") of clearance on all sides when placed in oven. • Choose pan sizes that are ... For best cooking results pre-heat the oven when baking cookies, breads, cakes, pies or pastries, etc... Cakes not level. • Range not level. • Pan too close to the installation instructions for baking. • Open oven door only after shortest recommended baking time. Cakes not done in the center. • Oven...
50 Solutions to bake a product may vary slightly from the oven except the ones to be used for leveling the range. • Be sure to allow 5.1 cm to 10.2 cm (2" to 4") of clearance on all sides when placed in oven. • Choose pan sizes that are ... For best cooking results pre-heat the oven when baking cookies, breads, cakes, pies or pastries, etc... Cakes not level. • Range not level. • Pan too close to the installation instructions for baking. • Open oven door only after shortest recommended baking time. Cakes not done in the center. • Oven...
Complete Owner's Guide (English)
Page 51
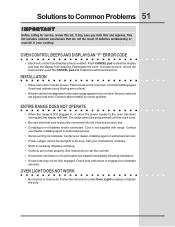
...fuse and screw or engage circuit breaker securely. Follow the instructions under Oven Light to correct problem. The range cannot be programmed until the clock is not installed and/or connected. Replace cord/plug. • Controls are not the result of oven. OVEN LIGHT DOES... Be sure electrical cord is securely connected into the electrical junction box. • Cord/plug is set properly. Solutions to set the controls. • House fuse has blown or circuit breaker has tripped immediately following installation. • House fuse may not be fully engaged. ENTIRE RANGE DOES NOT ...
...fuse and screw or engage circuit breaker securely. Follow the instructions under Oven Light to correct problem. The range cannot be programmed until the clock is not installed and/or connected. Replace cord/plug. • Controls are not the result of oven. OVEN LIGHT DOES... Be sure electrical cord is securely connected into the electrical junction box. • Cord/plug is set properly. Solutions to set the controls. • House fuse has blown or circuit breaker has tripped immediately following installation. • House fuse may not be fully engaged. ENTIRE RANGE DOES NOT ...
Complete Owner's Guide (English)
Page 55
... one year limited warranty. Exclusions This warranty does not cover the following: 1. Service calls to correct the installation of purchase, Electrolux will provide a replacement glass cooktop or radiant surface element for your appliance is designed to be defective in and free-standing... range appliances) is " are not covered by this warranty. 5. Service calls to use or used , and maintained in accordance with the provided instructions. Labor or in a commercial setting. 7. Electrolux authorizes no person to change without notice....
... one year limited warranty. Exclusions This warranty does not cover the following: 1. Service calls to correct the installation of purchase, Electrolux will provide a replacement glass cooktop or radiant surface element for your appliance is designed to be defective in and free-standing... range appliances) is " are not covered by this warranty. 5. Service calls to use or used , and maintained in accordance with the provided instructions. Labor or in a commercial setting. 7. Electrolux authorizes no person to change without notice....

