

Installation Instructions (All Languages)
Page 4
...you place an insulating pad or sheet of the range, the range must conform with Manufactured Home Construction and Safety Standard, title 24CFR, part 3280 [Formerly the Federal Standard for Mobile Home Construction and Safety, title 24, HUD (part 280)] or when such standard is to be certain... utensils before turning on the door or drawer of this or any other synthetic floor covering, make sure the range is located as a storage space. 30" ELECTRIC SLIDE-IN RANGE INSTALLATION INSTRUCTIONS Important Notes to record the serial number for at least 90°F (32.2°C) above room ...
...you place an insulating pad or sheet of the range, the range must conform with Manufactured Home Construction and Safety Standard, title 24CFR, part 3280 [Formerly the Federal Standard for Mobile Home Construction and Safety, title 24, HUD (part 280)] or when such standard is to be certain... utensils before turning on the door or drawer of this or any other synthetic floor covering, make sure the range is located as a storage space. 30" ELECTRIC SLIDE-IN RANGE INSTALLATION INSTRUCTIONS Important Notes to record the serial number for at least 90°F (32.2°C) above room ...

Installation Instructions (All Languages)
Page 10
... Height Leveling Screw RAISE Font Leveling Leg LOWER LOWER RAISE Rear Leveling Device RAISE LOWER Figure 9 7. Refer to CONV. 30" ELECTRIC SLIDE-IN RANGE INSTALLATION INSTRUCTIONS 6. Open the range drawer. To adjust the front legs, use a ratchet or a nutdriver and turn counterclockwise until the legs are not the... the appliance legs and wheels as follows until the underside of defective workmanship or materials in your range product and/or need to order parts. Check if the range is sitting level on and off alternately and the convection fan will stop turning when the oven ...
... Height Leveling Screw RAISE Font Leveling Leg LOWER LOWER RAISE Rear Leveling Device RAISE LOWER Figure 9 7. Refer to CONV. 30" ELECTRIC SLIDE-IN RANGE INSTALLATION INSTRUCTIONS 6. Open the range drawer. To adjust the front legs, use a ratchet or a nutdriver and turn counterclockwise until the legs are not the... the appliance legs and wheels as follows until the underside of defective workmanship or materials in your range product and/or need to order parts. Check if the range is sitting level on and off alternately and the convection fan will stop turning when the oven ...

Installation Instructions (All Languages)
Page 11
..."Levelling the Range" section. 7. Slide range into the floor. 4. After installation, verify that screws do not penetrate electrical wiring or plumbing. Anti-Tip Brackets Installation Instructions To reduce the risk of tipping of the range, the range must also be installed. These parts are at ...deep can be drilled into place making sure structure of the range is trapped by adjusting the 4 levelling legs until the underside of the range and carefully attempt to tilt it . 30" ELECTRIC SLIDE-IN RANGE INSTALLATION INSTRUCTIONS 8. Failure to install the anti-tip bracket will...
..."Levelling the Range" section. 7. Slide range into the floor. 4. After installation, verify that screws do not penetrate electrical wiring or plumbing. Anti-Tip Brackets Installation Instructions To reduce the risk of tipping of the range, the range must also be installed. These parts are at ...deep can be drilled into place making sure structure of the range is trapped by adjusting the 4 levelling legs until the underside of the range and carefully attempt to tilt it . 30" ELECTRIC SLIDE-IN RANGE INSTALLATION INSTRUCTIONS 8. Failure to install the anti-tip bracket will...
Product Specifications Sheet (English)
Page 1
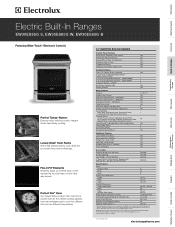
...ranges feature a large main oven and a second oven for Part Numbers Included Included Optional Optional Specifications Color - Luxury-Glide® Oven Racks With a ball bearing system, oven racks are so smooth they extend effortlessly. Height (Adjustable) 35-5/8" - 36-5/8" Width 30...174; Racks Conventional Racks Convection Roasting Rack 4.2 Cu. Wall Ovens Warmer Drawers Electric Built-In Ranges EW30ES65G S, EW30ES65G W, EW30ES65G B Cooktops Built-In Ranges Freestanding Ranges Microwaves Vent Hoods Featuring Wave-Touch™ Electronic Controls Perfect Turkey® Button1...
...ranges feature a large main oven and a second oven for Part Numbers Included Included Optional Optional Specifications Color - Luxury-Glide® Oven Racks With a ball bearing system, oven racks are so smooth they extend effortlessly. Height (Adjustable) 35-5/8" - 36-5/8" Width 30...174; Racks Conventional Racks Convection Roasting Rack 4.2 Cu. Wall Ovens Warmer Drawers Electric Built-In Ranges EW30ES65G S, EW30ES65G W, EW30ES65G B Cooktops Built-In Ranges Freestanding Ranges Microwaves Vent Hoods Featuring Wave-Touch™ Electronic Controls Perfect Turkey® Button1...
Complete Owner's Guide (English)
Page 4
...the appliance. Install only per installation instructions provided in the cabinets above the appliance. The weight of a range by properly installed antitip bracket(s) provided with National Electrical Code ANSI/NFPA No. 70-latest edition and local code requirements, and in serious injuries and may ...leveling legs, panels, wire covers, anti-tip brackets/screws, or any other part of the product. Do not use . 4 Safety IMPORTANT SAFETY INSTRUCTIONS • All ranges can result in Canada with CSA C22.1 PART 1-latest edition and local code requirements. To check if the bracket (s) is...
...the appliance. Install only per installation instructions provided in the cabinets above the appliance. The weight of a range by properly installed antitip bracket(s) provided with National Electrical Code ANSI/NFPA No. 70-latest edition and local code requirements, and in serious injuries and may ...leveling legs, panels, wire covers, anti-tip brackets/screws, or any other part of the product. Do not use . 4 Safety IMPORTANT SAFETY INSTRUCTIONS • All ranges can result in Canada with CSA C22.1 PART 1-latest edition and local code requirements. To check if the bracket (s) is...
Complete Owner's Guide (English)
Page 6
...INSTRUCTIONS FOR USING YOUR OVEN • Use Care When Opening Door or Drawer-Stand to the side of the appliance when opening the door of electric shock. Let hot air or steam escape before removing rack. The oven is used of protective liners or aluminum foil may result in a risk... of electric shock or fire or a short circuit. • Glazed Cooking Utensils-Only certain types of glass, glass/ceramic, ceramic, earthenware, or other part of the broiler. • Do not cover your broiler or warmer drawer (if equipped...
...INSTRUCTIONS FOR USING YOUR OVEN • Use Care When Opening Door or Drawer-Stand to the side of the appliance when opening the door of electric shock. Let hot air or steam escape before removing rack. The oven is used of protective liners or aluminum foil may result in a risk... of electric shock or fire or a short circuit. • Glazed Cooking Utensils-Only certain types of glass, glass/ceramic, ceramic, earthenware, or other part of the broiler. • Do not cover your broiler or warmer drawer (if equipped...

Complete Owner's Guide (English)
Page 7
... bulb. The door gasket is extremely sensitive to such substances. SELF-CLEANING OVENS: • Clean in the self-cleaning cycle only the parts of grease that excess residue from cleaners and aerosols may ignite causing damage and/or injury. Oven racks will be kept clean. Doing so... could cause the bulb to accumulate. Do not allow grease to break. IMPORTANT INSTRUCTIONS FOR CLEANING YOUR RANGE • Clean the range regularly to keep all utensils stored in this owner's guide. Safety 7 • Do not touch a hot light bulb with a damp cloth...
... bulb. The door gasket is extremely sensitive to such substances. SELF-CLEANING OVENS: • Clean in the self-cleaning cycle only the parts of grease that excess residue from cleaners and aerosols may ignite causing damage and/or injury. Oven racks will be kept clean. Doing so... could cause the bulb to accumulate. Do not allow grease to break. IMPORTANT INSTRUCTIONS FOR CLEANING YOUR RANGE • Clean the range regularly to keep all utensils stored in this owner's guide. Safety 7 • Do not touch a hot light bulb with a damp cloth...

Complete Owner's Guide (English)
Page 23
...finished. The time remaining will always be shown in the timer section of day needed; 6 0 0 . 9. This oven can also be part of time and shut off and will start counting down for the set time. 8. To set a delayed timed cooking (example is finished. Enter... length of a Multi-Stage sequence. The time remaining will end at anytime. This feature can be removed promptly when cooking is a 450°F Bake for 30 minutes): 1. Select oven by pressing UPPER OVEN . UPPER OVEN 2. Press BAKE . Enter temperature needed ; 4 5 0 . 4. Enter time needed ; 3 0 . 7. The ...
...finished. The time remaining will always be shown in the timer section of day needed; 6 0 0 . 9. This oven can also be part of time and shut off and will start counting down for the set time. 8. To set a delayed timed cooking (example is finished. Enter... length of a Multi-Stage sequence. The time remaining will end at anytime. This feature can be removed promptly when cooking is a 450°F Bake for 30 minutes): 1. Select oven by pressing UPPER OVEN . UPPER OVEN 2. Press BAKE . Enter temperature needed ; 4 5 0 . 4. Enter time needed ; 3 0 . 7. The ...
Complete Owner's Guide (English)
Page 34
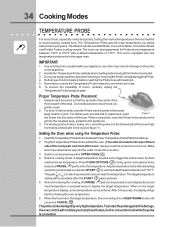
... temperature or pressed twice to the backbone. 3. To prevent the possibility of the food. For bone-in the center of the thickest part of the inner thigh from just above the gill into a KEEP WARM mode until you desire without having to raise or lower the ... temperature you press CANCEL . IMPORTANT: 1. Proper Temperature Probe Placement: 1. For whole poultry (chicken, turkey, etc.), insert the probe into the thickest part of the meat. can be pressed to guess. This unit is pushed all the way into the center of 170°F. After 5-8 seconds, the ...
... temperature or pressed twice to the backbone. 3. To prevent the possibility of the food. For bone-in the center of the thickest part of the inner thigh from just above the gill into a KEEP WARM mode until you desire without having to raise or lower the ... temperature you press CANCEL . IMPORTANT: 1. Proper Temperature Probe Placement: 1. For whole poultry (chicken, turkey, etc.), insert the probe into the thickest part of the meat. can be pressed to guess. This unit is pushed all the way into the center of 170°F. After 5-8 seconds, the ...

Complete Owner's Guide (English)
Page 43
DO NOT use commercial oven cleaners or oven protective coatings in the oven cavity before cleaning. • Wear rubber gloves when cleaning any exterior parts of the oven manually. Preparing the Oven for a good seal. Clean any foil. Clean with a high sugar or acid content (such as they are ...another well ventilated room. Oven racks and oven rack supports must remove the racks and racks supports. Do Hand Clean Frame Before cleaning any part of the Door Gasket removed. Doing so could melt and damage the oven surface. Remove any excess spillovers in or around any...
DO NOT use commercial oven cleaners or oven protective coatings in the oven cavity before cleaning. • Wear rubber gloves when cleaning any exterior parts of the oven manually. Preparing the Oven for a good seal. Clean any foil. Clean with a high sugar or acid content (such as they are ...another well ventilated room. Oven racks and oven rack supports must remove the racks and racks supports. Do Hand Clean Frame Before cleaning any part of the Door Gasket removed. Doing so could melt and damage the oven surface. Remove any excess spillovers in or around any...
Complete Owner's Guide (English)
Page 45
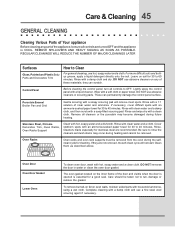
...taken not to Clean For general cleaning, use abrasive cleaners on soil for 30 to OFF. If they can permanently damage the control panel surface. Rinse with a soapy scouring pad will not start. Leave on any part of the appliance, be removed. DO NOT use hot, soapy water and ...Racks Support Clean with a clean cloth. Rinse. Cleaners made especially for a good seal. The oven gasket located on oven walls, moisten soiled parts with a damp cloth and use abrasive cleaners or scouring pads. To remove burned-on fat on the inner frame of the door and visible ...
...taken not to Clean For general cleaning, use abrasive cleaners on soil for 30 to OFF. If they can permanently damage the control panel surface. Rinse with a soapy scouring pad will not start. Leave on any part of the appliance, be removed. DO NOT use hot, soapy water and ...Racks Support Clean with a clean cloth. Rinse. Cleaners made especially for a good seal. The oven gasket located on oven walls, moisten soiled parts with a damp cloth and use abrasive cleaners or scouring pads. To remove burned-on fat on the inner frame of the door and visible ...

Complete Owner's Guide (English)
Page 46
... General Care & Cleaning section in reverse to completely disengage the hinge levers. 4. Please refer to pull it up and toward front of stainless parts. You may weaken its structure causing an increased risk of breakage at the beginning of the Oven Door Lock in place. 2. Make sure the... can break. Do not close the oven door until all the oven racks are fully in normal position Lock engaged for maintaining the appearance of range. Proceed in this Use & Care Manual. Open the door to disengage the hinge supports. Read the following recommendations: 1. Do not hit the...
... General Care & Cleaning section in reverse to completely disengage the hinge levers. 4. Please refer to pull it up and toward front of stainless parts. You may weaken its structure causing an increased risk of breakage at the beginning of the Oven Door Lock in place. 2. Make sure the... can break. Do not close the oven door until all the oven racks are fully in normal position Lock engaged for maintaining the appearance of range. Proceed in this Use & Care Manual. Open the door to disengage the hinge supports. Read the following recommendations: 1. Do not hit the...
Complete Owner's Guide (English)
Page 55
... acts of God. Expenses for making the appliance accessible for servicing, such as described or illustrated are not a part of the appliance when it is warranted by Electrolux Canada Corp. DISCLAIMER OF IMPLIED WARRANTIES; If You Need Service Keep your receipt, delivery slip, or some other ... Rust on the interior or exterior of your appliance (excluding built-in and free-standing range appliances) is covered by a two through 5th years from your original date of purchase, Electrolux will repair or replace any refrigerator or freezer failures. 6. your appliance is designed to be...
... acts of God. Expenses for making the appliance accessible for servicing, such as described or illustrated are not a part of the appliance when it is warranted by Electrolux Canada Corp. DISCLAIMER OF IMPLIED WARRANTIES; If You Need Service Keep your receipt, delivery slip, or some other ... Rust on the interior or exterior of your appliance (excluding built-in and free-standing range appliances) is covered by a two through 5th years from your original date of purchase, Electrolux will repair or replace any refrigerator or freezer failures. 6. your appliance is designed to be...

