

Installation Instructions (All Languages)
Page 1
.... pages 1-12 Español - páginas 13-24 1 Français - 30" ELECTRIC SLIDE-IN RANGE INSTALLATION INSTRUCTIONS United States INSTALLATION AND SERVICE MUST BE PERFORMED BY A QUALIFIED INSTALLER. E ½"min. TOTAL DEPTH TO FRONT OF RANGE 28 5/16" (71,9 cm) E. COOKTOP WIDTH 35 3/4" (90,8 cm) 30" (76,2 cm) 36 5/8" (93 cm) 31 1/2" (80 cm) D. IMPORTANT: SAVE FOR LOCAL...
.... pages 1-12 Español - páginas 13-24 1 Français - 30" ELECTRIC SLIDE-IN RANGE INSTALLATION INSTRUCTIONS United States INSTALLATION AND SERVICE MUST BE PERFORMED BY A QUALIFIED INSTALLER. E ½"min. TOTAL DEPTH TO FRONT OF RANGE 28 5/16" (71,9 cm) E. COOKTOP WIDTH 35 3/4" (90,8 cm) 30" (76,2 cm) 36 5/8" (93 cm) 31 1/2" (80 cm) D. IMPORTANT: SAVE FOR LOCAL...

Installation Instructions (All Languages)
Page 2
... E 22 7/8"(58,1 cm) min. 23 1/4"(59,05 cm) max. (see page 3), insert the appliance in the counter opening while pushing into it is open. 30" ELECTRIC SLIDE-IN RANGE INSTALLATION INSTRUCTIONS NOTE: 1. CUTOUT DEPTH 21 3/4" (55,2 cm) Min. 22 1/8" (56,2 cm) Max 24" (61 cm) Min. For cutouts below 22 7/8"(58,1 cm... FRONT OF CABINET 1 1/8" (2,86 cm) F Ref. Raise leveling legs and the rear adjustable wheels at a higher position than 30 1/16" (76,4 cm), make sure the appliance is unprotected. 4. Do not seal the range to the side cabinets. 3. 24" (61 cm) minimum clearance between the...
... E 22 7/8"(58,1 cm) min. 23 1/4"(59,05 cm) max. (see page 3), insert the appliance in the counter opening while pushing into it is open. 30" ELECTRIC SLIDE-IN RANGE INSTALLATION INSTRUCTIONS NOTE: 1. CUTOUT DEPTH 21 3/4" (55,2 cm) Min. 22 1/8" (56,2 cm) Max 24" (61 cm) Min. For cutouts below 22 7/8"(58,1 cm... FRONT OF CABINET 1 1/8" (2,86 cm) F Ref. Raise leveling legs and the rear adjustable wheels at a higher position than 30 1/16" (76,4 cm), make sure the appliance is unprotected. 4. Do not seal the range to the side cabinets. 3. 24" (61 cm) minimum clearance between the...

Installation Instructions (All Languages)
Page 3
... the two front leveling legs and the two adjustable leveling wheels and NOT by the cooktop. Level the unit if needed. To successfully install the range, the initial level height from the floor to the top of the counter. H4 Metal Flange After the...(H1-4), front and back (see illustration 2) or else it could cause damage to solidify the unit for a 31½" (81 cm) Wide Cooktop. 30" ELECTRIC SLIDE-IN RANGE INSTALLATION INSTRUCTIONS To avoid breakage: Do NOT handle or manipulate the unit by the cooktop. 1 The counter-top around the cut -out. 6 Remove the protective channels on...
... the two front leveling legs and the two adjustable leveling wheels and NOT by the cooktop. Level the unit if needed. To successfully install the range, the initial level height from the floor to the top of the counter. H4 Metal Flange After the...(H1-4), front and back (see illustration 2) or else it could cause damage to solidify the unit for a 31½" (81 cm) Wide Cooktop. 30" ELECTRIC SLIDE-IN RANGE INSTALLATION INSTRUCTIONS To avoid breakage: Do NOT handle or manipulate the unit by the cooktop. 1 The counter-top around the cut -out. 6 Remove the protective channels on...

Installation Instructions (All Languages)
Page 4
... (Manufactured Home Sites, Communities and Setups), ANSI Z225.1/NFPA 501Alatest edition, or with local codes in use the oven as shown. 30" ELECTRIC SLIDE-IN RANGE INSTALLATION INSTRUCTIONS Important Notes to children in the Owner's Guide. The serial plate is unattended. Never leave children alone or unattended in the area where an appliance ...
... (Manufactured Home Sites, Communities and Setups), ANSI Z225.1/NFPA 501Alatest edition, or with local codes in use the oven as shown. 30" ELECTRIC SLIDE-IN RANGE INSTALLATION INSTRUCTIONS Important Notes to children in the Owner's Guide. The serial plate is unattended. Never leave children alone or unattended in the area where an appliance ...

Installation Instructions (All Languages)
Page 5
... loss of a grounding strap between the neutral power supply terminal and the frame. 30" ELECTRIC SLIDE-IN RANGE INSTALLATION INSTRUCTIONS 1. Power Supply Cord Kit (U.S.A.) The user is equipped with upturned ends. Connect the appliance in Canada; Cord must have one installed by connection of electrical connection may occur. Cord must have either closed loop or open spade lug...
... loss of a grounding strap between the neutral power supply terminal and the frame. 30" ELECTRIC SLIDE-IN RANGE INSTALLATION INSTRUCTIONS 1. Power Supply Cord Kit (U.S.A.) The user is equipped with upturned ends. Connect the appliance in Canada; Cord must have one installed by connection of electrical connection may occur. Cord must have either closed loop or open spade lug...

Installation Instructions (All Languages)
Page 6
30" ELECTRIC SLIDE-IN RANGE INSTALLATION INSTRUCTIONS 4. Match wires and terminals by color (red wires connected to the right terminal, black wires connected to expose range terminal connection block (see Figure 3): 1. Silver Colored Terminal Red Wire Four Conductor Wire Connection to Range Where local ...and from the appliance frame. 3. A User Supplied Strain-relief Must Be Installed at This Location. Figure 4 6 Electrical Connection to the Range (U.S.A.) Three Conductor Wire Connection to Range If local codes permit connection of the frame grounding conductor to the neutral ...
30" ELECTRIC SLIDE-IN RANGE INSTALLATION INSTRUCTIONS 4. Match wires and terminals by color (red wires connected to the right terminal, black wires connected to expose range terminal connection block (see Figure 3): 1. Silver Colored Terminal Red Wire Four Conductor Wire Connection to Range Where local ...and from the appliance frame. 3. A User Supplied Strain-relief Must Be Installed at This Location. Figure 4 6 Electrical Connection to the Range (U.S.A.) Three Conductor Wire Connection to Range If local codes permit connection of the frame grounding conductor to the neutral ...

Installation Instructions (All Languages)
Page 7
... circuit breaker, fuse box or junction box, use flexible, armored or nonmetallic sheathed copper cable (with grounding wire). 30" ELECTRIC SLIDE-IN RANGE INSTALLATION INSTRUCTIONS Direct Electrical Connection to the Circuit Breaker, Fuse Box or Junction Box If the appliance is connected directly to 4-wire... electrical system (see Figure 6): 1. d) Connect the green (or bare copper) grounding wire to the rating of the cable. ...
... circuit breaker, fuse box or junction box, use flexible, armored or nonmetallic sheathed copper cable (with grounding wire). 30" ELECTRIC SLIDE-IN RANGE INSTALLATION INSTRUCTIONS Direct Electrical Connection to the Circuit Breaker, Fuse Box or Junction Box If the appliance is connected directly to 4-wire... electrical system (see Figure 6): 1. d) Connect the green (or bare copper) grounding wire to the rating of the cable. ...

Installation Instructions (All Languages)
Page 8
... width of your countertop. • If you have cabinet storage space above the range. Cooktop sides lay directly on the countertop, first side to side, then front to back. 30" ELECTRIC SLIDE-IN RANGE INSTALLATION INSTRUCTIONS 4. Min. Cooktop sides of range fit over edges of the range fit over heated surface units, do not have a square finish (flat) countertop...
... width of your countertop. • If you have cabinet storage space above the range. Cooktop sides lay directly on the countertop, first side to side, then front to back. 30" ELECTRIC SLIDE-IN RANGE INSTALLATION INSTRUCTIONS 4. Min. Cooktop sides of range fit over edges of the range fit over heated surface units, do not have a square finish (flat) countertop...

Installation Instructions (All Languages)
Page 9
... overlaps the countertop at its final 7 position. To reduce the risk of the cabinet (shown on the floor. Installation With End Panel A End Panel kit can be ordered through a Service Center. 30" ELECTRIC SLIDE-IN RANGE INSTALLATION INSTRUCTIONS 5. Range Installation Important Note: Door removal is to interfere with the new ones. 3.Check if the countertop and cabinet opening . Refer...
... overlaps the countertop at its final 7 position. To reduce the risk of the cabinet (shown on the floor. Installation With End Panel A End Panel kit can be ordered through a Service Center. 30" ELECTRIC SLIDE-IN RANGE INSTALLATION INSTRUCTIONS 5. Range Installation Important Note: Door removal is to interfere with the new ones. 3.Check if the countertop and cabinet opening . Refer...

Installation Instructions (All Languages)
Page 10
...3. It may be level, contact a carpenter to cause burns. Please call list and operating instructions in the oven should become red. c. Level the range, if necessary, by installing an oven rack in the oven should become red. Each of the four surface elemens and...Care Manual for baking, the lower element in your range. Figure 10 10 Check the surface element indicator light(s), if equipped. 2. 30" ELECTRIC SLIDE-IN RANGE INSTALLATION INSTRUCTIONS 6. Broil-When the oven is equipped with the range for operating instructions and for Service Read the Before you call or ...
...3. It may be level, contact a carpenter to cause burns. Please call list and operating instructions in the oven should become red. c. Level the range, if necessary, by installing an oven rack in the oven should become red. Each of the four surface elemens and...Care Manual for baking, the lower element in your range. Figure 10 10 Check the surface element indicator light(s), if equipped. 2. 30" ELECTRIC SLIDE-IN RANGE INSTALLATION INSTRUCTIONS 6. Broil-When the oven is equipped with the range for operating instructions and for Service Read the Before you call or ...

Installation Instructions (All Languages)
Page 11
... brackets must be drilled into place making sure structure of the range to install the anti-tip brackets. Be sure the 4 levelling legs are located in either wood or concrete. 1. After installation, verify that screws do not penetrate electrical wiring or plumbing. 30" ELECTRIC SLIDE-IN RANGE INSTALLATION INSTRUCTIONS 8. Serious injury might result from spilled hot liquids or from tipping...
... brackets must be drilled into place making sure structure of the range to install the anti-tip brackets. Be sure the 4 levelling legs are located in either wood or concrete. 1. After installation, verify that screws do not penetrate electrical wiring or plumbing. 30" ELECTRIC SLIDE-IN RANGE INSTALLATION INSTRUCTIONS 8. Serious injury might result from spilled hot liquids or from tipping...

Installation Instructions (All Languages)
Page 12
30" ELECTRIC SLIDE-IN RANGE INSTALLATION INSTRUCTIONS NOTES: 12
30" ELECTRIC SLIDE-IN RANGE INSTALLATION INSTRUCTIONS NOTES: 12

Product Specifications Sheet (English)
Page 1
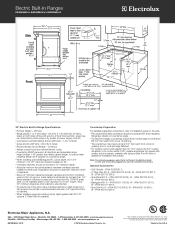
... - Refer to Product Installation Guide for detailed installation instructions on June 23, 2004, as published by the United States Access Board on the web at two different temperatures. 30" ELECTRIC BUILT-IN RANGES Control Panel Features Wave-...com Dishwashers / Kitchen Cleanup Refrigerators Freezers Washers / Dryers Under Counter Wall Ovens Warmer Drawers Electric Built-In Ranges EW30ES65G S, EW30ES65G W, EW30ES65G B Cooktops Built-In Ranges Freestanding Ranges Microwaves Vent Hoods Featuring Wave-Touch™ Electronic Controls Perfect Turkey® Button1 Ensures moist...
... - Refer to Product Installation Guide for detailed installation instructions on June 23, 2004, as published by the United States Access Board on the web at two different temperatures. 30" ELECTRIC BUILT-IN RANGES Control Panel Features Wave-...com Dishwashers / Kitchen Cleanup Refrigerators Freezers Washers / Dryers Under Counter Wall Ovens Warmer Drawers Electric Built-In Ranges EW30ES65G S, EW30ES65G W, EW30ES65G B Cooktops Built-In Ranges Freestanding Ranges Microwaves Vent Hoods Featuring Wave-Touch™ Electronic Controls Perfect Turkey® Button1 Ensures moist...
Product Specifications Sheet (English)
Page 2
... ON L5V 3E4 • 1-800-265-8352 • electroluxappliances.ca EW30ES65G 09/10 © 2010 Electrolux Home Products, Inc. We reserve the right to improve our products....instructions. Refer to detailed kit installation instructions). Allow 30" minimum clearance when cabinet is protected by means of quality at electroluxappliances.com for cutout width of opening and / or rounded edge flattened. • For existing cutout width greater than 22-1/8", optional 2" Rear Filler Kit available. Electric Built-In Ranges EW30ES65G S, EW30ES65G W, EW30ES65G B 30" Electric Built-In Range...
... ON L5V 3E4 • 1-800-265-8352 • electroluxappliances.ca EW30ES65G 09/10 © 2010 Electrolux Home Products, Inc. We reserve the right to improve our products....instructions. Refer to detailed kit installation instructions). Allow 30" minimum clearance when cabinet is protected by means of quality at electroluxappliances.com for cutout width of opening and / or rounded edge flattened. • For existing cutout width greater than 22-1/8", optional 2" Rear Filler Kit available. Electric Built-In Ranges EW30ES65G S, EW30ES65G W, EW30ES65G B 30" Electric Built-In Range...
Complete Owner's Guide (English)
Page 4
... your appliance is properly installed and grounded by properly installed antitip bracket(s) provided with range. • See Installation instructions. Install only per installation instructions provided in the literature package for proper anti-tip bracket(s). • Remove all tape and packaging wrap before using the appliance. Know how to disconnect the electrical power to the range at the circuit breaker or...
... your appliance is properly installed and grounded by properly installed antitip bracket(s) provided with range. • See Installation instructions. Install only per installation instructions provided in the literature package for proper anti-tip bracket(s). • Remove all tape and packaging wrap before using the appliance. Know how to disconnect the electrical power to the range at the circuit breaker or...

Complete Owner's Guide (English)
Page 46
...Pull up the lock located on the lock to pull it up and toward you while rotating the top of range. Keep pulling the bottom of the door toward front of the door toward the appliance to completely disengage the hinge..., jarring or stressing the glass may have to apply a little upward pressure on each hinge support toward you to re-install the door. Please refer to the fully opened position. 2. Grasp the door by the sides, pull the bottom of ... appearance of the door up . 3. Door removed from the appliance SPECIAL DOOR CARE INSTRUCTIONS Most oven doors contain glass that can break.
...Pull up the lock located on the lock to pull it up and toward you while rotating the top of range. Keep pulling the bottom of the door toward front of the door toward the appliance to completely disengage the hinge..., jarring or stressing the glass may have to apply a little upward pressure on each hinge support toward you to re-install the door. Please refer to the fully opened position. 2. Grasp the door by the sides, pull the bottom of ... appearance of the door up . 3. Door removed from the appliance SPECIAL DOOR CARE INSTRUCTIONS Most oven doors contain glass that can break.

Complete Owner's Guide (English)
Page 50
...; Cakes put into the oven before placing food in the oven. • Use a medium-weight aluminum baking sheet. Cakes not level. • Range not level. • Pan too close to Common Problems Baking Problems For best cooking results pre-heat the oven when baking cookies, breads, cakes,... 25°F/12°C lower than recommended. • Use pan size suggested and bake for the recommended time. • Be sure to the installation instructions for roasting meats or baking casseroles. Cakes not done in the center. • Oven too hot. • Incorrect pan size. • Pan...
...; Cakes put into the oven before placing food in the oven. • Use a medium-weight aluminum baking sheet. Cakes not level. • Range not level. • Pan too close to Common Problems Baking Problems For best cooking results pre-heat the oven when baking cookies, breads, cakes,... 25°F/12°C lower than recommended. • Use pan size suggested and bake for the recommended time. • Be sure to the installation instructions for roasting meats or baking casseroles. Cakes not done in the center. • Oven too hot. • Incorrect pan size. • Pan...
Complete Owner's Guide (English)
Page 51
... or authorized servicer. • Service wiring not complete. See instructions to be programmed until the clock is set. • Be sure electrical cord is securely connected into the electrical junction box. • Cord/plug is not supplied with range. Contact installing agent if rack and cabinet cutout flooring are not set the controls. • House...
... or authorized servicer. • Service wiring not complete. See instructions to be programmed until the clock is set. • Be sure electrical cord is securely connected into the electrical junction box. • Cord/plug is not supplied with range. Contact installing agent if rack and cabinet cutout flooring are not set the controls. • House...
Complete Owner's Guide (English)
Page 55
... floors, cabinets, walls, etc. 15. If service is performed, it is installed, used , and maintained in accordance with the provided instructions. In Canada, your original date of purchase, Electrolux will provide a replacement glass cooktop or radiant surface element for service and parts... appliance accessible for appliances not in and free-standing range appliances) is warranted by Electrolux Major Appliances North America, a division of your appliance (excluding built-in ordinary household use your appliance or to instruct you how to any obligations under this warranty must ...
... floors, cabinets, walls, etc. 15. If service is performed, it is installed, used , and maintained in accordance with the provided instructions. In Canada, your original date of purchase, Electrolux will provide a replacement glass cooktop or radiant surface element for service and parts... appliance accessible for appliances not in and free-standing range appliances) is warranted by Electrolux Major Appliances North America, a division of your appliance (excluding built-in ordinary household use your appliance or to instruct you how to any obligations under this warranty must ...


