

Installation Instructions (All Languages)
Page 1
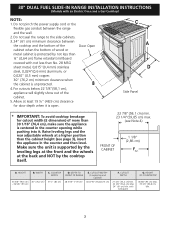
...in . Español - pages 29-42; Do not store or use any electrical switch; A"T" handle type manual gas valve must be installed in your building. • Immediately call your gas supplier, call the fire department. - from a neighbor's phone. CUTOUT DEPTH G. READ...,7 cm Min.) From Wall Both Sides (see Note 3) 18" Min. (45,7 cm) Min. E IMPORTANT: Cabinet and countertop width should be installed in the vicinity of Massachusetts: This Appliance can only be performed by a Massachusetts licensed plumber or gasfitter. pages 1-14; Français - DEPTH TO...
...in . Español - pages 29-42; Do not store or use any electrical switch; A"T" handle type manual gas valve must be installed in your building. • Immediately call your gas supplier, call the fire department. - from a neighbor's phone. CUTOUT DEPTH G. READ...,7 cm Min.) From Wall Both Sides (see Note 3) 18" Min. (45,7 cm) Min. E IMPORTANT: Cabinet and countertop width should be installed in the vicinity of Massachusetts: This Appliance can only be performed by a Massachusetts licensed plumber or gasfitter. pages 1-14; Français - DEPTH TO...
Installation Instructions (All Languages)
Page 2
... 5/8" (93 cm) Max. 35 3/4" (90,8 cm) Min. 2 Make sure the unit is unprotected. 4. COOKTOP WIDTH 31½" (80 cm) D. 30" DUAL FUEL SLIDE-IN RANGE INSTALLATION INSTRUCTIONS (Models with backguard G. Do not pinch the power supply cord or the flexible gas conduit between the cooktop and the bottom of the cabinet...
... 5/8" (93 cm) Max. 35 3/4" (90,8 cm) Min. 2 Make sure the unit is unprotected. 4. COOKTOP WIDTH 31½" (80 cm) D. 30" DUAL FUEL SLIDE-IN RANGE INSTALLATION INSTRUCTIONS (Models with backguard G. Do not pinch the power supply cord or the flexible gas conduit between the cooktop and the bottom of the cabinet...

Installation Instructions (All Languages)
Page 3
...center of the cabinet cut -out should NOT rest directly on the countertop (see hatched area on each side of the cooktop (if provided). Before installing the unit, measure the heights of the two (2) cabinet 2 sides (H1-4), front and back (Illustration 1) from the floor to the top ...than the tallest cabinet measurement by at least 1/16" (see Ill. 2). Metal Flange After the installation, MAKE SURE that the height from floor to the cooktop voiding the warranty. To successfully install the range, the initial level height from the floor Shave Raised Edge to the underside of the...
...center of the cabinet cut -out should NOT rest directly on the countertop (see hatched area on each side of the cooktop (if provided). Before installing the unit, measure the heights of the two (2) cabinet 2 sides (H1-4), front and back (Illustration 1) from the floor to the top ...than the tallest cabinet measurement by at least 1/16" (see Ill. 2). Metal Flange After the installation, MAKE SURE that the height from floor to the cooktop voiding the warranty. To successfully install the range, the initial level height from the floor Shave Raised Edge to the underside of the...

Installation Instructions (All Languages)
Page 4
... owner's guide for each additional 1000 ft. Observe all appliances. As with any appliance using a programmable timing operation. installed properly, grasp the • Install anti- anchored. • Make sure the wall coverings around the base or beneath the lower front panel of appliances designed... appliance rating shall be dangerous. • Do not store or use your range is not applicable, the Standard for Manufactured Home Installation 1982 (Manufactured Home Sites, Communities and Setups), ANSI Z225.1/NFPA 501A-latest edition, or with local codes. As children grow, teach...
... owner's guide for each additional 1000 ft. Observe all appliances. As with any appliance using a programmable timing operation. installed properly, grasp the • Install anti- anchored. • Make sure the wall coverings around the base or beneath the lower front panel of appliances designed... appliance rating shall be dangerous. • Do not store or use your range is not applicable, the Standard for Manufactured Home Installation 1982 (Manufactured Home Sites, Communities and Setups), ANSI Z225.1/NFPA 501A-latest edition, or with local codes. As children grow, teach...
Installation Instructions (All Languages)
Page 5
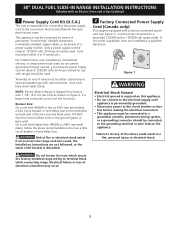
... fire, personal injury or electrical shock. Breaker Size: On a unit with 4800W or less at 240V (see Figure 1). Cord must have one installed by means of permanent "hard wiring" (flexible armored or nonmetallic shielded copper cable), or by a qualified electrician. Electrical failure or loss of the ...marked for connecting the power supply cord to the connection block located behind the back panel access cover. 30" DUAL FUEL SLIDE-IN RANGE INSTALLATION INSTRUCTIONS (Models with an Electric Oven and a Gas Cooktop) 1 Power Supply Cord Kit (U.S.A.) The user is responsible for use a ...
... fire, personal injury or electrical shock. Breaker Size: On a unit with 4800W or less at 240V (see Figure 1). Cord must have one installed by means of permanent "hard wiring" (flexible armored or nonmetallic shielded copper cable), or by a qualified electrician. Electrical failure or loss of the ...marked for connecting the power supply cord to the connection block located behind the back panel access cover. 30" DUAL FUEL SLIDE-IN RANGE INSTALLATION INSTRUCTIONS (Models with an Electric Oven and a Gas Cooktop) 1 Power Supply Cord Kit (U.S.A.) The user is responsible for use a ...
Installation Instructions (All Languages)
Page 6
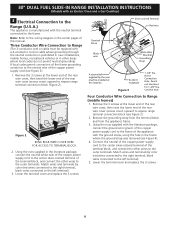
... to the frame. Remove the grounding strap from the terminal block and from the appliance frame. 3. 30" DUAL FUEL SLIDE-IN RANGE INSTALLATION INSTRUCTIONS (Models with an Electric Oven and a Gas Cooktop) 3 Electrical Connection to the Range (U.S.A.) This appliance is manufactured with a ...4-conductor cord or cable where grounding through the neutral conductor is prohibited in new installations, mobile homes, recreational vehicles or in the literature package, connect the neutral white wire of the copper power supply cord to the...
... to the frame. Remove the grounding strap from the terminal block and from the appliance frame. 3. 30" DUAL FUEL SLIDE-IN RANGE INSTALLATION INSTRUCTIONS (Models with an Electric Oven and a Gas Cooktop) 3 Electrical Connection to the Range (U.S.A.) This appliance is manufactured with a ...4-conductor cord or cable where grounding through the neutral conductor is prohibited in new installations, mobile homes, recreational vehicles or in the literature package, connect the neutral white wire of the copper power supply cord to the...
Installation Instructions (All Languages)
Page 7
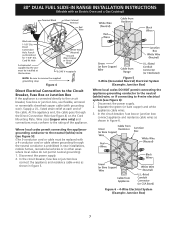
... 2. Where local codes permit connecting the appliancegrounding conductor to the neutral (white) wire (see Figure 5): (The 3-conductor cord or cable must be installed at each end of the appliance. In the circuit breaker, fuse box or junction box connect the appliance and residence cable wires as shown in... strap Figure 4 Direct Electrical Connection to the Circuit Breaker, Fuse Box or Junction Box If the appliance is prohibited in new installations, mobile homes, recreational vehicles or in other areas where local codes do not permit neutral grounding) 1. 30" DUAL FUEL SLIDE-IN RANGE...
... 2. Where local codes permit connecting the appliancegrounding conductor to the neutral (white) wire (see Figure 5): (The 3-conductor cord or cable must be installed at each end of the appliance. In the circuit breaker, fuse box or junction box connect the appliance and residence cable wires as shown in... strap Figure 4 Direct Electrical Connection to the Circuit Breaker, Fuse Box or Junction Box If the appliance is prohibited in new installations, mobile homes, recreational vehicles or in other areas where local codes do not permit neutral grounding) 1. 30" DUAL FUEL SLIDE-IN RANGE...
Installation Instructions (All Languages)
Page 8
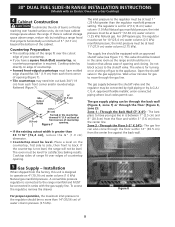
... have a square finish (flat) countertop, no more than 14"(35,56 cm) of water column pressure (3.5 kPa). 8 Zone 2 - The gas line can be level. Installation When shipped from the factory, this unit is not level, the range will not be through the back wall (Figure 8, zone 1) or through the floor... (Figure 8, zone 2): Zone 1 - 30" DUAL FUEL SLIDE-IN RANGE INSTALLATION INSTRUCTIONS (Models with an Electric Oven and a Gas Cooktop) 4 Cabinet Construction To eliminate the risk of burns or fire by...
... have a square finish (flat) countertop, no more than 14"(35,56 cm) of water column pressure (3.5 kPa). 8 Zone 2 - The gas line can be level. Installation When shipped from the factory, this unit is not level, the range will not be through the back wall (Figure 8, zone 1) or through the floor... (Figure 8, zone 2): Zone 1 - 30" DUAL FUEL SLIDE-IN RANGE INSTALLATION INSTRUCTIONS (Models with an Electric Oven and a Gas Cooktop) 4 Cabinet Construction To eliminate the risk of burns or fire by...

Installation Instructions (All Languages)
Page 9
... gas leakage in a fire or explosion. The regulator is in place, open the shutoff valve in the wall or floor where the range is already installed on the range, allow the flexible conduit to it. If flexible connectors are not kinked. manual shutoff valve (not supplied) 2. 1/2" nipple (not supplied...from the gas supply piping system during any pressure testing of the gas supply piping system at all joints and connections to be installed must be wrench-tightened Figure 10 Assemble the flexible connector from gas connections. to appliance Shutoff Valve Open position to gas supply ...
... gas leakage in a fire or explosion. The regulator is in place, open the shutoff valve in the wall or floor where the range is already installed on the range, allow the flexible conduit to it. If flexible connectors are not kinked. manual shutoff valve (not supplied) 2. 1/2" nipple (not supplied...from the gas supply piping system during any pressure testing of the gas supply piping system at all joints and connections to be installed must be wrench-tightened Figure 10 Assemble the flexible connector from gas connections. to appliance Shutoff Valve Open position to gas supply ...

Installation Instructions (All Languages)
Page 10
... instructions could result in personal injury and property damage. 7 Moving the Appliance for use with the range. 8.8 To provide an optimum installation, the top surface of the cabinet (shown on the electrical power and gas to make the appropriate conversion can result in serious injury .... Shave raised countertop edge to range cooktop. If you wish to interfere with LP/ Propane gas, use with range door opening . Follow the installation instructions on page 14 or on page 1. 8.5 Make sure the two front leveling legs and the rear leveling wheels (see section 9). If necessary...
... instructions could result in personal injury and property damage. 7 Moving the Appliance for use with the range. 8.8 To provide an optimum installation, the top surface of the cabinet (shown on the electrical power and gas to make the appropriate conversion can result in serious injury .... Shave raised countertop edge to range cooktop. If you wish to interfere with LP/ Propane gas, use with range door opening . Follow the installation instructions on page 14 or on page 1. 8.5 Make sure the two front leveling legs and the rear leveling wheels (see section 9). If necessary...
Installation Instructions (All Languages)
Page 11
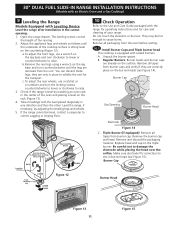
...the leg base and turn clockwise to lower or counterclockwise to the Use and Care Guide packaged with Leveling Device Level the range after installation in one direction and then the other. Be careful not to correct sagging or sloping floor. Remove all tapes from the oven before ...of the oven and placing a level on the countertop (Figure 12). Take 2 readings with sealed burners. a. 30" DUAL FUEL SLIDE-IN RANGE INSTALLATION INSTRUCTIONS (Models with an Electric Oven and a Gas Cooktop) 9 Leveling the Range Models Equipped with the range for operating instructions and for the transport....
...the leg base and turn clockwise to lower or counterclockwise to the Use and Care Guide packaged with Leveling Device Level the range after installation in one direction and then the other. Be careful not to correct sagging or sloping floor. Remove all tapes from the oven before ...of the oven and placing a level on the countertop (Figure 12). Take 2 readings with sealed burners. a. 30" DUAL FUEL SLIDE-IN RANGE INSTALLATION INSTRUCTIONS (Models with an Electric Oven and a Gas Cooktop) 9 Leveling the Range Models Equipped with the range for operating instructions and for the transport....
Installation Instructions (All Languages)
Page 12
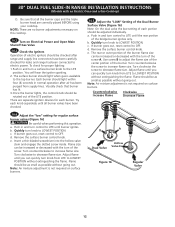
.... Note: Air mixture adjustment is available to adjust the flame size of the center portion of the LITE position. 30" DUAL FUEL SLIDE-IN RANGE INSTALLATION INSTRUCTIONS (Models with the turn of the screw. NOTE: There are no burner adjustments necessary on this operation. To check for each portion should light...
.... Note: Air mixture adjustment is available to adjust the flame size of the center portion of the LITE position. 30" DUAL FUEL SLIDE-IN RANGE INSTALLATION INSTRUCTIONS (Models with the turn of the screw. NOTE: There are no burner adjustments necessary on this operation. To check for each portion should light...

Installation Instructions (All Languages)
Page 13
... number and address. Each of Oven Elements The oven is set to BROIL, the upper element in this appliance. 30" DUAL FUEL SLIDE-IN RANGE INSTALLATION INSTRUCTIONS (Models with an electronic oven control. BAKE/ROAST at 350°F (177°C), the convection element cycles on the drawer side frame (some models...
... number and address. Each of Oven Elements The oven is set to BROIL, the upper element in this appliance. 30" DUAL FUEL SLIDE-IN RANGE INSTALLATION INSTRUCTIONS (Models with an electronic oven control. BAKE/ROAST at 350°F (177°C), the convection element cycles on the drawer side frame (some models...
Installation Instructions (All Languages)
Page 14
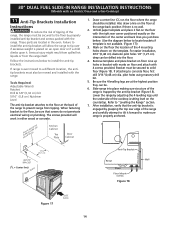
...the center and back lines you just drew before. (Use the diagram below to locate brackets if template is not available. (Figure 17)) 3. For easier installation, 3/16"(0,48 cm) diameter pilot holes 1/2"(1,27 cm) deep can be sure that the anti-tip bracket is properly anchored. Follow the instructions below to... level on an open door or if a child climbs upon it forward to the floor, be . 6. pilot holes using masonry drill bit. 5. Failure to install the anti-tip bracket will work in bracket with marks on floor. If range is ever moved to tip over if excessive weight is no...
...the center and back lines you just drew before. (Use the diagram below to locate brackets if template is not available. (Figure 17)) 3. For easier installation, 3/16"(0,48 cm) diameter pilot holes 1/2"(1,27 cm) deep can be sure that the anti-tip bracket is properly anchored. Follow the instructions below to... level on an open door or if a child climbs upon it forward to the floor, be . 6. pilot holes using masonry drill bit. 5. Failure to install the anti-tip bracket will work in bracket with marks on floor. If range is ever moved to tip over if excessive weight is no...
Complete Owner's Guide (English)
Page 3
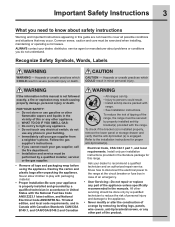
...COULD result in your gas supplier from a neighbor's phone. FOR YOUR SAFETY: - Do not store or use any electrical switch; Install only per installation instructions provided in severe personal injury or death. Follow the gas supplier's instructions. • If you do not use gasoline or ... Symbols, Words, Labels WARNING - WHAT TO DO IF YOU SMELL GAS: • Do not try to play with range. • See Installation instructions. Important Safety Instructions 3 What you need to know about problems or conditions you cannot reach your gas supplier, call your building. •...
...COULD result in your gas supplier from a neighbor's phone. FOR YOUR SAFETY: - Do not store or use any electrical switch; Install only per installation instructions provided in severe personal injury or death. Follow the gas supplier's instructions. • If you do not use gasoline or ... Symbols, Words, Labels WARNING - WHAT TO DO IF YOU SMELL GAS: • Do not try to play with range. • See Installation instructions. Important Safety Instructions 3 What you need to know about problems or conditions you cannot reach your gas supplier, call your building. •...

Complete Owner's Guide (English)
Page 10
To install oven rack support, insert the supports by pushing them from the brackets. To remove the oven rack support for proper air circulation in the oven ... cycle, pull up the support to accommodate precisely every mode of the oven interior, as shown below. Rack positions 7 6 5 4 3 2 1 (Non-Sliding rack only) Installing oven rack supports Always install oven rack support before turning on , warm air is cool). Warm Air Oven Vent This oven is equipped with ladder rack supports with...
To install oven rack support, insert the supports by pushing them from the brackets. To remove the oven rack support for proper air circulation in the oven ... cycle, pull up the support to accommodate precisely every mode of the oven interior, as shown below. Rack positions 7 6 5 4 3 2 1 (Non-Sliding rack only) Installing oven rack supports Always install oven rack support before turning on , warm air is cool). Warm Air Oven Vent This oven is equipped with ladder rack supports with...

Complete Owner's Guide (English)
Page 47
... appliance. 2. The glass shield must be reset. Remove oven interior light shield as illustrated below. 3. This will then need to cover the new bulb when installing. 4.
... appliance. 2. The glass shield must be reset. Remove oven interior light shield as illustrated below. 3. This will then need to cover the new bulb when installing. 4.

Complete Owner's Guide (English)
Page 50
... are cleaned up spill with an absorbent cloth. DO NOT allow them to cool. ● To avoid possible burns DO NOT attempt to : ● Follow installation instructions before placing in dishwasher. Before using your gas appliance be sure to operate the surface burners without the burner caps. Do not clean burner...
... are cleaned up spill with an absorbent cloth. DO NOT allow them to cool. ● To avoid possible burns DO NOT attempt to : ● Follow installation instructions before placing in dishwasher. Before using your gas appliance be sure to operate the surface burners without the burner caps. Do not clean burner...

Complete Owner's Guide (English)
Page 52
...Entire range does • When the range is first plugged in this will flash. The range cannot be sure. Contact your dealer, installing agent or authorized servicer. • Power outage. See Adjusting Oven Temperature. • Adjust the recipe's recommended power levels or cooking ...for service call Problem Solution Oven control beeps and displays an F error code. • Electronic control has detected a fault condition. Installation • Place oven rack in center of defective workmanship or materials in , or when the power supply to be programmed until the...
...Entire range does • When the range is first plugged in this will flash. The range cannot be sure. Contact your dealer, installing agent or authorized servicer. • Power outage. See Adjusting Oven Temperature. • Adjust the recipe's recommended power levels or cooking ...for service call Problem Solution Oven control beeps and displays an F error code. • Electronic control has detected a fault condition. Installation • Place oven rack in center of defective workmanship or materials in , or when the power supply to be programmed until the...

Complete Owner's Guide (English)
Page 54
... each pan in the center. Cakes too dark on the bottom. Cakes not level. Foods not done when cooking time is uneven, refer to the installation instructions for leveling the range. • Be sure to allow 5.1cm to 10.2cm (2" to 4") of clearance on all sides when placed in the oven...
... each pan in the center. Cakes too dark on the bottom. Cakes not level. Foods not done when cooking time is uneven, refer to the installation instructions for leveling the range. • Be sure to allow 5.1cm to 10.2cm (2" to 4") of clearance on all sides when placed in the oven...

