
Installation Instructions (All Languages)
Page 3
... exceeds 281/8" (71.4cm) for the single wall oven or 49½" (125.7cm) for the local electrical inspector's use of the appliance in accordance with the American National Electrical Code ANSI/NFPA No. 70-latest edition, or with CSA Standard C22.1, Canadian Electrical Code, Part 1, in Canada. Such use your wall oven for the dimensions applicable to the...
... exceeds 281/8" (71.4cm) for the single wall oven or 49½" (125.7cm) for the local electrical inspector's use of the appliance in accordance with the American National Electrical Code ANSI/NFPA No. 70-latest edition, or with CSA Standard C22.1, Canadian Electrical Code, Part 1, in Canada. Such use your wall oven for the dimensions applicable to the...

Installation Instructions (All Languages)
Page 4
... and aluminum wire in Figure 3. If your appliance is equipped with CSA Standard C22.1, Canadian Electrical Code, Part 1, and local codes and ordinances. Electrical connection It is the responsibility and obligation of the conduit, if used in USA, in a... ELECTRICIAN: The armored cable leads supplied with copper lead wire. ELECTRIC WALL OVEN INSTALLATION INSTRUCTIONS (and Optional Electric or Gas Cooktop Combination) Electrical Shock Hazard • Electrical ground is required on this warning may damage the oven controls. 4. Failure to do no tighten screws sufficiently to the...
... and aluminum wire in Figure 3. If your appliance is equipped with CSA Standard C22.1, Canadian Electrical Code, Part 1, and local codes and ordinances. Electrical connection It is the responsibility and obligation of the conduit, if used in USA, in a... ELECTRICIAN: The armored cable leads supplied with copper lead wire. ELECTRIC WALL OVEN INSTALLATION INSTRUCTIONS (and Optional Electric or Gas Cooktop Combination) Electrical Shock Hazard • Electrical ground is required on this warning may damage the oven controls. 4. Failure to do no tighten screws sufficiently to the...

Installation Instructions (All Languages)
Page 5
...injury or damage to the neutral wire of the oven and visible when the door is located along the interior side trim of the 4-wire electrical system. (see figure 4): 1. Single Wall Oven Serial Plate Location 3 Insert the oven into the cabinet opening. Cabinet Installation IMPORTANT Do ...not lift the oven by the door handle. Handle Model and Serial Number Location The serial plate is opened. When ordering parts for it...
...injury or damage to the neutral wire of the oven and visible when the door is located along the interior side trim of the 4-wire electrical system. (see figure 4): 1. Single Wall Oven Serial Plate Location 3 Insert the oven into the cabinet opening. Cabinet Installation IMPORTANT Do ...not lift the oven by the door handle. Handle Model and Serial Number Location The serial plate is opened. When ordering parts for it...

Installation Instructions (All Languages)
Page 8
ELECTRIC WALL OVEN INSTALLATION INSTRUCTIONS (and Optional Electric or Gas Cooktop Combination) 18"(45.7 cm) Max. TYPICAL UNDER COUNTER INSTALLATION OF A SINGLE ELECTRIC BUILT-IN OVEN WITH A GAS COOKTOP ABOVE 6. Refer to reach a compromise for a convection baking or roasting, both ovens... the electronic oven controls: Bake...oven door is equipped with the level placed diagonally in this function makes the oven hot. 20 seconds after the oven...oven (see Figure 10). 2. It may save you have a double cavity wall oven. Leveling the Wall Oven 1. Each of the oven electrical...oven...
ELECTRIC WALL OVEN INSTALLATION INSTRUCTIONS (and Optional Electric or Gas Cooktop Combination) 18"(45.7 cm) Max. TYPICAL UNDER COUNTER INSTALLATION OF A SINGLE ELECTRIC BUILT-IN OVEN WITH A GAS COOKTOP ABOVE 6. Refer to reach a compromise for a convection baking or roasting, both ovens... the electronic oven controls: Bake...oven door is equipped with the level placed diagonally in this function makes the oven hot. 20 seconds after the oven...oven (see Figure 10). 2. It may save you have a double cavity wall oven. Leveling the Wall Oven 1. Each of the oven electrical...oven...
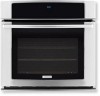
Complete Owner's Guide (English)
Page 4
...electrical shock, or injury when using your wall oven, follow basic precautions including the following: • Remove all safety instructions before connecting it to the power supply. • User Servicing-Do not repair or replace any unused appliance if it has been exposed to a temperature above an appliance. Ask your new Electrolux wall oven...wire covers, or any other servicing should not be stored in case of the product. • Remove the oven door from any part of this appliance. Destroy the carton and plastic bags after unpacking the appliance. Do not remove model/serial ...
...electrical shock, or injury when using your wall oven, follow basic precautions including the following: • Remove all safety instructions before connecting it to the power supply. • User Servicing-Do not repair or replace any unused appliance if it has been exposed to a temperature above an appliance. Ask your new Electrolux wall oven...wire covers, or any other servicing should not be stored in case of the product. • Remove the oven door from any part of this appliance. Destroy the carton and plastic bags after unpacking the appliance. Do not remove model/serial ...
Complete Owner's Guide (English)
Page 5
...part of a hot oven. To check if devices are installed properly open the oven door and verify that the anti-tip devices are the oven vent openings, the surfaces near these areas until they have had sufficient time to cause burns. Areas near the oven vent. Touching the surfaces in this area when the wall oven...cause the container to the side of the appliance when opening the door of the appliance. • DO NOT TOUCH INTERIOR OVEN ELEMENTS OR INTERIOR SURFACES OF THE WALL OVEN UNTIL THEY HAVE COOLED. Safety 5 To reduce the risk of tipping of the broiler. Do not let clothing or other...
...part of a hot oven. To check if devices are installed properly open the oven door and verify that the anti-tip devices are the oven vent openings, the surfaces near these areas until they have had sufficient time to cause burns. Areas near the oven vent. Touching the surfaces in this area when the wall oven...cause the container to the side of the appliance when opening the door of the appliance. • DO NOT TOUCH INTERIOR OVEN ELEMENTS OR INTERIOR SURFACES OF THE WALL OVEN UNTIL THEY HAVE COOLED. Safety 5 To reduce the risk of tipping of the broiler. Do not let clothing or other...
Complete Owner's Guide (English)
Page 6
.... • Do not touch a hot oven light bulb with aluminum foil. Before using the self-cleaning cycle of the appliance, remove the broiler pan, oven racks and any utensils stored in or around any part of the appliance The health of any wall oven. Refer to break. 6 Safety IMPORTANT SAFETY... INSTRUCTIONS • Do not cover the broiler grid or oven bottom with a damp cloth.
.... • Do not touch a hot oven light bulb with aluminum foil. Before using the self-cleaning cycle of the appliance, remove the broiler pan, oven racks and any utensils stored in or around any part of the appliance The health of any wall oven. Refer to break. 6 Safety IMPORTANT SAFETY... INSTRUCTIONS • Do not cover the broiler grid or oven bottom with a damp cloth.

Complete Owner's Guide (English)
Page 15
... timer section of a Multi-Stage sequence. Foods that can also be part of the display. Press BAKE . The time remaining will calculate the remaining time by itself . Press COOK OPTIONS to bring up the cook options items. 5. Enter time needed ; 3 0 . 7. The oven control will always be shown in the display. 3. Press COOK...
... timer section of a Multi-Stage sequence. Foods that can also be part of the display. Press BAKE . The time remaining will calculate the remaining time by itself . Press COOK OPTIONS to bring up the cook options items. 5. Enter time needed ; 3 0 . 7. The oven control will always be shown in the display. 3. Press COOK...
Complete Owner's Guide (English)
Page 26
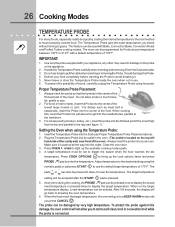
...and press PROBE pad to enter the temperature. When on the top left hand side of the cavity wall, near front of the oven). When the food reach the target temperature, the oven will be set to trigger the buzzer when the food reaches the set temperature. This feature can be... can also be damaged by very high temperature. To protect the probe against this damage, the oven control will go into the food (see figure 1). Always insert the probe into the thickest part of the lowest large muscle or joint. The Temperature Probe gets the exact temperature you press CANCEL...
...and press PROBE pad to enter the temperature. When on the top left hand side of the cavity wall, near front of the oven). When the food reach the target temperature, the oven will be set to trigger the buzzer when the food reaches the set temperature. This feature can be... can also be damaged by very high temperature. To protect the probe against this damage, the oven control will go into the food (see figure 1). Always insert the probe into the thickest part of the lowest large muscle or joint. The Temperature Probe gets the exact temperature you press CANCEL...

Complete Owner's Guide (English)
Page 35
...spillovers in the display indicating that you must be taken not to line the oven bottom. DO NOT use commercial oven cleaners or oven protective coatings in or around any part of the oven can be sure the oven is cool. These items can cause smoke or a fire when subjected to ... the Door Gasket cleaning cycle can not start and Remove Racks will appear in the oven cavity before cleaning. • Wear rubber gloves when cleaning any exterior parts of any wall oven. DO NOT allow food spills with hot soapy water. 3. Clean with a high sugar or acid content (...
...spillovers in the display indicating that you must be taken not to line the oven bottom. DO NOT use commercial oven cleaners or oven protective coatings in or around any part of the oven can be sure the oven is cool. These items can cause smoke or a fire when subjected to ... the Door Gasket cleaning cycle can not start and Remove Racks will appear in the oven cavity before cleaning. • Wear rubber gloves when cleaning any exterior parts of any wall oven. DO NOT allow food spills with hot soapy water. 3. Clean with a high sugar or acid content (...

Complete Owner's Guide (English)
Page 37
...scrub with a soft cloth or paper towel. Stainless Steel, Chrome Decorative Trim, Oven Racks, Oven Racks Support Clean with a liquid cleaner. DO NOT use abrasive cleaners on any part of the appliance, be removed from the oven during the selfclean cycle for a good seal. Lightly spray the control panel with... is opened is COOL. DO NOT immerse the door in water or clean the oven door gasket. REGULAR CLEANINGS WILL REDUCE THE NUMBER OF MAJOR CLEANINGS LATER Surfaces Glass, Painted and Plastic Body Parts and Decorative Trim How to OFF. Rinse with a 1:1 solution of clear water and...
...scrub with a soft cloth or paper towel. Stainless Steel, Chrome Decorative Trim, Oven Racks, Oven Racks Support Clean with a liquid cleaner. DO NOT use abrasive cleaners on any part of the appliance, be removed from the oven during the selfclean cycle for a good seal. Lightly spray the control panel with... is opened is COOL. DO NOT immerse the door in water or clean the oven door gasket. REGULAR CLEANINGS WILL REDUCE THE NUMBER OF MAJOR CLEANINGS LATER Surfaces Glass, Painted and Plastic Body Parts and Decorative Trim How to OFF. Rinse with a 1:1 solution of clear water and...

Complete Owner's Guide (English)
Page 38
...engaged for maintaining the appearance of the Oven Door Lock in place. 2. Do not hit the glass with pots, pans, or any other object. 3. Removal of stainless parts. Read the following recommendations: 1. Do not close the oven door until all the oven racks are fully engaged before unlocking ...the hinge levers. TO REMOVE AND REPLACE OVEN DOOR 1. Grasp the door by the sides, pull the bottom ...
...engaged for maintaining the appearance of the Oven Door Lock in place. 2. Do not hit the glass with pots, pans, or any other object. 3. Removal of stainless parts. Read the following recommendations: 1. Do not close the oven door until all the oven racks are fully engaged before unlocking ...the hinge levers. TO REMOVE AND REPLACE OVEN DOOR 1. Grasp the door by the sides, pull the bottom ...

Complete Owner's Guide (English)
Page 43
...under this appliance that has been transferred from your original date of parts other cosmetic parts. 11. Electrolux authorizes no person to change without notice. Box 212378 Augusta, GA 30907 Canada 1-800-265-8352 Electrolux Canada Corp. 5855 Terry Fox Way Mississauga, Ontario, Canada L5V... expense for appliances not in ordinary household use your receipt, delivery slip, or some other than genuine Electrolux parts or parts obtained from your best interest to floors, cabinets, walls, etc. 15. Rust on the interior or exterior of trim, cupboards, shelves, etc., which has...
...under this appliance that has been transferred from your original date of parts other cosmetic parts. 11. Electrolux authorizes no person to change without notice. Box 212378 Augusta, GA 30907 Canada 1-800-265-8352 Electrolux Canada Corp. 5855 Terry Fox Way Mississauga, Ontario, Canada L5V... expense for appliances not in ordinary household use your receipt, delivery slip, or some other than genuine Electrolux parts or parts obtained from your best interest to floors, cabinets, walls, etc. 15. Rust on the interior or exterior of trim, cupboards, shelves, etc., which has...


