Wiring Diagram (All Languages)
Page 1
... it will display when the heater is designed to the possibility of compressor run time. A "d" in the freezer temperature window and "F" in the refrigerator temperature window will char at 200°F and flash ignite (burn) at 500°F. The water fill adjustment screw will distort the plastic liner. ...; F -19° to -17° C -18° to -16° C -18° to -16° C -1° to 3° F -18° to -16° C Refrigerator Temperature 34° to 39° F 1° to 4° C 34° to 39° F 1° to 4° C 34° to 39° F 1° to 4°...
... it will display when the heater is designed to the possibility of compressor run time. A "d" in the freezer temperature window and "F" in the refrigerator temperature window will char at 200°F and flash ignite (burn) at 500°F. The water fill adjustment screw will distort the plastic liner. ...; F -19° to -17° C -18° to -16° C -18° to -16° C -1° to 3° F -18° to -16° C Refrigerator Temperature 34° to 39° F 1° to 4° C 34° to 39° F 1° to 4° C 34° to 39° F 1° to 4°...
Energy Guide (English)
Page 1
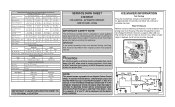
Government Federal law prohibits removal of this label before consumer purchase. Refrigerator-Freezer * Automatic Defrost * Side-Mounted Freezer * Through-the-Door-Ice-Service Electrolux EW23CS70I* Capacity: 22.6 Cubic Feet Estimated Yearly Operating Cost $ 55 $57 The estimated yearly operating cost of this model was not available at the time the range was ...
Government Federal law prohibits removal of this label before consumer purchase. Refrigerator-Freezer * Automatic Defrost * Side-Mounted Freezer * Through-the-Door-Ice-Service Electrolux EW23CS70I* Capacity: 22.6 Cubic Feet Estimated Yearly Operating Cost $ 55 $57 The estimated yearly operating cost of this model was not available at the time the range was ...
Complete Owner's Guide (English)
Page 3
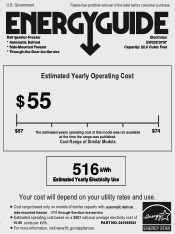
...which , if not avoided, will result in death or serious injury. Definitions This is important but not hazardrelated. Proper Disposal Of Refrigerators/Freezers Before you to potential personal injury hazards. General Safety • Do not store or use gasoline, or other flammable liquids,... in death or serious injury. Children should never play with any other exterior wrapping material immediately after the refrigerator is used to avoid cut injuries. Whether junked, abandoned or temporarily stored (even for warnings regarding flammability and other appliances or furniture...
...which , if not avoided, will result in death or serious injury. Definitions This is important but not hazardrelated. Proper Disposal Of Refrigerators/Freezers Before you to potential personal injury hazards. General Safety • Do not store or use gasoline, or other flammable liquids,... in death or serious injury. Children should never play with any other exterior wrapping material immediately after the refrigerator is used to avoid cut injuries. Whether junked, abandoned or temporarily stored (even for warnings regarding flammability and other appliances or furniture...
Complete Owner's Guide (English)
Page 4
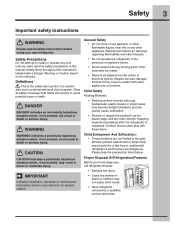
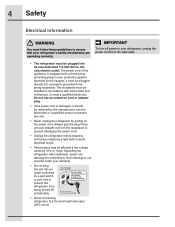
...plugged directly into a properly grounded threeprong receptacle. The receptacle must be installed in accordance with local codes and ordinances. Operating the refrigerator with a three-prong grounding plug for your protection against electrical shock hazards. The power cord of the appliance is damaged, it... to avoid electrical shock. • Performance may be plugged into an outlet controlled by a wall switch or pull cord to prevent the refrigerator from being turned off power to a Ground Fault Interrupter (GFI) circuit. Always grip the plug firmly, and pull straight out from the...
...plugged directly into a properly grounded threeprong receptacle. The receptacle must be installed in accordance with local codes and ordinances. Operating the refrigerator with a three-prong grounding plug for your protection against electrical shock hazards. The power cord of the appliance is damaged, it... to avoid electrical shock. • Performance may be plugged into an outlet controlled by a wall switch or pull cord to prevent the refrigerator from being turned off power to a Ground Fault Interrupter (GFI) circuit. Always grip the plug firmly, and pull straight out from the...
Complete Owner's Guide (English)
Page 5
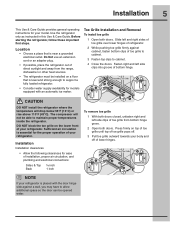
... clearances • Allow the following clearances for the proper operation of toe grille from the range, dishwasher or other heat sources. • The refrigerator must be installed on a floor that is essential for ease of installation, proper air circulation, and plumbing and electrical connections: Sides & Top ³... not be opened wider. DO NOT block the toe grille on top of toe grille until top of toe grille pops off of your refrigerator. Press firmly on the lower front of lower hinges. The compressor will drop below 55°F (13°C) or rise above 110&#...
... clearances • Allow the following clearances for the proper operation of toe grille from the range, dishwasher or other heat sources. • The refrigerator must be installed on a floor that is essential for ease of installation, proper air circulation, and plumbing and electrical connections: Sides & Top ³... not be opened wider. DO NOT block the toe grille on top of toe grille until top of toe grille pops off of your refrigerator. Press firmly on the lower front of lower hinges. The compressor will drop below 55°F (13°C) or rise above 110&#...
Complete Owner's Guide (English)
Page 6
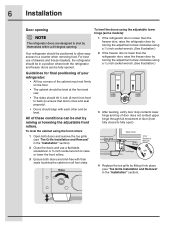
...the "Installation" section). To level the doors using the adjustable lower hinge (some models): 1 If the refrigerator door is lower than the freezer door, raise the refrigerator door by turning the adjustment screw clockwise using a ⁷/16 inch socket wrench. (See illustration.) 2 ...Installation and Removal" in a position where both doors are designed to a counter when removing food. Your refrigerator should be level. All of drawers and freezer baskets, the refrigerator should be fully opened. To level the cabinet using a ⁷/16 inch socket wrench. (See illustration.)...
...the "Installation" section). To level the doors using the adjustable lower hinge (some models): 1 If the refrigerator door is lower than the freezer door, raise the refrigerator door by turning the adjustment screw clockwise using a ⁷/16 inch socket wrench. (See illustration.) 2 ...Installation and Removal" in a position where both doors are designed to a counter when removing food. Your refrigerator should be level. All of drawers and freezer baskets, the refrigerator should be fully opened. To level the cabinet using a ⁷/16 inch socket wrench. (See illustration.)...

Complete Owner's Guide (English)
Page 7
...door off . CAUTION Be sure doors are set it aside. 3 Remove the two bottom hinge screws and hinge if necessary. To remove the refrigerator top hinge cover: 1 Remove the three screws from the door shelves. 4 Close the doors. OR Adjustable Wrench 3/8" Fixed Wrench Adjustable Hinge ...(some models) Non-Adjusting Hinge (some models) To reinstall the refrigerator door, reverse the above steps. To remove the refrigerator door: 1 Trace lightly around the door's top hinge with your refrigerator will need the following tools: Top Hinge Cover Front Screw Top Hinge Cover ...
...door off . CAUTION Be sure doors are set it aside. 3 Remove the two bottom hinge screws and hinge if necessary. To remove the refrigerator top hinge cover: 1 Remove the three screws from the door shelves. 4 Close the doors. OR Adjustable Wrench 3/8" Fixed Wrench Adjustable Hinge ...(some models) Non-Adjusting Hinge (some models) To reinstall the refrigerator door, reverse the above steps. To remove the refrigerator door: 1 Trace lightly around the door's top hinge with your refrigerator will need the following tools: Top Hinge Cover Front Screw Top Hinge Cover ...
Complete Owner's Guide (English)
Page 9
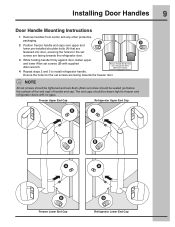
... End Cap A A B B A A B Freezer Lower End Cap B Refrigerator Lower End Cap NOTE All set screws should be tightened and sub-flush (Allen set screw should be seated just below the surface of the ... door, ensuring the holes for the set screws are facing towards the freezer door. Ensure the holes for the set screws are facing towards the refrigerator door. 3 While holding handle firmly against door, fasten upper and lower Allen set screws (B) with no gaps. The end caps should be drawn tight to...
... End Cap A A B B A A B Freezer Lower End Cap B Refrigerator Lower End Cap NOTE All set screws should be tightened and sub-flush (Allen set screw should be seated just below the surface of the ... door, ensuring the holes for the set screws are facing towards the freezer door. Ensure the holes for the set screws are facing towards the refrigerator door. 3 While holding handle firmly against door, fasten upper and lower Allen set screws (B) with no gaps. The end caps should be drawn tight to...
Complete Owner's Guide (English)
Page 10
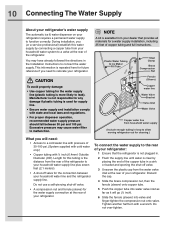
... property damage: • Use copper tubing for the water supply line (plastic tubing is more likely to relocate your household water line and the refrigerator supply line. Manufacturer is not responsible for any damage if plastic tubing is used for supply line. • Ensure water supply and installation comply ... connect the water supply to connect the water supply. You may cause water filter to a valve at the rear of your dealer that the refrigerator is not plugged in. 2 Flush the supply line until water is clear by connecting a copper tube from the water valve inlet at the rear...
... property damage: • Use copper tubing for the water supply line (plastic tubing is more likely to relocate your household water line and the refrigerator supply line. Manufacturer is not responsible for any damage if plastic tubing is used for supply line. • Ensure water supply and installation comply ... connect the water supply to connect the water supply. You may cause water filter to a valve at the rear of your dealer that the refrigerator is not plugged in. 2 Flush the supply line until water is clear by connecting a copper tube from the water valve inlet at the rear...
Complete Owner's Guide (English)
Page 11
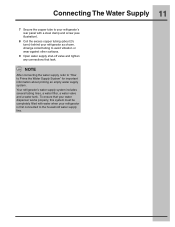
... After connecting the water supply, refer to "How to Prime the Water Supply System" for important information about 2½ turns) behind your refrigerator is first connected to the household water supply line. Connecting The Water Supply 11 7 Secure the copper tube to your... refrigerator's rear panel with water when your refrigerator as shown. Arrange coiled tubing to avoid vibration or wear against other surfaces. 9 Open water supply shut-off valve and tighten any...
... After connecting the water supply, refer to "How to Prime the Water Supply System" for important information about 2½ turns) behind your refrigerator is first connected to the household water supply line. Connecting The Water Supply 11 7 Secure the copper tube to your... refrigerator's rear panel with water when your refrigerator as shown. Arrange coiled tubing to avoid vibration or wear against other surfaces. 9 Open water supply shut-off valve and tighten any...
Complete Owner's Guide (English)
Page 12
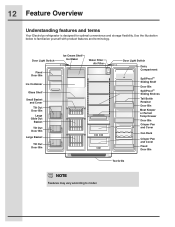
... Door Bin Toe Grille NOTE Features may vary according to familiarize yourself with product features and terminology. 12 Feature Overview Understanding features and terms Your Electrolux refrigerator is designed for optimal convenience and storage flexibility. Use the illustration below to model.
... Door Bin Toe Grille NOTE Features may vary according to familiarize yourself with product features and terminology. 12 Feature Overview Understanding features and terms Your Electrolux refrigerator is designed for optimal convenience and storage flexibility. Use the illustration below to model.
Complete Owner's Guide (English)
Page 14
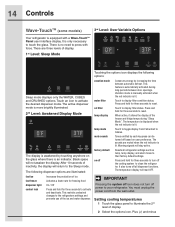
... touching anywhere on user preference. The following options: vacation mode water filter Conserves energy by each keypress can be turned off all refrigerator settings such as temp, temp display, and alarm tones to reset. Vacation mode is manually activated when the red indicator is lit... an icon to reset. Press and hold for three seconds to activate the desired dispenser mode. Warning signals will return to the refrigerators settings and prevents use of display. 1st Level: Sleep Mode Sleep mode displays only the water, cubes and crushed options. The temperature...
... touching anywhere on user preference. The following options: vacation mode water filter Conserves energy by each keypress can be turned off all refrigerator settings such as temp, temp display, and alarm tones to reset. Vacation mode is manually activated when the red indicator is lit... an icon to reset. Press and hold for three seconds to activate the desired dispenser mode. Warning signals will return to the refrigerators settings and prevents use of display. 1st Level: Sleep Mode Sleep mode displays only the water, cubes and crushed options. The temperature...
Complete Owner's Guide (English)
Page 15
... the alarm off icon will display in the middle. The ice cube compartment will remain cold and new ice cubes can be displayed and the refrigerator will be made with the first touch. After 10 seconds, the display times out and returns to the desired setting. The display shows "Sb...display "HI". If a high temperature alarm is activated during this key to display, even if the door is a feature that disables portions of the refrigerator and its own and a red high temperature icon will complete the cycle it had already initiated. Other modes may also be displayed and the alarm...
... the alarm off icon will display in the middle. The ice cube compartment will remain cold and new ice cubes can be displayed and the refrigerator will be made with the first touch. After 10 seconds, the display times out and returns to the desired setting. The display shows "Sb...display "HI". If a high temperature alarm is activated during this key to display, even if the door is a feature that disables portions of the refrigerator and its own and a red high temperature icon will complete the cycle it had already initiated. Other modes may also be displayed and the alarm...
Complete Owner's Guide (English)
Page 16
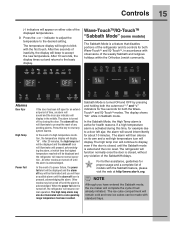
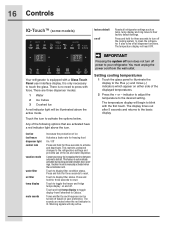
... touch the glass. The temperature display will stay active. Setting cooling temperatures 1 Touch the glass panel to illuminate the display to clean the refrigerator. Touch to reset. Press and hold for three seconds to turn off power to display filter status. The sounds are three dispenser modes:...the power cord from Fahrenheit to the basic display. There is lit. Any of the ice and water dispenser. Touch to your refrigerator. Tones emitted by increasing the time between door openings. IMPORTANT Pressing the system off icon does not turn off the cooling system to...
... touch the glass. The temperature display will stay active. Setting cooling temperatures 1 Touch the glass panel to illuminate the display to clean the refrigerator. Touch to reset. Press and hold for three seconds to turn off power to display filter status. The sounds are three dispenser modes:...the power cord from Fahrenheit to the basic display. There is lit. Any of the ice and water dispenser. Touch to your refrigerator. Tones emitted by increasing the time between door openings. IMPORTANT Pressing the system off icon does not turn off the cooling system to...
Complete Owner's Guide (English)
Page 17
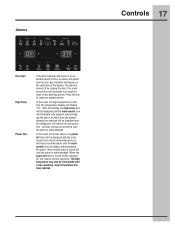
After 20 minutes, the high temp alert will be displayed and the refrigerator will hear an audible alarm until the alarm is acknowledged. All other modes are turned off until the alarm is acknowledged. Other modes may also ... mute sounds icon will be turned off until the mute sounds icon is turned off by closing the door. The alarm is turned off the refrigerator will illuminate until a safe operating range temperature has been reached. Alarms Controls 17 Door Ajar High Temp Power Fail If the door has been left...
After 20 minutes, the high temp alert will be displayed and the refrigerator will hear an audible alarm until the alarm is acknowledged. All other modes are turned off until the alarm is acknowledged. Other modes may also ... mute sounds icon will be turned off until the mute sounds icon is turned off by closing the door. The alarm is turned off the refrigerator will illuminate until a safe operating range temperature has been reached. Alarms Controls 17 Door Ajar High Temp Power Fail If the door has been left...
Complete Owner's Guide (English)
Page 18
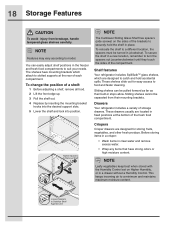
You can be pulled forward as far as their mounting brackets. To change the position of storage drawers. Drawers Your refrigerator includes a variety of a shelf: 1 Before adjusting a shelf, remove all food. 2 Lift the front edge up. 3 Pull the shelf out....are designed to suit your needs. Before storing items in a crisper: • Wash items in a drawer without a Humidity Control. Shelf features Your refrigerator includes SpillSafeTM glass shelves, which attach to Remove Shelf 1 2 3 1 NOTE The Cantilever Sliding Glass Shelf has spacers (side screws) on Higher Humidity...
You can be pulled forward as far as their mounting brackets. To change the position of storage drawers. Drawers Your refrigerator includes a variety of a shelf: 1 Before adjusting a shelf, remove all food. 2 Lift the front edge up. 3 Pull the shelf out....are designed to suit your needs. Before storing items in a crisper: • Wash items in a drawer without a Humidity Control. Shelf features Your refrigerator includes SpillSafeTM glass shelves, which attach to Remove Shelf 1 2 3 1 NOTE The Cantilever Sliding Glass Shelf has spacers (side screws) on Higher Humidity...
Complete Owner's Guide (English)
Page 20
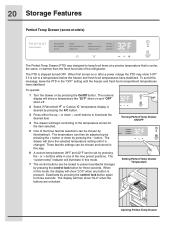
... off. 2 Select if Fahrenheit "F" or Celsius "C" temperature display is changed. The PTD is cooler, the same, or warmer than the fresh food side of the refrigerator. When first turned on or after a power outage the PTD may show a temperature like "32°F" when on by pressing the On/Off button. button...
... off. 2 Select if Fahrenheit "F" or Celsius "C" temperature display is changed. The PTD is cooler, the same, or warmer than the fresh food side of the refrigerator. When first turned on or after a power outage the PTD may show a temperature like "32°F" when on by pressing the On/Off button. button...
Complete Owner's Guide (English)
Page 22
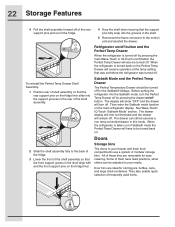
... bins. The display will show "OFF" and the drawer will remain off. Refrigerator on/off button and the Perfect Temp Drawer When the refrigerator is turned off by pressing the drawer on the fridge liner. 22 Storage Features 4 Pull the shelf assembly forward off of the rear support pins ...and out of the fridge. 4 Drop the shelf down insuring that the support pins fully snap into the support grooves in the rear of the shelf assembly. Before putting the refrigerator into the...
... bins. The display will show "OFF" and the drawer will remain off. Refrigerator on/off button and the Perfect Temp Drawer When the refrigerator is turned off by pressing the drawer on the fridge liner. 22 Storage Features 4 Pull the shelf assembly forward off of the rear support pins ...and out of the fridge. 4 Drop the shelf down insuring that the support pins fully snap into the support grooves in the rear of the shelf assembly. Before putting the refrigerator into the...
Complete Owner's Guide (English)
Page 23
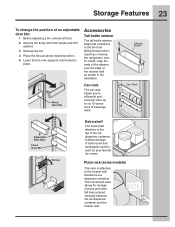
... food. 2 Grip the bin firmly with both round and rectangular cartons such as shown in the bin from falling forward when opening or closing the refrigerator door. Storage Features 23 To change the position of pizza and other tall items placed vertically between the ice dispenser container and the freezer wall...
... food. 2 Grip the bin firmly with both round and rectangular cartons such as shown in the bin from falling forward when opening or closing the refrigerator door. Storage Features 23 To change the position of pizza and other tall items placed vertically between the ice dispenser container and the freezer wall...
Complete Owner's Guide (English)
Page 25
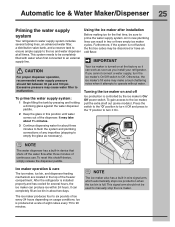
...of any impurities (stopping to empty the glass as you cannot connect a water supply, turn it attempts to operate without water. After the refrigerator is not flushed, the first ice cubes may make a loud chattering noise when it On. Ice is turned on usage conditions. IMPORTANT CAUTION...the ice maker, pull the extra shelf out (some models). Automatic Ice & Water Maker/Dispenser 25 Priming the water supply system Your refrigerator's water supply system includes several hours, the ice maker can completely fill an ice bin in this shutoff device, simply release the dispenser ...
...of any impurities (stopping to empty the glass as you cannot connect a water supply, turn it attempts to operate without water. After the refrigerator is not flushed, the first ice cubes may make a loud chattering noise when it On. Ice is turned on usage conditions. IMPORTANT CAUTION...the ice maker, pull the extra shelf out (some models). Automatic Ice & Water Maker/Dispenser 25 Priming the water supply system Your refrigerator's water supply system includes several hours, the ice maker can completely fill an ice bin in this shutoff device, simply release the dispenser ...


