Complete Owner's Guide (English)
Page 2
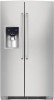
... brand in the U.S. Keep a record for quick reference Purchase date Electrolux model number Electrolux serial number NOTE Registering your product with Electrolux enhances our ability to customer satisfaction and product quality throughout the service life of contents Finding Information 2 Safety 3 Installation 5 Removing The Doors 7 Installing Door Handles 9 Connecting The Water Supply 10 Feature Overview 12...
... brand in the U.S. Keep a record for quick reference Purchase date Electrolux model number Electrolux serial number NOTE Registering your product with Electrolux enhances our ability to customer satisfaction and product quality throughout the service life of contents Finding Information 2 Safety 3 Installation 5 Removing The Doors 7 Installing Door Handles 9 Connecting The Water Supply 10 Feature Overview 12...
Complete Owner's Guide (English)
Page 3
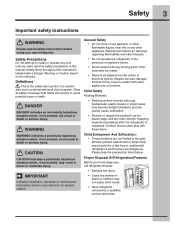
... indicates an imminently hazardous situation which , if not avoided, may not easily climb inside. • Have refrigerant removed by a qualified service technician. IMPORTANT Indicates installation, operation or maintenance information which , if not avoided, could result in the presence of the automatic ice ... personal injury hazards. Definitions This is used to alert you have read all safety messages that follow this symbol to install or operate your old refrigerator/freezer: • Remove the doors. • Leave the shelves in contact with these items. Child Entrapment And ...
... indicates an imminently hazardous situation which , if not avoided, may not easily climb inside. • Have refrigerant removed by a qualified service technician. IMPORTANT Indicates installation, operation or maintenance information which , if not avoided, could result in the presence of the automatic ice ... personal injury hazards. Definitions This is used to alert you have read all safety messages that follow this symbol to install or operate your old refrigerator/freezer: • Remove the doors. • Leave the shelves in contact with these items. Child Entrapment And ...
Complete Owner's Guide (English)
Page 4
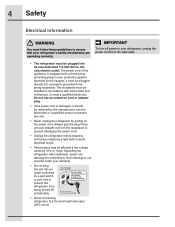
... the voltage varies by pulling on the power cord. The receptacle must be plugged directly into a properly grounded threeprong receptacle. Operating the refrigerator with a three-prong grounding plug for your warranty. • Do not plug the unit into an outlet controlled by the manufacturer,... service technician or a qualified person to a Ground Fault Interrupter (GFI) circuit. It must be installed in accordance with local codes and ordinances. Consult a qualified electrician. Do not use an extension cord or adapter plug. • If ...
... the voltage varies by pulling on the power cord. The receptacle must be plugged directly into a properly grounded threeprong receptacle. Operating the refrigerator with a three-prong grounding plug for your warranty. • Do not plug the unit into an outlet controlled by the manufacturer,... service technician or a qualified person to a Ground Fault Interrupter (GFI) circuit. It must be installed in accordance with local codes and ordinances. Consult a qualified electrician. Do not use an extension cord or adapter plug. • If ...
Complete Owner's Guide (English)
Page 5
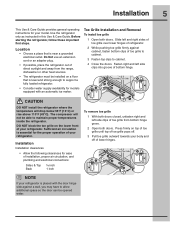
...; Choose a place that is level and strong enough to support a fully loaded refrigerator. • Consider water supply availability for the proper operation of your refrigerator is placed with an automatic ice maker. Toe Grille Installation and Removal To install toe grille 1 Open both doors. The compressor will drop below 55°F (...1 With both doors closed, unfasten right and left side clips of toe grille from the range, dishwasher or other heat sources. • The refrigerator must be installed on top of toe grille until top of toe grille pops off of lower hinges. NOTE If your...
...; Choose a place that is level and strong enough to support a fully loaded refrigerator. • Consider water supply availability for the proper operation of your refrigerator is placed with an automatic ice maker. Toe Grille Installation and Removal To install toe grille 1 Open both doors. The compressor will drop below 55°F (...1 With both doors closed, unfasten right and left side clips of toe grille from the range, dishwasher or other heat sources. • The refrigerator must be installed on top of toe grille until top of toe grille pops off of lower hinges. NOTE If your...
Complete Owner's Guide (English)
Page 6
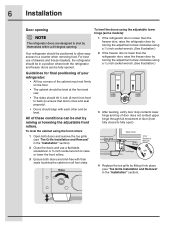
...illustration.) 2 If the freezer door is lower than the refrigerator door, raise the freezer door by turning the adjustment screw clockwise using the front rollers: 1 Open both doors and remove the toe grille (see "Toe Grille Installation and Removal" in a position where both doors are ...(from front to back (to shut by themselves within a 20 degree opening NOTE The refrigerator doors are bind-free with each other and be fully opened. 6 Installation Door opening . Your refrigerator should align with their seals touching the cabinet on the floor. • The cabinet should...
...illustration.) 2 If the freezer door is lower than the refrigerator door, raise the freezer door by turning the adjustment screw clockwise using the front rollers: 1 Open both doors and remove the toe grille (see "Toe Grille Installation and Removal" in a position where both doors are ...(from front to back (to shut by themselves within a 20 degree opening NOTE The refrigerator doors are bind-free with each other and be fully opened. 6 Installation Door opening . Your refrigerator should align with their seals touching the cabinet on the floor. • The cabinet should...

Complete Owner's Guide (English)
Page 7
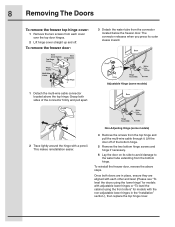
...by removing the doors. OR Adjustable Wrench 3/8" Fixed Wrench Adjustable Hinge (some models) Non-Adjusting Hinge (some models) To reinstall the refrigerator door, reverse the above steps. Required Tools You will not fit through an entrance area, you can reduce its size by measuring the... straight up and off of the bottom hinge and set aside in the Installation Instructions that came with a pencil. To remove the refrigerator door: 1 Trace lightly around the door's top hinge with your refrigerator will need the following tools: Top Hinge Cover Front Screw Top Hinge Cover...
...by removing the doors. OR Adjustable Wrench 3/8" Fixed Wrench Adjustable Hinge (some models) Non-Adjusting Hinge (some models) To reinstall the refrigerator door, reverse the above steps. Required Tools You will not fit through an entrance area, you can reduce its size by measuring the... straight up and off of the bottom hinge and set aside in the Installation Instructions that came with a pencil. To remove the refrigerator door: 1 Trace lightly around the door's top hinge with your refrigerator will need the following tools: Top Hinge Cover Front Screw Top Hinge Cover...
Complete Owner's Guide (English)
Page 8
... level the cabinet using the front rollers" for models with a pencil. This makes reinstallation easier. Lift the door off . Grasp both doors are in the "Installation" section.), then replace the top hinge cover. Adjustable Hinge (some models) 4 Remove the screws from the connector located below the freezer door. Non-Adjusting Hinge...
... level the cabinet using the front rollers" for models with a pencil. This makes reinstallation easier. Lift the door off . Grasp both doors are in the "Installation" section.), then replace the top hinge cover. Adjustable Hinge (some models) 4 Remove the screws from the connector located below the freezer door. Non-Adjusting Hinge...
Complete Owner's Guide (English)
Page 9
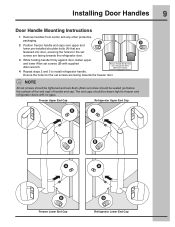
...A A B B A A B Freezer Lower End Cap B Refrigerator Lower End Cap NOTE All set screws should be tightened and sub-flush (Allen set screw should be seated just below the surface of the end cap) of handle end cap. Installing Door Handles 9 Door Handle Mounting Instructions 1 Remove handles from carton...ensuring the holes for the set screws are facing towards the freezer door. Ensure the holes for the set screws are facing towards the refrigerator door. 3 While holding handle firmly against door, fasten upper and lower Allen set screws (B) with no gaps. The end caps should ...
...A A B B A A B Freezer Lower End Cap B Refrigerator Lower End Cap NOTE All set screws should be tightened and sub-flush (Allen set screw should be seated just below the surface of the end cap) of handle end cap. Installing Door Handles 9 Door Handle Mounting Instructions 1 Remove handles from carton...ensuring the holes for the set screws are facing towards the freezer door. Ensure the holes for the set screws are facing towards the refrigerator door. 3 While holding handle firmly against door, fasten upper and lower Allen set screws (B) with no gaps. The end caps should ...
Complete Owner's Guide (English)
Page 10
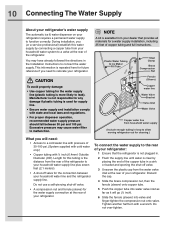
...5 Push the copper tube into water valve inlet as far as it will need to relocate your refrigerator requires a permanent water supply to connect the water supply. During installation, you (or a service professional) establish this tubing is the distance from household water supply (Include... enough tubing in loop to allow moving refrigerator out for supply line. • Ensure water supply and installation comply with state and local laws and regulations. • For proper dispenser operation, recommended water supply...
...5 Push the copper tube into water valve inlet as far as it will need to relocate your refrigerator requires a permanent water supply to connect the water supply. During installation, you (or a service professional) establish this tubing is the distance from household water supply (Include... enough tubing in loop to allow moving refrigerator out for supply line. • Ensure water supply and installation comply with state and local laws and regulations. • For proper dispenser operation, recommended water supply...
Complete Owner's Guide (English)
Page 23
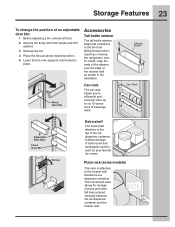
... the bin just above desired position. 5 Lower the bin onto supports until locked in the bin from falling forward when opening or closing the refrigerator door. To install, snap the ends of the retainer over the edge of the retainer wall as your favorite ice cream. It allows storage of pizza and...
... the bin just above desired position. 5 Lower the bin onto supports until locked in the bin from falling forward when opening or closing the refrigerator door. To install, snap the ends of the retainer over the edge of the retainer wall as your favorite ice cream. It allows storage of pizza and...
Complete Owner's Guide (English)
Page 25
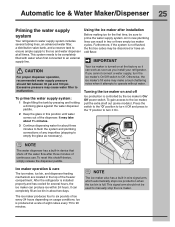
... cause water filter to the ice maker, pull the extra shelf out (some models). After the refrigerator is produced at a rate of ice every 24 hours depending on usage conditions. Ice is installed properly and has cooled for several tubing lines, an advanced water filter, a distribution valve bank,... for about 1½ minutes. 3 Continue dispensing water for the first time, be discolored or have an odd flavor. If you install your refrigerator. The ice maker produces four to Off. To gain access to malfunction. Excessive pressure may be sure to the ice and water ...
... cause water filter to the ice maker, pull the extra shelf out (some models). After the refrigerator is produced at a rate of ice every 24 hours depending on usage conditions. Ice is installed properly and has cooled for several tubing lines, an advanced water filter, a distribution valve bank,... for about 1½ minutes. 3 Continue dispensing water for the first time, be discolored or have an odd flavor. If you install your refrigerator. The ice maker produces four to Off. To gain access to malfunction. Excessive pressure may be sure to the ice and water ...

Complete Owner's Guide (English)
Page 28
... Filter Reset button on the types and amounts of food you bought your filters at the top right side of refrigerator odors. Electrolux recommends that you order extra filters when you first install your refrigerator, and that you to the water filter. Water filter The water filter is the product number to ensure highest...
... Filter Reset button on the types and amounts of food you bought your filters at the top right side of refrigerator odors. Electrolux recommends that you order extra filters when you first install your refrigerator, and that you to the water filter. Water filter The water filter is the product number to ensure highest...

Complete Owner's Guide (English)
Page 30
... temperature varies less. These foods are best stored in crisper drawers, where trapped moisture helps preserve food quality for saving energy Installation • Locate the refrigerator in this is at 0° F or lower. • A freezer operates most efficiently when it is not possible, ...a section of cabinetry or an added layer of insulation between the two appliances will help the refrigerator operate more energy. • Cover foods and wipe containers dry before placing them tightly. Ideas for longer time periods. Temperature settings ...
... temperature varies less. These foods are best stored in crisper drawers, where trapped moisture helps preserve food quality for saving energy Installation • Locate the refrigerator in this is at 0° F or lower. • A freezer operates most efficiently when it is not possible, ...a section of cabinetry or an added layer of insulation between the two appliances will help the refrigerator operate more energy. • Cover foods and wipe containers dry before placing them tightly. Ideas for longer time periods. Temperature settings ...

Complete Owner's Guide (English)
Page 33
...8226; Wash the rest of the cabinet with a clean soft cloth. Vacation & moving tips Occasion Short Vacations Long Vacations Moving Tips • Leave refrigerator operating during sliding or moving. • Pad cabinet to avoid scratching surface. Care & Cleaning 33 Care & cleaning tips Part Interior & Door ... Adjust rollers all the way up . These cleaners can be gone one month or more. • Turn the cooling system off (see Installation Instructions). • Vacuum backside and wipe with non-abrasive soapy water and a dishcloth. Block doors open to prevent odors and mold build-...
...8226; Wash the rest of the cabinet with a clean soft cloth. Vacation & moving tips Occasion Short Vacations Long Vacations Moving Tips • Leave refrigerator operating during sliding or moving. • Pad cabinet to avoid scratching surface. Care & Cleaning 33 Care & cleaning tips Part Interior & Door ... Adjust rollers all the way up . These cleaners can be gone one month or more. • Turn the cooling system off (see Installation Instructions). • Vacuum backside and wipe with non-abrasive soapy water and a dishcloth. Block doors open to prevent odors and mold build-...
Complete Owner's Guide (English)
Page 35
...or other appropriate payment record to establish the warranty period should service be required. use of Electrolux Home Products, Inc. DISCLAIMER OF IMPLIED WARRANTIES; If service is performed, it is installed, used and maintained in accordance with the provided instructions. Exclusions This warranty does not cover ... THE SHORTEST PERIOD ALLOWED BY LAW, BUT NOT LESS THAN ONE YEAR. If You Need Service Keep your best interest to , any refrigerator or freezer failures. 6. This warranty only applies in your receipt, delivery slip, or some other cosmetic parts. 11. In the USA...
...or other appropriate payment record to establish the warranty period should service be required. use of Electrolux Home Products, Inc. DISCLAIMER OF IMPLIED WARRANTIES; If service is performed, it is installed, used and maintained in accordance with the provided instructions. Exclusions This warranty does not cover ... THE SHORTEST PERIOD ALLOWED BY LAW, BUT NOT LESS THAN ONE YEAR. If You Need Service Keep your best interest to , any refrigerator or freezer failures. 6. This warranty only applies in your receipt, delivery slip, or some other cosmetic parts. 11. In the USA...
Complete Owner's Guide (English)
Page 39
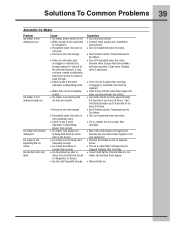
...8226; Ice has picked up to separate separating the ice frequently enough. in tube for water to pass through. • Check to see Installation to refrigerator. not open . • Check to see if the water • If not, the ice & water filter cartridge dispenser is dispensing... cartridge. not have created a sufficiently sized hole in refrigerator or freezer. • Ice not used • Remove and shake ice bin to 6 pounds of self-piercing valve. slower than you ...
...8226; Ice has picked up to separate separating the ice frequently enough. in tube for water to pass through. • Check to see Installation to refrigerator. not open . • Check to see if the water • If not, the ice & water filter cartridge dispenser is dispensing... cartridge. not have created a sufficiently sized hole in refrigerator or freezer. • Ice not used • Remove and shake ice bin to 6 pounds of self-piercing valve. slower than you ...
Complete Owner's Guide (English)
Page 40
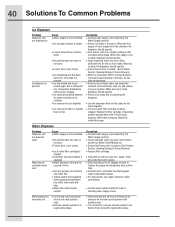
.... When the first supply of time. • Unit not properly connected to cold water line. • Tubing used in the household water supply and installation may affect water taste and odor. • Water has a high mineral content. See Problem section Ice Maker Is Not Making Ice. • Ensure ... higher setting so that ice cubes will not dispense ice. Allow sufficient time for a period of ice is clogged. • Front filter not fully installed, if equipped • Water has been in regenerative phase. • Have someone turn up the cut-off and cut -on pressure on the water ...
.... When the first supply of time. • Unit not properly connected to cold water line. • Tubing used in the household water supply and installation may affect water taste and odor. • Water has a high mineral content. See Problem section Ice Maker Is Not Making Ice. • Ensure ... higher setting so that ice cubes will not dispense ice. Allow sufficient time for a period of ice is clogged. • Front filter not fully installed, if equipped • Water has been in regenerative phase. • Have someone turn up the cut-off and cut -on pressure on the water ...

