Installation Instructions (All Languages)
Page 3
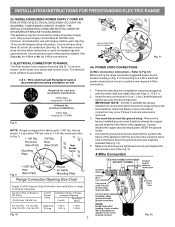
...be accessible. 3 & 4 - hole as shown. Rear Access Cover Fig. 11 4A. If connecting to Fig.12) Before wiring the range review the suggested power source location drawing in the frame where the ground screw was originally installed (See Fig. 12). 5. Insert the end connectors ...Neutral and tighten securely to the terminal block. Follow the manufacturer's installation instructions supplied with 1-3/8" dia. Cord must be used. Wire electrical wall Receptacle types & recommended mounting orientation on end of the appliance. You must have either closed loop or open-end spade lugs ...
...be accessible. 3 & 4 - hole as shown. Rear Access Cover Fig. 11 4A. If connecting to Fig.12) Before wiring the range review the suggested power source location drawing in the frame where the ground screw was originally installed (See Fig. 12). 5. Insert the end connectors ...Neutral and tighten securely to the terminal block. Follow the manufacturer's installation instructions supplied with 1-3/8" dia. Cord must be used. Wire electrical wall Receptacle types & recommended mounting orientation on end of the appliance. You must have either closed loop or open-end spade lugs ...

Installation Instructions (All Languages)
Page 4
...Wire Permanent Connection ONLY) Disconnect the ground strap. Before wiring the range, review the suggested power source location drawings in Fig. 14). Cut and discard the copper strap from the ends of electrical connection may occur if these 3 nuts are loosened or removed. ... while inserting rear leveling leg into the remaining open floor area behind the range Warmer or storage drawer. Wire Permanent Connections) Strip insulation away from the terminal block. INSTALLATION INSTRUCTIONS FOR FREESTANDING ELECTRIC RANGE or 4B. follow Steps 1 thru 5 below . 4 - Insert the...
...Wire Permanent Connection ONLY) Disconnect the ground strap. Before wiring the range, review the suggested power source location drawings in Fig. 14). Cut and discard the copper strap from the ends of electrical connection may occur if these 3 nuts are loosened or removed. ... while inserting rear leveling leg into the remaining open floor area behind the range Warmer or storage drawer. Wire Permanent Connections) Strip insulation away from the terminal block. INSTALLATION INSTRUCTIONS FOR FREESTANDING ELECTRIC RANGE or 4B. follow Steps 1 thru 5 below . 4 - Insert the...
Complete Owner's Guide (English)
Page 56
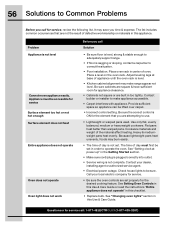
... Before you call Solution • Be sure floor is level, strong & stable enough to adequately support range. • If floor is sagging or sloping, contact a carpenter to correct the situation. • ... day is not set. Call your dealer, installing agent or authorized service agent. • Electrical power outage. Be sure cabinets are square & have sufficient room for appliance clearance. •...call: 1-877-4ELECTROLUX (1-877-435-3287) Questions or for service, review the following list. Cookware materials and weight of oven. See "Changing oven lights" section in ...
... Before you call Solution • Be sure floor is level, strong & stable enough to adequately support range. • If floor is sagging or sloping, contact a carpenter to correct the situation. • ... day is not set. Call your dealer, installing agent or authorized service agent. • Electrical power outage. Be sure cabinets are square & have sufficient room for appliance clearance. •...call: 1-877-4ELECTROLUX (1-877-435-3287) Questions or for service, review the following list. Cookware materials and weight of oven. See "Changing oven lights" section in ...

