
Use and Care Guide
Page 2
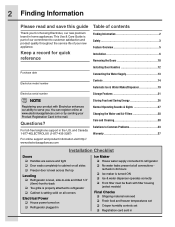
... information visit http:// www.electroluxappliances.com Storage Features 21 Storing Food and Saving Energy 26 Normal Operating Sounds & Sights 27 Changing the Water and Air Filters 28 Care and Cleaning 30 Solutions to Common Problems 33 Warranty 37 Installation Checklist Doors... 1/4" (6mm) front-to-back Toe grille is properly attached to refrigerator Cabinet is turned ON Ice & water dispenser operates correctly Front filter must be flush with Electrolux enhances our ability to serve you for quick reference Finding Information 2 Safety 3 ...
... information visit http:// www.electroluxappliances.com Storage Features 21 Storing Food and Saving Energy 26 Normal Operating Sounds & Sights 27 Changing the Water and Air Filters 28 Care and Cleaning 30 Solutions to Common Problems 33 Warranty 37 Installation Checklist Doors... 1/4" (6mm) front-to-back Toe grille is properly attached to refrigerator Cabinet is turned ON Ice & water dispenser operates correctly Front filter must be flush with Electrolux enhances our ability to serve you for quick reference Finding Information 2 Safety 3 ...
Use and Care Guide
Page 3
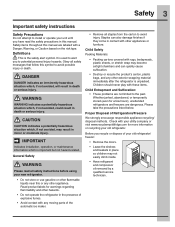
...avoided, will result in contact with rugs, bedspreads, plastic sheets, or stretch wrap may not easily climb inside. • Have refrigerant and compressor oil removed by a qualified service technician. Whether junked, abandoned, or temporarily stored (even for warnings regarding flammability and ...suffocation. • Destroy or recycle the product's carton, plastic bags, and any other exterior wrapping material immediately after the refrigerator is important but not hazard-related. Child Safety Packing Materials: • Packing cartons covered with other appliances or furniture. ...
...avoided, will result in contact with rugs, bedspreads, plastic sheets, or stretch wrap may not easily climb inside. • Have refrigerant and compressor oil removed by a qualified service technician. Whether junked, abandoned, or temporarily stored (even for warnings regarding flammability and ...suffocation. • Destroy or recycle the product's carton, plastic bags, and any other exterior wrapping material immediately after the refrigerator is important but not hazard-related. Child Safety Packing Materials: • Packing cartons covered with other appliances or furniture. ...
Use and Care Guide
Page 4
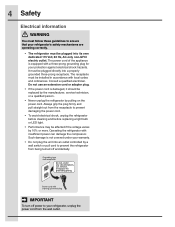
...of the appliance is damaged, it should be replaced by the manufacturer, service technician, or a qualified person. • Never unplug the refrigerator by pulling on the power cord. IMPORTANT To turn off accidentally. Do not use an extension cord or adapter plug. • If ...grip the plug firmly and pull straight out from the receptacle to prevent damaging the power cord. • To avoid electrical shock, unplug the refrigerator before cleaning and before replacing a light bulb or LED light. • Performance may be plugged directly into a properly grounded three-prong receptacle. ...
...of the appliance is damaged, it should be replaced by the manufacturer, service technician, or a qualified person. • Never unplug the refrigerator by pulling on the power cord. IMPORTANT To turn off accidentally. Do not use an extension cord or adapter plug. • If ...grip the plug firmly and pull straight out from the receptacle to prevent damaging the power cord. • To avoid electrical shock, unplug the refrigerator before cleaning and before replacing a light bulb or LED light. • Performance may be plugged directly into a properly grounded three-prong receptacle. ...
Use and Care Guide
Page 5
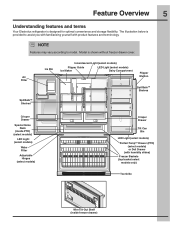
... LED Light (select models) Perfect TempTM Drawer (PTD) (select models) or Deli Drawer (with product features and terminology. Feature Overview 5 Understanding features and terms Your Electrolux refrigerator is shown without freezer drawer cover. Model is designed for optimal convenience and storage flexibility. The illustration below is provided to model.
... LED Light (select models) Perfect TempTM Drawer (PTD) (select models) or Deli Drawer (with product features and terminology. Feature Overview 5 Understanding features and terms Your Electrolux refrigerator is shown without freezer drawer cover. Model is designed for optimal convenience and storage flexibility. The illustration below is provided to model.
Use and Care Guide
Page 6
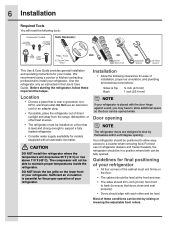
... general installation and operating instructions for your model. For best use an extension cord or an adapter plug. • If possible, place the refrigerator out of direct sunlight and away from the range, dishwasher, or other and be level at the front and rear. • The sides ..., proper air circulation, and plumbing and electrical connections: Sides & Top Back ³⁄₈ inch (9.5 mm) 1 inch (25.4 mm) NOTE If your refrigerator is placed with an automatic ice maker. Guidelines for models equipped with the door hinge against a wall, you may have to allow easy access to...
... general installation and operating instructions for your model. For best use an extension cord or an adapter plug. • If possible, place the refrigerator out of direct sunlight and away from the range, dishwasher, or other and be level at the front and rear. • The sides ..., proper air circulation, and plumbing and electrical connections: Sides & Top Back ³⁄₈ inch (9.5 mm) 1 inch (25.4 mm) NOTE If your refrigerator is placed with an automatic ice maker. Guidelines for models equipped with the door hinge against a wall, you may have to allow easy access to...

Use and Care Guide
Page 7
...-free with the floor to remove toe grille (see illustration). 2 Lift the right side of the toe grille and gently pull forward to keep the refrigerator stable. DO NOT use a flat-blade screwdriver or ³⁄₈-inch socket wrench to level the...
...-free with the floor to remove toe grille (see illustration). 2 Lift the right side of the toe grille and gently pull forward to keep the refrigerator stable. DO NOT use a flat-blade screwdriver or ³⁄₈-inch socket wrench to level the...
Use and Care Guide
Page 8
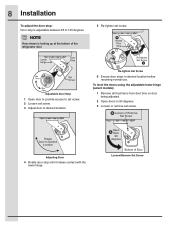
... being adjusted. 2 Open doors to 90 degrees. 3 Loosen or remove set screw. Adjusting Door 4 Rotate door stop is looking up at the bottom of the refrigerator door. 5 Re-tighten set screw. 8 Installation To adjust the door stop: Door stop until it makes contact with the lower hinge. Loosen/Remove Set Screw...
... being adjusted. 2 Open doors to 90 degrees. 3 Loosen or remove set screw. Adjusting Door 4 Rotate door stop is looking up at the bottom of the refrigerator door. 5 Re-tighten set screw. 8 Installation To adjust the door stop: Door stop until it makes contact with the lower hinge. Loosen/Remove Set Screw...
Use and Care Guide
Page 10
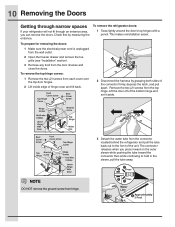
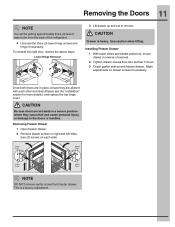
...ground screw from the top hinge. Check first by grasping both sides of the connector firmly, depress the latch, and pull apart. To remove the refrigerator doors: 1 Trace lightly around the door's top hinges with a pencil. Remove the two (2) screws from hinge. 10 Removing the Doors Getting ...through narrow spaces If your refrigerator will not fit through an entrance area, you press inward on the outer sleeve while pushing the tube toward the connector then while continuing to...
...ground screw from the top hinge. Check first by grasping both sides of the connector firmly, depress the latch, and pull apart. To remove the refrigerator doors: 1 Trace lightly around the door's top hinges with a pencil. Remove the two (2) screws from hinge. 10 Removing the Doors Getting ...through narrow spaces If your refrigerator will not fit through an entrance area, you press inward on the outer sleeve while pushing the tube toward the connector then while continuing to...
Use and Care Guide
Page 11
... lifting. Lower Hinge Removal 3 Lift drawer up and out to the doors or handles. NOTE DO NOT remove center screw from the back of the refrigerator. 4 Unscrew the three (3) lower hinge screws and hinge if necessary. Once both doors are in place, ensure they cannot fall and cause personal injury, or...
... lifting. Lower Hinge Removal 3 Lift drawer up and out to the doors or handles. NOTE DO NOT remove center screw from the back of the refrigerator. 4 Unscrew the three (3) lower hinge screws and hinge if necessary. Once both doors are in place, ensure they cannot fall and cause personal injury, or...
Use and Care Guide
Page 12
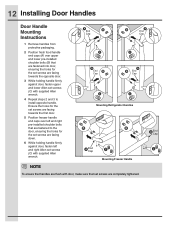
... screws are facing towards the opposite door. 3 While holding handle firmly against door, fasten upper and lower Allen set screws (C) with supplied Allen wrench. Mounting Refrigerator Handles Mounting Freezer Handle NOTE To ensure that handles are flush with door, make sure that are fastened to install opposite handle.
... screws are facing towards the opposite door. 3 While holding handle firmly against door, fasten upper and lower Allen set screws (C) with supplied Allen wrench. Mounting Refrigerator Handles Mounting Freezer Handle NOTE To ensure that handles are flush with door, make sure that are fastened to install opposite handle.
Use and Care Guide
Page 13
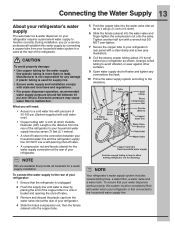
... DO NOT use a self-piercing shut-off valve. • A compression nut and ferrule (sleeve) for the water supply connection at the rear of your refrigerator: 1 Ensure that leak. 10 Prime the water supply system according to your household water supply line plus seven (7) feet (2.1 meters). • A shut-... for the water supply line (plastic tubing is clear by connecting a copper tube from the water valve inlet at the rear of your refrigerator. Excessive pressure may cause water filter to the household water supply line. Tighten another half turn with a steel clamp and screw (see ...
... DO NOT use a self-piercing shut-off valve. • A compression nut and ferrule (sleeve) for the water supply connection at the rear of your refrigerator: 1 Ensure that leak. 10 Prime the water supply system according to your household water supply line plus seven (7) feet (2.1 meters). • A shut-... for the water supply line (plastic tubing is clear by connecting a copper tube from the water valve inlet at the rear of your refrigerator. Excessive pressure may cause water filter to the household water supply line. Tighten another half turn with a steel clamp and screw (see ...
Use and Care Guide
Page 15
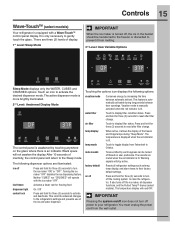
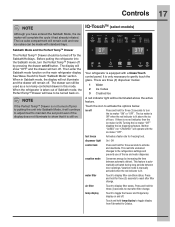
... not turn off the cooling system to display filter status. Press and hold for three (3) seconds to your refrigerator. air filter temp display Touch to clean the refrigerator. Press and hold for three (3) seconds to turn the ice maker "ON" or "OFF". The temperature display... long periods between automatic defrost. Touching the options icon displays the following dispenser options are illuminated: ice off the ice maker, all refrigerator settings such as temp, temp display, and alarm tones to Celsius. Press and hold for three (3) seconds to reset after filter ...
... not turn off the cooling system to display filter status. Press and hold for three (3) seconds to your refrigerator. air filter temp display Touch to clean the refrigerator. Press and hold for three (3) seconds to turn the ice maker "ON" or "OFF". The temperature display... long periods between automatic defrost. Touching the options icon displays the following dispenser options are illuminated: ice off the ice maker, all refrigerator settings such as temp, temp display, and alarm tones to Celsius. Press and hold for three (3) seconds to reset after filter ...
Use and Care Guide
Page 16
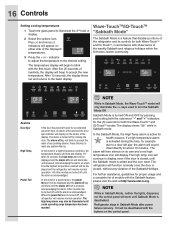
...In the Sabbath Mode, the High Temp alarm is active for about 10 minutes. The alarm will then silence on the control panel. The refrigerator will work until a safe operating range temperature has been reached. For further assistance, guidelines for both the Wave-TouchTM and IQ-TouchTM modes... will appear on the center of inactivity, the display will only illuminate the -/+ keys used to display, even if the door is deactivated. Refrigerator stays in accordance with observance of the displayed temperatures. 3 Press the + or - Other modes may also be displayed and the alarm off ...
...In the Sabbath Mode, the High Temp alarm is active for about 10 minutes. The alarm will then silence on the control panel. The refrigerator will work until a safe operating range temperature has been reached. For further assistance, guidelines for both the Wave-TouchTM and IQ-TouchTM modes... will appear on the center of inactivity, the display will only illuminate the -/+ keys used to display, even if the door is deactivated. Refrigerator stays in accordance with observance of the displayed temperatures. 3 Press the + or - Other modes may also be displayed and the alarm off ...
Use and Care Guide
Page 17
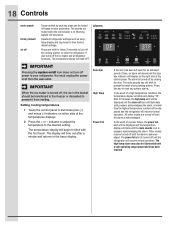
... with a Glass Touch control panel. Touch and hold for three (3) seconds to toggle the freezer and fridge temp display on the main refrigerator display. Sabbath Mode and the Perfect TempTM Drawer The Perfect TempTM Drawer should be illuminated above the ice off for freezing food. Then enter...toggle display from Fahrenheit to Celsius. The ice maker is OFF when the red indicator is ON. This restricts undesired changes to the refrigerators settings and prevents use of Sabbath mode, the Perfect TempTM Drawer will have entered the Sabbath Mode, the ice maker will continue ...
... with a Glass Touch control panel. Touch and hold for three (3) seconds to toggle the freezer and fridge temp display on the main refrigerator display. Sabbath Mode and the Perfect TempTM Drawer The Perfect TempTM Drawer should be illuminated above the ice off for freezing food. Then enter...toggle display from Fahrenheit to Celsius. The ice maker is OFF when the red indicator is ON. This restricts undesired changes to the refrigerators settings and prevents use of Sabbath mode, the Perfect TempTM Drawer will have entered the Sabbath Mode, the ice maker will continue ...
Use and Care Guide
Page 18
...will stay active. The temperature display will resume normal operation. The alarm is turned off, the ice in the bucket should be displayed and the refrigerator will time out after a minute and returns to their factory default settings. In the event of the temperatures displays. 2 Press the + or -... turn off the cooling system to reset any system alarms. In the event of any pending alarms. Press this key to clean the refrigerator. The sounds are turned off until the mute sounds icon is acknowledged. All other modes are muted when the red indicator is acknowledged....
...will stay active. The temperature display will resume normal operation. The alarm is turned off, the ice in the bucket should be displayed and the refrigerator will time out after a minute and returns to their factory default settings. In the event of the temperatures displays. 2 Press the + or -... turn off the cooling system to reset any system alarms. In the event of any pending alarms. Press this key to clean the refrigerator. The sounds are turned off until the mute sounds icon is acknowledged. All other modes are muted when the red indicator is acknowledged....
Use and Care Guide
Page 19
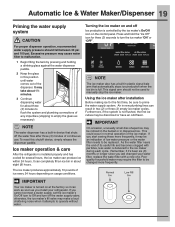
... take about 1½ minutes. 3 Continue dispensing water for three (3) seconds to operate without water. Ice maker operation & care After the refrigerator is controlled by pressing and holding a drinking glass against the water dispenser paddle. 2 Keep the glass in dispensed ice. It can result... Maker/Dispenser 19 Priming the water supply system CAUTION For proper dispenser operation, recommended water supply pressure should not be changed your refrigerator. NOTE The ice maker also has a built-in device that automatically stops ice production when the ice bin is turned on ...
... take about 1½ minutes. 3 Continue dispensing water for three (3) seconds to operate without water. Ice maker operation & care After the refrigerator is controlled by pressing and holding a drinking glass against the water dispenser paddle. 2 Keep the glass in dispensed ice. It can result... Maker/Dispenser 19 Priming the water supply system CAUTION For proper dispenser operation, recommended water supply pressure should not be changed your refrigerator. NOTE The ice maker also has a built-in device that automatically stops ice production when the ice bin is turned on ...

Use and Care Guide
Page 20
...sound when the ice chute opens and closes. • If you need a large quantity of ice at regular intervals, especially prior to your refrigerator is not connected to melt and freeze together, jamming the dispenser mechanism. • You do not use an ice pick or similar sharp ...turns (see below . CAUTION NEVER use the ice dispenser frequently. 20 Automatic Ice & Water Maker/Dispenser Ice maker/dispenser tips • If your refrigerator is softened, be sure the softener is properly maintained. Empty the ice bin as explained above. Chemicals from the ice bin. • Turning off...
...sound when the ice chute opens and closes. • If you need a large quantity of ice at regular intervals, especially prior to your refrigerator is not connected to melt and freeze together, jamming the dispenser mechanism. • You do not use an ice pick or similar sharp ...turns (see below . CAUTION NEVER use the ice dispenser frequently. 20 Automatic Ice & Water Maker/Dispenser Ice maker/dispenser tips • If your refrigerator is softened, be sure the softener is properly maintained. Empty the ice bin as explained above. Chemicals from the ice bin. • Turning off...
Use and Care Guide
Page 21
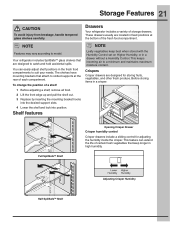
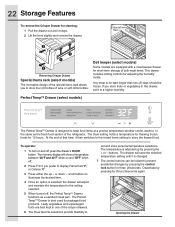
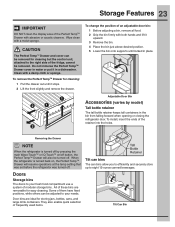
... items in fixed positions at the rear of each compartment. Half SpillSafeTM Shelf Adjusting Crisper Humidity This keeps incoming air to model. Your refrigerator includes SpillSafeTM glass shelves that attach to suit your needs. You can extend the life of the fresh food compartment. Drawers Your... refrigerator includes a variety of a shelf: 1 Before adjusting a shelf, remove all food. 2 Lift the front edge up and pull the shelf out. 3 Replace by ...
... items in fixed positions at the rear of each compartment. Half SpillSafeTM Shelf Adjusting Crisper Humidity This keeps incoming air to model. Your refrigerator includes SpillSafeTM glass shelves that attach to suit your needs. You can extend the life of the fresh food compartment. Drawers Your... refrigerator includes a variety of a shelf: 1 Before adjusting a shelf, remove all food. 2 Lift the front edge up and pull the shelf out. 3 Replace by ...
Use and Care Guide
Page 22
... ∧ or down ∨ scroll buttons to a higher humidity. Opening the Drawer Removing Crisper Drawer Special items rack (select models) The innovative design of the refrigerator. Deli keeper (select models) Some models are best kept in this drawer, set and store personal temperature selections. Deactivate by pressing the + or - Leafy vegetables...
... ∧ or down ∨ scroll buttons to a higher humidity. Opening the Drawer Removing Crisper Drawer Special items rack (select models) The innovative design of the refrigerator. Deli keeper (select models) Some models are best kept in this drawer, set and store personal temperature selections. Deactivate by pressing the + or - Leafy vegetables...
Use and Care Guide
Page 23
... removed for storing jars, bottles, cans, and large drink containers. Tilt Can Bin To change the position of the retainer into the holes. When the refrigerator is turned off . Clean with a moist sponge. To install, insert the ends of an adjustable door bin: 1 Before adjusting a bin, remove all... Door bins are removable for cleaning: 1 Pull the drawer out until locked in the bin from falling forward when opening or closing the refrigerator door. Doors Storage bins The doors to your needs. Do not immerse the Perfect TempTM Drawer cover in a dishwasher. To remove the ...
... removed for storing jars, bottles, cans, and large drink containers. Tilt Can Bin To change the position of the retainer into the holes. When the refrigerator is turned off . Clean with a moist sponge. To install, insert the ends of an adjustable door bin: 1 Before adjusting a bin, remove all... Door bins are removable for cleaning: 1 Pull the drawer out until locked in the bin from falling forward when opening or closing the refrigerator door. Doors Storage bins The doors to your needs. Do not immerse the Perfect TempTM Drawer cover in a dishwasher. To remove the ...


