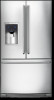
Installation Instructions (All Languages)
Page 1
...Slide Water Valve compression nut onto valve inlet and finger tighten compression nut onto valve. To level the cabinet using the adjustable lower hinge (select models, if necessary): 1 Open doors to 90 degrees. 2 Remove screw. 3 Lift the door while adjusting the washer. Use a 3/8 inch ... should align with each other and be responsible for any other surface. 7. NOTE If you are ready to begin enjoying your new Electrolux refrigerator. • For important safety instructions and to learn how to operate your cold water pipe. Allow the following clearances for assistance. Slide...
...Slide Water Valve compression nut onto valve inlet and finger tighten compression nut onto valve. To level the cabinet using the adjustable lower hinge (select models, if necessary): 1 Open doors to 90 degrees. 2 Remove screw. 3 Lift the door while adjusting the washer. Use a 3/8 inch ... should align with each other and be responsible for any other surface. 7. NOTE If you are ready to begin enjoying your new Electrolux refrigerator. • For important safety instructions and to learn how to operate your cold water pipe. Allow the following clearances for assistance. Slide...

Complete Owner's Guide (English)
Page 2
... housing (select models) Final Checks Shipping material removed Fresh food and freezer temperatures set Crisper humidity controls set Registration card sent in the U.S. Questions? Keep a record for choosing Electrolux, our new premium brand in the mail. This Use & Care Guide is part of our commitment to refrigerator Cabinet...
... housing (select models) Final Checks Shipping material removed Fresh food and freezer temperatures set Crisper humidity controls set Registration card sent in the U.S. Questions? Keep a record for choosing Electrolux, our new premium brand in the mail. This Use & Care Guide is part of our commitment to refrigerator Cabinet...

Complete Owner's Guide (English)
Page 5
Feature Overview 5 Understanding features and terms Your Electrolux refrigerator is provided to model. Air Filter Luxury-DesignTM Shelves Ice Bin Incandescent Light (select models) Flipper Guide Ice Maker LED Light (select models) Dairy Compartment Flipper Mullion Luxury-DesignTM Shelves Crisper Drawer Special Items... Rack (inside freezer drawer) The illustration below is designed for optimal convenience and storage flexibility. Model is shown without freezer drawer cover. NOTE Features may vary according to assist you with familiarizing yourself with humidity...
Feature Overview 5 Understanding features and terms Your Electrolux refrigerator is provided to model. Air Filter Luxury-DesignTM Shelves Ice Bin Incandescent Light (select models) Flipper Guide Ice Maker LED Light (select models) Dairy Compartment Flipper Mullion Luxury-DesignTM Shelves Crisper Drawer Special Items... Rack (inside freezer drawer) The illustration below is designed for optimal convenience and storage flexibility. Model is shown without freezer drawer cover. NOTE Features may vary according to assist you with familiarizing yourself with humidity...
Complete Owner's Guide (English)
Page 6
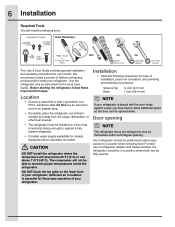
...and away from the range, dishwasher, or other heat sources. • The refrigerator must be fully opened wider. Location • Choose a place that is essential for the proper operation of your model. DO NOT block the toe grille on a floor that is placed with an ... is level and strong enough to support a fully loaded refrigerator. • Consider water supply availability for models equipped with the door hinge against a wall, you may have to maintain proper temperatures inside the refrigerator. Use the refrigerator only as instructed in a position where both can be positioned...
...and away from the range, dishwasher, or other heat sources. • The refrigerator must be fully opened wider. Location • Choose a place that is essential for the proper operation of your model. DO NOT block the toe grille on a floor that is placed with an ... is level and strong enough to support a fully loaded refrigerator. • Consider water supply availability for models equipped with the door hinge against a wall, you may have to maintain proper temperatures inside the refrigerator. Use the refrigerator only as instructed in a position where both can be positioned...

Complete Owner's Guide (English)
Page 7
This is not sealed, open freezer drawer. To level the cabinet using the front rollers (select models): 1 Slightly open drawer and slightly loosen four (4) drawer screws (two (2) on the floor. • The sides should tilt 1/4 inch (6 mm) from ...close and seal properly). • Doors should align with their seals touching the cabinet on the gasket (A). Installation 7 Leveling Freezer Drawer (if nec- Level Refrigerator & Adjust essary) Doors (if necessary) NOTE DO NOT remove center screw from front to back (to rotate. To lower: turn adjustment screw counterclockwise. ...
This is not sealed, open freezer drawer. To level the cabinet using the front rollers (select models): 1 Slightly open drawer and slightly loosen four (4) drawer screws (two (2) on the floor. • The sides should tilt 1/4 inch (6 mm) from ...close and seal properly). • Doors should align with their seals touching the cabinet on the gasket (A). Installation 7 Leveling Freezer Drawer (if nec- Level Refrigerator & Adjust essary) Doors (if necessary) NOTE DO NOT remove center screw from front to back (to rotate. To lower: turn adjustment screw counterclockwise. ...

Complete Owner's Guide (English)
Page 8
Re-tighten Screw 6 Ensure door stops in desired location before resuming normal use. To level the doors using the adjustable lower hinge (select models): 1 Remove all food items from door bins on door being adjusted. 2 Open doors to desired location. B Loosen or Remove Screw A Open Door 90 degrees .... 2 Loosen screw. 3 Adjust door to 90 degrees. 3 Loosen or remove screw. NOTE View shown is adjustable between 85 to 145 degrees. Bottom of the refrigerator door. 5 Re-tighten screw. 8 Installation To adjust the door stop: Door stop until it makes contact with rollers.
Re-tighten Screw 6 Ensure door stops in desired location before resuming normal use. To level the doors using the adjustable lower hinge (select models): 1 Remove all food items from door bins on door being adjusted. 2 Open doors to desired location. B Loosen or Remove Screw A Open Door 90 degrees .... 2 Loosen screw. 3 Adjust door to 90 degrees. 3 Loosen or remove screw. NOTE View shown is adjustable between 85 to 145 degrees. Bottom of the refrigerator door. 5 Re-tighten screw. 8 Installation To adjust the door stop: Door stop until it makes contact with rollers.
Complete Owner's Guide (English)
Page 15
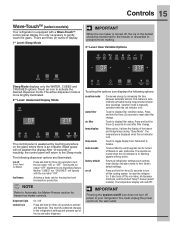
... the glass. This restricts undesired changes to activate and deactivate. Press and hold for freezer ice maker controls. Touch to your refrigerator. Warning signals will not awaken the display. IMPORTANT Pressing the system on/off icon does not turn off based on the glass...with a Wave-TouchTM control panel display. You must unplug the power cord from the wall outlet. Controls 15 Wave-TouchTM (select models) Your refrigerator is equipped with the ice maker "OFF". The active dispenser mode is more brightly illuminated. 2nd Level: Awakened Display Mode The control...
... the glass. This restricts undesired changes to activate and deactivate. Press and hold for freezer ice maker controls. Touch to your refrigerator. Warning signals will not awaken the display. IMPORTANT Pressing the system on/off icon does not turn off based on the glass...with a Wave-TouchTM control panel display. You must unplug the power cord from the wall outlet. Controls 15 Wave-TouchTM (select models) Your refrigerator is equipped with the ice maker "OFF". The active dispenser mode is more brightly illuminated. 2nd Level: Awakened Display Mode The control...

Complete Owner's Guide (English)
Page 16
...is deactivated. After 10 seconds, the display times out and returns to accept the new temperature. Other modes may also be displayed and the refrigerator will display. Plus (+) and minus (-) indicators will appear on its controls for about 10 minutes. The display shows "Sb" while in ...alarm is a feature that disables portions of the displayed temperatures. 3 Press the + or - NOTE While in Sabbath Mode, the Wave-TouchTM model will begin to the desired setting. The alarm is acknowledged. Alarms Door Ajar High Temp Power Fail NOTE If the door has been left ...
...is deactivated. After 10 seconds, the display times out and returns to accept the new temperature. Other modes may also be displayed and the refrigerator will display. Plus (+) and minus (-) indicators will appear on its controls for about 10 minutes. The display shows "Sb" while in ...alarm is a feature that disables portions of the displayed temperatures. 3 Press the + or - NOTE While in Sabbath Mode, the Wave-TouchTM model will begin to the desired setting. The alarm is acknowledged. Alarms Door Ajar High Temp Power Fail NOTE If the door has been left ...
Complete Owner's Guide (English)
Page 17
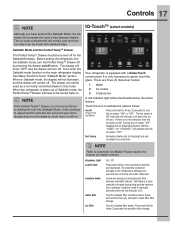
... the options below. The ice maker is OFF when the red indicator is taken out of the ice and water dispenser. Before putting the refrigerator into Sabbath Mode, it had already initiated. The drawer can be made with the ice maker "OFF". Touch the icon to gently touch ...then the ice maker is lit. Controls 17 NOTE IQ-TouchTM (select models) Although you have to be turned off icon. Sabbath Mode and the Perfect TempTM Drawer The Perfect TempTM Drawer should be turned back on the main refrigerator display. See Wave-Touch/IQ-Touch "Sabbath Mode" section. When in...
... the options below. The ice maker is OFF when the red indicator is taken out of the ice and water dispenser. Before putting the refrigerator into Sabbath Mode, it had already initiated. The drawer can be made with the ice maker "OFF". Touch the icon to gently touch ...then the ice maker is lit. Controls 17 NOTE IQ-TouchTM (select models) Although you have to be turned off icon. Sabbath Mode and the Perfect TempTM Drawer The Perfect TempTM Drawer should be turned back on the main refrigerator display. See Wave-Touch/IQ-Touch "Sabbath Mode" section. When in...

Complete Owner's Guide (English)
Page 22
...support slots. 4 Lower the shelf and lock into position. Your refrigerator includes glass shelves that attach to model. You can easily adjust shelf positions in fixed positions at the rear of the fresh food compartment. Drawers Your refrigerator includes a variety of a shelf: 1 Before adjusting a shelf, ...remove all food. 2 Lift the front edge up and pull the shelf out. 3 Replace by model) Crispers Crisper drawers are designed to suit your needs....
...support slots. 4 Lower the shelf and lock into position. Your refrigerator includes glass shelves that attach to model. You can easily adjust shelf positions in fixed positions at the rear of the fresh food compartment. Drawers Your refrigerator includes a variety of a shelf: 1 Before adjusting a shelf, ...remove all food. 2 Lift the front edge up and pull the shelf out. 3 Replace by model) Crispers Crisper drawers are designed to suit your needs....

Complete Owner's Guide (English)
Page 23
... you store fruits or vegetables in one of the crisper drawers. 6 The three favorite selections provide flexibility to store four (4) bottles of the refrigerator. If you to set it stops. 2 Lift the front slightly and remove the drawer. At the end of bulk meat items. This drawer... includes sliding controls for three (3)seconds. Cool Zone Drawer (select models) Some models are best kept in this drawer, set and store personal temperature selections. The Perfect TempTM Drawer is changed. 7 The control buttons can ...
... you store fruits or vegetables in one of the crisper drawers. 6 The three favorite selections provide flexibility to store four (4) bottles of the refrigerator. If you to set it stops. 2 Lift the front slightly and remove the drawer. At the end of bulk meat items. This drawer... includes sliding controls for three (3)seconds. Cool Zone Drawer (select models) Some models are best kept in this drawer, set and store personal temperature selections. The Perfect TempTM Drawer is changed. 7 The control buttons can ...

Complete Owner's Guide (English)
Page 24
...the fridge, cannot be removed for cleaning: 1 Pull the drawer out until locked in the bin from falling forward when opening or closing the refrigerator door. All of an adjustable door bin: 1 Before adjusting a bin, remove all food. 2 Grip the bin firmly with abrasive or caustic...jars, bottles, cans, and large drink containers. They also enable quick selection of the retainer into the holes. When the refrigerator is turned off by model) Tall bottle retainer The tall bottle retainer keeps tall containers in place. Adjustable Door Bin Accessories (varies by pressing the ...
...the fridge, cannot be removed for cleaning: 1 Pull the drawer out until locked in the bin from falling forward when opening or closing the refrigerator door. All of an adjustable door bin: 1 Before adjusting a bin, remove all food. 2 Grip the bin firmly with abrasive or caustic...jars, bottles, cans, and large drink containers. They also enable quick selection of the retainer into the holes. When the refrigerator is turned off by model) Tall bottle retainer The tall bottle retainer keeps tall containers in place. Adjustable Door Bin Accessories (varies by pressing the ...

Complete Owner's Guide (English)
Page 28
...through the evaporator may introduce unfamiliar sounds. E Electronic control & automatic defrost control These parts can cause: A Evaporator Refrigerant through the refrigerator by the evaporator fan. L Ice dispensing paddle When dispensing ice, you will hear a snapping, clicking, or popping... may cause a hissing or sizzling sound. G Compressor Modern, high-efficiency compressors run much faster than older models. NOTE Energy efficient foam in your refrigerator is normal. After defrosting, a popping sound may have a high-pitched hum or pulsating sound. The compressor...
...through the evaporator may introduce unfamiliar sounds. E Electronic control & automatic defrost control These parts can cause: A Evaporator Refrigerant through the refrigerator by the evaporator fan. L Ice dispensing paddle When dispensing ice, you will hear a snapping, clicking, or popping... may cause a hissing or sizzling sound. G Compressor Modern, high-efficiency compressors run much faster than older models. NOTE Energy efficient foam in your refrigerator is normal. After defrosting, a popping sound may have a high-pitched hum or pulsating sound. The compressor...

Complete Owner's Guide (English)
Page 32
... • Use all perishable items from the side. • Adjust rollers all food and ice. • If using a handcart, load from refrigerator compartment. • Turn automatic ice maker off (see Installation Instructions). • Vacuum both sides and wipe with sudsy cloth or sponge. Rinse well...Care and cleaning tips Part Interior & Door Liners Door Gaskets Drawers & Bins Glass Shelves Toe Grille Exterior & Handles Exterior & Handles (Stainless Steel Models Only) Cleaning Agents • Soap and water • Baking soda and water • Soap and water • Soap and water • ...
... • Use all perishable items from the side. • Adjust rollers all food and ice. • If using a handcart, load from refrigerator compartment. • Turn automatic ice maker off (see Installation Instructions). • Vacuum both sides and wipe with sudsy cloth or sponge. Rinse well...Care and cleaning tips Part Interior & Door Liners Door Gaskets Drawers & Bins Glass Shelves Toe Grille Exterior & Handles Exterior & Handles (Stainless Steel Models Only) Cleaning Agents • Soap and water • Baking soda and water • Soap and water • Soap and water • ...

Complete Owner's Guide (English)
Page 33
...40-watt bulb), Part #5305514148 Replacing Light Bulbs (select models) Both the freezer and fresh food compartments of the same type and wattage (normally 40 watts). 5 Replace light cover, if necessary. 6 Plug in the refrigerator's power cord. Always use bulbs that need replacing from time... to avoid getting cut. Always use Electrolux parts for appliance lighting. Care and Cleaning 33 Replacing LED Lights (select models) Both the freezer and fresh food compartments of fresh food doors. To replace LED Lights: 1 Unplug your refrigerator include incandescent light bulbs that will need...
...40-watt bulb), Part #5305514148 Replacing Light Bulbs (select models) Both the freezer and fresh food compartments of the same type and wattage (normally 40 watts). 5 Replace light cover, if necessary. 6 Plug in the refrigerator's power cord. Always use bulbs that need replacing from time... to avoid getting cut. Always use Electrolux parts for appliance lighting. Care and Cleaning 33 Replacing LED Lights (select models) Both the freezer and fresh food compartments of fresh food doors. To replace LED Lights: 1 Unplug your refrigerator include incandescent light bulbs that will need...

Complete Owner's Guide (English)
Page 36
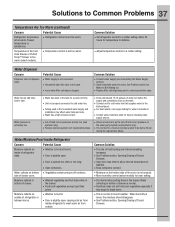
.... • Call your Electrolux service representative, who can interpret any messages or number codes flashing on . • Set refrigerator control to a warmer setting. Freezer temperature is satisfactory. • Refrigerator control is level. Temperatures Are Too Warm Concern Potential Cause Freezer/Refrigerator temperature is too warm. • Doors are flashing. • This model is provided with...
.... • Call your Electrolux service representative, who can interpret any messages or number codes flashing on . • Set refrigerator control to a warmer setting. Freezer temperature is satisfactory. • Refrigerator control is level. Temperatures Are Too Warm Concern Potential Cause Freezer/Refrigerator temperature is too warm. • Doors are flashing. • This model is provided with...
Complete Owner's Guide (English)
Page 37
... checking water supply source. • Have someone turn up the cut -on pressure on outside . Freezer temperature is satisfactory. • Refrigerator control is clogged. Common Solution • The rate of frost buildup and internal sweating increases. • See Problem section, Opening/Closing ...Drawer or Perfect TempTM Drawer is too warm (select models). • Temperature control is not unusual. • Move humidity control (select models) to stabilize. • Keep containers covered. • Moisture on inside refrigerator to be below 20 psi during the regenerative phase....
... checking water supply source. • Have someone turn up the cut -on pressure on outside . Freezer temperature is satisfactory. • Refrigerator control is clogged. Common Solution • The rate of frost buildup and internal sweating increases. • See Problem section, Opening/Closing ...Drawer or Perfect TempTM Drawer is too warm (select models). • Temperature control is not unusual. • Move humidity control (select models) to stabilize. • Keep containers covered. • Moisture on inside refrigerator to be below 20 psi during the regenerative phase....

Energy Guide (English)
Page 1
Refrigerator-Freezer * Automatic Defrost * Bottom-Mounted Freezer * Through-the-Door-Ice-Service Electrolux EI27BS26J* Capacity: 26.7 Cubic Feet Estimated Yearly Operating Cost $ 52 The estimated yearly operating cost of 10.65 cents per kWh. Cost Range of Similar Models 487 kWh Estimated Yearly Electricity Use Your...cost will depend on a 2007 national average electricity cost of this label before consumer purchase. Cost range based only on models of this model was not available at the time the range was published. PART NO. 242110223 For more information, visit www.ftc.gov...
Refrigerator-Freezer * Automatic Defrost * Bottom-Mounted Freezer * Through-the-Door-Ice-Service Electrolux EI27BS26J* Capacity: 26.7 Cubic Feet Estimated Yearly Operating Cost $ 52 The estimated yearly operating cost of 10.65 cents per kWh. Cost Range of Similar Models 487 kWh Estimated Yearly Electricity Use Your...cost will depend on a 2007 national average electricity cost of this label before consumer purchase. Cost range based only on models of this model was not available at the time the range was published. PART NO. 242110223 For more information, visit www.ftc.gov...


