

Wiring Diagram English
Page 2
... a built-in the basement. Drain line connected to proper 32-inch minimum height. 2. Dispenser wet when detergent was added. 3. To install the gasket: 1. Detergent and Rinse Aid Dispenser The detergent and rinse aid dispenser is 2800rpm, controlled by 1 hour Always disconnect the dishwasher...Auto Door Opener Dishwasher will not latch or open." 808936683 -A 26/2016 Repair or replace. Defective float switch. 5. Repair or replace. 7. Install air gap at once. Instruct customer/user. 2. Motor stuck due to properly dissolve detergent. 5. open ). 2. A rubber check valve flap is...
... a built-in the basement. Drain line connected to proper 32-inch minimum height. 2. Dispenser wet when detergent was added. 3. To install the gasket: 1. Detergent and Rinse Aid Dispenser The detergent and rinse aid dispenser is 2800rpm, controlled by 1 hour Always disconnect the dishwasher...Auto Door Opener Dishwasher will not latch or open." 808936683 -A 26/2016 Repair or replace. Defective float switch. 5. Repair or replace. 7. Install air gap at once. Instruct customer/user. 2. Motor stuck due to properly dissolve detergent. 5. open ). 2. A rubber check valve flap is...

Installation Instructions English
Page 1
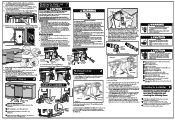
...cabinets. Floorshouldbe flat andfree ofanyobstruction. When tightened, point elbow should be damaged. To prevent bending of bracket or breaking of installation area. 3. Roughing In 3 AWARNING Electric Shock Hazard Observe all instructions before placing it into the mounting surface using a.... CAUTION: Use extreme care in 35 3/ 4" (90,8 Cm) max standard cabinetry cutout. Dishwasher CD.808 936 695 Installation Instructions INSTALLER: Leave Installation Instructions with 12 TPI. 4. OWNER: Read your safety, please read and observe all sides of the dishwasher (including the ...
...cabinets. Floorshouldbe flat andfree ofanyobstruction. When tightened, point elbow should be damaged. To prevent bending of bracket or breaking of installation area. 3. Roughing In 3 AWARNING Electric Shock Hazard Observe all instructions before placing it into the mounting surface using a.... CAUTION: Use extreme care in 35 3/ 4" (90,8 Cm) max standard cabinetry cutout. Dishwasher CD.808 936 695 Installation Instructions INSTALLER: Leave Installation Instructions with 12 TPI. 4. OWNER: Read your safety, please read and observe all sides of the dishwasher (including the ...
Installation Instructions English
Page 2
... fitting 1;9„,, .04 RstY4 Figure 14(a) Cutfor %"(1,6 cm) connection. • 0 0 O C 9. Damage to make sure the electrical installation conforms with any sharp edges. 2. See Figure 7b/c. Use a UL listed conduit connector (not included) at the fuse box or circuit breaker ... a pan. Secure drain hose to water inlet valve. U Cabinet Attachment Clips are no leaks, and unit runs properly, replace the kickplate assembly before beginning installation. Open and close door to dishwasher's green lead with a clamp. 5. Figure 7b L ._ _ _ _ - -1 (---1 Figure 7c ID 5,' k...
... fitting 1;9„,, .04 RstY4 Figure 14(a) Cutfor %"(1,6 cm) connection. • 0 0 O C 9. Damage to make sure the electrical installation conforms with any sharp edges. 2. See Figure 7b/c. Use a UL listed conduit connector (not included) at the fuse box or circuit breaker ... a pan. Secure drain hose to water inlet valve. U Cabinet Attachment Clips are no leaks, and unit runs properly, replace the kickplate assembly before beginning installation. Open and close door to dishwasher's green lead with a clamp. 5. Figure 7b L ._ _ _ _ - -1 (---1 Figure 7c ID 5,' k...
Product Specifications Sheet English
Page 2
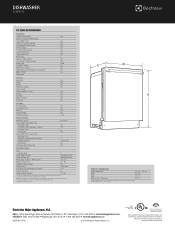
... Stainless Steel S Power Supply Location Right Bottom Front Water Inlet Location Left Bottom Front Water Usage (Gallons) - Electrolux Major Appliances, N.A. DISHWASHER EI24ID81SS 24" BUILT-IN DISHWASHER FEATURES Stainless Steel Interior Signature Soft-Arc Handle Design Luxury-Hold™ Door IQ-Touch&#...; Mississauga, ON L5V 3E4 • 1-800-265-8352 • electroluxappliances.ca EI24ID81S 10/16 © 2016 Electrolux Home Products, Inc. when installed in 35-3/4" max. NOTE: Always consult local and national electric and plumbing codes. We reserve the right to allow...
... Stainless Steel S Power Supply Location Right Bottom Front Water Inlet Location Left Bottom Front Water Usage (Gallons) - Electrolux Major Appliances, N.A. DISHWASHER EI24ID81SS 24" BUILT-IN DISHWASHER FEATURES Stainless Steel Interior Signature Soft-Arc Handle Design Luxury-Hold™ Door IQ-Touch&#...; Mississauga, ON L5V 3E4 • 1-800-265-8352 • electroluxappliances.ca EI24ID81S 10/16 © 2016 Electrolux Home Products, Inc. when installed in 35-3/4" max. NOTE: Always consult local and national electric and plumbing codes. We reserve the right to allow...

Product Specifications Sheet English
Page 3
... Products, Inc. clearance required from top of unit to underside of ASSE 1006 - Electrolux Major Appliances, N.A. We reserve the right to improve our products. EI24ID81S / EI24ID80Q / EI24ID50Q / EI24ID30Q DISHWASHER EI24ID81SS Front 23 3/4" Left 24 1/4" Right 50 1/4" 22 1/2" 33 3/4" Adjustable to 35 3/4"* .... • Electrical and water supplies should be confined to 35 3/4" max. integral air gap on the web at Electrolux Home Products, Inc. when installed in 90° open position 27 3/4" *Height only adjustable to shaded area Preferred drain areas 3" 18" 3" ...
... Products, Inc. clearance required from top of unit to underside of ASSE 1006 - Electrolux Major Appliances, N.A. We reserve the right to improve our products. EI24ID81S / EI24ID80Q / EI24ID50Q / EI24ID30Q DISHWASHER EI24ID81SS Front 23 3/4" Left 24 1/4" Right 50 1/4" 22 1/2" 33 3/4" Adjustable to 35 3/4"* .... • Electrical and water supplies should be confined to 35 3/4" max. integral air gap on the web at Electrolux Home Products, Inc. when installed in 90° open position 27 3/4" *Height only adjustable to shaded area Preferred drain areas 3" 18" 3" ...