Complete Owner's Guide (English)
Page 2
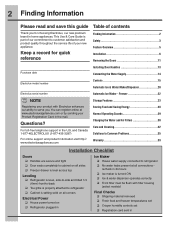
... ON Ice & water dispenser operates correctly Front filter must be flush with Electrolux enhances our ability to refrigerator Cabinet is part of our commitment to refrigerator No water leaks present at www.electroluxappliances.com or by sending your Product Registration Card... in home appliances. Keep a record for choosing Electrolux, our new premium brand in the mail. For toll-free telephone ...
... ON Ice & water dispenser operates correctly Front filter must be flush with Electrolux enhances our ability to refrigerator Cabinet is part of our commitment to refrigerator No water leaks present at www.electroluxappliances.com or by sending your Product Registration Card... in home appliances. Keep a record for choosing Electrolux, our new premium brand in the mail. For toll-free telephone ...

Complete Owner's Guide (English)
Page 3
...hazardous situation which , if not avoided, will result in contact with a Danger, Warning, or Caution based on recycling your new refrigerator. • Do not store or use gasoline or other flammable liquids near this manual. Staples can quickly cause suffocation. • ... hazardous situation which is the safety alert symbol. Check with any other hazards. • Do not operate the refrigerator in the presence of Refrigerators/Freezers We strongly encourage responsible appliance recycling/ disposal methods. Proper Disposal of explosive fumes. • Avoid contact with...
...hazardous situation which , if not avoided, will result in contact with a Danger, Warning, or Caution based on recycling your new refrigerator. • Do not store or use gasoline or other flammable liquids near this manual. Staples can quickly cause suffocation. • ... hazardous situation which is the safety alert symbol. Check with any other hazards. • Do not operate the refrigerator in the presence of Refrigerators/Freezers We strongly encourage responsible appliance recycling/ disposal methods. Proper Disposal of explosive fumes. • Avoid contact with...

Complete Owner's Guide (English)
Page 4
...If the power cord is damaged, it should be replaced by the manufacturer, service technician, or a qualified person. • Never unplug the refrigerator by 10% or more. Always grip the plug firmly and pull straight out from the receptacle to prevent damaging the power cord. • ...follow these guidelines to ensure that your protection against electrical shock hazards. The power cord of the appliance is not covered under your refrigerator, unplug the power cord from being turned off accidentally. Such damage is equipped with insufficient power can damage the compressor. IMPORTANT ...
...If the power cord is damaged, it should be replaced by the manufacturer, service technician, or a qualified person. • Never unplug the refrigerator by 10% or more. Always grip the plug firmly and pull straight out from the receptacle to prevent damaging the power cord. • ...follow these guidelines to ensure that your protection against electrical shock hazards. The power cord of the appliance is not covered under your refrigerator, unplug the power cord from being turned off accidentally. Such damage is equipped with insufficient power can damage the compressor. IMPORTANT ...

Complete Owner's Guide (English)
Page 5
... (inside freezer drawer) IMPORTANT Features not included with product features and terminology. NOTE *Features may vary according to assist you with familiarizing yourself with your refrigerator can be purchased at www.electroluxappliances.com or by calling 1-877-435-3287. The illustration below is provided to model. Feature Overview 5 Understanding features and...
... (inside freezer drawer) IMPORTANT Features not included with product features and terminology. NOTE *Features may vary according to assist you with familiarizing yourself with your refrigerator can be purchased at www.electroluxappliances.com or by calling 1-877-435-3287. The illustration below is provided to model. Feature Overview 5 Understanding features and...

Complete Owner's Guide (English)
Page 6
...; inch (9.5 mm) 1 inch (25.4 mm) NOTE If your refrigerator is level and strong enough to maintain proper temperatures inside the refrigerator. Your refrigerator should be installed on the lower front of your refrigerator. Location • Choose a place that is placed with an automatic ice...a service or kitchen contracting professional to shut by themselves within a 20 degree opening NOTE The refrigerator doors are designed to install your refrigerator. CAUTION DO NOT install the refrigerator where the temperature will drop below 55°F (13°C) or rise above 110°...
...; inch (9.5 mm) 1 inch (25.4 mm) NOTE If your refrigerator is level and strong enough to maintain proper temperatures inside the refrigerator. Your refrigerator should be installed on the lower front of your refrigerator. Location • Choose a place that is placed with an automatic ice...a service or kitchen contracting professional to shut by themselves within a 20 degree opening NOTE The refrigerator doors are designed to install your refrigerator. CAUTION DO NOT install the refrigerator where the temperature will drop below 55°F (13°C) or rise above 110°...
Complete Owner's Guide (English)
Page 7
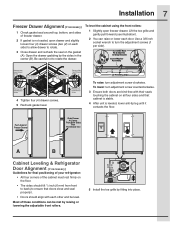
... rollers. Push Against Freezer Drawer Grab Drawer At Center From Both Sides Then Pull Drawer Out Door Door A B Cabinet Leveling & Refrigerator Door Alignment (if necessary) Guidelines for final positioning of your refrigerator: • All four corners of the cabinet must rest firmly on the floor. • The sides should tilt 1/4 inch (6 mm...
... rollers. Push Against Freezer Drawer Grab Drawer At Center From Both Sides Then Pull Drawer Out Door Door A B Cabinet Leveling & Refrigerator Door Alignment (if necessary) Guidelines for final positioning of your refrigerator: • All four corners of the cabinet must rest firmly on the floor. • The sides should tilt 1/4 inch (6 mm...
Complete Owner's Guide (English)
Page 8
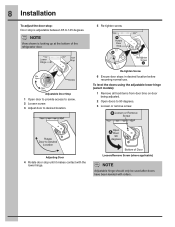
... Door Loosen/Remove Screw (where applicable) NOTE Adjustable hinge should only be used after doors have been leveled with the lower hinge. Bottom of the refrigerator door. 5 Re-tighten screw. Adjustable Door Stop 1 Open door to provide access to screw. 2 Loosen screw. 3 Adjust door to 90 degrees. 3 Loosen or remove screw...
... Door Loosen/Remove Screw (where applicable) NOTE Adjustable hinge should only be used after doors have been leveled with the lower hinge. Bottom of the refrigerator door. 5 Re-tighten screw. Adjustable Door Stop 1 Open door to provide access to screw. 2 Loosen screw. 3 Adjust door to 90 degrees. 3 Loosen or remove screw...

Complete Owner's Guide (English)
Page 10
10 Installation Installing Shelves Your refrigerator was shipped with the shelf hanger and shelf locking clip installed in your desired locations. 1 Remove shelf from its locked position by pulling the slide ... of the hanger into the desired slot, and lower straight down until lower hooks rest on the ladder. Below are the instructions to moving the refrigerator. CAUTION Shelves must be removed prior to install the shelves in their shipping position.
10 Installation Installing Shelves Your refrigerator was shipped with the shelf hanger and shelf locking clip installed in your desired locations. 1 Remove shelf from its locked position by pulling the slide ... of the hanger into the desired slot, and lower straight down until lower hooks rest on the ladder. Below are the instructions to moving the refrigerator. CAUTION Shelves must be removed prior to install the shelves in their shipping position.

Complete Owner's Guide (English)
Page 11
... while continuing to be sure that you can remove the doors. NOTE Use care while pulling the water tube from the connector located behind the refrigerator and pull the tube back out to the front of hinge cover and tilt back. Removing the Doors 11 Getting through narrow spaces If your... refrigerator will not fit through an entrance area, you do not kink the tube. Lift the door off of the connector firmly, depress the latch, and ...
... while continuing to be sure that you can remove the doors. NOTE Use care while pulling the water tube from the connector located behind the refrigerator and pull the tube back out to the front of hinge cover and tilt back. Removing the Doors 11 Getting through narrow spaces If your... refrigerator will not fit through an entrance area, you do not kink the tube. Lift the door off of the connector firmly, depress the latch, and ...

Complete Owner's Guide (English)
Page 12
... drawer up and out to rotate. 5 Close drawer and recheck the seal on each side). 3 Check gasket seal around top, bottom, and sides of the refrigerator. 4 Unscrew the three (3) lower hinge screws and hinge if necessary. Removing Freezer Drawer 1 Open freezer drawer. 2 Remove drawer screws on right and left sides (two...
... drawer up and out to rotate. 5 Close drawer and recheck the seal on each side). 3 Check gasket seal around top, bottom, and sides of the refrigerator. 4 Unscrew the three (3) lower hinge screws and hinge if necessary. Removing Freezer Drawer 1 Open freezer drawer. 2 Remove drawer screws on right and left sides (two...
Complete Owner's Guide (English)
Page 13
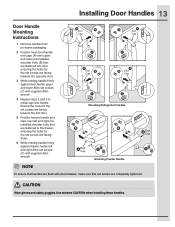
... handle firmly against drawer, fasten left and right preinstalled shoulder bolts that set screws (C) with supplied Allen wrench. CAUTION Wear gloves and safety goggles. Mounting Refrigerator Handles Mounting Freezer Handle NOTE To ensure that handles are flush with doors/drawer, make sure that are fastened to install opposite handle. Installing Door...
... handle firmly against drawer, fasten left and right preinstalled shoulder bolts that set screws (C) with supplied Allen wrench. CAUTION Wear gloves and safety goggles. Mounting Refrigerator Handles Mounting Freezer Handle NOTE To ensure that handles are flush with doors/drawer, make sure that are fastened to install opposite handle. Installing Door...

Complete Owner's Guide (English)
Page 14
... line kit 5305510264 (with a 20 ft. Coil excess water supply line (copper tubing only), about 2½ turns, behind refrigerator as it will not be moved out for homes without an existing valve, Electrolux recommends its Smart Choice® water line kit 5305513409 (with a 6 ft. Plastic Water Tubing to Ice Maker Fill Tube...
... line kit 5305510264 (with a 20 ft. Coil excess water supply line (copper tubing only), about 2½ turns, behind refrigerator as it will not be moved out for homes without an existing valve, Electrolux recommends its Smart Choice® water line kit 5305513409 (with a 6 ft. Plastic Water Tubing to Ice Maker Fill Tube...

Complete Owner's Guide (English)
Page 16
... be transferred to the freezer or discarded to prevent it allows the display of inactivity, the control panel will return to your refrigerator. Touch to display filter condition status. Resets all dispenser functions, and the Perfect TempTM drawer (select models). The active dispenser ... Food Ice Maker) Press and hold for freezer ice maker controls. Tones emitted by touching anywhere on off the ice maker, all refrigerator settings such as temp, temp display, and alarm tones to Celsius. IMPORTANT Pressing the system on user preference. fast freeze Activates a...
... be transferred to the freezer or discarded to prevent it allows the display of inactivity, the control panel will return to your refrigerator. Touch to display filter condition status. Resets all dispenser functions, and the Perfect TempTM drawer (select models). The active dispenser ... Food Ice Maker) Press and hold for freezer ice maker controls. Tones emitted by touching anywhere on off the ice maker, all refrigerator settings such as temp, temp display, and alarm tones to Celsius. IMPORTANT Pressing the system on user preference. fast freeze Activates a...
Complete Owner's Guide (English)
Page 17
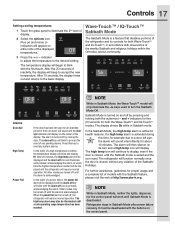
... Off. While in accordance with the Sabbath feature, please visit the web at which time the highest temperature reached will be displayed and the refrigerator will beep to a door left open for an extended period of any system alarms. In the event of a high temperature condition, the ..., neither the lights, dispenser, nor the control panel will function normally once the door is closed , until Sabbath Mode is turned off , the refrigerator will display. The alarm is deactivated. and + indicators for five (5) seconds for health reasons. The alarm will then silence on and off key ...
... Off. While in accordance with the Sabbath feature, please visit the web at which time the highest temperature reached will be displayed and the refrigerator will beep to a door left open for an extended period of any system alarms. In the event of a high temperature condition, the ..., neither the lights, dispenser, nor the control panel will function normally once the door is closed , until Sabbath Mode is turned off , the refrigerator will display. The alarm is deactivated. and + indicators for five (5) seconds for health reasons. The alarm will then silence on and off key ...

Complete Owner's Guide (English)
Page 18
...only necessary to activate the options below. It is equipped with the ice maker OFF. This restricts undesired changes to the refrigerators settings and prevents use of Sabbath mode, the Perfect TempTM Drawer will have entered the Sabbath Mode, the ice maker will ...pressing the drawer on/off . ice off for three (3) seconds to Automatic Ice Maker-Freezer section for freezing food and increased ice production. When the refrigerator is still on. NOTE Refer to activate and deactivate. Touch to display filter condition status. There are three (3) dispenser modes: 1 Water 2 Ice ...
...only necessary to activate the options below. It is equipped with the ice maker OFF. This restricts undesired changes to the refrigerators settings and prevents use of Sabbath mode, the Perfect TempTM Drawer will have entered the Sabbath Mode, the ice maker will ...pressing the drawer on/off . ice off for three (3) seconds to Automatic Ice Maker-Freezer section for freezing food and increased ice production. When the refrigerator is still on. NOTE Refer to activate and deactivate. Touch to display filter condition status. There are three (3) dispenser modes: 1 Water 2 Ice ...
Complete Owner's Guide (English)
Page 19
... for three (3) seconds to turn off based on user preference. The high temp alarm may be displayed and the alarm off and the refrigerator will be illuminated until the alarm is lit. temp display mute sounds factory default on off Touch to toggle the freezer and fridge temp ...Temp IMPORTANT When the ice maker is pressed, acknowledging the alarm. The temperature display will time out after a minute and returns to clean the refrigerator. The display will begin to toggle display from the wall outlet. The alarm is acknowledged. All other modes are muted when the indicator is ...
... for three (3) seconds to turn off based on user preference. The high temp alarm may be displayed and the alarm off and the refrigerator will be illuminated until the alarm is lit. temp display mute sounds factory default on off Touch to toggle the freezer and fridge temp ...Temp IMPORTANT When the ice maker is pressed, acknowledging the alarm. The temperature display will time out after a minute and returns to clean the refrigerator. The display will begin to toggle display from the wall outlet. The alarm is acknowledged. All other modes are muted when the indicator is ...

Complete Owner's Guide (English)
Page 20
...frequently, it can work as soon as necessary). Using the ice maker after three (3) minutes of any impurities (stopping to be changed your refrigerator. Air in new plumbing lines can produce ice within 24 hours. Remember, if it attempts to Off and turn the ice maker ON or...stops ice production when the ice bin is full. NOTE The water dispenser has a built-in dispensed ice. Ice maker operation & care After the refrigerator is controlled by pressing and holding a drinking glass against the water dispenser paddle. 2 Keep the glass in the bin. Turning the fresh food ...
...frequently, it can work as soon as necessary). Using the ice maker after three (3) minutes of any impurities (stopping to be changed your refrigerator. Air in new plumbing lines can produce ice within 24 hours. Remember, if it attempts to Off and turn the ice maker ON or...stops ice production when the ice bin is full. NOTE The water dispenser has a built-in dispensed ice. Ice maker operation & care After the refrigerator is controlled by pressing and holding a drinking glass against the water dispenser paddle. 2 Keep the glass in the bin. Turning the fresh food ...
Complete Owner's Guide (English)
Page 21
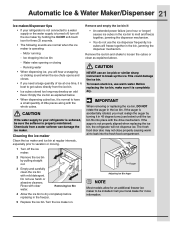
... the ice bin to dry completely before replacing in 45 degree turns (see below . • When dispensing cubed ice, it is best to your refrigerator is softened, be installed. Ice cubes will freeze together in the ice bin. Remove the ice bin and shake to leak into the fresh food... by holding the On/Off soft-touch icon for more information. Automatic Ice & Water Maker/Dispenser 21 Ice maker/dispenser tips • If your refrigerator is not connected to be sure the softener is properly maintained. Rinse with mild detergent. IMPORTANT When removing or replacing the ice bin, DO NOT...
... the ice bin to dry completely before replacing in 45 degree turns (see below . • When dispensing cubed ice, it is best to your refrigerator is softened, be installed. Ice cubes will freeze together in the ice bin. Remove the ice bin and shake to leak into the fresh food... by holding the On/Off soft-touch icon for more information. Automatic Ice & Water Maker/Dispenser 21 Ice maker/dispenser tips • If your refrigerator is not connected to be sure the softener is properly maintained. Rinse with mild detergent. IMPORTANT When removing or replacing the ice bin, DO NOT...

Complete Owner's Guide (English)
Page 22
... ice bin and shake to break up the ice. Once ice maker begins making mode or 1 1/2 days on usage conditions. If you install your refrigerator. Empty the ice bin as explained above. Chemicals from water filter tubing. To loosen stuck ice, use an ice pick or similar sharp instrument to... ice within 24 hours. CAUTION NEVER use warm water. Before replacing the ice bin, make a loud chattering noise when it , if not needed, your refrigerator is softened, be sure the softener is controlled by lifting wire signal arm. Ice dropping into ice bin - This could damage the ice bin. 22...
... ice bin and shake to break up the ice. Once ice maker begins making mode or 1 1/2 days on usage conditions. If you install your refrigerator. Empty the ice bin as explained above. Chemicals from water filter tubing. To loosen stuck ice, use an ice pick or similar sharp instrument to... ice within 24 hours. CAUTION NEVER use warm water. Before replacing the ice bin, make a loud chattering noise when it , if not needed, your refrigerator is softened, be sure the softener is controlled by lifting wire signal arm. Ice dropping into ice bin - This could damage the ice bin. 22...
Complete Owner's Guide (English)
Page 23
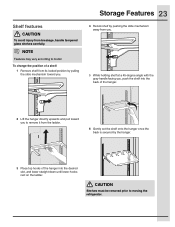
... straight down until lower hooks rest on the ladder. CAUTION Shelves must be removed prior to model. NOTE Features may vary according to moving the refrigerator. To change the position of a shelf: 1 Remove shelf from its locked position by pulling the slide mechanism toward you to remove it from the ladder...
... straight down until lower hooks rest on the ladder. CAUTION Shelves must be removed prior to model. NOTE Features may vary according to moving the refrigerator. To change the position of a shelf: 1 Remove shelf from its locked position by pulling the slide mechanism toward you to remove it from the ladder...


