
Use and Care Guide
Page 2
...Doors [] Handles are secure and tight rq Door seals completely to cabinet on all sides [] Freezer door is level across the top Leveling [] Refrigerator is level, side-to-side and tilted 1/4" (Cmm) front-to-back 13 Toe grille is properly attached to serve you for quick installation ... card sent in 24 hours [] Ice maker is turned ON [] Ice & water dispenser operates correctly [] Front filter must be flush with Electrolux enhances our ability to refrigerator [] Cabinet is setting solid on all connections - You can register online at all corners Electrical Power 83 House power turned on...
...Doors [] Handles are secure and tight rq Door seals completely to cabinet on all sides [] Freezer door is level across the top Leveling [] Refrigerator is level, side-to-side and tilted 1/4" (Cmm) front-to-back 13 Toe grille is properly attached to serve you for quick installation ... card sent in 24 hours [] Ice maker is turned ON [] Ice & water dispenser operates correctly [] Front filter must be flush with Electrolux enhances our ability to refrigerator [] Cabinet is setting solid on all connections - You can register online at all corners Electrical Power 83 House power turned on...

Use and Care Guide
Page 3
...the risk type. Whether junked, abandoned, or temporarily stored (even for 'warnings regarding flammability and other appliances or furniture. Have refrigerant and compressor oil removed by a qualified service technician. Definitions _This is u npacked. It is important but not hazard-related. ...to avoid possible injury or death. Destroy or recycle the product's carton, plastic bags, and any moving parts of your old refrigerator/ freezer: o Remove the doors. Staples can quickly cause suffocation. Please take the precautions listed below. IMPORTANT Indicates installation, operation,...
...the risk type. Whether junked, abandoned, or temporarily stored (even for 'warnings regarding flammability and other appliances or furniture. Have refrigerant and compressor oil removed by a qualified service technician. Definitions _This is u npacked. It is important but not hazard-related. ...to avoid possible injury or death. Destroy or recycle the product's carton, plastic bags, and any moving parts of your old refrigerator/ freezer: o Remove the doors. Staples can quickly cause suffocation. Please take the precautions listed below. IMPORTANT Indicates installation, operation,...

Use and Care Guide
Page 4
... cord of the appliance is damaged, it should be replaced by the manufacturer, service technician, or a qualified person. • Never unplug the refrigerator by pulling on the power cord. o Performance may be affected if the voltage varies by a walt switch or pull cord to prevent the...the plug firmly and pull straight out from being turned off power to prevent damaging the power cord. • To avoid electrical shock, unplug the refrigerator before cleaning and before replacing a light bulb or LED light. It must be plugged into a properly grounded three-prong receptacle. o If the ...
... cord of the appliance is damaged, it should be replaced by the manufacturer, service technician, or a qualified person. • Never unplug the refrigerator by pulling on the power cord. o Performance may be affected if the voltage varies by a walt switch or pull cord to prevent the...the plug firmly and pull straight out from being turned off power to prevent damaging the power cord. • To avoid electrical shock, unplug the refrigerator before cleaning and before replacing a light bulb or LED light. It must be plugged into a properly grounded three-prong receptacle. o If the ...

Use and Care Guide
Page 5
... is provided to assist you with familiarizing yourself with humidity slides) Freezer Baskets (top basket select models only) _---- Feature Overview 5 Understanding features and terms Your Electrolux refrigerator is shown without freezer drawer cover. Toe Grille I1_: 'b, Wire Tilt-Out Shelf (inside PTD) (select models) LED Light (select models) Water Filter Adjustable Hinges...
... is provided to assist you with familiarizing yourself with humidity slides) Freezer Baskets (top basket select models only) _---- Feature Overview 5 Understanding features and terms Your Electrolux refrigerator is shown without freezer drawer cover. Toe Grille I1_: 'b, Wire Tilt-Out Shelf (inside PTD) (select models) LED Light (select models) Water Filter Adjustable Hinges...

Use and Care Guide
Page 6
... CoTovperHFi_ro_ _ToP Ht_ Screw _ _ 8c_ &!8" Fb¢_::l Wrench This Use & Care Guide provides general installation and operating instructionsfor your refrigerator. e The cabinet should be installed on the lower front of these important first steps. 6 installation Required Tools You will drop below... 55°F (13°O) or rise above 110°F (43°C). NOTE If your refrigerator. Do Not use of installation, proper air circulation, and plumbing and electrical connections: Sides & Top Back ¾ inch (9.5 mm) 1 ...
... CoTovperHFi_ro_ _ToP Ht_ Screw _ _ 8c_ &!8" Fb¢_::l Wrench This Use & Care Guide provides general installation and operating instructionsfor your refrigerator. e The cabinet should be installed on the lower front of these important first steps. 6 installation Required Tools You will drop below... 55°F (13°O) or rise above 110°F (43°C). NOTE If your refrigerator. Do Not use of installation, proper air circulation, and plumbing and electrical connections: Sides & Top Back ¾ inch (9.5 mm) 1 ...

Use and Care Guide
Page 7
...-blade screwdriver or %-inch socket wrench to raise or lower the front rollers, 4 Ensure both doors are bind-free with the floor to level the refrigerator. 6 Replace the toe grille by fitting it contacts the floor, 3 Close the drawer and use the anti-tip leg to keep the...
...-blade screwdriver or %-inch socket wrench to raise or lower the front rollers, 4 Ensure both doors are bind-free with the floor to level the refrigerator. 6 Replace the toe grille by fitting it contacts the floor, 3 Close the drawer and use the anti-tip leg to keep the...

Use and Care Guide
Page 8
.... 3 Adjust door to 145 degrees. Adjusting Door Rotate door stop is looking up at the bottom of Door Loosen/Remove Set Screw Bottom of the refrigerator door, 5 Re-tighten set screw. NOTE View shown is adjustable between 85 to desired location, Set Screw e Re-tighten Set Screw 6 Ensure door stops in...
.... 3 Adjust door to 145 degrees. Adjusting Door Rotate door stop is looking up at the bottom of Door Loosen/Remove Set Screw Bottom of the refrigerator door, 5 Re-tighten set screw. NOTE View shown is adjustable between 85 to desired location, Set Screw e Re-tighten Set Screw 6 Ensure door stops in...

Use and Care Guide
Page 10
... shelves and close the doors, To remove the top hinge covers: 1 Remove the two (2) screws from the connector located behind the refrigerator and pull the tube back out to the front of hinge cover and tilt back. Detach the water tube from each cover over the...v_ I I scr_ jzF'--....f I "%_b _"-. Remove the two (2) screws from hinge. To remove the refrigerator doors: 1 Trace tightly around the door's top hinges with a pencil. Removing e Doors Getting through narrow spaces if your refrigerator will not fit through an entrance area, you press inward on the outer sleeve while pushing...
... shelves and close the doors, To remove the top hinge covers: 1 Remove the two (2) screws from the connector located behind the refrigerator and pull the tube back out to the front of hinge cover and tilt back. Detach the water tube from each cover over the...v_ I I scr_ jzF'--....f I "%_b _"-. Remove the two (2) screws from hinge. To remove the refrigerator doors: 1 Trace tightly around the door's top hinges with a pencil. Removing e Doors Getting through narrow spaces if your refrigerator will not fit through an entrance area, you press inward on the outer sleeve while pushing...

Use and Care Guide
Page 11
... and left sides (two (2) screws on drawer screws if necessary. L Once both doors are in place, ensure they are set aside in reverse of the refrigerator. 4 Unscrew the three (3) lower hinge screws and hinge if necessary. This is heavy. CAUTION Drawer is a factory adjustment, Installing Freezer Drawer 1 With lower slides and...
... and left sides (two (2) screws on drawer screws if necessary. L Once both doors are in place, ensure they are set aside in reverse of the refrigerator. 4 Unscrew the three (3) lower hinge screws and hinge if necessary. This is heavy. CAUTION Drawer is a factory adjustment, Installing Freezer Drawer 1 With lower slides and...
Use and Care Guide
Page 12
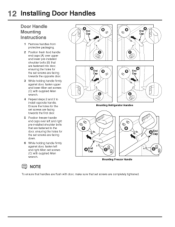
... screws are facing towards the first door. 5 Position freezer handle end caps over left and right Allen set screws (C) with supplied Allen wrench, NOTE Mounting Refrigerator Handles oEnd Cap Mounting Freezer Handle To ensure that handles are flush with supplied Allen wrench, 4 Repeat steps 2 and 3 to the door, ensuring the holes...
... screws are facing towards the first door. 5 Position freezer handle end caps over left and right Allen set screws (C) with supplied Allen wrench, NOTE Mounting Refrigerator Handles oEnd Cap Mounting Freezer Handle To ensure that handles are flush with supplied Allen wrench, 4 Repeat steps 2 and 3 to the door, ensuring the holes...
Use and Care Guide
Page 13
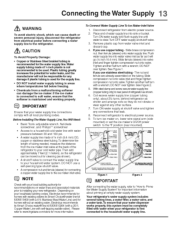
...DO NOT use copper tubing - NOTE Check with a 20 ft. Stainless Steel Water Line) and for homes without an existing valve, Electrolux recommends its Smart Choice@water line kit 5305513409 (with a 6 ft. Disconnect refrigerator from water valve inlet and discard cap. 4. Place end of... rear panelof refrigerabras shovm. 6. Tighten another half turn with water when your local/state building codes, Electrolux recommends for the water supply line. See Figure 1. Your refrigerator's water supply system includes several tubing lines, a water filter, a water valve, and a water tank_...
...DO NOT use copper tubing - NOTE Check with a 20 ft. Stainless Steel Water Line) and for homes without an existing valve, Electrolux recommends its Smart Choice@water line kit 5305513409 (with a 6 ft. Disconnect refrigerator from water valve inlet and discard cap. 4. Place end of... rear panelof refrigerabras shovm. 6. Tighten another half turn with water when your local/state building codes, Electrolux recommends for the water supply line. See Figure 1. Your refrigerator's water supply system includes several tubing lines, a water filter, a water valve, and a water tank_...

Use and Care Guide
Page 15
...The sounds are muted when the red indicator is lit. Press and hold for three (3) seconds to turn off power to your refrigerator. It also turns off Touchto toggledisplayfrom Fahrenhetiot Celsius. Thetemperature display will return to the Sleep mode. Neither "CUBES"nor "CRUSHED"will ..., and alarm tones to display filter condition status. matically activated during "Sleep Mode". Press and hold for three (3) seconds to the refrigerator's settings and prevents use of display. 1_tLevel: Sleep Mode IMPORTANT When the ice maker is auto- Touch to activate the desired dispenser ...
...The sounds are muted when the red indicator is lit. Press and hold for three (3) seconds to turn off power to your refrigerator. It also turns off Touchto toggledisplayfrom Fahrenhetiot Celsius. Thetemperature display will return to the Sleep mode. Neither "CUBES"nor "CRUSHED"will ..., and alarm tones to display filter condition status. matically activated during "Sleep Mode". Press and hold for three (3) seconds to the refrigerator's settings and prevents use of display. 1_tLevel: Sleep Mode IMPORTANT When the ice maker is auto- Touch to activate the desired dispenser ...

Use and Care Guide
Page 16
...TM model will resume normal operation. In the Sabbath Mode, the High Temp alarm is turned ON and OFF by closing the door. Refrigerator stays in Sabbath mode. G Contro Setting cooling temperatures Touch the glass panel to illuminate the 2ndlevel of the weekly Sabbath and religious ...emp alert will be deactivated with the Sabbath feature, please visit the web at which time the highest temperature reachedwill be turned off , the refrigerator will only illuminate the -/+ keys used to prompt the reset of any pending alarms. Pressthis keyto reset any violation of a power failure, ...
...TM model will resume normal operation. In the Sabbath Mode, the High Temp alarm is turned ON and OFF by closing the door. Refrigerator stays in Sabbath mode. G Contro Setting cooling temperatures Touch the glass panel to illuminate the 2ndlevel of the weekly Sabbath and religious ...emp alert will be deactivated with the Sabbath feature, please visit the web at which time the highest temperature reachedwill be turned off , the refrigerator will only illuminate the -/+ keys used to prompt the reset of any pending alarms. Pressthis keyto reset any violation of a power failure, ...

Use and Care Guide
Page 17
...betweenautomatic defrost. This feature is lit. Touchto dispaayfilter status. Pressand hold for the Sabbath/Holidays. Then enter the Sabbath mode function on the main refrigerator display. There are three (3) dispenser modes: 1 Water 2 Ice Cubes 3 Crushed Ice A red indicator light will show that it is still...feature. Touch the icon to gently touch the glass. if there is equipped with a Glass Touch control panel. Before putting the refrigerator into Sabbath Mode, it had already initiated. When in this mode. NOTE If the Perfect Temp TM Drawer is taken out of...
...betweenautomatic defrost. This feature is lit. Touchto dispaayfilter status. Pressand hold for the Sabbath/Holidays. Then enter the Sabbath mode function on the main refrigerator display. There are three (3) dispenser modes: 1 Water 2 Ice Cubes 3 Crushed Ice A red indicator light will show that it is still...feature. Touch the icon to gently touch the glass. if there is equipped with a Glass Touch control panel. Before putting the refrigerator into Sabbath Mode, it had already initiated. When in this mode. NOTE If the Perfect Temp TM Drawer is taken out of...

Use and Care Guide
Page 18
... blink with the first touch, The display will illuminate until the alarm is acknowledged. The highletup alarm may be displayedand the refrigerator will be illuminateduntil a safe operatingrange temperaturehas been reached. The mute sounds keywill blinkto prompt the reset of the temperatures displays.... temperature reachedwill be turned off until the mute soundsiconis pressed,acknowledging the alarm. Setting cooling temperatures Touch the control panel to your refrigerator, You must unplug the power cord from melting. Press the + or- In the eventof a power failure, the power fail...
... blink with the first touch, The display will illuminate until the alarm is acknowledged. The highletup alarm may be displayedand the refrigerator will be illuminateduntil a safe operatingrange temperaturehas been reached. The mute sounds keywill blinkto prompt the reset of the temperatures displays.... temperature reachedwill be turned off until the mute soundsiconis pressed,acknowledging the alarm. Setting cooling temperatures Touch the control panel to your refrigerator, You must unplug the power cord from melting. Press the + or- In the eventof a power failure, the power fail...

Use and Care Guide
Page 19
... loud chattering noise when it attempts to operate without water. Keep the glass in about eight (8) hours. Ice maker operation & care After the refrigerator is delivered to the ice maker during each cycle. Continue dispensing water for three (3) seconds to turn off Ice production is full. If you .... Furthermore, if the system is "OFF" the red LED above the icon will disable the ice dispenser. You wilt still be changed your refrigerator. If you last changed more frequently, it may be discolored or have an odd flavor. Press and hold the "Ice Off" icon for ...
... loud chattering noise when it attempts to operate without water. Keep the glass in about eight (8) hours. Ice maker operation & care After the refrigerator is delivered to the ice maker during each cycle. Continue dispensing water for three (3) seconds to turn off Ice production is full. If you .... Furthermore, if the system is "OFF" the red LED above the icon will disable the ice dispenser. You wilt still be changed your refrigerator. If you last changed more frequently, it may be discolored or have an odd flavor. Press and hold the "Ice Off" icon for ...
Use and Care Guide
Page 20
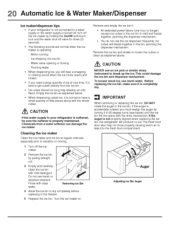
...air to melt and freeze together, jamming the dispenser mechanism. • You do not use an ice pick or similar sharp instrument to your refrigerator is not connected to loosen the cubes or clean as explained below ) until the ice bin fits into the fresh food compartment. If the auger... is not properly aligned when replacing the ice bin, the refrigerator will hear a snapping or clicking sound when the ice chute opens and closes. CAUTION if the water supply to break up the ice.This could...
...air to melt and freeze together, jamming the dispenser mechanism. • You do not use an ice pick or similar sharp instrument to your refrigerator is not connected to loosen the cubes or clean as explained below ) until the ice bin fits into the fresh food compartment. If the auger... is not properly aligned when replacing the ice bin, the refrigerator will hear a snapping or clicking sound when the ice chute opens and closes. CAUTION if the water supply to break up the ice.This could...
Use and Care Guide
Page 21
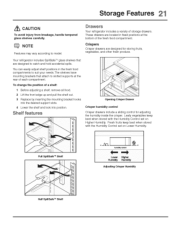
... Opening Crisper Drawer Crisper humidity control Crisper drawers include a sliding control for storing fruits, vegetables, and other fresh produce. Your refrigerator includes SpiltSafe TM glass shelves that attach to catch and hold accidental spills. Leafy vegetables keep best when stored with the Humidity ...adjust shelf positions in fixed positions at the rear of the fresh food compartment. NOTE Features may vary according to suit your needs. Your refrigerator includes a variety of a shelf: 1 Before adjusting a shelf, remove all food. 2 Lift the front edge up and pull the shelf...
... Opening Crisper Drawer Crisper humidity control Crisper drawers include a sliding control for storing fruits, vegetables, and other fresh produce. Your refrigerator includes SpiltSafe TM glass shelves that attach to catch and hold accidental spills. Leafy vegetables keep best when stored with the Humidity ...adjust shelf positions in fixed positions at the rear of the fresh food compartment. NOTE Features may vary according to suit your needs. Your refrigerator includes a variety of a shelf: 1 Before adjusting a shelf, remove all food. 2 Lift the front edge up and pull the shelf...

Use and Care Guide
Page 22
... will show a temperature between _28 o F and 42 o F_ when on and off , the Perfect Temp TM Drawer functions as the fresh food section of the refrigerator. 22 Storage Features To remove the Crisper Drawer for cleaning: 1 Pull the drawer out until it to a higher humidity. The Perfect Temp TM Drawer is selected...
... will show a temperature between _28 o F and 42 o F_ when on and off , the Perfect Temp TM Drawer functions as the fresh food section of the refrigerator. 22 Storage Features To remove the Crisper Drawer for cleaning: 1 Pull the drawer out until it to a higher humidity. The Perfect Temp TM Drawer is selected...

Use and Care Guide
Page 23
...for cleaning but the control unit, attached to your fresh food compartment use a system of modular storage bins. Removing the Drawer NOTE When the refrigerator is turned back on, the Perfect Temp TM Drawer will also be removed. Wipe clean with a damp cloth or sponge. To install insert... the ends of the retainer into the holes. DOORS Storage bins The doors to eight 12-ounce canned beverages. When the refrigerator is turned off . All of these bins are ideal for easy cleaning. Door bins are removable for storing jars, bottles cans, and large...
...for cleaning but the control unit, attached to your fresh food compartment use a system of modular storage bins. Removing the Drawer NOTE When the refrigerator is turned back on, the Perfect Temp TM Drawer will also be removed. Wipe clean with a damp cloth or sponge. To install insert... the ends of the retainer into the holes. DOORS Storage bins The doors to eight 12-ounce canned beverages. When the refrigerator is turned off . All of these bins are ideal for easy cleaning. Door bins are removable for storing jars, bottles cans, and large...


