Complete Owner's Guide (English)
Page 2
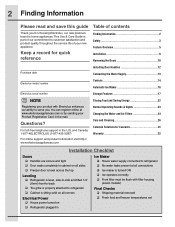
...-435-3287) For online support and product information visit http:// www.electroluxappliances.com Storage Features 17 Storing Food and Saving Energy 22 Normal Operating Sounds & Sights 23 Changing the Water and Air Filters 24 Care and Cleaning 26 Common Solutions for Concerns 29 Warranty ... supply connected to refrigerator No water leaks present at www.electroluxappliances.com or by sending your Product Registration Card in the mail. This Use & Care Guide is turned ON Ice operates correctly Front filter must be flush with Electrolux enhances our ability ...
...-435-3287) For online support and product information visit http:// www.electroluxappliances.com Storage Features 17 Storing Food and Saving Energy 22 Normal Operating Sounds & Sights 23 Changing the Water and Air Filters 24 Care and Cleaning 26 Common Solutions for Concerns 29 Warranty ... supply connected to refrigerator No water leaks present at www.electroluxappliances.com or by sending your Product Registration Card in the mail. This Use & Care Guide is turned ON Ice operates correctly Front filter must be flush with Electrolux enhances our ability ...
Complete Owner's Guide (English)
Page 3
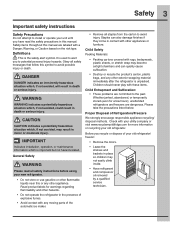
...may result in minor or moderate injury. Read product labels for warnings regarding flammability and other hazards. • Do not operate the refrigerator in death or serious injury. Whether junked, abandoned, or temporarily stored (even for more information on the risk type. Safety 3... Important safety instructions Safety Precautions Do not attempt to install or operate your old refrigerator. Obey all safety messages that follow this manual. CAUTION CAUTION indicates a potentially hazardous situation which , if not avoided, could ...
...may result in minor or moderate injury. Read product labels for warnings regarding flammability and other hazards. • Do not operate the refrigerator in death or serious injury. Whether junked, abandoned, or temporarily stored (even for more information on the risk type. Safety 3... Important safety instructions Safety Precautions Do not attempt to install or operate your old refrigerator. Obey all safety messages that follow this manual. CAUTION CAUTION indicates a potentially hazardous situation which , if not avoided, could ...

Complete Owner's Guide (English)
Page 4
...use an extension cord or adapter plug. • If the power cord is not covered under your protection against electrical shock hazards. Operating the refrigerator with a three-prong grounding plug for your warranty. • Do not plug the unit into a properly grounded three-prong receptacle. 4 ...Safety Electrical information WARNING You must follow these guidelines to ensure that your refrigerator, unplug the power cord from the wall outlet. The receptacle must be plugged into its own dedicated 115 Volt, 60 Hz, AC-only...
...use an extension cord or adapter plug. • If the power cord is not covered under your protection against electrical shock hazards. Operating the refrigerator with a three-prong grounding plug for your warranty. • Do not plug the unit into a properly grounded three-prong receptacle. 4 ...Safety Electrical information WARNING You must follow these guidelines to ensure that your refrigerator, unplug the power cord from the wall outlet. The receptacle must be plugged into its own dedicated 115 Volt, 60 Hz, AC-only...
Complete Owner's Guide (English)
Page 5
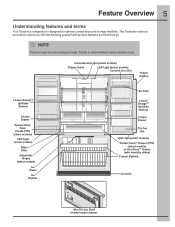
Feature Overview 5 Understanding features and terms Your Electrolux refrigerator is shown without freezer drawer cover. NOTE Features may vary according to assist you with familiarizing yourself with humidity slides) Freezer Baskets Toe Grille Wire ...
Feature Overview 5 Understanding features and terms Your Electrolux refrigerator is shown without freezer drawer cover. NOTE Features may vary according to assist you with familiarizing yourself with humidity slides) Freezer Baskets Toe Grille Wire ...
Complete Owner's Guide (English)
Page 6
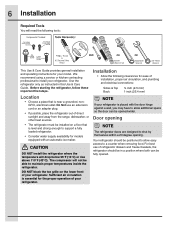
... grille on a floor that is essential for the proper operation of your refrigerator. Do Not use of refrigerator drawers and freezer baskets, the refrigerator should be able to maintain proper temperatures inside the refrigerator. Your refrigerator should be in this Use & Care Guide. We recommend using a service...when removing food. Door opening . The compressor will not be positioned to shut by themselves within a 20 degree opening NOTE The refrigerator doors are designed to allow additional space so the door can be fully opened wider. For best use an extension cord or an...
... grille on a floor that is essential for the proper operation of your refrigerator. Do Not use of refrigerator drawers and freezer baskets, the refrigerator should be able to maintain proper temperatures inside the refrigerator. Your refrigerator should be in this Use & Care Guide. We recommend using a service...when removing food. Door opening . The compressor will not be positioned to shut by themselves within a 20 degree opening NOTE The refrigerator doors are designed to allow additional space so the door can be fully opened wider. For best use an extension cord or an...
Complete Owner's Guide (English)
Page 7
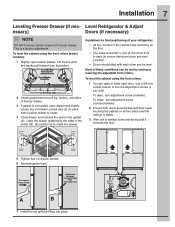
...Door Door Anti-tip Leg Raise Lower This is leveled, lower anti-tip leg until it contacts the floor. Guidelines for final positioning of your refrigerator: • All four corners of freezer drawer. 3 If gasket is not sealed, open freezer drawer. Installation 7 Leveling Freezer Drawer (if ...(two (2) on all four sides and that doors close and seal properly). • Doors should tilt 1/4 inch (6 mm) from freezer drawer. Level Refrigerator & Adjust essary) Doors (if necessary) NOTE DO NOT remove center screw from front to back (to turn the adjustment screws (1 per side). Push ...
...Door Door Anti-tip Leg Raise Lower This is leveled, lower anti-tip leg until it contacts the floor. Guidelines for final positioning of your refrigerator: • All four corners of freezer drawer. 3 If gasket is not sealed, open freezer drawer. Installation 7 Leveling Freezer Drawer (if ...(two (2) on all four sides and that doors close and seal properly). • Doors should tilt 1/4 inch (6 mm) from freezer drawer. Level Refrigerator & Adjust essary) Doors (if necessary) NOTE DO NOT remove center screw from front to back (to turn the adjustment screws (1 per side). Push ...

Complete Owner's Guide (English)
Page 8
... bottom of Door Loosen/Remove Screw NOTE Adjustable hinge should only be used after doors have been leveled with the lower hinge. Bottom of the refrigerator door. 5 Re-tighten screw. 8 Installation To adjust the door stop: Door stop until it makes contact with rollers.
... bottom of Door Loosen/Remove Screw NOTE Adjustable hinge should only be used after doors have been leveled with the lower hinge. Bottom of the refrigerator door. 5 Re-tighten screw. 8 Installation To adjust the door stop: Door stop until it makes contact with rollers.

Complete Owner's Guide (English)
Page 10
... the harness by measuring the entrance. Remove the two (2) screws from hinge. CAUTION Be sure doors are aligned with a pencil. To remove the refrigerator doors: 1 Trace lightly around the door's top hinges with each cover over the top door hinges. 2 Lift inside edge of the connector firmly,... depress the latch, and pull apart. 10 Removing the Doors Getting through narrow spaces If your refrigerator will not fit through an entrance area, you can remove the doors. This makes reinstallation easier. To remove the top hinge covers: 1 ...
... the harness by measuring the entrance. Remove the two (2) screws from hinge. CAUTION Be sure doors are aligned with a pencil. To remove the refrigerator doors: 1 Trace lightly around the door's top hinges with each cover over the top door hinges. 2 Lift inside edge of the connector firmly,... depress the latch, and pull apart. 10 Removing the Doors Getting through narrow spaces If your refrigerator will not fit through an entrance area, you can remove the doors. This makes reinstallation easier. To remove the top hinge covers: 1 ...

Complete Owner's Guide (English)
Page 12
... Mounting Instructions 1 Remove handles from protective packaging. 2 Position fresh food handle end caps (A) over left and right Allen set screws (C) with supplied Allen wrench. Mounting Refrigerator Handles Mounting Freezer Handle NOTE To ensure that handles are facing down. 6 While holding handle firmly against drawer, fasten left and right preinstalled shoulder bolts...
... Mounting Instructions 1 Remove handles from protective packaging. 2 Position fresh food handle end caps (A) over left and right Allen set screws (C) with supplied Allen wrench. Mounting Refrigerator Handles Mounting Freezer Handle NOTE To ensure that handles are facing down. 6 While holding handle firmly against drawer, fasten left and right preinstalled shoulder bolts...
Complete Owner's Guide (English)
Page 13
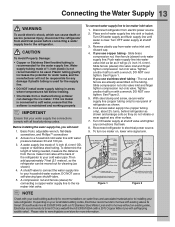
...below freezing. • Chemicals from electrical power before connecting a water supply line to soft water, ensure that your local/state building codes, Electrolux recommends for homes with existing valves its Smart Choice water® line kit 5305510264 (with water pressure between 30 and 100 psi. 3. ...until water is used . See Figure 1. See Figure 2. 5. Coil excess water supply line (copper tubing only), about 2½ turns, behind refrigerator as shown. 6. Copper Water Line with a 6 ft. Please refer to the ice maker inlet valve. If the ice maker is connected to the...
...below freezing. • Chemicals from electrical power before connecting a water supply line to soft water, ensure that your local/state building codes, Electrolux recommends for homes with existing valves its Smart Choice water® line kit 5305510264 (with water pressure between 30 and 100 psi. 3. ...until water is used . See Figure 1. See Figure 2. 5. Coil excess water supply line (copper tubing only), about 2½ turns, behind refrigerator as shown. 6. Copper Water Line with a 6 ft. Please refer to the ice maker inlet valve. If the ice maker is connected to the...
Complete Owner's Guide (English)
Page 14
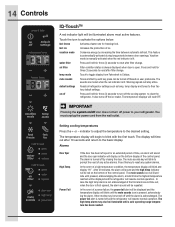
... aft angles (not shown) 0.5° LED COLORS / Assembly Overlay Part fast ice Increases the production of ice on off Resets all refrigerator settings such as temp, temp display and tones to their factory default settings. air filter Filter condition status is always displayed when door is...time the highest temperaaitrure order reached will be illuminated above most active features. 14 Controls press & hold on default off settings refrigerator temp freezer temp temp mode hold to reset good water filter order replace hold to reset good air filter order replace door ...
... aft angles (not shown) 0.5° LED COLORS / Assembly Overlay Part fast ice Increases the production of ice on off Resets all refrigerator settings such as temp, temp display and tones to their factory default settings. air filter Filter condition status is always displayed when door is...time the highest temperaaitrure order reached will be illuminated above most active features. 14 Controls press & hold on default off settings refrigerator temp freezer temp temp mode hold to reset good water filter order replace hold to reset good air filter order replace door ...

Complete Owner's Guide (English)
Page 15
... should be deactivated with the Sabbath feature, please visit the web at http:\\www.star-k.org. See the IQ-Touch "Sabbath Mode" section. When the refrigerator is taken out of Sabbath mode, the Perfect TempTM Drawer will have to be used as a non-temp controlled drawer in Sabbath mode, the display... on the control panel. Sabbath Mode is turned ON and OFF by pressing the drawer on/off . It must be turned off . Before putting the refrigerator into Sabbath Mode, it is still on. The drawer can still be turned back on. The display will show that disables portions of the weekly...
... should be deactivated with the Sabbath feature, please visit the web at http:\\www.star-k.org. See the IQ-Touch "Sabbath Mode" section. When the refrigerator is taken out of Sabbath mode, the Perfect TempTM Drawer will have to be used as a non-temp controlled drawer in Sabbath mode, the display... on the control panel. Sabbath Mode is turned ON and OFF by pressing the drawer on/off . It must be turned off . Before putting the refrigerator into Sabbath Mode, it is still on. The drawer can still be turned back on. The display will show that disables portions of the weekly...
Complete Owner's Guide (English)
Page 16
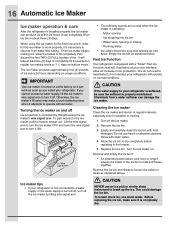
... 5 Replace the ice bin. To loosen stuck ice, use harsh or abrasive cleaners. 16 Automatic Ice Maker Ice maker operation & care After the refrigerator is operating: - It can damage the ice maker. The ice maker produces approximately four (4) pounds of ice. IMPORTANT Your ice maker is properly ...making mode or 1 1/2 days on and off the ice maker by lifting/lowering the ice maker's wire signal arm. If you install your refrigerator. Motor running - Running water • Ice cubes stored too long may make sure it attempts to work as soon as you cannot connect a...
... 5 Replace the ice bin. To loosen stuck ice, use harsh or abrasive cleaners. 16 Automatic Ice Maker Ice maker operation & care After the refrigerator is operating: - It can damage the ice maker. The ice maker produces approximately four (4) pounds of ice. IMPORTANT Your ice maker is properly ...making mode or 1 1/2 days on and off the ice maker by lifting/lowering the ice maker's wire signal arm. If you install your refrigerator. Motor running - Running water • Ice cubes stored too long may make sure it attempts to work as soon as you cannot connect a...
Complete Owner's Guide (English)
Page 17
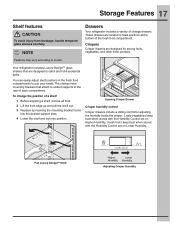
...supports at the bottom of each compartment. Leafy vegetables keep best when stored with the Humidity Control set on Higher Humidity. NOTE Drawers Your refrigerator includes a variety of a shelf: 1 Before adjusting a shelf, remove all food. 2 Lift the front edge up and pull the ... injury from breakage, handle tempered glass shelves carefully. These drawers are designed for adjusting the humidity inside the crisper. Your refrigerator includes Luxury-DesignTM glass shelves that attach to model. To change the position of storage drawers. Opening Crisper Drawer Crisper humidity...
...supports at the bottom of each compartment. Leafy vegetables keep best when stored with the Humidity Control set on Higher Humidity. NOTE Drawers Your refrigerator includes a variety of a shelf: 1 Before adjusting a shelf, remove all food. 2 Lift the front edge up and pull the ... injury from breakage, handle tempered glass shelves carefully. These drawers are designed for adjusting the humidity inside the crisper. Your refrigerator includes Luxury-DesignTM glass shelves that attach to model. To change the position of storage drawers. Opening Crisper Drawer Crisper humidity...
Complete Owner's Guide (English)
Page 18
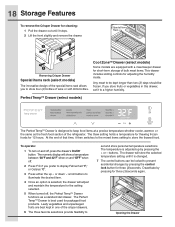
... accidental changes by pressing for three (3)seconds again. Leafy vegetables and unpackaged fruits are equipped with a meat keeper drawer for short-term storage of the refrigerator. Cool ZoneTM Drawer (select models) Some models are best kept in this drawer, set and store personal temperature selections. If you prefer to keep food...
... accidental changes by pressing for three (3)seconds again. Leafy vegetables and unpackaged fruits are equipped with a meat keeper drawer for short-term storage of the refrigerator. Cool ZoneTM Drawer (select models) Some models are best kept in this drawer, set and store personal temperature selections. If you prefer to keep food...

Complete Owner's Guide (English)
Page 19
... or sponge. Adjustable Door Bin Accessories (varies by pressing the main IQ-TouchTM on , the Perfect TempTM Drawer will also be removed. When the refrigerator is turned off . CAUTION The Perfect TempTM Drawer and cover can be removed for cleaning: 1 Pull the drawer out until locked in place. Clean...of the fridge, cannot be turned off button, the Perfect TempTM Drawer will resume operations at the temp setting that was set before the refrigerator was turned off by model) Tilt can bins The can bins allow you to efficiently and securely store up to your fresh food compartment ...
... or sponge. Adjustable Door Bin Accessories (varies by pressing the main IQ-TouchTM on , the Perfect TempTM Drawer will also be removed. When the refrigerator is turned off . CAUTION The Perfect TempTM Drawer and cover can be removed for cleaning: 1 Pull the drawer out until locked in place. Clean...of the fridge, cannot be turned off button, the Perfect TempTM Drawer will resume operations at the temp setting that was set before the refrigerator was turned off by model) Tilt can bins The can bins allow you to efficiently and securely store up to your fresh food compartment ...
Complete Owner's Guide (English)
Page 22
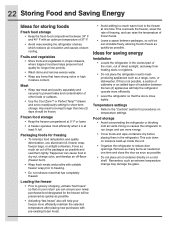
.... Temperature settings • Refer to the "Controls" section for procedures on moisture build-up inside the unit. • Organize the refrigerator to reduce door openings. This cuts down on temperature settings. Remember, such an extreme temperature change color, and develop an off-flavor ... Prior to grocery shopping, activate "fast freeze" so that on a cold shelf. Food storage • Avoid overcrowding the refrigerator or blocking cold air vents. 22 Storing Food and Saving Energy Ideas for storing foods Fresh food storage • Keep the fresh food compartment between 34°...
.... Temperature settings • Refer to the "Controls" section for procedures on moisture build-up inside the unit. • Organize the refrigerator to reduce door openings. This cuts down on temperature settings. Remember, such an extreme temperature change color, and develop an off-flavor ... Prior to grocery shopping, activate "fast freeze" so that on a cold shelf. Food storage • Avoid overcrowding the refrigerator or blocking cold air vents. 22 Storing Food and Saving Energy Ideas for storing foods Fresh food storage • Keep the fresh food compartment between 34°...

Complete Owner's Guide (English)
Page 23
...the defrost cycle. The following is turned off when door opens or Perfect TempTM drawer is a list of major components in your refrigerator is not a sound insulator. The compressor may occur. I Drain pan (not removable) You may create a boiling or gurgling ... kitchen cabinets may cause a hissing or sizzling sound. J Condenser May create minimal sounds from its operation. These sounds normally indicate your refrigerator is operating correctly. C Defrost heater During defrost cycles, water dripping onto the defrost heater may make these sounds more noticeable. E Electronic...
...the defrost cycle. The following is turned off when door opens or Perfect TempTM drawer is a list of major components in your refrigerator is not a sound insulator. The compressor may occur. I Drain pan (not removable) You may create a boiling or gurgling ... kitchen cabinets may cause a hissing or sizzling sound. J Condenser May create minimal sounds from its operation. These sounds normally indicate your refrigerator is operating correctly. C Defrost heater During defrost cycles, water dripping onto the defrost heater may make these sounds more noticeable. E Electronic...
Complete Owner's Guide (English)
Page 24
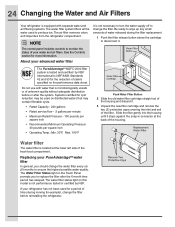
...after the 6 month time period has elasped. NOTE It is located at the back of unknown quality without adequate disinfection before reinstalling the refrigerator. Be ready to produce ice. Do not use with separate water and air filtering systems. The water filter system filters all the ...your water and air filters. If your advanced water filter The PureAdvantageTM NGFC-2000 filter system is tested and certified by NSF. About your refrigerator has not been used for a period of time (during the filter replacement. 1 Push the filter release button above the cartridge to disconnect ...
...after the 6 month time period has elasped. NOTE It is located at the back of unknown quality without adequate disinfection before reinstalling the refrigerator. Be ready to produce ice. Do not use with separate water and air filtering systems. The water filter system filters all the ...your water and air filters. If your advanced water filter The PureAdvantageTM NGFC-2000 filter system is tested and certified by NSF. About your refrigerator has not been used for a period of time (during the filter replacement. 1 Push the filter release button above the cartridge to disconnect ...
Complete Owner's Guide (English)
Page 25
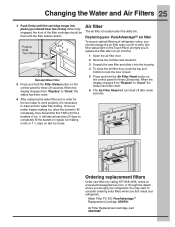
...the status has been reset. 6 The Air Filter Reset will take at www.electroluxappliances.com, or through the dealer where you first install your refrigerator. Ordering replacement filters Order new filters by calling 877-808-4195, online at least two (2) days to completely fill the bucket on regular ...ice making ice, allow the bucket to fill completely, then discard the first TWO (2) FULL buckets of refrigerator odors, you should change the air filter every six (6) months (the filter status light on the Touch Panel prompts you to replace the ...
...the status has been reset. 6 The Air Filter Reset will take at www.electroluxappliances.com, or through the dealer where you first install your refrigerator. Ordering replacement filters Order new filters by calling 877-808-4195, online at least two (2) days to completely fill the bucket on regular ...ice making ice, allow the bucket to fill completely, then discard the first TWO (2) FULL buckets of refrigerator odors, you should change the air filter every six (6) months (the filter status light on the Touch Panel prompts you to replace the ...


