Complete Owners Guide English
Page 10
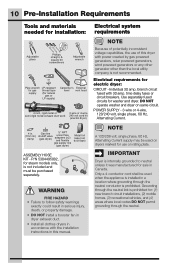
P/N 5304495002, for steam models only, is not included and must be used when the appliance is installed in a location where grounding through the neutral. IMPORTANT Dryer is internally grounded ... vent hood 4 inch, rigid metal or 3-wire or 4-wire semi-rigid metal exhaust duct work 240 volt cord kit (electric dryer) NOTE Because of this manual. Electrical requirements for electric dryer: CIRCUIT - Individual 30 amp.
P/N 5304495002, for steam models only, is not included and must be used when the appliance is installed in a location where grounding through the neutral. IMPORTANT Dryer is internally grounded ... vent hood 4 inch, rigid metal or 3-wire or 4-wire semi-rigid metal exhaust duct work 240 volt cord kit (electric dryer) NOTE Because of this manual. Electrical requirements for electric dryer: CIRCUIT - Individual 30 amp.
Complete Owners Guide English
Page 21
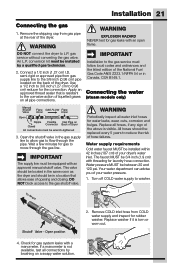
... be in the same room as the dryer and should be 3/4 inch (1.9 cm) with an approved manual shutoff valve. Apply an approved thread sealer that allows ease of the dryer. Connecting the water (steam models only) Manual Shutoff Valve Flare GAS FLOW Flare Union Union Open Nipple Flexible Inlet Pipe on the back...
... be in the same room as the dryer and should be 3/4 inch (1.9 cm) with an approved manual shutoff valve. Apply an approved thread sealer that allows ease of the dryer. Connecting the water (steam models only) Manual Shutoff Valve Flare GAS FLOW Flare Union Union Open Nipple Flexible Inlet Pipe on the back...

Complete Owners Guide English
Page 24
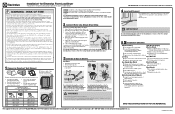
Gather your tools - Be sure dryer is available on all dryer models. Save latch and screws for reversal: BEFORE YOU REVERSE YOUR DRYER DOOR: 1. Removing latch and hole plugs 1. Remove both screws from power source! 24 Installation ... you have adequate swing area before servicing could result in personal injury or even death. Remove plastic hole plugs and save to dislodge the plugs manually. 3. x2 x2 IMPORTANT Tools needed for reinstallation later. Screwdriver with a #2 square bit and plastic knife (or small, flat prying tool that won't damage paint). 3. You...
Gather your tools - Be sure dryer is available on all dryer models. Save latch and screws for reversal: BEFORE YOU REVERSE YOUR DRYER DOOR: 1. Removing latch and hole plugs 1. Remove both screws from power source! 24 Installation ... you have adequate swing area before servicing could result in personal injury or even death. Remove plastic hole plugs and save to dislodge the plugs manually. 3. x2 x2 IMPORTANT Tools needed for reinstallation later. Screwdriver with a #2 square bit and plastic knife (or small, flat prying tool that won't damage paint). 3. You...
Complete Owners Guide English
Page 26
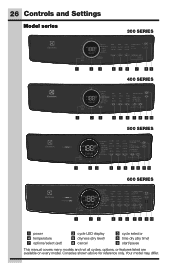
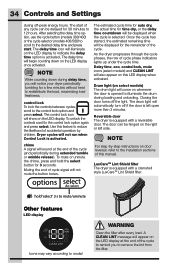
Consoles shown above for reference only. Your model may differ. 26 Controls and Settings Model series 300 SERIES 1 23 4 5 6 7 89 400 SERIES 1 23 4 5 6 7 8 9 10 500 SERIES 1 23 4 5 6 7 8 9 10 600 SERIES 1 23 4 5 6 7 8 9 10 1 power 4 temperature 7 options/select (set) 2 cycle LED display 5 dryness (dry level) 8 cancel 3 cycle selector 6 time dry (dry time) 9 start/pause This manual covers many models and not all cycles, options, or features listed are available on every model.
Consoles shown above for reference only. Your model may differ. 26 Controls and Settings Model series 300 SERIES 1 23 4 5 6 7 89 400 SERIES 1 23 4 5 6 7 8 9 10 500 SERIES 1 23 4 5 6 7 8 9 10 600 SERIES 1 23 4 5 6 7 8 9 10 1 power 4 temperature 7 options/select (set) 2 cycle LED display 5 dryness (dry level) 8 cancel 3 cycle selector 6 time dry (dry time) 9 start/pause This manual covers many models and not all cycles, options, or features listed are available on every model.
Complete Owners Guide English
Page 32
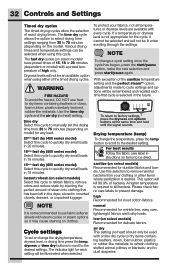
..., down , foam rubber, plastics similarly textured, rubber-like materials; Dryness levels will kill 99.9% of exact drying times. sanitize (on select models) Recommended for each time that has been left in the dryer, stored in 15 minutes. and to remove harmful bacteria from 30 to prevent ... be an available option when using this cycle to the desired setting. air dry This setting (no heat) setting. Use this cycle to manually set or change the temperature, press the temp button to scroll to quickly dry small loads in crowded closets, drawers, or unpacked luggage....
..., down , foam rubber, plastics similarly textured, rubber-like materials; Dryness levels will kill 99.9% of exact drying times. sanitize (on select models) Recommended for each time that has been left in the dryer, stored in 15 minutes. and to remove harmful bacteria from 30 to prevent ... be an available option when using this cycle to the desired setting. air dry This setting (no heat) setting. Use this cycle to manually set or change the temperature, press the temp button to scroll to quickly dry small loads in crowded closets, drawers, or unpacked luggage....
Complete Owners Guide English
Page 33
...minutes on select models). Most Auto Dry cycles default to your fabrics, not all auto dry cycles and fast dry cycles and cannot be selected or changed. To increase drying time for similar loads in the same cycle will conflict with every cycle. Drying time (time dry) Manually select or ...change the drying time for 5 minutes out of the cycle. Time dry options include 30, 45, 60 and 75 minutes (dependent on select models) by tumbling the dry load without heat will increase to reduce static....
...minutes on select models). Most Auto Dry cycles default to your fabrics, not all auto dry cycles and fast dry cycles and cannot be selected or changed. To increase drying time for similar loads in the same cycle will conflict with every cycle. Drying time (time dry) Manually select or ...change the drying time for 5 minutes out of the cycle. Time dry options include 30, 45, 60 and 75 minutes (dependent on select models) by tumbling the dry load without heat will increase to reduce static....
Complete Owners Guide English
Page 34
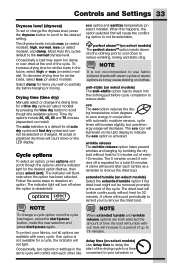
NOTE While counting down on door reversal, refer to reduce the likelihood of this manual. Muting the end of cycle phase indicators lights up under the cycle time. Delay time, eco, control lock, mute icons (select models) and CLEAN LINT will also appear on the LED display. NOTE For step-...' 3 s to mute/unmute Other features LED display Icons may vary according to redistribute the load, maximizing load freshness. Drum light (on select models) The drum light will illuminate on the right or left open more than 3 minutes. The door can be displayed when the cycle is opened to...
NOTE While counting down on door reversal, refer to reduce the likelihood of this manual. Muting the end of cycle phase indicators lights up under the cycle time. Delay time, eco, control lock, mute icons (select models) and CLEAN LINT will also appear on the LED display. NOTE For step-...' 3 s to mute/unmute Other features LED display Icons may vary according to redistribute the load, maximizing load freshness. Drum light (on select models) The drum light will illuminate on the right or left open more than 3 minutes. The door can be displayed when the cycle is opened to...
Wiring Diagram English
Page 1
...Mode 2 Dryer Error Codes 3 Wiring Diagrams 10 Push Button Cycle Select Dryer User Interface Dryer Tech Data Sheet 1 Safety items throughout this manual are selected by pressing the power button. 5. The displayed test numbers also correspond to the selector LEDs to the first test by pressing... the cycle button to advance to situations that may cause bodily injury or property damage. Turn knob counterclockwise to the first test; Power on other models) to set ) 9 cancel 10 start button. Press the start / pause Entering Diagnostic Mode: 1. and flash " " on the risk type as...
...Mode 2 Dryer Error Codes 3 Wiring Diagrams 10 Push Button Cycle Select Dryer User Interface Dryer Tech Data Sheet 1 Safety items throughout this manual are selected by pressing the power button. 5. The displayed test numbers also correspond to the selector LEDs to the first test by pressing... the cycle button to advance to situations that may cause bodily injury or property damage. Turn knob counterclockwise to the first test; Power on other models) to set ) 9 cancel 10 start button. Press the start / pause Entering Diagnostic Mode: 1. and flash " " on the risk type as...
Installation Instructions English
Page 1
.... • LP systems MUST use conversion kit installed by qualified technician. Installation* for Electrolux Front Load Dryer *Please refer to the Use & Care Guide provided with this dryer.... This dryer is not a steam dryer, skip to comply with flame Water Hookup (Select Models) ˆˆ Inspect hoses for proper placement of rubber washers ˆˆ Water supply ...by hand, then tighten additional 2/3 turn elbow to semi-rigid metal ducting. An individual manual shutoff valve must be properly grounded at all connections by a qualified installer, service agency...
.... • LP systems MUST use conversion kit installed by qualified technician. Installation* for Electrolux Front Load Dryer *Please refer to the Use & Care Guide provided with this dryer.... This dryer is not a steam dryer, skip to comply with flame Water Hookup (Select Models) ˆˆ Inspect hoses for proper placement of rubber washers ˆˆ Water supply ...by hand, then tighten additional 2/3 turn elbow to semi-rigid metal ducting. An individual manual shutoff valve must be properly grounded at all connections by a qualified installer, service agency...
Product Specifications Sheet English
Page 2
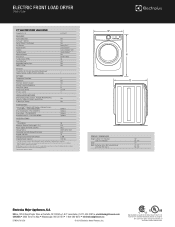
... ELECTRIC FRONT LOAD DRYER EFME427UIW 27" ELECTRIC FRONT LOAD DRYER Capacity D.O.E. 8.0 Cu. Refer to Installation Guide on the web at Electrolux Home Products, Inc. We reserve the right to change . Ft. FEATURES Pull-to change specifications or discontinue models without 15" Pedestal)...Island White - PN # A04840701 Assembly Hose Kit - Fast Dry, Delicates 7 OPTIONS Temperature Selections Add Steam Electronic Auto Dry System Manual Timed Dry Selections Delay Start (Hours) End-of quality at electroluxappliances.ca. PN # STACKIT7X Drying Rack - NOTE: Always consult ...
... ELECTRIC FRONT LOAD DRYER EFME427UIW 27" ELECTRIC FRONT LOAD DRYER Capacity D.O.E. 8.0 Cu. Refer to Installation Guide on the web at Electrolux Home Products, Inc. We reserve the right to change . Ft. FEATURES Pull-to change specifications or discontinue models without 15" Pedestal)...Island White - PN # A04840701 Assembly Hose Kit - Fast Dry, Delicates 7 OPTIONS Temperature Selections Add Steam Electronic Auto Dry System Manual Timed Dry Selections Delay Start (Hours) End-of quality at electroluxappliances.ca. PN # STACKIT7X Drying Rack - NOTE: Always consult ...


