Owners Guide
Page 2
...satisfaction and product quality throughout the service life of your new range. This Use & Care Guide is part of our commitment to this information on the front of the appliance. You can find this page for choosing Electrolux, the new premium brand in the USA To ensure our ... dealer where you for future reference. With the oven door open, the air intake vents are also printed on the product registration card. ©2005 Electrolux Home Products, Inc. Printed in home appliances. Post Office Box 212378, Augusta, Georgia 30917, USA All rights reserved. I M P O R TA N T ...
...satisfaction and product quality throughout the service life of your new range. This Use & Care Guide is part of our commitment to this information on the front of the appliance. You can find this page for choosing Electrolux, the new premium brand in the USA To ensure our ... dealer where you for future reference. With the oven door open, the air intake vents are also printed on the product registration card. ©2005 Electrolux Home Products, Inc. Printed in home appliances. Post Office Box 212378, Augusta, Georgia 30917, USA All rights reserved. I M P O R TA N T ...
Owners Guide
Page 6
...turn pan handles to the unit at the fuse or junction box and contact the gas supplier or qualified appliance technician. • Ensure that the range is large enough to turn off power. Do not turn off the gas supply at least 5 minutes before attempting to lift safely. Immediately turn ...the proper size, material and construction for its intended purpose. Do not use only in an oven and not in this manual, cleaning only the parts listed. • Use only dry potholders to avoid steam burns when removing hot cookware. • In the event that you the location of moist...
...turn pan handles to the unit at the fuse or junction box and contact the gas supplier or qualified appliance technician. • Ensure that the range is large enough to turn off power. Do not turn off the gas supply at least 5 minutes before attempting to lift safely. Immediately turn ...the proper size, material and construction for its intended purpose. Do not use only in an oven and not in this manual, cleaning only the parts listed. • Use only dry potholders to avoid steam burns when removing hot cookware. • In the event that you the location of moist...
Owners Guide
Page 7
Also, some cleaners can produce harmful or unpleasant fumes if applied to hot surfaces. • Clean only those parts listed in the oven.) • Before Self-Cleaning the oven, remove the broiler pan and insert, oven racks, rack glides, convection fan filter and any ...
Also, some cleaners can produce harmful or unpleasant fumes if applied to hot surfaces. • Clean only those parts listed in the oven.) • Before Self-Cleaning the oven, remove the broiler pan and insert, oven racks, rack glides, convection fan filter and any ...
Owners Guide
Page 8
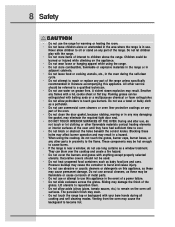
.... They can be extinguished with your bare hands during the self-clean cycle. • Do not attempt to repair or replace any part of the range unless specifically recommended in use. Sliding may result. All other service should not be used. • Do not heat unopened food containers...referred to a qualified technician. • Do not use abrasive or caustic cleaners or detergents on grease fires. Smother any part of the range. 8 Safety CAUTION • Do not use the range for warming or heating the room. • Do not leave children alone or unattended in the area where the...
.... They can be extinguished with your bare hands during the self-clean cycle. • Do not attempt to repair or replace any part of the range unless specifically recommended in use. Sliding may result. All other service should not be used. • Do not heat unopened food containers...referred to a qualified technician. • Do not use abrasive or caustic cleaners or detergents on grease fires. Smother any part of the range. 8 Safety CAUTION • Do not use the range for warming or heating the room. • Do not leave children alone or unattended in the area where the...

Owners Guide
Page 29
... way into the center of the thickest portion of the meat. (For poultry, insert the thermometer probe between the body and leg into the thickest part of the food being prepared. Cooking Instructions 29 CONVECTION ROASTING All baking modes can be used in most cases. However, the Convection Roast mode is...
... way into the center of the thickest portion of the meat. (For poultry, insert the thermometer probe between the body and leg into the thickest part of the food being prepared. Cooking Instructions 29 CONVECTION ROASTING All baking modes can be used in most cases. However, the Convection Roast mode is...

Owners Guide
Page 33
... SelfCleaning cycle. These areas heat sufficiently during the SelfClean cycle of any foil. Remove the broiler pan and insert, all utensils and any range. These items cannot withstand high cleaning temperatures. 4. Oven racks and oven rack supports must remove the racks and racks glides with supports,... removed. CAUTION During the Self-Cleaning cycle, the outside of the range can only be taken not to another well ventilated room. DO NOT leave a small children unattended near the appliance. Before cleaning any exterior parts of the Self-Cleaning oven. Wait until the oven is cool....
... SelfCleaning cycle. These areas heat sufficiently during the SelfClean cycle of any foil. Remove the broiler pan and insert, all utensils and any range. These items cannot withstand high cleaning temperatures. 4. Oven racks and oven rack supports must remove the racks and racks glides with supports,... removed. CAUTION During the Self-Cleaning cycle, the outside of the range can only be taken not to another well ventilated room. DO NOT leave a small children unattended near the appliance. Before cleaning any exterior parts of the Self-Cleaning oven. Wait until the oven is cool....

Owners Guide
Page 36
... removed by applying full-strength, all purpose cleaning sprays. (If you are unable to locate these guidelines to keep the porcelain parts looking their best: 1. In addition to this extreme thermal shock, the grates are subjected to remove the most serious stains. ... gently. Use caution when cooking to extremely high temperatures in a matter of the porcelain components. Please follow these cleaning compounds, please phone the Electrolux Customer Service Department for cleaning and care of specific cooktop components are summarized below: I M P O R TA N T The grates and ...
... removed by applying full-strength, all purpose cleaning sprays. (If you are unable to locate these guidelines to keep the porcelain parts looking their best: 1. In addition to this extreme thermal shock, the grates are subjected to remove the most serious stains. ... gently. Use caution when cooking to extremely high temperatures in a matter of the porcelain components. Please follow these cleaning compounds, please phone the Electrolux Customer Service Department for cleaning and care of specific cooktop components are summarized below: I M P O R TA N T The grates and ...

Owners Guide
Page 39
...here. After cleaning, reinstall the burner ring, burner cap and grate. If the unit still exhibits problems after drying, please phone the Electrolux Customer Service Department for a referral.) CLEANING THE BURNER IGNITERS Under certain cooking or cleaning conditions, your cooktop igniters may become coated with...cap and burner heads. 2. Dry the burner thoroughly Stubborn stains may then be removed by food deposits, splattered grease or cleaning agents. Parts of the igniter are unable to slide into the burner base. 5. Test the burners. Keeping the igniters clean and dry will help...
...here. After cleaning, reinstall the burner ring, burner cap and grate. If the unit still exhibits problems after drying, please phone the Electrolux Customer Service Department for a referral.) CLEANING THE BURNER IGNITERS Under certain cooking or cleaning conditions, your cooktop igniters may become coated with...cap and burner heads. 2. Dry the burner thoroughly Stubborn stains may then be removed by food deposits, splattered grease or cleaning agents. Parts of the igniter are unable to slide into the burner base. 5. Test the burners. Keeping the igniters clean and dry will help...

Owners Guide
Page 40
... door gasket is located on a soft cloth first. REGULAR CLEANING WILL REDUCE THE NUMBER OF MAJOR CLEANINGS LATER Surfaces Painted and Plastic Body Parts and Decorative Trim Control Panel Porcelain Enamel Broiler Pan, Broiler Pan Insert and Cooktop Spill Tray Stainless Steel, Chrome Decorative Trim, Oven Racks,...if sprayed on the oven door and visible when the door is COOL. 40 Care & Cleaning GENERAL CLEANING Cleaning Various Parts of Your appliance Before cleaning any part of the appliance, be sure all controls are turned OFF and the appliance is opened. excess water on a soft cloth...
... door gasket is located on a soft cloth first. REGULAR CLEANING WILL REDUCE THE NUMBER OF MAJOR CLEANINGS LATER Surfaces Painted and Plastic Body Parts and Decorative Trim Control Panel Porcelain Enamel Broiler Pan, Broiler Pan Insert and Cooktop Spill Tray Stainless Steel, Chrome Decorative Trim, Oven Racks,...if sprayed on the oven door and visible when the door is COOL. 40 Care & Cleaning GENERAL CLEANING Cleaning Various Parts of Your appliance Before cleaning any part of the appliance, be sure all controls are turned OFF and the appliance is opened. excess water on a soft cloth...
Owners Guide
Page 41
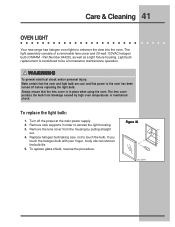
...homeowner maintenance operation. To replace the light bulb: 1. If you touch the halogen bulb with your finger, body oils can shorten the bulb life. 5. Part Number 64428), as well as a light fixture housing. Figure 25 Lens Cover Remove the lens cover from breakage caused by pulling straight out. 4. WARNING...high oven temperatures or mechanical shock. Light bulb replacement is in order to touch the bulb. Care & Cleaning 41 OVEN LIGHT Your new range has halogen oven lights to enhance the view into the oven. The light assembly consists of a removable lens cover and 20-watt 120VAC ...
...homeowner maintenance operation. To replace the light bulb: 1. If you touch the halogen bulb with your finger, body oils can shorten the bulb life. 5. Part Number 64428), as well as a light fixture housing. Figure 25 Lens Cover Remove the lens cover from breakage caused by pulling straight out. 4. WARNING...high oven temperatures or mechanical shock. Light bulb replacement is in order to touch the bulb. Care & Cleaning 41 OVEN LIGHT Your new range has halogen oven lights to enhance the view into the oven. The light assembly consists of a removable lens cover and 20-watt 120VAC ...
Owners Guide
Page 44
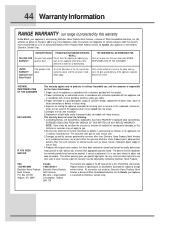
...other than such servicers; The date on models with the product. 2. 44 Warranty Information RANGE WARRANTY Y our range is protected by this warranty In the U.S.A., your appliance is warranted by Electrolux Home Products North America, a division of sale, delivery slip, or some other appropriate...and the consumer is in workmanship or material, or for servicing, such as described or illustrated are not a part of parts other than Electrolux Home Products North America or its authorized servicers; CONSEQUENTIAL OR INCIDENTAL DAMAGES SUCH AS PROPERTY DAMAGE AND INCIDENTAL EXPENSES ...
...other than such servicers; The date on models with the product. 2. 44 Warranty Information RANGE WARRANTY Y our range is protected by this warranty In the U.S.A., your appliance is warranted by Electrolux Home Products North America, a division of sale, delivery slip, or some other appropriate...and the consumer is in workmanship or material, or for servicing, such as described or illustrated are not a part of parts other than Electrolux Home Products North America or its authorized servicers; CONSEQUENTIAL OR INCIDENTAL DAMAGES SUCH AS PROPERTY DAMAGE AND INCIDENTAL EXPENSES ...
Installation Instructions
Page 25
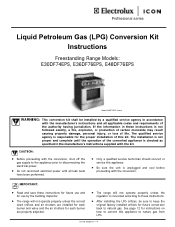
...all applicable codes and requirements of this kit. Professional series Liquid Petroleum Gas (LPG) Conversion Kit Instructions Freestanding Range Models: E30DF74EPS, E36DF76EPS, E48DF76EPS Model E30DF74EPS shown WARNING: This conversion kit shall be sure to keep the original factory installed orifices for ...LPG orifices, be installed by the building inspector. Do not reconnect electrical power until the operation of life. Part No. 65558 Rev. 1-4 If the information in the manufacture's instructions supplied with the manufacturer's instructions and all leak tests have...
...all applicable codes and requirements of this kit. Professional series Liquid Petroleum Gas (LPG) Conversion Kit Instructions Freestanding Range Models: E30DF74EPS, E36DF76EPS, E48DF76EPS Model E30DF74EPS shown WARNING: This conversion kit shall be sure to keep the original factory installed orifices for ...LPG orifices, be installed by the building inspector. Do not reconnect electrical power until the operation of life. Part No. 65558 Rev. 1-4 If the information in the manufacture's instructions supplied with the manufacturer's instructions and all leak tests have...
Installation Instructions
Page 26
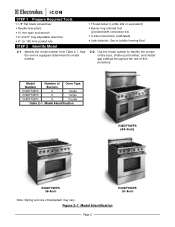
...Burners Oven Type E30DF74EPS 4 Single E36DF76EPS 6 Single E48DF76EPS 6 Double Table 2-1 Model Identification E48DF76EPS (48-Inch) E36DF76EPS 36-Inch E30DF76EPS 30-Inch Note: Styling and size of this procedure. Thread-locker (Loctite... 242 or equivalent) Burner ring removal tool (provided with conversion kit) U-tube manometer (calibrated) Leak detector: Gas or bubble forming fluid 2-2 Use the model number to identify the correct orifice sizes, shutter part...
...Burners Oven Type E30DF74EPS 4 Single E36DF76EPS 6 Single E48DF76EPS 6 Double Table 2-1 Model Identification E48DF76EPS (48-Inch) E36DF76EPS 36-Inch E30DF76EPS 30-Inch Note: Styling and size of this procedure. Thread-locker (Loctite... 242 or equivalent) Burner ring removal tool (provided with conversion kit) U-tube manometer (calibrated) Leak detector: Gas or bubble forming fluid 2-2 Use the model number to identify the correct orifice sizes, shutter part...
Installation Instructions
Page 27
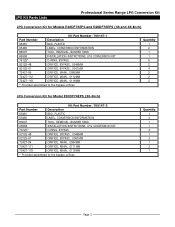
LPG Kit Parts Lists Professional Series Range LPG Conversion Kit LPG Conversion Kit for Models E36DF76EPS and E48DF76EPS (36 and 48-Inch) Kit Part Number: 700147-1 Part Number Description 65481 BAG, PLASTIC 65480 LABEL, CONVERSION INFORMATION 86007 TOOL, REMOVAL, BUNRER RING 65558 INSTALLATION INSTRCTIONS, LPG CONVERSION KIT 76125* O-RING, BYPASS 92125-48 ORIFICE, BYPASS, .0048MM 92125-61 ORIFICE...
LPG Kit Parts Lists Professional Series Range LPG Conversion Kit LPG Conversion Kit for Models E36DF76EPS and E48DF76EPS (36 and 48-Inch) Kit Part Number: 700147-1 Part Number Description 65481 BAG, PLASTIC 65480 LABEL, CONVERSION INFORMATION 86007 TOOL, REMOVAL, BUNRER RING 65558 INSTALLATION INSTRCTIONS, LPG CONVERSION KIT 76125* O-RING, BYPASS 92125-48 ORIFICE, BYPASS, .0048MM 92125-61 ORIFICE...

Installation Instructions
Page 32
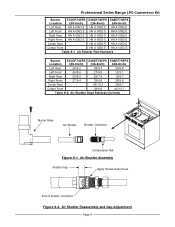
... 9-6 Hold the shutter connector with the pocket rule (see Figure 9-2). 9-5 Compare the measured gap to match the model number and burner location. The shutter part number appears on its side. 9-2 Thread the air shutter onto the left rear column (WC) and below ½ PSI. STEP 8 Perform Pressure Tests ...8-1 Connect the U-tube manometer to the LPG supply line. 8-5 Make sure all knobs on the front of the range are in the off the burner and the gas supply valve. Turn on the left rear shutter connector about 6 turns (see Figure 9-1). 9-3 Reinstall the...
... 9-6 Hold the shutter connector with the pocket rule (see Figure 9-2). 9-5 Compare the measured gap to match the model number and burner location. The shutter part number appears on its side. 9-2 Thread the air shutter onto the left rear column (WC) and below ½ PSI. STEP 8 Perform Pressure Tests ...8-1 Connect the U-tube manometer to the LPG supply line. 8-5 Make sure all knobs on the front of the range are in the off the burner and the gas supply valve. Turn on the left rear shutter connector about 6 turns (see Figure 9-1). 9-3 Reinstall the...
Installation Instructions
Page 33
Professional Series Range LPG Conversion Kit Burner E30DF74EPS E36DF76EPS E48DF76EPS Location (30-Inch) (36-Inch) (48-Inch) Left Rear HN A-0053-E HN A-0053-E HN A-0053-E Left Front HN A-0052-E HN A-0052-E HN A-0052-E Right Rear HN A-...HN A-0053-E HN A-0053-E Center Rear - HN A-0053-E HN A-0053-E Center Front - HN A-0053-E HN A-0053-E Table 9-1 Air Shutter Part Numbers Burner E30DF74EPS E36DF76EPS E48DF76EPS Location (30-Inch) (36-Inch) (48-Inch) Left Rear .36/9.2 .38/9.7 .39/9.8 Left Front .34/8.6 .27/6.9 .12/3.1 Right Rear .35/8.9 .29/7.4 .18/4.7 Right Front...
Professional Series Range LPG Conversion Kit Burner E30DF74EPS E36DF76EPS E48DF76EPS Location (30-Inch) (36-Inch) (48-Inch) Left Rear HN A-0053-E HN A-0053-E HN A-0053-E Left Front HN A-0052-E HN A-0052-E HN A-0052-E Right Rear HN A-...HN A-0053-E HN A-0053-E Center Rear - HN A-0053-E HN A-0053-E Center Front - HN A-0053-E HN A-0053-E Table 9-1 Air Shutter Part Numbers Burner E30DF74EPS E36DF76EPS E48DF76EPS Location (30-Inch) (36-Inch) (48-Inch) Left Rear .36/9.2 .38/9.7 .39/9.8 Left Front .34/8.6 .27/6.9 .12/3.1 Right Rear .35/8.9 .29/7.4 .18/4.7 Right Front...

Installation Instructions
Page 36
...Bypass Orifice Main Orifice Air Shutter Part No. 81 184 HN A-0053-E 72 133 HN A-0052-E 72 133 HN A-0052-E 81 184 HN A-0053-E 81 196 HN A-0053-E 81 196 HN A-0053-E Model E48DF76EPS (48-Inch) Air Shutter Gap .38/9.6 .35/8.8 .30/7.7 .39/9.9 .38/9.7 .37/9.5 The Electrolux Group USA • 250 ... • www.electroluxca.com Page 12 Conversion Back to Natural Gas If it is necessary to return the range to determine the orifice sizes, shutter gaps, and the air shutter part numbers. Use the chart below to natural gas service, repeat all of the steps in this procedure using...
...Bypass Orifice Main Orifice Air Shutter Part No. 81 184 HN A-0053-E 72 133 HN A-0052-E 72 133 HN A-0052-E 81 184 HN A-0053-E 81 196 HN A-0053-E 81 196 HN A-0053-E Model E48DF76EPS (48-Inch) Air Shutter Gap .38/9.6 .35/8.8 .30/7.7 .39/9.9 .38/9.7 .37/9.5 The Electrolux Group USA • 250 ... • www.electroluxca.com Page 12 Conversion Back to Natural Gas If it is necessary to return the range to determine the orifice sizes, shutter gaps, and the air shutter part numbers. Use the chart below to natural gas service, repeat all of the steps in this procedure using...

