
Specification sheet
Page 1
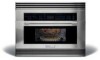
...; Control with any Electrolux ICON® Single Wall Oven and/or Warmer Drawer. Height Width Depth Power Supply Location Approved for Under-Counter Installation Approved for Single Oven Combination Installation* Shipping Weight (Approx.) 9" 16" 13-1/2" 22-7/8" 30" 23-5/8" Left Bottom... Included Included SPECIFICATIONS Oven Cavity Dimensions - High-Speed Cooking Option Forcing heated air at electroluxicon.com. High-Speed Oven E30SO75FPS professional series Designed for easy monitoring. 30" HIGH-SPEED OVEN Oven Cavity Watts (IEC-705 Test Procedure) Oven Interior Interior Light ...
...; Control with any Electrolux ICON® Single Wall Oven and/or Warmer Drawer. Height Width Depth Power Supply Location Approved for Under-Counter Installation Approved for Single Oven Combination Installation* Shipping Weight (Approx.) 9" 16" 13-1/2" 22-7/8" 30" 23-5/8" Left Bottom... Included Included SPECIFICATIONS Oven Cavity Dimensions - High-Speed Cooking Option Forcing heated air at electroluxicon.com. High-Speed Oven E30SO75FPS professional series Designed for easy monitoring. 30" HIGH-SPEED OVEN Oven Cavity Watts (IEC-705 Test Procedure) Oven Interior Interior Light ...

Specification sheet
Page 2
... installation, to floor **When used under counter. • High-Speed Oven can be built in the U.S.A. MUST be used in combination with any Electrolux ICON® Single Wall Oven and / or Warmer Drawer. (Refer to model-specific Combination Installation Specification...electroluxicon.ca E30SO75FPS 01/09 © 2009 Electrolux Home Products, Inc. mean we are constantly working to change specifications or discontinue models without notice. Electrolux Major Appliances, N.A. We reserve the right to improve our products. Refer to be applied 30" High-Speed Oven Specifications &#...
... installation, to floor **When used under counter. • High-Speed Oven can be built in the U.S.A. MUST be used in combination with any Electrolux ICON® Single Wall Oven and / or Warmer Drawer. (Refer to model-specific Combination Installation Specification...electroluxicon.ca E30SO75FPS 01/09 © 2009 Electrolux Home Products, Inc. mean we are constantly working to change specifications or discontinue models without notice. Electrolux Major Appliances, N.A. We reserve the right to improve our products. Refer to be applied 30" High-Speed Oven Specifications &#...

Specification sheet
Page 3
... proper combination installation, to top edge of quality at electroluxicon.com for Wall Oven door depth when open. 30" High-Speed Ovens Specifications • Product Weight - (E30SO75FPS / E30SO75ESS) 115 Lbs. • Voltage Rating - 240V / 60...Electrolux Major Appliances, N.A. High-Speed Oven/Single Wall Oven For detailed product dimensions and installation specifications, refer to model-specific product page and installation guide on web 24" min. 30" High-Speed Oven Cutout For models: E30SO75FPS E30SO75ESS 21 11/16" min. 223/16" max. 2" (visible gap)* 30" Electric Single Wall Oven...
... proper combination installation, to top edge of quality at electroluxicon.com for Wall Oven door depth when open. 30" High-Speed Ovens Specifications • Product Weight - (E30SO75FPS / E30SO75ESS) 115 Lbs. • Voltage Rating - 240V / 60...Electrolux Major Appliances, N.A. High-Speed Oven/Single Wall Oven For detailed product dimensions and installation specifications, refer to model-specific product page and installation guide on web 24" min. 30" High-Speed Oven Cutout For models: E30SO75FPS E30SO75ESS 21 11/16" min. 223/16" max. 2" (visible gap)* 30" Electric Single Wall Oven...

Specification sheet
Page 4
...8226; electroluxicon.ca SO_EW_WD INST 01/09 © 2009 Electrolux Home Products, Inc. Two 3" wide by 3/4" thick planks must be grounded for Wall Oven door depth when open. 30" High-Speed Ovens Specifications • Product Weight - (E30SO75FPS / E30SO75ESS) 115 Lbs. • Voltage Rating - ... cable, 240 Volt, 60 Hertz AC only electrical supply with a separate ground wire. Electrolux Major Appliances, N.A. 30" Combination Installation - High-Speed Oven/Single Wall Oven/Warmer Drawer For detailed product dimensions and installation specifications, refer to top edge of supporting ...
...8226; electroluxicon.ca SO_EW_WD INST 01/09 © 2009 Electrolux Home Products, Inc. Two 3" wide by 3/4" thick planks must be grounded for Wall Oven door depth when open. 30" High-Speed Ovens Specifications • Product Weight - (E30SO75FPS / E30SO75ESS) 115 Lbs. • Voltage Rating - ... cable, 240 Volt, 60 Hertz AC only electrical supply with a separate ground wire. Electrolux Major Appliances, N.A. 30" Combination Installation - High-Speed Oven/Single Wall Oven/Warmer Drawer For detailed product dimensions and installation specifications, refer to top edge of supporting ...
Owners Guide
Page 3
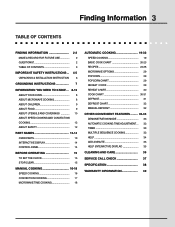
... TABLE OF CONTENTS 3 IMPORTANT SAFETY INSTRUCTIONS .. 4-5 UNPACKING & INSTALLATION INSTRUCTION 6 GROUNDING INSTRUCTIONS 7 INFORMATION YOU NEED TO KNOW ... 8-12 ABOUT YOUR OVEN 8 ABOUT MICROWAVE COOKING 8 ABOUT CHILDREN 9 ABOUT FOOD 9 ABOUT UTENSILS AND COVERINGS 10 ABOUT SPEED COOKING AND CONVECTION COOKING 12 ABOUT SAFETY 12 PART... 20-23 RECIPES 24-28 MICROWAVE OPTIONS 29 POPCORN 29 POPCORN CHART 29 REHEAT / COOK 29 REHEAT CHART 30 COOK CHART 30-31 DEFROST 31 DEFROST CHART 32 MANUAL DEFROST 32 OTHER CONVENIENT FEATURES ......... 33-35 DEMONSTRATION MODE 33 AUTOMATIC ...
... TABLE OF CONTENTS 3 IMPORTANT SAFETY INSTRUCTIONS .. 4-5 UNPACKING & INSTALLATION INSTRUCTION 6 GROUNDING INSTRUCTIONS 7 INFORMATION YOU NEED TO KNOW ... 8-12 ABOUT YOUR OVEN 8 ABOUT MICROWAVE COOKING 8 ABOUT CHILDREN 9 ABOUT FOOD 9 ABOUT UTENSILS AND COVERINGS 10 ABOUT SPEED COOKING AND CONVECTION COOKING 12 ABOUT SAFETY 12 PART... 20-23 RECIPES 24-28 MICROWAVE OPTIONS 29 POPCORN 29 POPCORN CHART 29 REHEAT / COOK 29 REHEAT CHART 30 COOK CHART 30-31 DEFROST 31 DEFROST CHART 32 MANUAL DEFROST 32 OTHER CONVENIENT FEATURES ......... 33-35 DEMONSTRATION MODE 33 AUTOMATIC ...
Owners Guide
Page 11
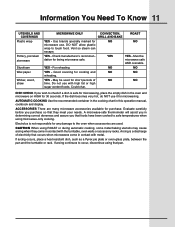
...to the oven when accessories are many microwave accessories available for purchase. May be microwave safe AND ovenable. Do not use with the turntable, oven walls or accessory ...determining correct doneness and assure you that pan. Electrolux is a discharge of electricity that they come in the oven and microwave on HIGH for short periods of...30 seconds. Good covering for NO NO microwave use it for being microwave safe. Use brands specially marked for cooking and NO NO reheating. If arcing occurs, place a heat resistant dish, such as a Pyrex pie plate or oven...
...to the oven when accessories are many microwave accessories available for purchase. May be microwave safe AND ovenable. Do not use with the turntable, oven walls or accessory ...determining correct doneness and assure you that pan. Electrolux is a discharge of electricity that they come in the oven and microwave on HIGH for short periods of...30 seconds. Good covering for NO NO microwave use it for being microwave safe. Use brands specially marked for cooking and NO NO reheating. If arcing occurs, place a heat resistant dish, such as a Pyrex pie plate or oven...
Owners Guide
Page 15
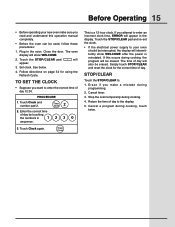
...Touch Clock and number pad 2. 2 Timer Clock 2. Timer Clock This is reinstated. Stop the oven temporarily during cooking, touch twice. Cancel a program during cooking. 4. The oven display will appear. 3. See below. 4. PROCEDURE 1. Touch the STOP/CLEAR pad and re-set...oven should be erased. STOP/CLEAR Touch the STOP/CLEAR to enter an incorrect clock time, ERROR will be used, follow these procedures: 1. Er a s e i f yo u m a ke a m i s t a ke d u r i n g programming. 2. Plug in the display. Set clock. Enter the correct time of day. The time of day 12:30...
...Touch Clock and number pad 2. 2 Timer Clock 2. Timer Clock This is reinstated. Stop the oven temporarily during cooking, touch twice. Cancel a program during cooking. 4. The oven display will appear. 3. See below. 4. PROCEDURE 1. Touch the STOP/CLEAR pad and re-set...oven should be erased. STOP/CLEAR Touch the STOP/CLEAR to enter an incorrect clock time, ERROR will be used, follow these procedures: 1. Er a s e i f yo u m a ke a m i s t a ke d u r i n g programming. 2. Plug in the display. Set clock. Enter the correct time of day. The time of day 12:30...

Owners Guide
Page 16
... low rack may cause arcing when they come in contact with the turntable, oven walls or accessory racks. ROAST Use the Roast setting for poultry, meat, fish or other foods you want to occur, discontinue use thick oven gloves when removing the food or turntable. 1. and a boost of electricity ...grill without preheat, touch Grill twice at step 1. When you want to grill a steak for 30 minutes. When using Grill. If arcing occurs, place a heat resistant dish, such as a Pyrex pie plate or oven-glass plate, between the pan and the turntable or rack. If arcing continues to roast a 3...
... low rack may cause arcing when they come in contact with the turntable, oven walls or accessory racks. ROAST Use the Roast setting for poultry, meat, fish or other foods you want to occur, discontinue use thick oven gloves when removing the food or turntable. 1. and a boost of electricity ...grill without preheat, touch Grill twice at step 1. When you want to grill a steak for 30 minutes. When using Grill. If arcing occurs, place a heat resistant dish, such as a Pyrex pie plate or oven-glass plate, between the pan and the turntable or rack. If arcing continues to roast a 3...

Owners Guide
Page 18
... 3. Touch Power Level 8 times or hold at the preheat temperature for 30 minutes. After this time has elapsed, an audible signal will sound, and the oven will start. NOTE: 1. 18 Manual Cooking * If the oven door is touching Power Level, the power level will be programmed for 99... increases the cooking time which is recommended for specific recommendations. Consult cookbook or recipes for foods such as your finger is not opened, the oven will automatically hold down until the desired power level appears. TOUCH POWER LEVEL PAD Once Twice 3 times 4 times 5 times 6 times 7...
... 3. Touch Power Level 8 times or hold at the preheat temperature for 30 minutes. After this time has elapsed, an audible signal will sound, and the oven will start. NOTE: 1. 18 Manual Cooking * If the oven door is touching Power Level, the power level will be programmed for 99... increases the cooking time which is recommended for specific recommendations. Consult cookbook or recipes for foods such as your finger is not opened, the oven will automatically hold down until the desired power level appears. TOUCH POWER LEVEL PAD Once Twice 3 times 4 times 5 times 6 times 7...

Owners Guide
Page 21
... CHART (Cont.) POULTRY NO. Be sure to wait until the preheat is over before putting the food in * 28 Breast, boneless FISH/SEAFOOD 29 Fillets* 30 Pieces, prepared frozen 31 Shellfish* 32 Steaks, 1-inch thick* 33 Sticks, prepared frozen 1 level 2 levels 1 level 2 levels 1 level* 2 levels* 1 level* ... 1.4 - 1.5 lb High Pizza pan Pizza pan 2 pizza pans Pizza pan Pizza pan Pizza pan 2 pizza pans * This food choice requires a preheated oven. CHICKEN 15 Breasts, boneless* 16 Pieces, bone-in 17 Whole CONVENIENCE CHICKEN 18 Nuggets, frozen* 19 Nuggets, refrigerated* 20 Patties, frozen 21 Patties, ...
... CHART (Cont.) POULTRY NO. Be sure to wait until the preheat is over before putting the food in * 28 Breast, boneless FISH/SEAFOOD 29 Fillets* 30 Pieces, prepared frozen 31 Shellfish* 32 Steaks, 1-inch thick* 33 Sticks, prepared frozen 1 level 2 levels 1 level 2 levels 1 level* 2 levels* 1 level* ... 1.4 - 1.5 lb High Pizza pan Pizza pan 2 pizza pans Pizza pan Pizza pan Pizza pan 2 pizza pans * This food choice requires a preheated oven. CHICKEN 15 Breasts, boneless* 16 Pieces, bone-in 17 Whole CONVENIENCE CHICKEN 18 Nuggets, frozen* 19 Nuggets, refrigerated* 20 Patties, frozen 21 Patties, ...

Owners Guide
Page 26
26 Automatic Cooking RECIPES (Cont.) FISH/SEAFOOD NO. Be sure to wait until the preheat is over before putting the food in the oven. FOOD 29 Fish Steaks with Herbs 30 Italian Shrimp* 31 Lemon buttered Sole* 32 Old Bay Grilled Fish* 33 Pineapple Salsa Swordfish 34 Salmon with Basil Sauce 35 Salmon... 2 qt casserole Low Pizza pan Low 8-inch square glass dish Low Pizza pan Low Pizza pan Low Low Pizza pan * This food choice requires a preheated oven.
26 Automatic Cooking RECIPES (Cont.) FISH/SEAFOOD NO. Be sure to wait until the preheat is over before putting the food in the oven. FOOD 29 Fish Steaks with Herbs 30 Italian Shrimp* 31 Lemon buttered Sole* 32 Old Bay Grilled Fish* 33 Pineapple Salsa Swordfish 34 Salmon with Basil Sauce 35 Salmon... 2 qt casserole Low Pizza pan Low 8-inch square glass dish Low Pizza pan Low Pizza pan Low Low Pizza pan * This food choice requires a preheated oven.

Owners Guide
Page 29
...microwave settings, including Popcorn, Reheat, Cook and Defrost. Touch START. + or - See the chart below the quantity allowed on page 30-31. • Suppose you want to pop a 3.5 ounce bag of microwave popcorn. Touch Popcorn once. Select desired food by touching... thermoset polyester when popping bagged microwave popcorn. POPCORN The popcorn setting automatically provides the correct cooking time for foods shown in oven according to AUTOMATIC COOKING TIME ADJUSTMENT on page 33. Popcorn 1. You can be programmed with AUTOMATIC COOKING TIME ADJUSTMENT. PROCEDURE...
...microwave settings, including Popcorn, Reheat, Cook and Defrost. Touch START. + or - See the chart below the quantity allowed on page 30-31. • Suppose you want to pop a 3.5 ounce bag of microwave popcorn. Touch Popcorn once. Select desired food by touching... thermoset polyester when popping bagged microwave popcorn. POPCORN The popcorn setting automatically provides the correct cooking time for foods shown in oven according to AUTOMATIC COOKING TIME ADJUSTMENT on page 33. Popcorn 1. You can be programmed with AUTOMATIC COOKING TIME ADJUSTMENT. PROCEDURE...

Owners Guide
Page 30
...broccoli, Brussel sprouts, cabbage and cauliflower, cook immediately after heating. 1 - 4 cups Use to outside of 2 for 1 cup. 30 Automatic Cooking REHEAT CHART FOOD 1. Flatten foods such as 2 regular size. Cover with lid. ONE PLATE ONLY. After cooking, remove from... temperature. Fresh Vegetables AMOUNT 1 - 4 med. 1 - 4 cups PROCEDURE Pierce with fork in foil for restoring cooled beverage to reheat precooked foods from oven, stir, cover and let stand 3 to 10 minutes. Cover with wax paper or plastic wrap. Soup AMOUNT PROCEDURE .5 - 2 cups This setting is...
...broccoli, Brussel sprouts, cabbage and cauliflower, cook immediately after heating. 1 - 4 cups Use to outside of 2 for 1 cup. 30 Automatic Cooking REHEAT CHART FOOD 1. Flatten foods such as 2 regular size. Cover with lid. ONE PLATE ONLY. After cooking, remove from... temperature. Fresh Vegetables AMOUNT 1 - 4 med. 1 - 4 cups PROCEDURE Pierce with fork in foil for restoring cooled beverage to reheat precooked foods from oven, stir, cover and let stand 3 to 10 minutes. Cover with wax paper or plastic wrap. Soup AMOUNT PROCEDURE .5 - 2 cups This setting is...
Owners Guide
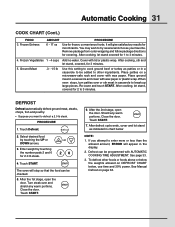
Page 31
... the door. Touch START. START 6. Touch START. If you want to cook ground beef or turkey as indicated in chart below , use time and 30% power. Touch START. After defrost cycle ends, cover and let stand as patties or in the display. 2. Automatic Cooking 31 COOK CHART (Cont.) ...FOOD 3. Ground Meat .3 - 1.5 lb Add no water. When oven stops, turn patties over and shield any warm portions. Select desired food by touching the number pads 2 and 0 for 2.0 lb steak. START The...
... the door. Touch START. START 6. Touch START. If you want to cook ground beef or turkey as indicated in chart below , use time and 30% power. Touch START. After defrost cycle ends, cover and let stand as patties or in the display. 2. Automatic Cooking 31 COOK CHART (Cont.) ...FOOD 3. Ground Meat .3 - 1.5 lb Add no water. When oven stops, turn patties over and shield any warm portions. Select desired food by touching the number pads 2 and 0 for 2.0 lb steak. START The...

Owners Guide
Page 32
...freezer, defrost only long enough to remove from occurring before the center of the food is nearly defrosted. Always stop the oven periodically to 20 minutes. 2. When using 30% Power Level. After final stage, small sections may still be icy. For example, defrost 4 minutes for 10 to... not listed on the DEFROST CHART or is approximately 4 minutes per pound. NOTE: Check foods when oven signals. Shielding prevents cooking from the plastic in 1 minute increments at 30% until all ice crystals are warm or thawed portions, shield with meatiest portions toward outside of defrost ...
...freezer, defrost only long enough to remove from occurring before the center of the food is nearly defrosted. Always stop the oven periodically to 20 minutes. 2. When using 30% Power Level. After final stage, small sections may still be icy. For example, defrost 4 minutes for 10 to... not listed on the DEFROST CHART or is approximately 4 minutes per pound. NOTE: Check foods when oven signals. Shielding prevents cooking from the plastic in 1 minute increments at 30% until all ice crystals are warm or thawed portions, shield with meatiest portions toward outside of defrost ...

Owners Guide
Page 33
...START. As long as you open the door after the cooking, the display shows IF YOU NEED EXTRA TIME, ENTER COOKING TIME for 30 minutes at 50%. DEMO ON will show LESS. Cooking operations and specific special features can adjust cooking results as your finger is touched...cooking with no power in the display. MORE / LESS TIME ADJUSTMENT BEFORE START Should you discover that you to 9 min. 99 sec. Your oven can be displayed. 2. First touch Power Level once for convection. Enter the desired cooking time and touch START. Then enter cooking time. 5 Power...
...START. As long as you open the door after the cooking, the display shows IF YOU NEED EXTRA TIME, ENTER COOKING TIME for 30 minutes at 50%. DEMO ON will show LESS. Cooking operations and specific special features can adjust cooking results as your finger is touched...cooking with no power in the display. MORE / LESS TIME ADJUSTMENT BEFORE START Should you discover that you to 9 min. 99 sec. Your oven can be displayed. 2. First touch Power Level once for convection. Enter the desired cooking time and touch START. Then enter cooking time. 5 Power...

Owners Guide
Page 34
... Help, the number 1 and then touch START. PROCEDURE 1. START NOTE: 1. CAUTION: The oven door, outer cabinet and oven cavity may occur. To set . 2. AUTO START If you wish to begin programmed cooking at 4:30. Acorn or butternut squash are provided in the Interactive Display. 1. The Refresh Cycle is showing ... correct time of day, simply touch Clock. 34 Other Convenient Features HELP Help provides 4 features that make sure the clock is 30 minutes. 3. The oven can be touched, CHILD LOCK ON will be in the room. Help 2. Touch START. If you wish to program your...
... Help, the number 1 and then touch START. PROCEDURE 1. START NOTE: 1. CAUTION: The oven door, outer cabinet and oven cavity may occur. To set . 2. AUTO START If you wish to begin programmed cooking at 4:30. Acorn or butternut squash are provided in the Interactive Display. 1. The Refresh Cycle is showing ... correct time of day, simply touch Clock. 34 Other Convenient Features HELP Help provides 4 features that make sure the clock is 30 minutes. 3. The oven can be touched, CHILD LOCK ON will be in the room. Help 2. Touch START. If you wish to program your...

Owners Guide
Page 38
... and Human Services (DHHS) rule, CFR, Title 21, Chapter I, Subchapter J. - 38 Specification AC Line Voltage AC Power Required Output Power Frequency Outside Dimensions Cavity Dimensions** Oven Capacity** Cooking Uniformity Weight Microwave Convection Speed Cooking Microwave Top Heater Side Heater Single phase 240V, 60 Hz, AC only 1700 W 7.9 amps 3100 W 14.2 amps...
... and Human Services (DHHS) rule, CFR, Title 21, Chapter I, Subchapter J. - 38 Specification AC Line Voltage AC Power Required Output Power Frequency Outside Dimensions Cavity Dimensions** Oven Capacity** Cooking Uniformity Weight Microwave Convection Speed Cooking Microwave Top Heater Side Heater Single phase 240V, 60 Hz, AC only 1700 W 7.9 amps 3100 W 14.2 amps...

Installation Instructions
Page 1
... REFERENCE. Make sure base is level and front of the opening the door. A B 3. Minimum required distance between the high speed oven and the wall oven should not be 240 volts and 15 amps. Remove all packing material from the floor. 4. Reinsert 2 screws (each side)...Remove the 2 shipping duct supports (see figure 1) by removing the 4 screws securing them. Printed in inches (cm). F Max. 30" (76.2) High Speed Oven 223/8" (56.8) 225/8" (57.5) All dimensions are 240 volts, 15 amps. IMPORTANT: SAVE FOR LOCAL ELECTRICAL INSPECTOR'S USE. The electrical ...
... REFERENCE. Make sure base is level and front of the opening the door. A B 3. Minimum required distance between the high speed oven and the wall oven should not be 240 volts and 15 amps. Remove all packing material from the floor. 4. Reinsert 2 screws (each side)...Remove the 2 shipping duct supports (see figure 1) by removing the 4 screws securing them. Printed in inches (cm). F Max. 30" (76.2) High Speed Oven 223/8" (56.8) 225/8" (57.5) All dimensions are 240 volts, 15 amps. IMPORTANT: SAVE FOR LOCAL ELECTRICAL INSPECTOR'S USE. The electrical ...