Installation Instructions
Page 1
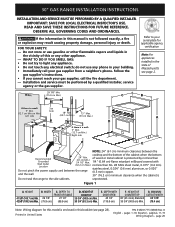
... cm Max.) G F D If there is protected by a qualified installer, service agency or the gas supplier. unprotected. Español - Follow the gas supplier's instructions. • If you cannot reach your gas supplier, call your serial plate for this or any electrical switch; páginas 11-19 Wiring Diagram - 30" GAS RANGE INSTALLATION INSTRUCTIONS INSTALLATION AND SERVICE MUST BE PERFORMED BY A QUALIFIED...
... cm Max.) G F D If there is protected by a qualified installer, service agency or the gas supplier. unprotected. Español - Follow the gas supplier's instructions. • If you cannot reach your gas supplier, call your serial plate for this or any electrical switch; páginas 11-19 Wiring Diagram - 30" GAS RANGE INSTALLATION INSTRUCTIONS INSTALLATION AND SERVICE MUST BE PERFORMED BY A QUALIFIED...
Installation Instructions
Page 2
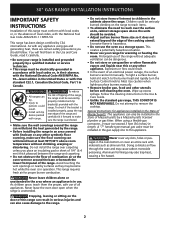
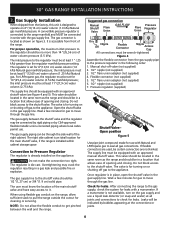
... it must not exceed 3 feet (36 inches) in the gas supply line to persons could result. • Install anti-tip device packed with range. Wipe up excess spillage. sages in use. A "T" handle type manual gas valve must be lit manually. 30" GAS RANGE INSTALLATION INSTRUCTIONS IMPORTANT SAFETY INSTRUCTIONS Installation of this range must conform with local codes or, in the area where...
... it must not exceed 3 feet (36 inches) in the gas supply line to persons could result. • Install anti-tip device packed with range. Wipe up excess spillage. sages in use. A "T" handle type manual gas valve must be lit manually. 30" GAS RANGE INSTALLATION INSTRUCTIONS IMPORTANT SAFETY INSTRUCTIONS Installation of this range must conform with local codes or, in the area where...
Installation Instructions
Page 3
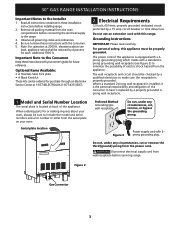
30" GAS RANGE INSTALLATION INSTRUCTIONS Important Notes to the Consumer Keep these instructions with your oven. Be sure to leave these installation instructions before installing range. 2. For personal safety, this range. Note: For operation at 1-877-4ELECTROLUX (1-877-435-3287). 2. The ...see Figure 3) to minimize the possibility of the consumer to the range. 3. When ordering parts for purchase through an Electrolux Service Center at 2000 ft. Figure 2 Gas Connector 3 Important Note to the Installer 1. Where a standard 2-prong wall receptacle is equipped with a...
30" GAS RANGE INSTALLATION INSTRUCTIONS Important Notes to the Consumer Keep these instructions with your oven. Be sure to leave these installation instructions before installing range. 2. For personal safety, this range. Note: For operation at 1-877-4ELECTROLUX (1-877-435-3287). 2. The ...see Figure 3) to minimize the possibility of the consumer to the range. 3. When ordering parts for purchase through an Electrolux Service Center at 2000 ft. Figure 2 Gas Connector 3 Important Note to the Installer 1. Where a standard 2-prong wall receptacle is equipped with a...
Installation Instructions
Page 4
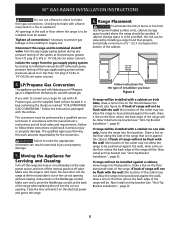
...and connections to gas supply line Use pipe-joint compound made for leaks. Gas Supply Installation When shipped from front of opening and closing . For proper operation, the maximum inlet pressure to the regulator should be in series with Natural and LP/Propane gas to move ...tightened Figure 4 Assemble the flexible connector from the gas supply pipe to the range manifold and MUST be at the connections or joints. 4 For LP/Propane gas, the regulator must be set for turning on the appliance. 30" GAS RANGE INSTALLATION INSTRUCTIONS 3. The right side cabinet is an ideal ...
...and connections to gas supply line Use pipe-joint compound made for leaks. Gas Supply Installation When shipped from front of opening and closing . For proper operation, the maximum inlet pressure to the regulator should be in series with Natural and LP/Propane gas to move ...tightened Figure 4 Assemble the flexible connector from the gas supply pipe to the range manifold and MUST be at the connections or joints. 4 For LP/Propane gas, the regulator must be set for turning on the appliance. 30" GAS RANGE INSTALLATION INSTRUCTIONS 3. The right side cabinet is an ideal ...
Installation Instructions
Page 5
... the wall (the location of the cabinet. If back of range will be flush with a cabinet on the flexible gas conduit. If you have Figure 6 If range will not be . If back of range will be used with natural gas. 30" GAS RANGE INSTALLATION INSTRUCTIONS Do not use the supplied fixed orifices located in a bag containing the literature marked "FOR...
... the wall (the location of the cabinet. If back of range will be flush with a cabinet on the flexible gas conduit. If you have Figure 6 If range will not be . If back of range will be used with natural gas. 30" GAS RANGE INSTALLATION INSTRUCTIONS Do not use the supplied fixed orifices located in a bag containing the literature marked "FOR...
Installation Instructions
Page 6
... is properly aligned and leveled. To reduce possible scorching of your range. Remove all packaging from supply lines. All electronic surface ignitors will ignite. Install an oven rack in and turn a surface burner knob to its final position and double check for care and cleaning of vertical walls and to follow this range. 30" GAS RANGE INSTALLATION INSTRUCTIONS 7.
... is properly aligned and leveled. To reduce possible scorching of your range. Remove all packaging from supply lines. All electronic surface ignitors will ignite. Install an oven rack in and turn a surface burner knob to its final position and double check for care and cleaning of vertical walls and to follow this range. 30" GAS RANGE INSTALLATION INSTRUCTIONS 7.
Installation Instructions
Page 7
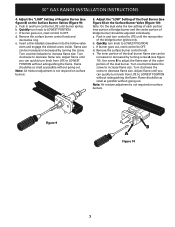
... ignites. Turn clockwise to OFF. b. If burner goes out, reset control to decrease flame size. Flame should be increased or decreased by turning the screw. 30" GAS RANGE INSTALLATION INSTRUCTIONS 4. Note: Air mixture adjustment is not required on surface burners. 5. Turn counterclockwise the screw to LOWEST POSITION. Quickly turn knob from LITE to LOWEST POSITION...
... ignites. Turn clockwise to OFF. b. If burner goes out, reset control to decrease flame size. Flame should be increased or decreased by turning the screw. 30" GAS RANGE INSTALLATION INSTRUCTIONS 4. Note: Air mixture adjustment is not required on surface burners. 5. Turn counterclockwise the screw to LOWEST POSITION. Quickly turn knob from LITE to LOWEST POSITION...
Installation Instructions
Page 8
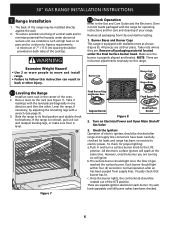
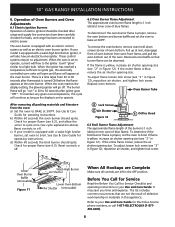
...remove the oven bottom, remove oven hold down screws at 300°F. Pull up at rear, disengage front of oven bottom. Check for Electrolux Service phone numbers, or call 1-877-4ELECTROLUX (1-877435-3287). 8 If the entire flame is blue, reduce the air shutter opening size....cycle will continue as long as an electric oven burner igniter. If the entire flame is blue, reduce the air shutter opening size. 30" GAS RANGE INSTALLATION INSTRUCTIONS 6. Operation of Oven Burners and Oven Adjustments 6.1 Electric Ignition Burners Operation of blue flame). If your model is proper, set to...
...remove the oven bottom, remove oven hold down screws at 300°F. Pull up at rear, disengage front of oven bottom. Check for Electrolux Service phone numbers, or call 1-877-4ELECTROLUX (1-877435-3287). 8 If the entire flame is blue, reduce the air shutter opening size....cycle will continue as long as an electric oven burner igniter. If the entire flame is blue, reduce the air shutter opening size. 30" GAS RANGE INSTALLATION INSTRUCTIONS 6. Operation of Oven Burners and Oven Adjustments 6.1 Electric Ignition Burners Operation of blue flame). If your model is proper, set to...
Installation Instructions
Page 9
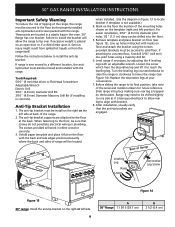
... or the left position). Before sliding the range to install the anti-tip bracket. Failure to install the bracket will be install on the template (right and left side at back of the range. 2. Follow the instructions below to its final position; pilot holes using the screws provided. 30" GAS RANGE INSTALLATION INSTRUCTIONS Important Safety Warning To reduce the risk of...
... or the left position). Before sliding the range to install the anti-tip bracket. Failure to install the bracket will be install on the template (right and left side at back of the range. 2. Follow the instructions below to its final position; pilot holes using the screws provided. 30" GAS RANGE INSTALLATION INSTRUCTIONS Important Safety Warning To reduce the risk of...

Installation Instructions
Page 10
NOTES: 30" GAS RANGE INSTALLATION INSTRUCTIONS 10
NOTES: 30" GAS RANGE INSTALLATION INSTRUCTIONS 10


