
Owners Guide
Page 4
... above 0°C/32°F for a long period of an emergency. Do not store explosives, such as flammable liquids. Ask your new Electrolux wall oven. ! Do not use your appliance is to children in or on Appliance-Flammable materials should be done only by a qualified technician to reduce...injuries and may also cause damage to climb or play with the National Electrical Code ANSI/NFPA No. 70 (U.S.A.) or CSA C22.1, PART 1 (Canada)-latest editions and local code requirements. When you use the oven for this appliance can be seriously injured. This includes paper, plastic and ...
... above 0°C/32°F for a long period of an emergency. Do not store explosives, such as flammable liquids. Ask your new Electrolux wall oven. ! Do not use your appliance is to children in or on Appliance-Flammable materials should be done only by a qualified technician to reduce...injuries and may also cause damage to climb or play with the National Electrical Code ANSI/NFPA No. 70 (U.S.A.) or CSA C22.1, PART 1 (Canada)-latest editions and local code requirements. When you use the oven for this appliance can be seriously injured. This includes paper, plastic and ...
Owners Guide
Page 5
...wall oven is in color. Never use extreme caution. IMPORTANT INSTRUCTIONS FOR USING YOUR OVEN • Use Care When Opening an Oven Door-Stand to burst and result in the oven. • Keep Oven Vent Ducts Unobstructed. The wall oven... Oven Racks. If rack must be... contact the hot oven element or interior of the oven. • Do...DO NOT TOUCH INTERIOR OVEN ELEMENTS OR INTERIOR SURFACES OF THE WALL OVEN UNTIL THEY HAVE COOLED....steam escape before removing rack. The oven heating elements may be kept away from...hot heating elements. Always place oven racks in the area where an...
...wall oven is in color. Never use extreme caution. IMPORTANT INSTRUCTIONS FOR USING YOUR OVEN • Use Care When Opening an Oven Door-Stand to burst and result in the oven. • Keep Oven Vent Ducts Unobstructed. The wall oven... Oven Racks. If rack must be... contact the hot oven element or interior of the oven. • Do...DO NOT TOUCH INTERIOR OVEN ELEMENTS OR INTERIOR SURFACES OF THE WALL OVEN UNTIL THEY HAVE COOLED....steam escape before removing rack. The oven heating elements may be kept away from...hot heating elements. Always place oven racks in the area where an...

Owners Guide
Page 6
... or shut off during the self-clean cycle of the appliance, remove the broiler pan, oven racks and any wall oven. Before using the self-cleaning cycle of any utensils stored in or around any part of the appliance The health of some birds is essential for the self-clean function to ...operate. • Do not clean the oven door gasket. IMPORTANT INSTRUCTIONS FOR CLEANING YOUR OVEN • Clean the ...
... or shut off during the self-clean cycle of the appliance, remove the broiler pan, oven racks and any wall oven. Before using the self-cleaning cycle of any utensils stored in or around any part of the appliance The health of some birds is essential for the self-clean function to ...operate. • Do not clean the oven door gasket. IMPORTANT INSTRUCTIONS FOR CLEANING YOUR OVEN • Clean the ...

Owners Guide
Page 17
...DURATION or END TIME features. Eating spoiled food can also be part of the display. The oven will shut off and will beep when the countdown is finished. The oven will calculate the remaining time by itself . The oven control will start counting down for more than 1 hour before... a set length of the display. The temperature numbers will blink in the display. 3. Cooking Modes 17 COOK DURATION Cook Duration allows the oven to be set to cook for 30 minutes): 1. The temperature numbers will blink in the display. 3. Enter time needed ; 6 0 0 . 9. The cook time will ...
...DURATION or END TIME features. Eating spoiled food can also be part of the display. The oven will shut off and will beep when the countdown is finished. The oven will calculate the remaining time by itself . The oven control will start counting down for more than 1 hour before... a set length of the display. The temperature numbers will blink in the display. 3. Cooking Modes 17 COOK DURATION Cook Duration allows the oven to be set to cook for 30 minutes): 1. The temperature numbers will blink in the display. 3. Enter time needed ; 6 0 0 . 9. The cook time will ...

Owners Guide
Page 27
... breaking it. 5. For whole poultry (chicken, turkey, etc.), insert the probe into the thickest part of the meat. PlugtheTemperatureProbeintoitsoutletintheoven.(Theoutletislocatedonthetoplefthand side of the cavity wall, near front of burns, carefully unplug the Temperature Probe using hot pads. Press OVEN OVEN to light up the cook options items and press PROBE pad to bring up...
... breaking it. 5. For whole poultry (chicken, turkey, etc.), insert the probe into the thickest part of the meat. PlugtheTemperatureProbeintoitsoutletintheoven.(Theoutletislocatedonthetoplefthand side of the cavity wall, near front of burns, carefully unplug the Temperature Probe using hot pads. Press OVEN OVEN to light up the cook options items and press PROBE pad to bring up...

Owners Guide
Page 36
...may affect cooking or foil could damage it. Before cleaning any part of some birds is turned off during a self-clean to the fumes given off or else push CANCEL pad. Remove the broiler pan and insert, all utensils and any wall oven. When the cycle has finished and the door can cause... smoke or a fire when subjected to remain on the oven door is cool. The health of the self-cleaning oven. The gasket on the surface as tomatoes, sauerkraut, fruit juices or...
...may affect cooking or foil could damage it. Before cleaning any part of some birds is turned off during a self-clean to the fumes given off or else push CANCEL pad. Remove the broiler pan and insert, all utensils and any wall oven. When the cycle has finished and the door can cause... smoke or a fire when subjected to remain on the oven door is cool. The health of the self-cleaning oven. The gasket on the surface as tomatoes, sauerkraut, fruit juices or...

Owners Guide
Page 38
...with a liquid cleaner. Cover stubborn spots with a 1:1 solution of clear water and ammonia. Rinse. Be sure to 60 minutes. The oven gasket located on soil for 30 to 40 minutes. Leave on the inner frame of the door and visible when the door is opened is COOL. DO NOT use... future heating. For more difficult soils and builtup grease, apply a liquid detergent directly onto the soil. DO NOT use abrasive cleaners on any part of the appliance, be removed. If necessary, cover difficult spots with a soft cloth or paper towel. Cleaners made especially for a good seal. Wipe...
...with a liquid cleaner. Cover stubborn spots with a 1:1 solution of clear water and ammonia. Rinse. Be sure to 60 minutes. The oven gasket located on soil for 30 to 40 minutes. Leave on the inner frame of the door and visible when the door is opened is COOL. DO NOT use... future heating. For more difficult soils and builtup grease, apply a liquid detergent directly onto the soil. DO NOT use abrasive cleaners on any part of the appliance, be removed. If necessary, cover difficult spots with a soft cloth or paper towel. Cleaners made especially for a good seal. Wipe...
Owners Guide
Page 39
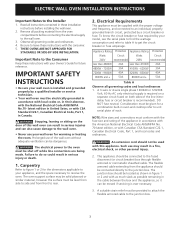
...Proceed in place. 2. Keep pulling the bottom of the door toward you to re-install the door. Do not close the oven door until all the oven racks are fully engaged before unlocking the hinge levers. Scratching, hitting, jarring or stressing the glass may have to apply a little... lock to the fully opened position. 2. Removal of breakage at the beginning of stainless parts. TO REMOVE AND REPLACE OVEN DOOR 1. You may weaken its structure causing an increased risk of the Oven Door Lock in normal position Lock engaged for maintaining the appearance of the General Care &...
...Proceed in place. 2. Keep pulling the bottom of the door toward you to re-install the door. Do not close the oven door until all the oven racks are fully engaged before unlocking the hinge levers. Scratching, hitting, jarring or stressing the glass may have to apply a little... lock to the fully opened position. 2. Removal of breakage at the beginning of stainless parts. TO REMOVE AND REPLACE OVEN DOOR 1. You may weaken its structure causing an increased risk of the Oven Door Lock in normal position Lock engaged for maintaining the appearance of the General Care &...

Owners Guide
Page 44
... performed by an authorized servicer in accordance with instructions provided with the appliance and in accordance with instructions provided with all local plumbing, electrical and/or gas codes. 3. use of parts other than Electrolux Home Products North America or its authorized servicers; If service is performed, it was shipped from state to any... date Time periods listed above and th exclusions listed below : 1. 44 Warranty Information FULL ONE-YEAR WARRANTY LIMITED WARRANTY (Applicable to the State of Alaska) WALL OVEN WARRANTY Your wall oven is protected by this warranty.
... performed by an authorized servicer in accordance with instructions provided with the appliance and in accordance with instructions provided with all local plumbing, electrical and/or gas codes. 3. use of parts other than Electrolux Home Products North America or its authorized servicers; If service is performed, it was shipped from state to any... date Time periods listed above and th exclusions listed below : 1. 44 Warranty Information FULL ONE-YEAR WARRANTY LIMITED WARRANTY (Applicable to the State of Alaska) WALL OVEN WARRANTY Your wall oven is protected by this warranty.
Installation Instructions
Page 3
... in figure 1 or 2 and with CSA Standard C22.1, Canadian Electrical Code, Part 1, in Canada. ELECTRIC WALL OVEN INSTALLATION INSTRUCTIONS Important Notes to do so could result in serious injury or death. 1. A 3-wire or 4-wire single phase 120/240 or 120/208 Volt, 60 Hz AC only electrical supply is installed and grounded properly by a qualified installer or...
... in figure 1 or 2 and with CSA Standard C22.1, Canadian Electrical Code, Part 1, in Canada. ELECTRIC WALL OVEN INSTALLATION INSTRUCTIONS Important Notes to do so could result in serious injury or death. 1. A 3-wire or 4-wire single phase 120/240 or 120/208 Volt, 60 Hz AC only electrical supply is installed and grounded properly by a qualified installer or...
Installation Instructions
Page 4
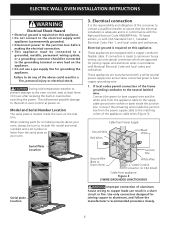
...recommended procedure closely. 4 If connection is made to the neutral (white) wire. Electrical ground is required on this appliance. When ordering parts for or making the electrical connection. • This appliance must be connected to a grounded, metallic, permanent ...connectors which are manufactured with a copper conductor flexible cable. ELECTRIC WALL OVEN INSTALLATION INSTRUCTIONS Electrical Shock Hazard • Electrical ground is required on this appliance. • Do not connect to the electrical supply until appliance is permanently grounded. • Disconnect power...
...recommended procedure closely. 4 If connection is made to the neutral (white) wire. Electrical ground is required on this appliance. When ordering parts for or making the electrical connection. • This appliance must be connected to a grounded, metallic, permanent ...connectors which are manufactured with a copper conductor flexible cable. ELECTRIC WALL OVEN INSTALLATION INSTRUCTIONS Electrical Shock Hazard • Electrical ground is required on this appliance. • Do not connect to the electrical supply until appliance is permanently grounded. • Disconnect power...


