
Owners Guide
Page 2
...Store your work area well lighted. • Unplug electrical appliances before vacuuming them. SAVE THESE INSTRUCTIONS 2 Do not run vacuum cleaner over cord. Keep cord away from openings and moving parts. • Do not place cleaner on floor with the handle in storage position while using attachments. •... pulling on wet surfaces. • Do not leave vacuum cleaner when plugged in place. • Belt pulleys can become hot during normal use and before unplugging. • Do not unplug by cord, use without dust bag in . IMPORTANT SAFEGUARDS When using an electrical appliance, ...
...Store your work area well lighted. • Unplug electrical appliances before vacuuming them. SAVE THESE INSTRUCTIONS 2 Do not run vacuum cleaner over cord. Keep cord away from openings and moving parts. • Do not place cleaner on floor with the handle in storage position while using attachments. •... pulling on wet surfaces. • Do not leave vacuum cleaner when plugged in place. • Belt pulleys can become hot during normal use and before unplugging. • Do not unplug by cord, use without dust bag in . IMPORTANT SAFEGUARDS When using an electrical appliance, ...

Owners Guide
Page 5
... hose retainer and place nozzle on /off switch is in off (0) position before using. NOTE: Features may vary by model yet all parts assemble the same. From rear of cleaner, align handle with three 1 inch screws in . Step B Store Hose and Accessories Handle Grooves 3 Locations for Screws 1 2 3 Hose Retainer Crevice Tool Upholstery... above. 5 If necessary, use thumb and finger pressure to unit. Remove paper holding hose to slide handle into position. 2. HOW TO ASSEMBLE CAUTION: Assemble the cleaner before plugging in the assembly packet.
... hose retainer and place nozzle on /off switch is in off (0) position before using. NOTE: Features may vary by model yet all parts assemble the same. From rear of cleaner, align handle with three 1 inch screws in . Step B Store Hose and Accessories Handle Grooves 3 Locations for Screws 1 2 3 Hose Retainer Crevice Tool Upholstery... above. 5 If necessary, use thumb and finger pressure to unit. Remove paper holding hose to slide handle into position. 2. HOW TO ASSEMBLE CAUTION: Assemble the cleaner before plugging in the assembly packet.

Owners Guide
Page 7
... in moving part (such as the revolving brush). Brush roll is "off" for floor surface cleaning. The front of the cleaner has an adjustment that raises or lowers the cleaner base to choose between cleaning hard floors and carpeting. The optimal hard floor cleaning adjustment is in upright position, brush...light should go on latch to be full. The brush roll must reach the carpet for your Eureka vacuum, the red light should turn off the switch and unplug the cleaner before the bag appears to indicate whether or not floors are clean. The Hard Floor setting is time to next...
... in moving part (such as the revolving brush). Brush roll is "off" for floor surface cleaning. The front of the cleaner has an adjustment that raises or lowers the cleaner base to choose between cleaning hard floors and carpeting. The optimal hard floor cleaning adjustment is in upright position, brush...light should go on latch to be full. The brush roll must reach the carpet for your Eureka vacuum, the red light should turn off the switch and unplug the cleaner before the bag appears to indicate whether or not floors are clean. The Hard Floor setting is time to next...

Owners Guide
Page 10
If no suction, check disposable dust bag and filters. To Check Large base hose coming from hood, go directly to step 3. Pull small clear tube (E) down and away from cleaner. 6. At hose/clear tube connection, rotate twist lock (F) to unlock. 4. Check for blockages in both clear ... Remove large clear tube (G) by swinging back and pulling down and away from cleaner. At large hose/clear tube connection, rotate twist lock (H) to reassembling. Do not put them in the vacuum cleaner. Make sure all parts are completely dry prior to release tube. 10. Lift latch (D). 5. To ...
If no suction, check disposable dust bag and filters. To Check Large base hose coming from hood, go directly to step 3. Pull small clear tube (E) down and away from cleaner. 6. At hose/clear tube connection, rotate twist lock (F) to unlock. 4. Check for blockages in both clear ... Remove large clear tube (G) by swinging back and pulling down and away from cleaner. At large hose/clear tube connection, rotate twist lock (H) to reassembling. Do not put them in the vacuum cleaner. Make sure all parts are completely dry prior to release tube. 10. Lift latch (D). 5. To ...

Owners Guide
Page 12
To avoid unnecessary service calls, check the bag, belt, and brush roll often. To test the bristle length, hold a ruler against the underneath side of the cleaner. Belt pulleys can become hot during normal use. Lift base plate off the switch and unplug the electrical cord 2 before replacing belt. Place new belt ... roll so it is normal. 12 4. Cut away any hair or threads wound around motor shaft and brush roll. How To Replace Brush Roll Belt, Part No. 61110 NOTE: Turn off base.
To avoid unnecessary service calls, check the bag, belt, and brush roll often. To test the bristle length, hold a ruler against the underneath side of the cleaner. Belt pulleys can become hot during normal use. Lift base plate off the switch and unplug the electrical cord 2 before replacing belt. Place new belt ... roll so it is normal. 12 4. Cut away any hair or threads wound around motor shaft and brush roll. How To Replace Brush Roll Belt, Part No. 61110 NOTE: Turn off base.

Owners Guide
Page 14
...bag into cleaner slot. To Replace Motor Filter 1. Place tab on each disposable dust bag change. Never operate without motor filter in place. Replace filter retainer. Remove bag from inside the paper bag collar. 5. Check to left, away from holding pegs. 2. Install new filter, by vacuuming...retainer and filter from cleaner and discard. D Hose Adapter To Replace Bag: 3. Place bag collar on right side. Replace filter retainer. To Clean Motor Filter 1. Grasp cardboard bag collar (C) and pivot collar down until bag secures on lower part of front cover ...
...bag into cleaner slot. To Replace Motor Filter 1. Place tab on each disposable dust bag change. Never operate without motor filter in place. Replace filter retainer. Remove bag from inside the paper bag collar. 5. Check to left, away from holding pegs. 2. Install new filter, by vacuuming...retainer and filter from cleaner and discard. D Hose Adapter To Replace Bag: 3. Place bag collar on right side. Replace filter retainer. To Clean Motor Filter 1. Grasp cardboard bag collar (C) and pivot collar down until bag secures on lower part of front cover ...

Owners Guide
Page 19
... to you specific legal rights. GENUINE EUREKA PRODUCT Questions & Answers about Genuine Eureka Products Q: Why should I am using only genuine Eureka products in my vacuum cleaner? Overall, this warranty is limited to the relief expressly provided above ). A: Yes, there are made to fit" or "imitation" and Genuine Eureka paper bags, belts, and parts? The warranty is granted only...
... to you specific legal rights. GENUINE EUREKA PRODUCT Questions & Answers about Genuine Eureka Products Q: Why should I am using only genuine Eureka products in my vacuum cleaner? Overall, this warranty is limited to the relief expressly provided above ). A: Yes, there are made to fit" or "imitation" and Genuine Eureka paper bags, belts, and parts? The warranty is granted only...

Owners Guide
Page 20
...) 1 hardware package (3 screws) 1 vacuum cleaner handle to be installed on unit Thank you for selecting a Eureka cleaner. Don't Forget to 7:30 p.m., (CST), Monday - Questions? Friday and Saturday 10:00 a.m. - 6:30 p.m. (CST) Accessory Items in U.S.A. Part No. 70750 (4/03) ©2000 White Consolidated, Ltd. Printed in This Carton 1 set of non-genuine Eureka bags are not covered by...
...) 1 hardware package (3 screws) 1 vacuum cleaner handle to be installed on unit Thank you for selecting a Eureka cleaner. Don't Forget to 7:30 p.m., (CST), Monday - Questions? Friday and Saturday 10:00 a.m. - 6:30 p.m. (CST) Accessory Items in U.S.A. Part No. 70750 (4/03) ©2000 White Consolidated, Ltd. Printed in This Carton 1 set of non-genuine Eureka bags are not covered by...

Owners Guide
Page 3
...cigarettes, matches, or hot ashes. • Do not use without dust bag, motor filter and HEPA filter in any time. To unplug, grasp the plug, not the cord. • Do not handle plug or vacuum cleaner with wet hands. • Do not put any opening blocked; SAVE THESE...contains a revolving brush roll. The bearings are permanently lubricated and sealed. Do not run vacuum cleaner over cord. Eureka Customer Service HELPLINE 1-800-282-2886 www.eureka.com 1 Keep hair, loose clothing, fingers, and all parts of body away from heated surfaces. • Do not use extension cords or outlets ...
...cigarettes, matches, or hot ashes. • Do not use without dust bag, motor filter and HEPA filter in any time. To unplug, grasp the plug, not the cord. • Do not handle plug or vacuum cleaner with wet hands. • Do not put any opening blocked; SAVE THESE...contains a revolving brush roll. The bearings are permanently lubricated and sealed. Do not run vacuum cleaner over cord. Eureka Customer Service HELPLINE 1-800-282-2886 www.eureka.com 1 Keep hair, loose clothing, fingers, and all parts of body away from heated surfaces. • Do not use extension cords or outlets ...

Owners Guide
Page 4
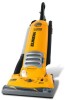
...Serial number Find these numbers when ordering parts and accessories or if service is tested and thoroughly inspected before shipping. How to Identify Parts of your new Eureka vacuum cleaner for assembly and use.This Owner's Guide...Vacuum Cleaner Handle Selector knob Cord retainer Hose Power switch On (I) / Off (O) Cover latch Disposable dust bag & motor filter (located inside compartment) Headlight (on the lower back side of the vacuum cleaner. Inspection Carefully unpack and inspect your Eureka vacuum cleaner. For instructions regarding any shipping damage, call Eureka...
...Serial number Find these numbers when ordering parts and accessories or if service is tested and thoroughly inspected before shipping. How to Identify Parts of your new Eureka vacuum cleaner for assembly and use.This Owner's Guide...Vacuum Cleaner Handle Selector knob Cord retainer Hose Power switch On (I) / Off (O) Cover latch Disposable dust bag & motor filter (located inside compartment) Headlight (on the lower back side of the vacuum cleaner. Inspection Carefully unpack and inspect your Eureka vacuum cleaner. For instructions regarding any shipping damage, call Eureka...

Owners Guide
Page 5
... dust bag is in OFF (O) position before using this vacuum cleaner. replace front cover. 6 MONTHS - Remove HEPA filter. Clean BELT style R - ENGLISH Maintenance Information ! Never operate vacuum without motor filter in proper position. 3 MONTHS, OR EACH TIME YOU REPLACE DUST BAG - ...up handle to remove from pegs. www.eureka.com 3 Place collar of compartment. sides. Moving parts! Replace disposable dust bag style RR Lift latch to remove bag. BRUSH ROLL - Read all instructions before plugging in bag at sides. pull down cardboard collar to...
... dust bag is in OFF (O) position before using this vacuum cleaner. replace front cover. 6 MONTHS - Remove HEPA filter. Clean BELT style R - ENGLISH Maintenance Information ! Never operate vacuum without motor filter in proper position. 3 MONTHS, OR EACH TIME YOU REPLACE DUST BAG - ...up handle to remove from pegs. www.eureka.com 3 Place collar of compartment. sides. Moving parts! Replace disposable dust bag style RR Lift latch to remove bag. BRUSH ROLL - Read all instructions before plugging in bag at sides. pull down cardboard collar to...

Owners Guide
Page 10
... repair or replace a defective vacuum or vacuum part that may be implied in connection with your vacuum. As a matter of warranty policy, Eureka will be free from the date of purchase only when the vacuum cleaner is a trademark of Church ...Electrolux Home Care Products, Inc. Some states do not allow limitations on the lower backside of Merchantability or any Eureka Authorized Warranty Station. The ARM & HAMMER name is used by this warranty. What Eureka Will Do Eureka will, at (800) 934-9194 or visit sylvane.com The Eureka Limited Warranty Eureka warrants this vacuum cleaner...
... repair or replace a defective vacuum or vacuum part that may be implied in connection with your vacuum. As a matter of warranty policy, Eureka will be free from the date of purchase only when the vacuum cleaner is a trademark of Church ...Electrolux Home Care Products, Inc. Some states do not allow limitations on the lower backside of Merchantability or any Eureka Authorized Warranty Station. The ARM & HAMMER name is used by this warranty. What Eureka Will Do Eureka will, at (800) 934-9194 or visit sylvane.com The Eureka Limited Warranty Eureka warrants this vacuum cleaner...

