User Manual
Page 2
....tw 1 Edimax Technology Co., Ltd. Any software described in this manual is sold or licensed as is. The product you have purchased and the setup screen may be reproduced, transmitted, transcribed, stored in a retrieval system, or translated into any language or computer language, ...manual on the CD-ROM. The software and specifications are trademarks and/or registered trademarks of all rights reserved. COPYRIGHT Copyright Edimax Technology Co., Ltd. For more information about this company, its distributor, or its dealer) assumes the entire cost of their purchase, ...
....tw 1 Edimax Technology Co., Ltd. Any software described in this manual is sold or licensed as is. The product you have purchased and the setup screen may be reproduced, transmitted, transcribed, stored in a retrieval system, or translated into any language or computer language, ...manual on the CD-ROM. The software and specifications are trademarks and/or registered trademarks of all rights reserved. COPYRIGHT Copyright Edimax Technology Co., Ltd. For more information about this company, its distributor, or its dealer) assumes the entire cost of their purchase, ...
User Manual
Page 4
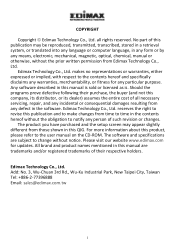
... distribution Broadband Internet sharing Internet Protocol Television (IPTV) and Voice over Internet Protocol (VoIP) applications 3 Chapter 1: Introduction 1.1 Product Features Easy plug-n-play setup and 128-bit AES security Max.
... distribution Broadband Internet sharing Internet Protocol Television (IPTV) and Voice over Internet Protocol (VoIP) applications 3 Chapter 1: Introduction 1.1 Product Features Easy plug-n-play setup and 128-bit AES security Max.
User Manual
Page 8
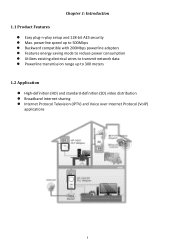
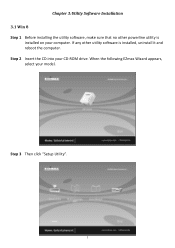
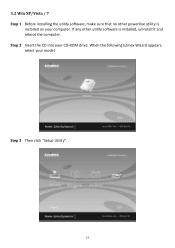
Step 3 Then click "Setup Utility". 7 Chapter 3:Utility Software Installation 3.1 Win 8 Step 1 Before installing the utility software, make sure that no other utility software is installed on your CD-ROM drive. If any other powerline utility is installed, uninstall it and reboot the computer. Step 2 Insert the CD into your computer. When the following EZmax Wizard appears, select your model.
Step 3 Then click "Setup Utility". 7 Chapter 3:Utility Software Installation 3.1 Win 8 Step 1 Before installing the utility software, make sure that no other utility software is installed on your CD-ROM drive. If any other powerline utility is installed, uninstall it and reboot the computer. Step 2 Insert the CD into your computer. When the following EZmax Wizard appears, select your model.
User Manual
Page 9
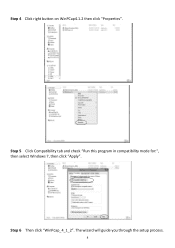
Step 5 Click Compatibility tab and check "Run this program in compatibility mode for:", then select Windows 7, then click "Apply". Step 4 Click right button on WinPCap4.1.2 then click "Properties". The wizard will guide you through the setup process. 8 Step 6 Then click "WinPcap_4_1_2".
Step 5 Click Compatibility tab and check "Run this program in compatibility mode for:", then select Windows 7, then click "Apply". Step 4 Click right button on WinPCap4.1.2 then click "Properties". The wizard will guide you through the setup process. 8 Step 6 Then click "WinPcap_4_1_2".
User Manual
Page 15
Step 2 Insert the CD into your model. When the following EZmax Wizard appears, select your CD-ROM drive. 3.2 Win XP/Vista / 7 Step 1 Before installing the utility software, make sure that no other utility software is installed on your computer. If any other powerline utility is installed, uninstall it and reboot the computer. Step 3 Then click "Setup Utility". 14
Step 2 Insert the CD into your model. When the following EZmax Wizard appears, select your CD-ROM drive. 3.2 Win XP/Vista / 7 Step 1 Before installing the utility software, make sure that no other utility software is installed on your computer. If any other powerline utility is installed, uninstall it and reboot the computer. Step 3 Then click "Setup Utility". 14
User Manual
Page 16
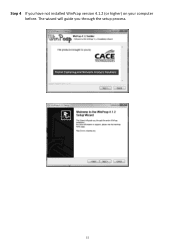
The wizard will guide you have not installed WinPcap version 4.1.2 (or higher) on your computer before. Step 4 If you through the setup process. 15
The wizard will guide you have not installed WinPcap version 4.1.2 (or higher) on your computer before. Step 4 If you through the setup process. 15
User Manual
Page 18
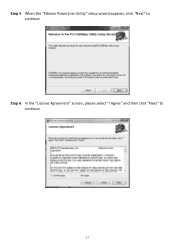
Step 5 When the "Edimax PowerLine Utility" setup wizard appears, click "Next" to continue. 17 Step 6 In the "License Agreement" screen, please select "I Agree" and then click "Next" to continue.
Step 5 When the "Edimax PowerLine Utility" setup wizard appears, click "Next" to continue. 17 Step 6 In the "License Agreement" screen, please select "I Agree" and then click "Next" to continue.