User Guide
Page 1
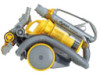
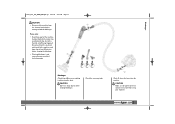
Owner's manual Please read this guide carefully before using your DC11. 11323_DC11_USA_OWNER_MAN.qxd p1 9/23/04 2:43 PM Page 1
Owner's manual Please read this guide carefully before using your DC11. 11323_DC11_USA_OWNER_MAN.qxd p1 9/23/04 2:43 PM Page 1
User Guide
Page 2
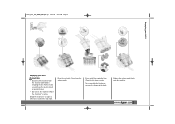
... the cord or pull the cord around sharp edges or corners. Unplug from this, do not use the cord as a toy. Use only with Dyson recommended or approved attachments and accessories. 6 Check to ensure your electricity supply corresponds to that shown on the rating plate, which can be found on...USING THIS VACUUM CLEANER When using an electrical appliance, basic precautions should always be used as described in this manual or advised by the Helpline. 2 Dyson Helpline contact us on the floor. 20 Do not pick up anything that may reduce air flow. 14 Keep hair, loose clothing, fingers, and all...
... the cord or pull the cord around sharp edges or corners. Unplug from this, do not use the cord as a toy. Use only with Dyson recommended or approved attachments and accessories. 6 Check to ensure your electricity supply corresponds to that shown on the rating plate, which can be found on...USING THIS VACUUM CLEANER When using an electrical appliance, basic precautions should always be used as described in this manual or advised by the Helpline. 2 Dyson Helpline contact us on the floor. 20 Do not pick up anything that may reduce air flow. 14 Keep hair, loose clothing, fingers, and all...
User Guide
Page 3
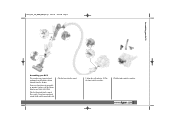
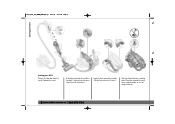
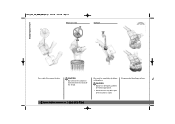
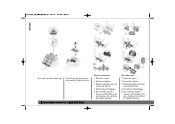
If you need assistance to release wand and extend it , please call the Dyson Helpline on 1-866-693-9766. Click the tools onto the machine. 3 Clip the floor tool into the machine. Press catch 1 to assemble or operate it fully until the wand cuffs click. Clip the hose into the wand. 1 Align the cuff and pins. 2 Clip the hose into the wand. Assembling your DC11 11323_DC11_USA_OWNER_MAN.qxd p1 9/23/04 2:43 PM Page 3 1 1 2 Assembling your DC11 This machine was inspected and packaged carefully before being shipped from the factory.
If you need assistance to release wand and extend it , please call the Dyson Helpline on 1-866-693-9766. Click the tools onto the machine. 3 Clip the floor tool into the machine. Press catch 1 to assemble or operate it fully until the wand cuffs click. Clip the hose into the wand. 1 Align the cuff and pins. 2 Clip the hose into the wand. Assembling your DC11 11323_DC11_USA_OWNER_MAN.qxd p1 9/23/04 2:43 PM Page 3 1 1 2 Assembling your DC11 This machine was inspected and packaged carefully before being shipped from the factory.
User Guide
Page 4
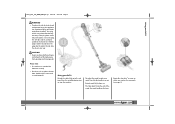
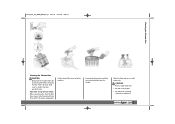
Clip the hose into the parking yoke. Compact the wand. Slide the floor tool into sides 3 and 4. Storing your DC11 11323_DC11_USA_OWNER_MAN.qxd p1 9/23/04 2:43 PM Page 4 1 2 3 4 Storing your DC11 Remove the floor tool from the wand. Loop the hose around the machine. Please do not park the wand in an upright position, as it into place. To attach the wand to the machine, clip catch 1 between bins then press catch 2 to click it 's not designed for this. 4 Dyson Helpline contact us on 1-866-693-9766
Clip the hose into the parking yoke. Compact the wand. Slide the floor tool into sides 3 and 4. Storing your DC11 11323_DC11_USA_OWNER_MAN.qxd p1 9/23/04 2:43 PM Page 4 1 2 3 4 Storing your DC11 Remove the floor tool from the wand. Loop the hose around the machine. Please do not park the wand in an upright position, as it into place. To attach the wand to the machine, clip catch 1 between bins then press catch 2 to click it 's not designed for this. 4 Dyson Helpline contact us on 1-866-693-9766
User Guide
Page 5
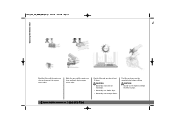
... all parts of the wand, the wand handle or the hose. The floor tools fit into the outlet. Using your DC11 Extend the cable fully up to the red tape. Using your DC11 11323_DC11_USA_OWNER_MAN.qxd p1 9/23/04 2:43 PM Page 5 WARNING • To reduce the risk of electric shock and personal...
... all parts of the wand, the wand handle or the hose. The floor tools fit into the outlet. Using your DC11 Extend the cable fully up to the red tape. Using your DC11 11323_DC11_USA_OWNER_MAN.qxd p1 9/23/04 2:43 PM Page 5 WARNING • To reduce the risk of electric shock and personal...
User Guide
Page 6
CAUTION • Hold plug when rewinding onto cord reel. Do not allow plug to rewind the cable. 11323_DC11_USA_OWNER_MAN.qxd p1 9/23/04 2:43 PM Page 6 Using your DC11 The tools clean upholstery, curtains and stairs. The tools fit the wand, wand handle and hose. 6 Dyson Helpline contact us on 1-866-693-9766 Hold the cable rewind button down to whip when rewinding.
CAUTION • Hold plug when rewinding onto cord reel. Do not allow plug to rewind the cable. 11323_DC11_USA_OWNER_MAN.qxd p1 9/23/04 2:43 PM Page 6 Using your DC11 The tools clean upholstery, curtains and stairs. The tools fit the wand, wand handle and hose. 6 Dyson Helpline contact us on 1-866-693-9766 Hold the cable rewind button down to whip when rewinding.
User Guide
Page 7
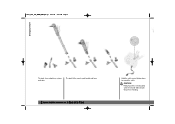
11323_DC11_USA_OWNER_MAN.qxd p1 9/23/04 2:43 PM Page 7 1 2 Using your tools clean air turbine head Using your tools Clean air turbine head When you start the machine the Turbine head is already in the button to turn the machine off . bare floor tool For bare floors, press in carpet mode. mini turbine head Optional Mini turbine head Cleans hair from confined spaces such as the car. 1 Attach the enclosed adapter to the Mini turbine head. 2 Attach the complete tool to carpet mode, pull out the button or turn the brushbar off . To return to the end of the wand. 7 Optional Bare ...
11323_DC11_USA_OWNER_MAN.qxd p1 9/23/04 2:43 PM Page 7 1 2 Using your tools clean air turbine head Using your tools Clean air turbine head When you start the machine the Turbine head is already in the button to turn the machine off . bare floor tool For bare floors, press in carpet mode. mini turbine head Optional Mini turbine head Cleans hair from confined spaces such as the car. 1 Attach the enclosed adapter to the Mini turbine head. 2 Attach the complete tool to carpet mode, pull out the button or turn the brushbar off . To return to the end of the wand. 7 Optional Bare ...

User Guide
Page 8
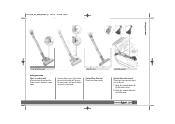
For loose fabrics pull the trigger and hold it to the base. • Ensure the hose has clicked into place on 1-866-693-9766 Carrying your DC11 For your safety do not press the cyclone release catch when carrying your DC11 Crevice tool Reaches into nooks and crannies. 11323_DC11_USA_OWNER_MAN.qxd p1 9/23/04 2:43 PM Page 8 Carrying your machine. CAUTION • Do not shake the machine when carrying. • Ensure the cyclone pack and wand handle are firmly secured to reduce suction. 8 Dyson Helpline contact us on both sides.
For loose fabrics pull the trigger and hold it to the base. • Ensure the hose has clicked into place on 1-866-693-9766 Carrying your DC11 For your safety do not press the cyclone release catch when carrying your DC11 Crevice tool Reaches into nooks and crannies. 11323_DC11_USA_OWNER_MAN.qxd p1 9/23/04 2:43 PM Page 8 Carrying your machine. CAUTION • Do not shake the machine when carrying. • Ensure the cyclone pack and wand handle are firmly secured to reduce suction. 8 Dyson Helpline contact us on both sides.
User Guide
Page 9
... in electric shock or personal injury. • Do not use the machine without the clear binsTM in place. Emptying your DC11 11323_DC11_USA_OWNER_MAN.qxd p1 9/23/04 2:43 PM Page 9 2 1 Emptying your DC11 CAUTION • Disconnect the machine from the electrical outlet before emptying the bin. Failure to empty the bins. Close the...
... in electric shock or personal injury. • Do not use the machine without the clear binsTM in place. Emptying your DC11 11323_DC11_USA_OWNER_MAN.qxd p1 9/23/04 2:43 PM Page 9 2 1 Emptying your DC11 CAUTION • Disconnect the machine from the electrical outlet before emptying the bin. Failure to empty the bins. Close the...
User Guide
Page 10
Brush the fine dust off the shroud. CAUTION • Do not rinse the cyclones in water. Recommended for allergy sufferers. 10 Dyson Helpline contact us on 1-866-693-9766 Bins must be completely dry before refitting them. 11323_DC11_USA_OWNER_MAN.qxd p1 9/23/04 2:43 PM Page 10 When necessary 3 Optional Emptying your DC11 Press catch 3 to remove the bins. CAUTION • Do not use detergents, polishes or freshening products. • Do not immerse any other part of the machine in water.
Brush the fine dust off the shroud. CAUTION • Do not rinse the cyclones in water. Recommended for allergy sufferers. 10 Dyson Helpline contact us on 1-866-693-9766 Bins must be completely dry before refitting them. 11323_DC11_USA_OWNER_MAN.qxd p1 9/23/04 2:43 PM Page 10 When necessary 3 Optional Emptying your DC11 Press catch 3 to remove the bins. CAUTION • Do not use detergents, polishes or freshening products. • Do not immerse any other part of the machine in water.
User Guide
Page 11
Cleaning the lifetime filter 11323_DC11_USA_OWNER_MAN.qxd p1 9/23/04 2:43 PM Page 11 1 Cleaning the lifetime filter . machine. CAUTION • Rinse in cold • Disconnect the machine from the electrical outlet before removing the filter. Press catch 1 to do so could result in a washing machine or dishwasher. 11 case and shake both over the dustbin. water only. Wash filter at least every 6 months. Failure to release cyclone pack. • Do not put in electric shock or personal injury. CAUTION Lift the plastic filter case out of the Separate the foam ...
Cleaning the lifetime filter 11323_DC11_USA_OWNER_MAN.qxd p1 9/23/04 2:43 PM Page 11 1 Cleaning the lifetime filter . machine. CAUTION • Rinse in cold • Disconnect the machine from the electrical outlet before removing the filter. Press catch 1 to do so could result in a washing machine or dishwasher. 11 case and shake both over the dustbin. water only. Wash filter at least every 6 months. Failure to release cyclone pack. • Do not put in electric shock or personal injury. CAUTION Lift the plastic filter case out of the Separate the foam ...
User Guide
Page 12
CAUTION • Do not dry in an oven or microwave. • Do not dry in place. 12 Dyson Helpline contact us on 1-866-693-9766 The filter and case must be completely dry before refitting. CAUTION • Do not use the machine without ...
CAUTION • Do not dry in an oven or microwave. • Do not dry in place. 12 Dyson Helpline contact us on 1-866-693-9766 The filter and case must be completely dry before refitting. CAUTION • Do not use the machine without ...
User Guide
Page 13
Blockages Check A and B to look for at least 30 minutes before clearing the blockage. • Clearing blockages is obstructing the ducts. C Check C where the hose joins the machine. Disconnect from B the electrical outlet before using your machine's limited warranty. CAUTION • Make sure all parts have been replaced securely before starting to ensure nothing is not A covered by your machine. 13 CAUTION • Don't use sharp objects when clearing blockages. Check the accessory tools. Blockages 11323_DC11_USA_OWNER_MAN.qxd p1 9/23/04 2:43 PM Page 13 ...
Blockages Check A and B to look for at least 30 minutes before clearing the blockage. • Clearing blockages is obstructing the ducts. C Check C where the hose joins the machine. Disconnect from B the electrical outlet before using your machine's limited warranty. CAUTION • Make sure all parts have been replaced securely before starting to ensure nothing is not A covered by your machine. 13 CAUTION • Don't use sharp objects when clearing blockages. Check the accessory tools. Blockages 11323_DC11_USA_OWNER_MAN.qxd p1 9/23/04 2:43 PM Page 13 ...
User Guide
Page 14
Check the air inlets. 14 Dyson Helpline contact us on 1-866-693-9766 Clean air turbine head 1 Release the catches. 2 Remove the soleplate. 3 Remove the brushbar and clear away thread and ...
Check the air inlets. 14 Dyson Helpline contact us on 1-866-693-9766 Clean air turbine head 1 Release the catches. 2 Remove the soleplate. 3 Remove the brushbar and clear away thread and ...
User Guide
Page 15
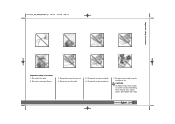
CAUTION 8 To avoid personal injury and to prevent the machine from falling when cleaning stairs, always place it at the bottom of the stairs. 15 Important safety instructions 11323_DC11_USA_OWNER_MAN.qxd p1 9/23/04 2:43 PM Page 15 1 3 5 7 2 4 6 8 Important safety instructions 1 Do not pull the cable. 2 Do not use near open flames. 3 Do not leave near heat sources. 4 Do not run over the cable. 5 Do not pick up water or liquids. 6 Do not pick up burning objects. 7 Do not put your hands near the brushbar in use.
CAUTION 8 To avoid personal injury and to prevent the machine from falling when cleaning stairs, always place it at the bottom of the stairs. 15 Important safety instructions 11323_DC11_USA_OWNER_MAN.qxd p1 9/23/04 2:43 PM Page 15 1 3 5 7 2 4 6 8 Important safety instructions 1 Do not pull the cable. 2 Do not use near open flames. 3 Do not leave near heat sources. 4 Do not run over the cable. 5 Do not pick up water or liquids. 6 Do not pick up burning objects. 7 Do not put your hands near the brushbar in use.

User Guide
Page 16
.../GB03/003658; PCT/GB03/003659; This warranty provides, at no cost to you the options available for service. To reach the Dyson Helpline call the Dyson Helpline we will be solved over the phone by the following intellectual property rights: Patent/Patent Application numbers: PCT/GB02/00320; WO...02/067742; Warranty and customer care 11323_DC11_USA_OWNER_MAN.qxd p1 9/23/04 2:43 PM Page 16 Household 2 year limited warranty Domestic use Your Dyson vacuum cleaner is warranted against original defects in material and workmanship for a period of two years from those shown. 16...
.../GB03/003658; PCT/GB03/003659; This warranty provides, at no cost to you the options available for service. To reach the Dyson Helpline call the Dyson Helpline we will be solved over the phone by the following intellectual property rights: Patent/Patent Application numbers: PCT/GB02/00320; WO...02/067742; Warranty and customer care 11323_DC11_USA_OWNER_MAN.qxd p1 9/23/04 2:43 PM Page 16 Household 2 year limited warranty Domestic use Your Dyson vacuum cleaner is warranted against original defects in material and workmanship for a period of two years from those shown. 16...
