User Guide
Page 6
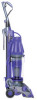
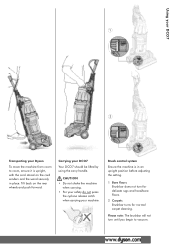
... the rear wheels and push forward. CAUTION • Do not shake the machine when carrying. • For your safety do not press the cyclone release catch when carrying your Dyson To move the machine from room to vacuum. 7 Using your DCO7 1 2 Transporting your machine. Carrying your DCO7 Your DCO7 should be lifted...
... the rear wheels and push forward. CAUTION • Do not shake the machine when carrying. • For your safety do not press the cyclone release catch when carrying your Dyson To move the machine from room to vacuum. 7 Using your DCO7 1 2 Transporting your machine. Carrying your DCO7 Your DCO7 should be lifted...
User Guide
Page 9
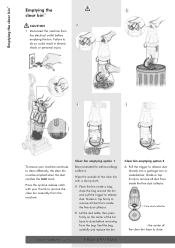
Press the cyclone release catch with a damp cloth. Shake or tap firmly to remove all dust from the machine. Clear bin emptying option 2 A Pull the trigger to close ... removing from inside the fine dust collector. A Place the bin inside a bag, close the bag around the bin and pull the trigger to close . 10 Dyson Helpline contact us on 1-866-693-9766
Press the cyclone release catch with a damp cloth. Shake or tap firmly to remove all dust from the machine. Clear bin emptying option 2 A Pull the trigger to close ... removing from inside the fine dust collector. A Place the bin inside a bag, close the bag around the bin and pull the trigger to close . 10 Dyson Helpline contact us on 1-866-693-9766
User Guide
Page 10
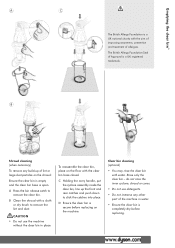
... rinse the clear bin with the aim of improving awareness, prevention and treatment of Approval is secure before replacing. 11 do not rinse the inner cyclone, shroud or cones. • Do not use the machine without the clear bin in water. • Ensure the clear bin is completely dry before ...with a cloth or dry brush to remove the clear bin. B Clean the shroud with the clear bin base closed. C Holding the carry handle, put the cyclone assembly inside the clear bin, line up of the machine in place. To reassemble the clear bin, place on the shroud: Ensure the clear bin...
... rinse the clear bin with the aim of improving awareness, prevention and treatment of Approval is secure before replacing. 11 do not rinse the inner cyclone, shroud or cones. • Do not use the machine without the clear bin in water. • Ensure the clear bin is completely dry before ...with a cloth or dry brush to remove the clear bin. B Clean the shroud with the clear bin base closed. C Holding the carry handle, put the cyclone assembly inside the clear bin, line up of the machine in place. To reassemble the clear bin, place on the shroud: Ensure the clear bin...
Parts List
Page 4
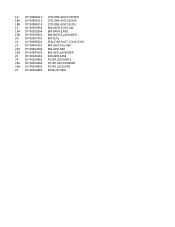
...,PUR/RED 18A DY‐90486115 CYCLONE ASSY,SIL/LAV 18B DY‐90486118 CYCLONE ASSY,SIL/YEL 19 DY‐90392901 BIN BAFFLE,YELLOW 19A DY‐90392904 BIN BAFFLE,RED 19B DY‐90392905 BIN BAFFLE,LAVENDER 20 ...
...,PUR/RED 18A DY‐90486115 CYCLONE ASSY,SIL/LAV 18B DY‐90486118 CYCLONE ASSY,SIL/YEL 19 DY‐90392901 BIN BAFFLE,YELLOW 19A DY‐90392904 BIN BAFFLE,RED 19B DY‐90392905 BIN BAFFLE,LAVENDER 20 ...

