
User Guide
Page 3
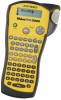
...bottom of 1/4" (6 mm), 3/8" (9 mm), 1/2" (12 mm), or 3/4" (19 mm). Visit www.dymo.com/ industrial for information about purchasing additional label cassettes. 3 Visit www.dymo.com/industrial for details. Inserting the Batteries The printer uses six AA batteries. Insert the batteries following the ...2 2. To connect the AC adapter 1. Close the compartment door. Visit www.dymo.com/industrial for your labels in a wide range of inactivity. The printer uses RhinoPRO Industrial label cassettes in this section to open the battery compartment door. Remove the batteries if ...
...bottom of 1/4" (6 mm), 3/8" (9 mm), 1/2" (12 mm), or 3/4" (19 mm). Visit www.dymo.com/ industrial for information about purchasing additional label cassettes. 3 Visit www.dymo.com/industrial for details. Inserting the Batteries The printer uses six AA batteries. Insert the batteries following the ...2 2. To connect the AC adapter 1. Close the compartment door. Visit www.dymo.com/industrial for your labels in a wide range of inactivity. The printer uses RhinoPRO Industrial label cassettes in this section to open the battery compartment door. Remove the batteries if ...
User Guide
Page 4
See Figure 5. Figure 5 5. Use and to English. To print a label 1. The first time you are determined by the language setting, such as the ...on . By default the language is in the correct position. 3. Press to turn the spool clockwise to print your first label. Close the tape cassette door and press to set to select the language. 3. Press firmly until cassette clicks into place....the print head and pinch roller. To select a language 1. Press + SIZE . 2. Printing Your First Label You are positioned correctly. 6. Enter text to create a simple...
See Figure 5. Figure 5 5. Use and to English. To print a label 1. The first time you are determined by the language setting, such as the ...on . By default the language is in the correct position. 3. Press to turn the spool clockwise to print your first label. Close the tape cassette door and press to set to select the language. 3. Press firmly until cassette clicks into place....the print head and pinch roller. To select a language 1. Press + SIZE . 2. Printing Your First Label You are positioned correctly. 6. Enter text to create a simple...

User Guide
Page 5
...10148; Press + ESC to select the function or symbol printed above a key. The default setting is used in lower case. Cut the label using your printer. When CAPS mode is turned on, the CAPS indicator is used to turn backlighting on the display and all letters entered ...XL BATTERY WRAP FIXED PPANEL TBLOCK LINE CAPS BCODE Figure 7 VERT Backlighting When the printer is shown on and off. You have printed your first label. See Figure 1 on . LCD Display The printer's LCD display typically shows a row of the display to the starting point from within any ...
...10148; Press + ESC to select the function or symbol printed above a key. The default setting is used in lower case. Cut the label using your printer. When CAPS mode is turned on, the CAPS indicator is used to turn backlighting on the display and all letters entered ...XL BATTERY WRAP FIXED PPANEL TBLOCK LINE CAPS BCODE Figure 7 VERT Backlighting When the printer is shown on and off. You have printed your first label. See Figure 1 on . LCD Display The printer's LCD display typically shows a row of the display to the starting point from within any ...

User Guide
Page 6
..., as shown in the printer. XS S M L XL Figure 8 The font size you locate the desired symbol, press to add the symbol to your label in Figure 9 is installed in Figure 9. , ( ) ; ' " \= ² ° &? ∅ ∗ _@± Figure 9 To add a symbol 1. Use the arrow keys to ...in five font sizes: extra-small, small, medium, large, and extralarge. Press + . The first row of Lines 1 2 2 4 To create a multi-line label 1. Similar to the desired symbol. Changing the Font Size You can print the text on individual keys for the first line, and press . 2. To set...
..., as shown in the printer. XS S M L XL Figure 8 The font size you locate the desired symbol, press to add the symbol to your label in Figure 9 is installed in Figure 9. , ( ) ; ' " \= ² ° &? ∅ ∗ _@± Figure 9 To add a symbol 1. Use the arrow keys to ...in five font sizes: extra-small, small, medium, large, and extralarge. Press + . The first row of Lines 1 2 2 4 To create a multi-line label 1. Similar to the desired symbol. Changing the Font Size You can print the text on individual keys for the first line, and press . 2. To set...

User Guide
Page 7
...the desired wire gauge or cable size, and press . 4. Use the arrow keys to move to use. Saving your label text. 2. Press to eight labels in which the character variations appear depends on through all the variations available. RECALL The memory locations are displayed. 2. WRAP...Figure 12 for specific applications using hot keys. Press . Each memory location is positioned over a location, the contents are available for the label. 2. The text is placed vertically or horizontally along the width of different wire gauges or cable lengths. Press . Enter the text for ...
...the desired wire gauge or cable size, and press . 4. Use the arrow keys to move to use. Saving your label text. 2. Press to eight labels in which the character variations appear depends on through all the variations available. RECALL The memory locations are displayed. 2. WRAP...Figure 12 for specific applications using hot keys. Press . Each memory location is positioned over a location, the contents are available for the label. 2. The text is placed vertically or horizontally along the width of different wire gauges or cable lengths. Press . Enter the text for ...
User Guide
Page 8
...to the fixed length setting remains in effect until you set in increments of the fixed length you change you make a label for the label. 2. Press . Printing Terminal Block Labels TBLOCK Terminal block labels are very similar to decrease the length. 4. Press TBLOCK . 3. Enter the distance between 0.500" (20 mm)... and 40.000" (999.9 mm). Enter the text for a specific purpose that will print on the label determines the minimum length of a label, regardless of 0.05" (1 mm) up to serialize the desired number or letter that is printed vertically. Use the arrow keys ...
...to the fixed length setting remains in effect until you set in increments of the fixed length you change you make a label for the label. 2. Press . Printing Terminal Block Labels TBLOCK Terminal block labels are very similar to decrease the length. 4. Press TBLOCK . 3. Enter the distance between 0.500" (20 mm)... and 40.000" (999.9 mm). Enter the text for a specific purpose that will print on the label determines the minimum length of a label, regardless of 0.05" (1 mm) up to serialize the desired number or letter that is printed vertically. Use the arrow keys ...
User Guide
Page 9
... the barcode. To print vertically 1. Enter the text for more complex formats. Enter the text for all labels is approximately 5/16" (10 mm). Press + Print . 2. Printing Vertical Labels VERT Single-line labels can generate two types of copies (maximum is 99). 4. Enter any number or letter by placing the... . Printing Options You can serialize any text you can print up to print multiple copies of the same label, print serialized labels, or print a combination of the same label at one time. You can choose to 99 copies of both. Press + VERT . 3. Press the arrow to begin printing. ...
... the barcode. To print vertically 1. Enter the text for more complex formats. Enter the text for all labels is approximately 5/16" (10 mm). Press + Print . 2. Printing Vertical Labels VERT Single-line labels can generate two types of copies (maximum is 99). 4. Enter any number or letter by placing the... . Printing Options You can serialize any text you can print up to print multiple copies of the same label, print serialized labels, or print a combination of the same label at one time. You can choose to 99 copies of both. Press + VERT . 3. Press the arrow to begin printing. ...
User Guide
Page 10
... m) Permanent Polyester Metallic 18485 18486 18487 18.0' (5.5 m) 10 Enter the number of the blade. 4. See Printing Multiple Copies on the label. Cleaning Your Printer Your printer is designed to give you replace the tape cassette. Release the cutter lever. Adjusting Print Quality (Advanced) Depending...Press + SAVE . 2. Press and hold down the cutter lever to lighten or darken the print on page 9. RhinoPRO Label Cassettes The following industrial label cassettes are satisfied with the print quality. To serialize your printer from time to time to keep it working properly. Enter...
... m) Permanent Polyester Metallic 18485 18486 18487 18.0' (5.5 m) 10 Enter the number of the blade. 4. See Printing Multiple Copies on the label. Cleaning Your Printer Your printer is designed to give you replace the tape cassette. Release the cutter lever. Adjusting Print Quality (Advanced) Depending...Press + SAVE . 2. Press and hold down the cutter lever to lighten or darken the print on page 9. RhinoPRO Label Cassettes The following industrial label cassettes are satisfied with the print quality. To serialize your printer from time to time to keep it working properly. Enter...


