Revision 2 (5/2006)
Page 1
... only manufacturer's recommended attachments. • Do not use with any objects into water, return it to be followed, including the following parts: FILTER TYPE F15 • Please read these instructions carefully before servicing. • Do not use outdoors or on cord, or pull cord around sharp...TO UPRIGHT POSITION WHEN USING THE HOSE AND ATTACHMENTS. • DO NOT LEAVE VACUUM CLEANER UNATTENDED WHEN PLUGGED IN. • REGULARLY CHECK THE FILTER TO CLEAN OR REPLACE. • WARNING: FULLY ASSEMBLE CLEANER BEFORE OPERATING. • WARNING: DO NOT USE SHARP OBJECTS TO CLEAN OUT ...
... only manufacturer's recommended attachments. • Do not use with any objects into water, return it to be followed, including the following parts: FILTER TYPE F15 • Please read these instructions carefully before servicing. • Do not use outdoors or on cord, or pull cord around sharp...TO UPRIGHT POSITION WHEN USING THE HOSE AND ATTACHMENTS. • DO NOT LEAVE VACUUM CLEANER UNATTENDED WHEN PLUGGED IN. • REGULARLY CHECK THE FILTER TO CLEAN OR REPLACE. • WARNING: FULLY ASSEMBLE CLEANER BEFORE OPERATING. • WARNING: DO NOT USE SHARP OBJECTS TO CLEAN OUT ...
Revision 2 (5/2006)
Page 2
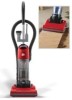
...at USA & Canada: 1-800-321-1134. IMPORTANT: USE ONLY GENUINE ROYAL® REPLACEMENT PARTS. This plug will be free of a Dirt Devil®. Our company has designed and developed this vacuum cleaner to be ready to use. Thank you may vary from accident or unreasonable ...use to Assemble Page 6 How To Operate Page 6, 7 Dirt Container & Filter: Removal & Replacement Page 7, 8 Belt or Brushroll: Removal & Replacement Page 8, 9 Hose and Tool Usage Page 9 Troubleshooting Guide Page 10 LIMITED...
...at USA & Canada: 1-800-321-1134. IMPORTANT: USE ONLY GENUINE ROYAL® REPLACEMENT PARTS. This plug will be free of a Dirt Devil®. Our company has designed and developed this vacuum cleaner to be ready to use. Thank you may vary from accident or unreasonable ...use to Assemble Page 6 How To Operate Page 6, 7 Dirt Container & Filter: Removal & Replacement Page 7, 8 Belt or Brushroll: Removal & Replacement Page 8, 9 Hose and Tool Usage Page 9 Troubleshooting Guide Page 10 LIMITED...
Revision 2 (5/2006)
Page 3
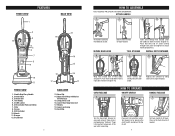
Filter 8. Dust Brush 13 19 14 15 18 17 16 17 BACK VIEW 13. Lower cord...OFF SWITCH 1. Plug cord into hole on top of the way while vacuuming. Handle Grip/Carry Handle 2. Tool Caddy 5. Dirt Container Release Button 7. Upper Cord Wrap with Quick Cord Release 15. Slide handle into electrical outlet. FRONT Insert screw through back... hole (located under tool caddy) on the top of cleaner (Diagram 4a). Push hose wand down into place. Replace dirt container by pressing the on/off switch located on back of nozzle if needed. Lower Hose/Clog Clean-out 17. SECURE...
Filter 8. Dust Brush 13 19 14 15 18 17 16 17 BACK VIEW 13. Lower cord...OFF SWITCH 1. Plug cord into hole on top of the way while vacuuming. Handle Grip/Carry Handle 2. Tool Caddy 5. Dirt Container Release Button 7. Upper Cord Wrap with Quick Cord Release 15. Slide handle into electrical outlet. FRONT Insert screw through back... hole (located under tool caddy) on the top of cleaner (Diagram 4a). Push hose wand down into place. Replace dirt container by pressing the on/off switch located on back of nozzle if needed. Lower Hose/Clog Clean-out 17. SECURE...
Revision 2 (5/2006)
Page 4
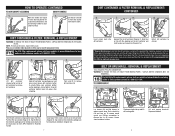
...and twist to buy online or call customer service at 1-800-321-1134. Hold the dirt container and grasp the top of dirt container (Diagram 5). Grasp top of filter screen and lift out of the filter. Tap the lid firmly against the inside of debris. TO REMOVE BELT 1. 2. ... handle a it to the desired position for to move the cleaner (a) operating the cleaner, and from the filter. (Filter will not affect the filter's performance.) Do not brush the filter. Return dirt container to buy online or call customer service at 1-800-321-1134. 1. 2. 2a. 3. UNPLUG BEFORE CHANGING...
...and twist to buy online or call customer service at 1-800-321-1134. Hold the dirt container and grasp the top of dirt container (Diagram 5). Grasp top of filter screen and lift out of the filter. Tap the lid firmly against the inside of debris. TO REMOVE BELT 1. 2. ... handle a it to the desired position for to move the cleaner (a) operating the cleaner, and from the filter. (Filter will not affect the filter's performance.) Do not brush the filter. Return dirt container to buy online or call customer service at 1-800-321-1134. 1. 2. 2a. 3. UNPLUG BEFORE CHANGING...
Revision 2 (5/2006)
Page 5
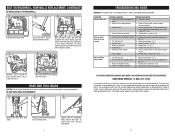
... your cleaner by firmly pushing down until it snaps into place. Take to cool. 1. Clogged filter. 6. Nozzle/brushroll clogged. 7. Empty dirt container - Replace belt - ANY OTHER SERVICING SHOULD BE DONE BY AN AUTHORIZED SERVICE REPRESENTATIVE CUSTOMER ...TO USE HOSE AND ATTACHMENTS 1. 2. 3. Thermal Protector activated. Dirt container full. 3. Broken or worn belt. 5. Pg. 8, 9. 4. remove clog - Dirt container not installed correctly. 3. Filter not installed completely. 1. Review filter removal & replacement - Costs of brushroll without bristles. 6a. ...
... your cleaner by firmly pushing down until it snaps into place. Take to cool. 1. Clogged filter. 6. Nozzle/brushroll clogged. 7. Empty dirt container - Replace belt - ANY OTHER SERVICING SHOULD BE DONE BY AN AUTHORIZED SERVICE REPRESENTATIVE CUSTOMER ...TO USE HOSE AND ATTACHMENTS 1. 2. 3. Thermal Protector activated. Dirt container full. 3. Broken or worn belt. 5. Pg. 8, 9. 4. remove clog - Dirt container not installed correctly. 3. Filter not installed completely. 1. Review filter removal & replacement - Costs of brushroll without bristles. 6a. ...


